Preparing for Trusted or External Authentication
In addition to configuring Managed Reporting security,
it is important to secure the WebFOCUS Administration Console. For
information about Console security, see Securing the WebFOCUS Administration Console.
x
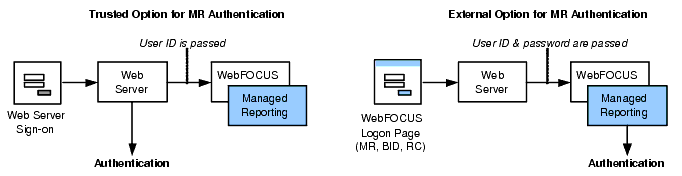
For planning purposes, it is useful to consider how
the Trusted and External options for Managed Reporting authentication
are different:
- With trusted
authentication, the user credentials are validated before WebFOCUS
is called and only the user ID is passed to Managed Reporting. The
user never sees a WebFOCUS logon page because Managed Reporting
trusts that the user was authenticated prior to accessing WebFOCUS.
- With external
authentication, the user submits credentials to WebFOCUS on a logon
page, and Managed Reporting authenticates them to the specified
external source.
These two scenarios are illustrated below.
Implementing security can be straightforward or challenging depending
on the nature of your requirements and the scope of your WebFOCUS
deployment.
x
Achieving Your Security Objectives
There may be several ways to achieve the same objective.
Consider, for example, the requirement of authenticating Managed
Reporting sign-ons to the Active Directory:
- You can configure
Managed Reporting to do this, which is relatively straightforward
to configure.
- You may also
be able to configure the Web server to authenticate users to Active Directory,
in which case you can configure Managed Reporting to trust that authentication
has already taken place. A trusted configuration is especially useful when
other applications are also available on the Web server and you
want to offer users a single sign-on capability for all of them.
- Another possibility
is for Managed Reporting to pass the Active Directory credentials
of the user to a Windows-based WebFOCUS Reporting Server, configured with
security enabled, for authentication. With this alternative, the
Reporting Server agent process runs in the security context of the
authenticated user. This solution is useful if access to file system
resources needs to be protected or if access to SQL Server data
needs to be protected by Windows security.
x
Security Requirements Across Development, Test, and Production Environments
It is not uncommon for a company to implement different
security models in development, test, and production environments.
For example, in a production environment the WebFOCUS Reporting
Server is typically configured to use a single service account to
access data on behalf of authenticated users. This enables reporting
system users to request reports generated from data stored in a
relational DBMS that does not have individual logon IDs for each
of them. In the development environment, just the opposite is sometimes
true. Developers have DBMS logon IDs, and it is critical that they
be used to control access to development data that may be sensitive.
Because of these different needs, you may find that having the
Reporting Server authenticate Managed Reporting sign-ons for the
development environment makes sense, while trusted authentication
makes sense in production. The Reporting Server can process user
profiles that contain personalized DBMS connection and search path
information, enabling it to control which data each developer has
access to. In the production environment, compliance with corporate
security initiatives, such as Netegrity SiteMinder or an LDAP server,
may be the primary goal, making the trusted authentication option
more useful. In most cases, the test and production environments
should share the same security model.
Customers may need to prototype one or more configuration scenarios
before arriving at the optimal solution. Information Builders can
also supplement these efforts with architecture and security expertise,
which is especially critical during the planning phase of a WebFOCUS
implementation.
xCreating a Managed Reporting Administrator Account
When Managed Reporting is installed, a default administrator
account, admin, exists in the internal repository. This account
has no password and has ReportCaster administrator privileges when
ReportCaster is installed. This account exists so you can log on
to the Managed Reporting Administration interface and create additional users,
developers, and administrators.
Once you configure external authentication, sign-on requests
for Managed Reporting, Dashboard, and ReportCaster are integrated
with the external source you specify. Typically, the external source
does not have a user account called admin. It is important, therefore,
that you create a Managed Reporting administrator account for yourself
before configuring external authentication. The user ID for this
account you create must match the ID in your external source.
This default administrator account is also used by the ReportCaster
Distribution Server to retrieve Managed Reporting Standard Report
procedures at execution time. If you decide to delete or disable
logon rights for the admin account, you must create and configure
another account for the ReportCaster Distribution Server to use.
For instructions, see How to Configure ReportCaster.
x
Procedure: How to Create a Managed Reporting Administrator Account
-
Access
the WebFOCUS Welcome page (http://hostname:port/ibi_apps/,
where hostname is the domain name of the machine on which
the WebFOCUS Client is installed, and port is the port on
which it listens) and click the Managed Reporting Administration link.
-
Log
on to Managed Reporting as an administrator (the default administrator
ID is admin with no password).
-
Select
the Users tab and then click New
User. The New User window opens.
-
Enter
the following information into the New User form.
The following image shows a new Managed
Reporting administrator account with the user ID jt01234.
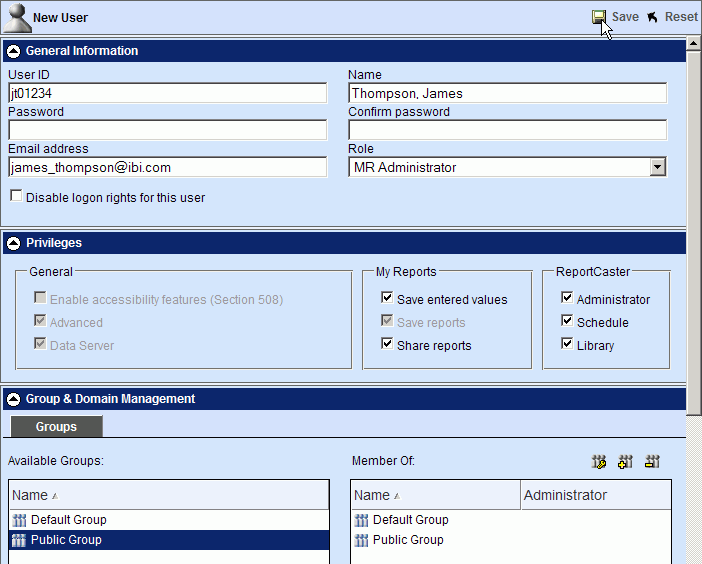
For
more information about the Managed Reporting Administration interface,
see the WebFOCUS Managed Reporting Administrator's Manual.
-
Click
the Save icon to create the account and then
click Logoff.
x
The Business Intelligence Dashboard offers what is known
as a public view to users who have not been authenticated. Internally,
Dashboard logs on to Managed Reporting with a service account in
order to determine which content these anonymous users should see.
A Managed Reporting administrator can set the user ID and password
for this service account in the Public User panel of the Dashboard
View Builder. This internal sign-on is processed differently for
the trusted and external options, which leads to important configuration
differences.
When you configure the trusted option, you do not change the
Dashboard service account from its default value of public.
You do not have to assign a password to this account in View Builder
or in Managed Reporting. You also do not have to create an account
called public in the external directory. For more information,
see Internal Processing for Trusted Authentication.
When you configure the External option, you can leave the Dashboard
service account set to its default value of public, provided
that this user account exists in the external directory that will
perform authentication. You can also change the value from public to
another ID, such as ibibidsvc, provided that this user account exists
in the external directory and that you create it in Managed Reporting.
In either case, you must register the password for the external
account with Dashboard, as shown in the following procedure.
x
Procedure: How to Configure the Dashboard Service Account for the External Option
This
procedure should only be followed when you configure the external
option for Managed Reporting authentication. If you are configuring
the trusted option, skip this procedure.
-
Access
the WebFOCUS Welcome page (http://hostname:port/ibi_apps/,
where hostname is the host name of the machine on which the
WebFOCUS Client is installed, and port is the port on which
it listens) and click the Business Intelligence Dashboard
View Builder link.
-
Log
on as an administrator (the default administrator ID is admin with
no password).
-
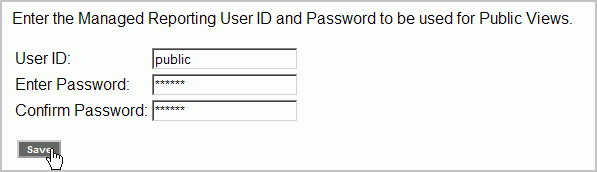
From
the View Builder, click the Public User link.
-
Type
the user ID and/or password for the Dashboard service account in the
form and click Save.
-
Click Done and
then Logoff.
Once you define a password for the Dashboard service account
and/or change the default user ID, the user ID and password you
provided are encrypted and stored in the WebFOCUS/worp/conf/worp_mre.mpd
file. If this file does not exist, Dashboard reverts to its default
behavior, which is that the User ID is public with no password.
If
you changed the service account from public to
another ID (such as ibibidsvc) in Step 4,
continue with Step 6 to create this account in Managed Reporting.
If you did not change it, skip the remainder of this procedure.
-
Go to
the WebFOCUS Welcome page (http://hostname:port/ibi_apps/,
where hostname is the host name of the machine on which the
WebFOCUS Client is installed, and port is the port on which
it listens) and click the Managed Reporting Administration link.
-
Log
on to Managed Reporting as an administrator (the default administrator
ID is admin with no password).
-
Select
the Users tab and then click New
User. The New User window opens.
-
Enter
the following information on the New User form:
The following
image shows a Dashboard service account with the user ID ibibidsvc.
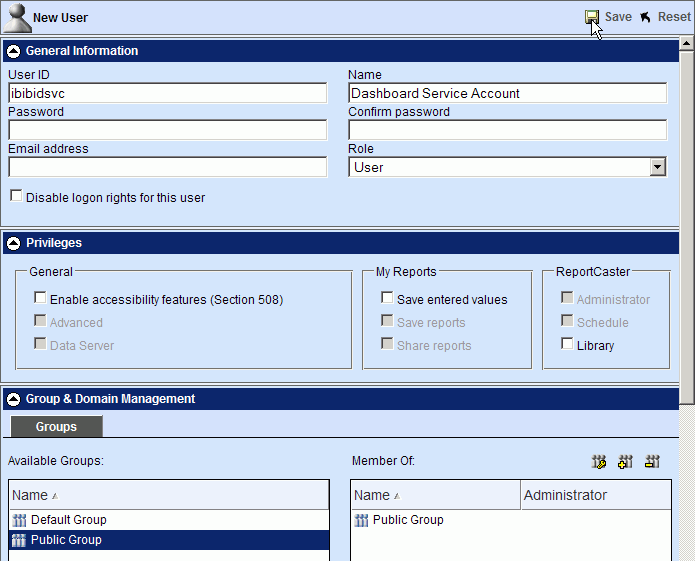
-
Click
the Save icon to create the account and then
click Logoff.
x
The steps necessary to prepare ReportCaster for trusted
or external Managed Reporting authentication are similar and are
described in the following procedure. If you are configuring the
trusted option in an Integrated Windows Authentication (IWA) environment,
you should also review Support for Integrated Windows Authentication.
x
Procedure: How to Configure ReportCaster
-
Go to
the WebFOCUS Welcome page (http://hostname:port/ibi_apps/, where hostname is
the host name of the machine on which the WebFOCUS Client is installed,
and port is the port on which it listens) and click the ReportCaster link.
-
Log
on to ReportCaster.
-
Click ReportCaster
Server Configuration.
The ReportCaster Server Configuration tool opens, displaying
the General tab.
-
From
the General tab, expand the Security folder
and select the Authentication Plug-in setting.
-
Select Trusted
MR Sign-On from the drop-down list.
If you did not install ReportCaster and WebFOCUS on one
machine, or if you are installing WebFOCUS on z/OS, you must manually
configure the trusted key file(s) for ReportCaster. For more information,
see Trusted Sign-on Processing.
-
Generally,
you can skip this step. However, if you deleted or disabled logon
rights for the built-in Managed Reporting administrator account admin, you
must do the following:
-
Expand the User Info folder and select
the Administrator setting.
-
Click the
 button
and type the Managed Reporting administrator account (for example, ibircsvc).
button
and type the Managed Reporting administrator account (for example, ibircsvc).
You do not have to specify the password for this ID because
you configured MR Trusted Sign-on in Step 4. You must create this
account in Managed Reporting as described in Steps 11 through 15.
-
Log on to the WebFOCUS Administration Console. Click Configuration and
then Managed Reporting. Set the IBIMR_RC_SVCUSER
parameter to the user ID you specified in Step b (for example, ibircsvc).
Save your changes.
If you are configuring external authentication, proceed
to Step 9.
-
For Trusted authentication only: If
you want the ability to access the ReportCaster tools from the Web
without first going through Managed Reporting, you must configure
the Caster Remote Authenticated setting.
Depending on your configuration, select one of the following values:
-
Yes if
the user identity will be found in the REMOTE_USER environment variable.
Select this option if your Web server is configured for Basic or
Integrated Windows authentication.
-
HTTP
Header if the user identity will be found in an HTTP
header variable. Type the name of the header in the Header Name
field when selecting this option.
Note: This
setting has no effect on the Managed Reporting, Dashboard, or Developer
Studio interfaces, which always present the user ID to ReportCaster
in the Managed Reporting cookie.
-
For Trusted authentication only: If
your Web server is configured for Basic authentication, specify
an ID and password for connecting to the Web server as follows:
-
Select the MR Info tab.
-
Select the HTTP User setting.
-
Click the button
to open a dialog box in which you will type the user ID and password
that ReportCaster will use to connect with the Web server when it
needs Managed Reporting information.
-
Click
the Save icon or choose Save from
the Action menu.
-
Restart
your ReportCaster Distribution Server and reload ReportCaster Web
application.
If you changed the default value admin in Step 6,
continue with Step 11. Otherwise, proceed to either Configuring Trusted Authentication or Configuring External Authentication.
-
Go to
the WebFOCUS Welcome page (http://hostname:port/ibi_apps/,
where hostname is the host name of the machine on which the
WebFOCUS Client is installed, and port is the port on which
it listens) and click the Managed Reporting Administration link.
-
Log
on to Managed Reporting as an administrator (the default administrator
ID is admin with no password).
-
Select
the Users tab and then click New
User. The New User window opens.
-
Enter
the following information on the New User form:
-
User ID. Type
the ID you specified in Step 6 (for example, ibircsvc).
-
User Name. Type
the name you would like to see displayed (for example, ReportCaster
Service Account) in user lists throughout the product.
-
Password/Confirm Password. Leave
this blank because you will be configuring trusted or external authentication.
-
Role. Select
the MR Administrator role from the drop-down
list.
-
Privileges. Leave
the default values.
-
Groups. Select
the Default and Public groups.
-
Click
the Save icon to create the account and then
click Logoff.