How to: |
Trusted sign-on processing allows ReportCaster and WebFOCUSOpen Portal Services to securely impersonate a user in scenarios in which they do not have knowledge of the user password.
The syntax for a trusted sign-on request is:
IBIMR_action=MR_SIGNON&IBIMR_user=userid&IBIMR_tid=ticket[IBIMR_random=string]
where:
- ticket
- Is an encrypted string composed of the following pieces of information:
Encrypt(ProductId|UserId|TrustedKey|RandomData)
where:
Encrypt specifies WebFOCUS encryption. For information about WebFOCUS encryption, see WebFOCUS Encryption.
ProductId identifies the trusted client. This field is reserved for future use.
UserId is the logon ID of the user being impersonated and must match the value of IBIMR_user included in the sign-on request.
TrustedKey is a string that must match the value of IBIMR_TRUSTED_KEY in cgivars.wfs.
RandomData is eight bytes of random data.
Note: If IBIMR_pass is included then IBIMR_tid is ignored and the request is passed as explicit.
During installation, IBIMR_TRUSTED_KEY is set to a default value and written to cgivars.wfs. The string is a representation of the WebFOCUS installation time in milliseconds. It is important to keep this key secret so that someone cannot use the value to create an unauthorized trusted connection to Managed Reporting. Because this key is encrypted, along with other information, in the trusted sign-on ticket you should also consider switching WebFOCUS encryption from its default value to one of the stronger options that has an external key (see WebFOCUS Encryption). This then provides two levels of security.
You can change the key value provided that you update the key(s) for ReportCaster also. For information about setting the keys forReportCaster, see How to Configure the Trusted MR Sign-On Setting for ReportCaster .
-
Access
the ReportCaster Server Configuration tool in one of the following ways:
- If you are on a Windows platform, you can access the configuration tool from the Start Programs menu by selecting Information Builders, ReportCaster, Distribution Server, Configuration, and then clicking Edit.
- When logged on to Managed Reporting as an administrator, click the clock icon. The ReportCaster Development and Administration Interface opens. From this interface, select the ReportCaster Server Configuration link.
- You can also
access ReportCaster independent of Managed Reporting by typing the following
URL:
http://hostname[:port]/rcaster/main/reportcaster.jsp
where:
- hostname[:port]
Is the host name and optional port number (specified only if you are not using the default port number) of the Application Server where the ReportCaster Web application is deployed.
- rcaster
Is the site-customized context root for the ReportCaster Web application deployed on your Application Server. rcaster is the default value.
In this case, since your user credentials have not been validated by Managed Reporting, you must type a valid ReportCaster administrator ID and password to log on to the ReportCaster Development and Administration Interface. From this interface, select the ReportCaster Server Configuration link.
The ReportCaster - Server Configuration window opens displaying the General tab.
-
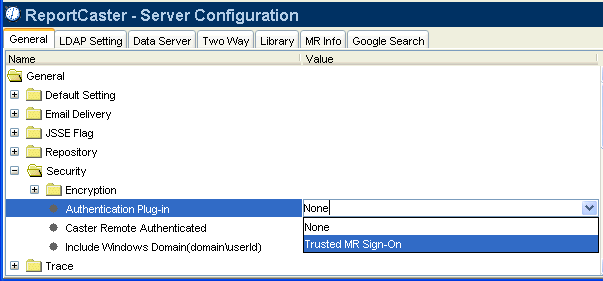
In the
General tab, select the Security folder and locate the Authentication
Plug-in setting. From the drop-down list, select Trusted
MR Sign-On.
-
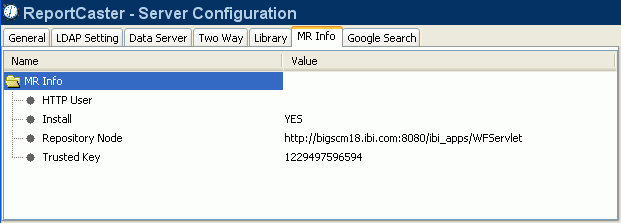
Click
the MR Info tab.
-
Verify that the Trusted Key configuration setting value matches
the IBIMR_TRUSTED_KEY setting in the cgivars.wfs file located in
the \ibi\WebFOCUS77\client\wfc\etc directory.
Note:
- When you perform an InstallShield installation on Windows or UNIX, and you install Managed Reporting and ReportCaster together, the Trusted Key value is populated automatically.
- When ReportCaster and WebFOCUS are installed at different times, you must populate the Trusted Key field in the Server Configuration tool with the IBIMR_TRUSTED_KEY parameter value in the cgivars.wfs file.
- Click the Save icon, or select Save from the Action menu. A message appears asking for confirmation that you want to save the changes to the configuration file. Click Yes.
- Restart the ReportCaster Distribution Server.
- Reload the WebFOCUS and ReportCaster Web applications.
- After reloading the Web application(s), all users currently logged on must restart their sessions to obtain the current configuration information. Since the session of the user does not have information cached pertaining to the ReportCaster configuration, the user interfaces must be restarted to obtain any updated information.
For more information, see Configuring an Authentication Plug-in for Self-Service ReportCaster Applications in ReportCaster Security in the ReportCaster Administration manual.
To update a Trusted MR sign-on key value:
-
Go to
the directory that contains the cgivars.wfs file:
On UNIX and z/OS, the cgivars.wfs file is located in:
/ibi/WebFOCUS/client/wfc/etc
On Windows, the cgivars.wfs file is located in:
\ibi\WebFOCUS77\client\wfc\etc
- Open the cgivars.wfs file and copy the IBIMR_TRUSTED_KEY variable value.
- Open the ReportCaster Server Configuration tool and click the MR Info tab.
- Paste the copied IBIMR_TRUSTED_KEY value into the Trusted Key field.
- Save the ReportCaster server configuration by selecting Save from the Action menu.
- Restart ReportCaster by selecting Restart from the Action menu or clicking the Restart icon in the toolbar.