When creating a schedule, you must create a Task to be distributed by ReportCaster. If you are scheduling a report from Dashboard, the task that appears in the schedule is that report. You then have the option to add more tasks, or pre-processing and post-processing procedures to the schedule. The task types are:
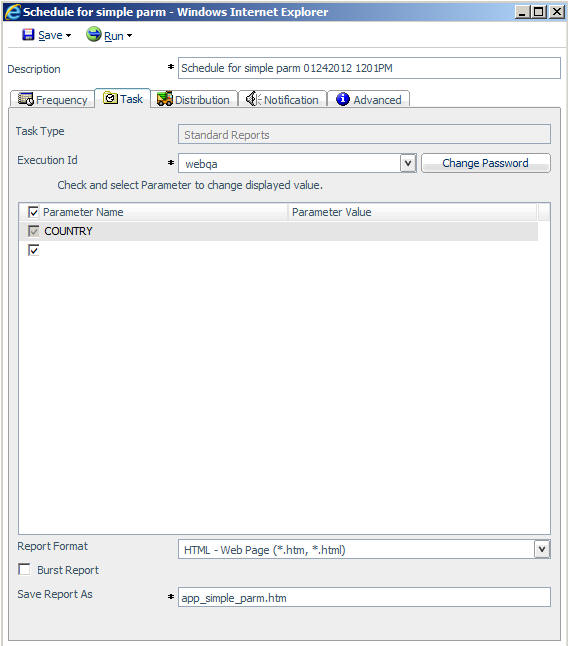
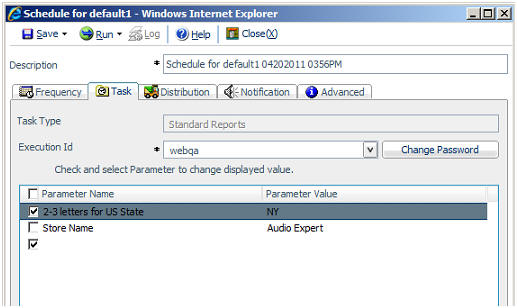
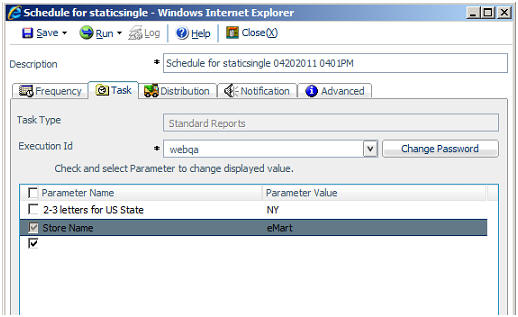
When you access the Scheduling tool by right-clicking a Standard Report or My Report from the Dashboard, the Task tab options are predefined with the selected report. You can complete the available task options, such as defining parameter values, and selecting whether or not to burst the report.
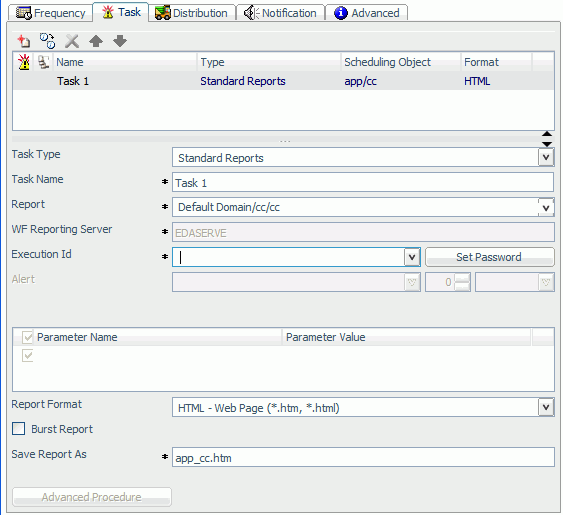
The following image shows an example of a predefined Task tab when the Scheduling tool is accessed from Dashboard.
To create a Task:
How to: |
The options available when you select the WF Server Procedure Task Type are:
If the Execution Id field is not grayed out, and you will be using an ID that you previously used for a Task on the selected server, you can select the ID (for example, rcadmin) from the drop-down list.
If the Execution Id field is not grayed out and you will be using a new ID, you can type the new ID and click Set Password. The Password Editor opens. Type a password for the Id in the Password field and retype it in the Confirm password field, then click OK.
To change the password for an existing Execution Id, click Change Password. The Password Editor opens, where you can type a new password and click OK.
Note: The Execution Id is added to the ReportCaster Repository and is viewable in the ReportCaster Console.
The new schedule window opens.
If this field is available, it means that a default Execution Id and password have been specified within the ReportCaster Server Configuration tool.
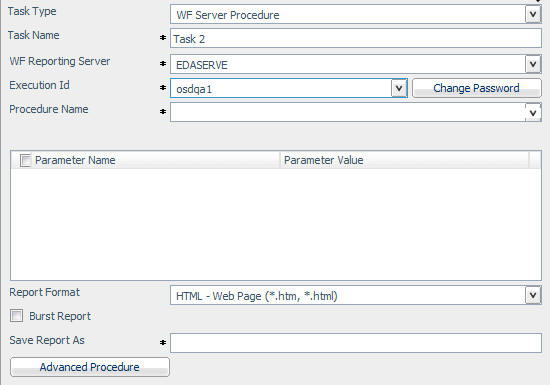
If the Execution Id field is available, and you will be using an Execution Id that you previously used for a Task on the selected server, you can select the Execution Id (for example, osdqa1) from the drop-down list, as shown in the following image.
If the Execution Id field is available and you will be using a new Execution Id, perform the following steps:
Note: The Execution Id is added to the ReportCaster Repository and is viewable in the ReportCaster Console.
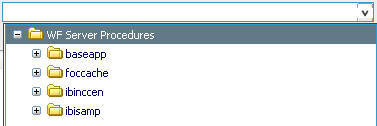
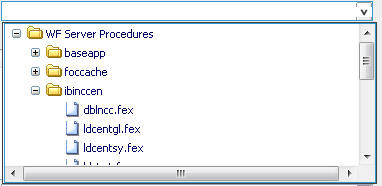
The Select WF Server Procedure folder expands, as shown in the following image.
When a WebFOCUS Reporting Server is Application Enabled, you will see a node called Applications. When you open the Applications node, a query is made to the server to retrieve a list of applications found under its Application Root (APPROOT) directory. When you open an application (for example, ibinccen), a request is issued to the server to get the list of accessible files in the application, as shown in the following image.
Note: When a WebFOCUS Reporting Server is configured with the traditional Cataloged Path (EDAPATH) setting, you will see Applications and Cataloged Path nodes listed under the server.
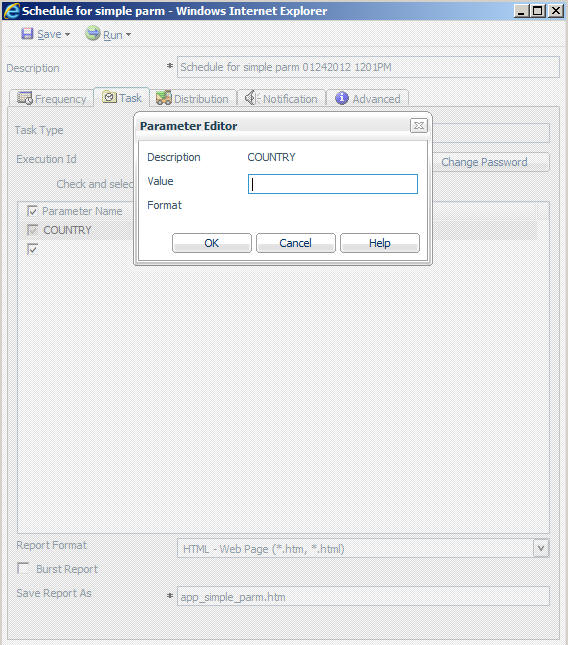
The Parameter Editor dialog box opens.
Note: The check box must be selected in order to edit the parameter.

Use the following guidelines when selecting a format:
ReportCaster administrators can specify which report formats will appear in the Tasks tab through the Schedule Format setting in the ReportCaster Server Configuration tool. For more information, see the ReportCaster Administration manual.
Note: In order to output HTML pages with images, normally you would select DHTML as the format and the output is distributed with the extension .mht. You can select HTML as the distribution format. If you select HTML ReportCaster creates the output with the extension .htm by default. If the scheduled procedure contains SET WEBARCHIVE = ON and outputs pages with images and you select HTML as the format be sure to change the extension in the Save Report As field from .htm to .mht.
A duplicate of the selected task appears in the list with the name Clone Of taskname.
Open the cloned task and modify as needed.
Note: If
you have multiple Tasks, you can move the position of a Task within
the window by clicking the following up or down  arrows.
Note: You cannot create a WF Server Procedure schedule when a server within a cluster configuration is unavailable.
The options available when you select either Standard Reports or My Reports Task Type are:
If the Execution Id field is not grayed out, and you will be using an ID that you previously used for a Task on the selected server, you can select the ID (for example, rcadmin) from the drop-down list.
If the Execution Id field is not grayed out and you plan to use a new ID, you can type the new ID and click Set Password. The Password Editor opens. Type a password for the ID in the Password field and retype it in the Confirm password field, then click OK.
To change the password for an existing ID, click Change Password. The Password Editor opens, where you can type a new password and click OK.
Note: The Execution ID is added to the ReportCaster Repository and is viewable in the ReportCaster Console.
The Alert Schedule dialog box opens. Select one of the following options:
Caution: An alert schedule distributes e-mails to your mail server more frequently than expected when the schedule interval is less than the time it takes to run the procedure and the Delay option is selected. Be sure that you set the schedule interval to a time period greater than the time it takes to run the scheduled procedure.
Note: In order to output HTML pages with images, normally you would select DHTML as the format and the output is distributed with the extension .mht. You can select HTML as the distribution format. If you select HTML ReportCaster creates the output with the extension .htm by default. If the scheduled procedure contains SET WEBARCHIVE = ON and outputs pages with images and you select HTML as the format be sure to change the extension in the Save Report As field from .htm to .mht.
How to: |
If you would like to add a parameter to a report, you can create a new parameter and specify the parameter name and parameter value.
If the scheduled procedure contains parameters for which values must be supplied at run time these parameters are displayed in the parameters section of the scheduling tool.
Parameters may have default values and may have values that can be selected from a static or dynamic list. For more information about parameters, see Considerations When Specifying Parameter Values.
The following are considerations when specifying parameter values for a procedure:
Note:
As an alternate method of creating a dynamic selectable list of parameter values, you can use the schedule technique in the HTML Composer. For details, see Technical Memo 4626: Adding Schedule Capability to the HTML Layout Painter.
If you are specifying the entire WHERE condition as the parameter value, you must enclose the value within two single quotation marks rather than a double quotation mark. For example: ''WHERE CAR NOT LIKE MOTO%''
If you are only specifying a value as the parameter value, you do not need to enclose the parameter value within quotation marks. For example: O&DINFO
Note: You can only schedule saved procedures using ReportCaster; HTML forms cannot be scheduled using ReportCaster. Parameter prompting is not available in pre-processing or post-processing procedures.
The following are examples of how ReportCaster displays default variable values, as well as static and dynamic single-select and multi-select lists.
Since ReportCaster requires considerations for special characters, Information Builders recommends using the syntax specified in the following examples.
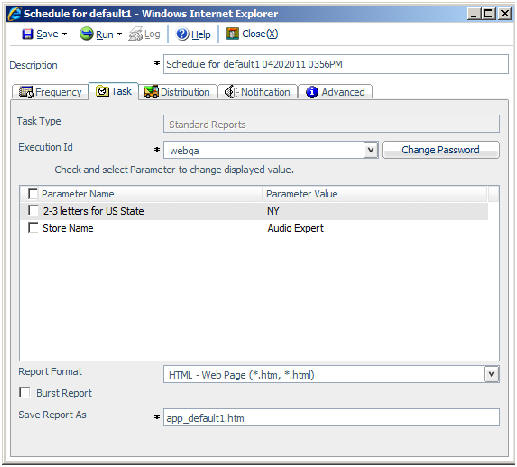
The following procedure sets a default value of NY for the STATE (2-3 letters for US State) field, and a default value of City Video for the SNAME (Store Name) field.
-DEFAULT &STATE=NY
-DEFAULT &SNAME=Web Sales
TABLE FILE CENTORD
SUM QTY_IN_STOCK BY STATE BY SNAME BY PRODNAME
ON TABLE SUBHEAD
"Inventory Report"
WHERE STATE EQ '&STATE.2-3 letters for US State.'
WHERE SNAME EQ '&SNAME.Store Name.'
END
For more information, see the Developing Reporting Applications manual.
The parameters that have a default value set in the procedure are not checked in the scheduler. Since they are not checked they will not be stored with schedule. At schedule execution time, the default value set in the procedure will be used.
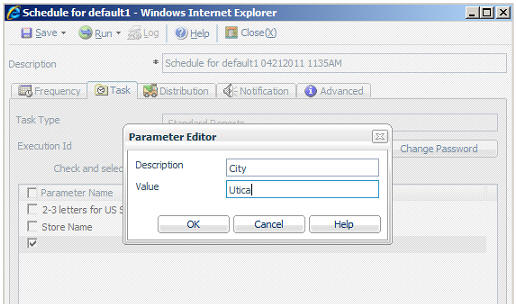
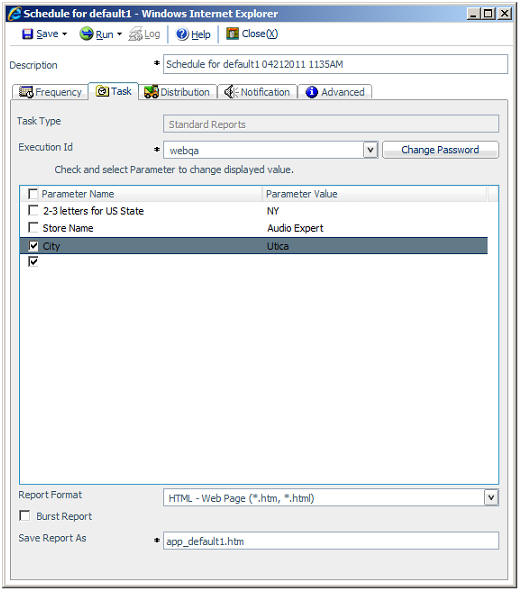
To use a value other that the default value at schedule execution time or to store the default value with the schedule so that it will be used even if the procedure is changed check the parameter and click the parameter to open the Parameter Editor. Type the value to be used in the value field and click OK.
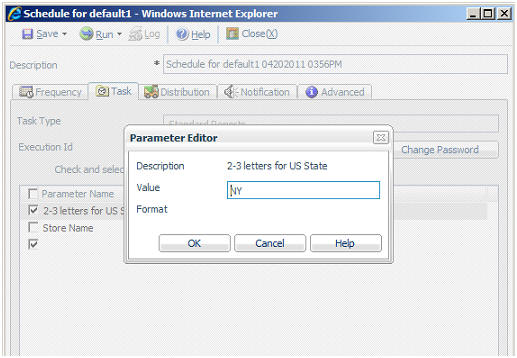
The parameter will now be checked and the displayed value will be stored with the schedule and used at schedule execution time.
The following procedure provides a list of static values that are valid for the SNAME (Store Name) field.
-DEFAULT &STATE=NY
TABLE FILE CENTORD
SUM QTY_IN_STOCK BY STATE BY SNAME BY PRODNAME
ON TABLE SUBHEAD
"Inventory Report"
WHERE STATE EQ '&STATE.2-3 letters for US State.'
WHERE SNAME EQ '&SNAME.(eMart,TV City,Web Sales).Store Name.'
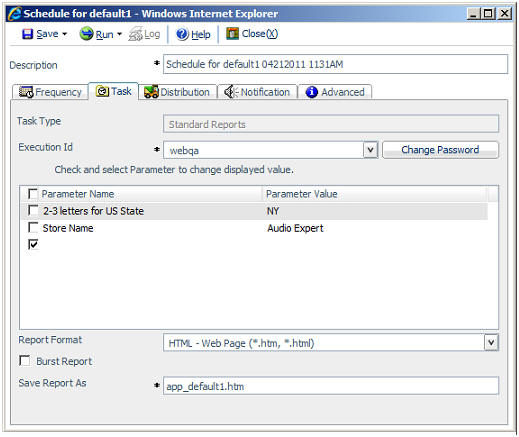
ENDThe Store Name parameter appears as follows in the ReportCaster Scheduler. Initially, no value has been set for the parameter so the value is blank.
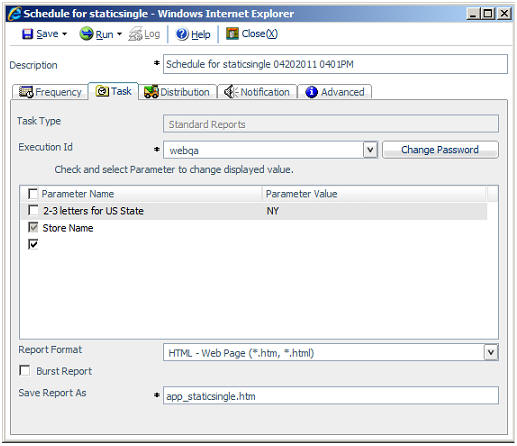
Since no default value for Store Name is supplied in the procedure, the parameter is checked in the scheduler. To supply a value for Store Name, click the parameter to open the Parameter Editor. The values for the Store Name parameter appear as follows in the ReportCaster Scheduler. You can select only one value from the list.
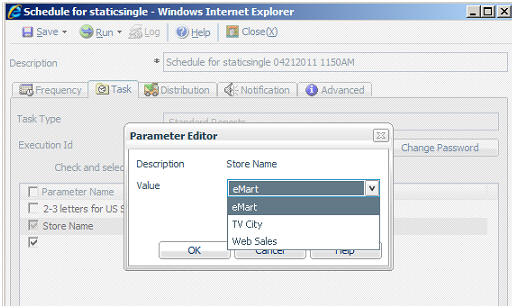
Select the value to be used from the list and click OK. The selected value appears in the scheduler.
The following procedure provides a list of values that are valid for the PRODNAME (Product Name) field. This list is dynamically populated with values from the CENTORD data source.
-DEFAULT &STATE=NY
TABLE FILE CENTORD
SUM QTY_IN_STOCK BY STATE BY SNAME BY PRODNAME
ON TABLE SUBHEAD
"Inventory Report"
WHERE STATE EQ '&STATE.2-3 letters for US State.'
WHERE SNAME EQ '&SNAME.(eMart,TV City,Web Sales).Store Name.'
WHERE PRODNAME EQ '&PRODNAME.(FIND PRODNAME IN CENTORD).Product Name.'
END
The Product Name parameter appears as follows in the ReportCaster Scheduler. Initially, no value has been set for the parameter so the value is blank.
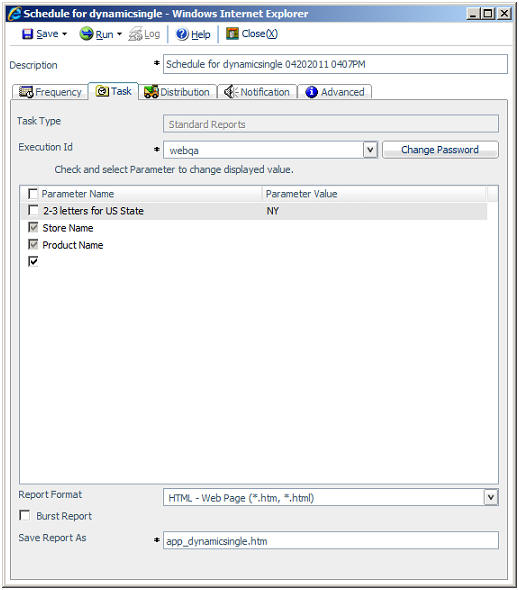
To supply a value for Product Name, click the parameter to open the Parameter Editor. The values for the Product Name parameter appear as follows in the ReportCaster Scheduler. You can select only one value from the list.
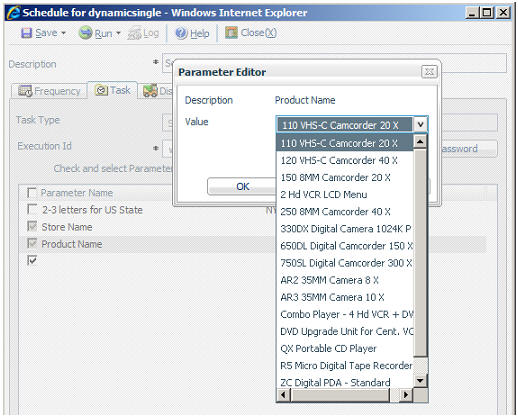
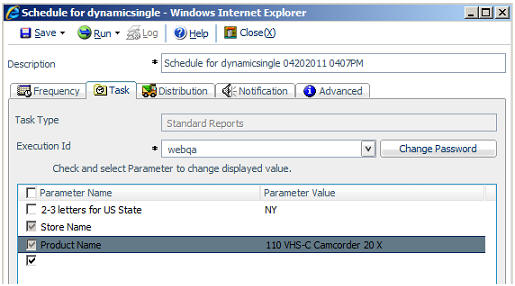
Select the value to be used and click OK. The selected value appears in the scheduler.
The following procedure provides a list of static values that are valid for the SNAME (Store Name) field.
-DEFAULT &STATE=NY
TABLE FILE CENTORD
SUM QTY_IN_STOCK BY STATE BY SNAME BY PRODNAME
ON TABLE SUBHEAD
"Inventory Report"
WHERE STATE EQ '&STATE.2-3 letters for US State.'
WHERE SNAME EQ &SNAME.(OR(eMart,TV City,Web Sales)).Store Name.
END
The Store Name parameter appears as follows in the ReportCaster Scheduler.
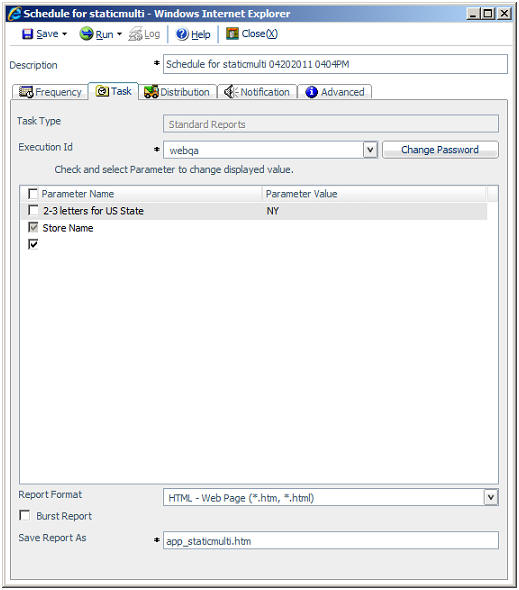
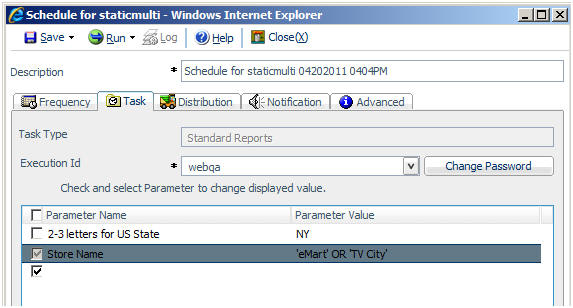
To supply values for Store Name, click the parameter to open the Parameter Editor. The values for the Store Name parameter appear as follows in the ReportCaster Scheduler. You can select more than one value from the list, as shown in the following image.

Select the values to be used from the list and click OK. The selected values appear in the scheduler.
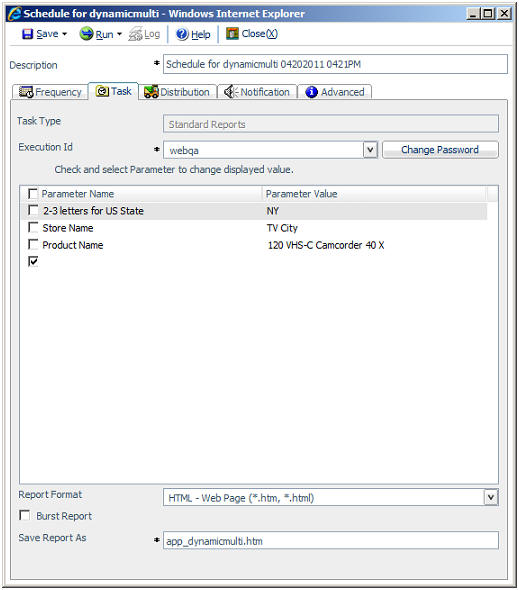
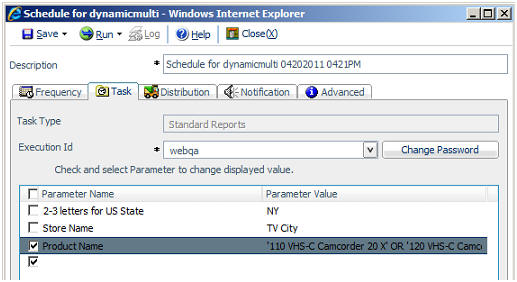
The following procedure provides a list of values that are valid for the PRODNAME (Product Name) field. This list is dynamically populated with values from the CENTORD data source.
-DEFAULT &STATE=NY
-DEFAULT &SNAME='TV City'
-DEFAULT &PRODNAME='''120 VHS-C Camcorder 40 X'''TABLE FILE CENTORD
SUM QTY_IN_STOCK BY STATE BY SNAME BY PRODNAME
ON TABLE SUBHEAD
"Inventory Report"
WHERE STATE EQ '&STATE.2-3 letters for US State.'
WHERE SNAME EQ &SNAME.(OR(eMart,TV City,Web Sales)).Store Name.
WHERE PRODNAME EQ &PRODNAME.(OR(FIND PRODNAME IN CENTORD)).Product Name.
END
The Product Name parameter appears as follows in the ReportCaster Scheduler.
To supply values for Product Name, click the parameter to open the Parameter Editor. The values for the Product Name parameter appear as follows in the ReportCaster Scheduler. You can select more than one value from the list. You can also select No Selection if you do not want to perform any data selection test on that field.
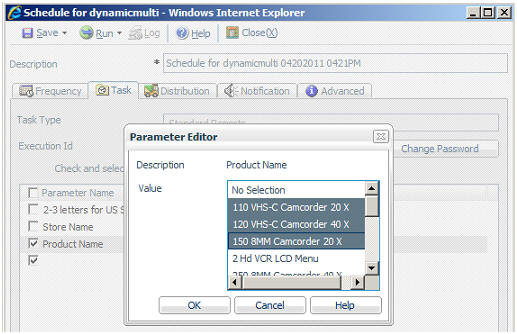
Select the values to be used and click OK. The selected values appear in the scheduler.
Important: When coding a multi-select list of parameter values using -DEFAULT syntax without storing parameter values in the ReportCaster Repository, the -DEFAULT value is used, as specified in the procedure, and the scheduled request will fail if you do not specify three single quotation marks before and after the parameter value string.
The Parameter Editor window opens.
How to: |
If you are scheduling a report Task that is a WF Server Procedure, Standard Report, or My Report, you can schedule a maximum of two pre-processing procedures. The pre-processing and post-processing procedures that you schedule must reside on the WebFOCUS Reporting Server.
To schedule pre-processing and post-processing procedures for a Task:
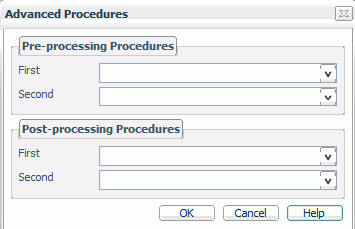
First. From the drop-down list, select the first pre-processing procedure. ReportCaster will run this procedure immediately preceding the scheduled Task.
Second. From the drop-down list, select the second pre-processing procedure. ReportCaster will run this procedure immediately after the first pre-processing procedure, but before the scheduled Task.
First. From the drop-down list, select the first post-processing procedure. ReportCaster will run this procedure immediately after the first pre-processing procedure, but before the scheduled Task.
Second. From the drop-down list, select the second post-processing procedure. ReportCaster will run this procedure immediately after the first post-processing procedure.
The options available when you select the URL Task Type are:
Note that you can also specify parameter names and associated values using the following format:
www.address.com?¶meter1_name=parameter1_value¶meter2_name=parameter2_valueThe maximum length of this field is 1200 characters.
To change the password for an existing ID, click Change Password. The Password Editor opens, where you can type a new password and click OK.
Note: The Execution Id is added to the ReportCaster Repository and is viewable in the ReportCaster Console.
The options available when you select the File Task Type are:
Note: If a schedule has multiple tasks and one of the tasks fails, then the file will not be deleted. This is true even when the file is distributed successfully.
The options available when you select the FTP or SFTP Task Type are:
Note: If a schedule has multiple tasks and one of the tasks fails, then the file will not be deleted. This is true even when the file is distributed successfully.
Use the following guidelines when selecting a format:
In order to output HTML pages with images, select the DHTML output with the extension .mht. However, if you would like to use an HTML extension in the Save Report As field include a .htm extension. For example, from a procedure containing SET WEBARCHIVE = ON, use DHTML. However, if you would like to schedule this procedure with HTML and include the images, select HTML as the format but be sure to change the Save As extension to .mht.
When scheduling a chart or graph report, the available formats will depend on which tool was used to create the report. When the report was created using:
| WebFOCUS |