The Field selection tab is used to select fields for a report.
x
x
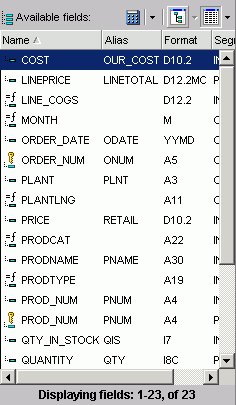
Reference: Field Selection Tab: Available Fields Window
The following image shows the Available
Fields window on the Field selection tab. The fields are sorted
by the Name column with corresponding columns containing their Alias, Format,
and Segment information.
-
Available Fields window
-
Displays a list of field names from the selected data source.
x
-
Define icon
-
Click the Define (calculator) icon to select: New define
field, Edit define field, or Delete define field. If you select
the New define field or Edit define field, the Define Field Creator
dialog box opens where you can create or edit a defined field.
x
-
Tree icon
-
Displays a tree structure of field names by segment with
segment, alias, title, description, and format information below
the tree. Individual field information appears when you click on
the field.
x
-
List icon
-
Displays a list of all field names with information that
you select from the adjacent arrow that opens a list box: name,
alias, title, format, description, segment, and file name. You can
also choose to sort by file order.
x
Reference: Field Selection Tab: Report Fields Window
x
x
x
The
following image shows the Report fields section on the Field selection
tab. You can view the selected fields with the following options:
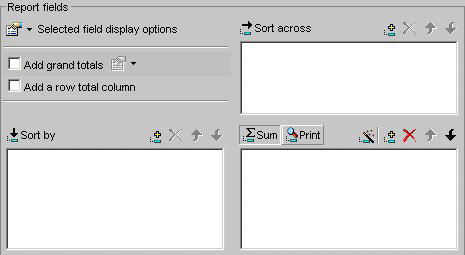
-
Selected field display options
-
Lists the following field display options:
-
Prefix with the Segment Name
-
Prefixes the field name with the segment name.
-
Prefix with the Filename
-
Prefixes the field name with the name of the data source.
-
Show the field's alias instead of name
-
Uses the alias defined in the Master File as the field name.
-
Show field's title
-
Uses the title in the Master File instead of the field name.
-
Show field's description
-
Uses the description in the Master File instead of the field
name.
x
-
Add grand totals
-
The Add grand totals drop-down list provides two options.
The Totals option displays the totals for each column. The Recompute
Totals option recalculates computed fields before displaying the
totals for each column.
x
-
Add a row total column
-
Displays the total for each row.
x
-
Sort By
-
Lists the vertical field that you have selected from the
Available Fields window.
x
-
Add icon
-
Adds a field to the Sort By window.
x
-
Remove icon
-
Removes a field from the Sort By window.
x
x
x
-
Move Up or Move Down icons
-
Moves the position of the field within the report.
-
Sort Across
-
Lists the horizontal field you have selected from the Available
Fields window. x
-
Add icon
-
Adds a field to the Sort Across window.
x
-
Remove icon
-
Removes a field from the Sort Across window.
x
x
x
-
Move Up or Move Down icons
-
Moves the position of the field within the report.
x
-
Sum
-
Indicates a report that aggregates data by the horizontal
field.
x
-
Print
-
Prints each value on a record-by-record basis.
x
x
-
New Computed Field icon
-
Opens the Computed Field Creator dialog box where you can
define the parameters for a new computed field. For more information
on the Field Creator dialog box, see Field Selection Tab: Field Creator Dialog Box.
x
-
Add icon
-
Adds a field to the report fields.
x
-
Remove icon
-
Removes a field from the report fields.
x
x
x
-
Move Up or Move Down icons
-
Moves the position of the field within the report.
x
x
x
Reference: Field Selection Tab: Field List Searching
The
following image shows the Field List Searching options that you
can use to search for a field in the Fields List. For more details,
see Searching Field Lists.
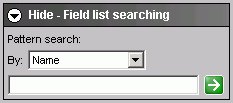
-
Pattern Search
-
Select the Master File attribute for which you want to search.
The following table lists the pattern attributes and a description
of each.
|
Attribute
|
Description
|
|---|
|
Name
|
Name of the field.
|
|
Alias
|
Alias for the field.
|
|
Title
|
Display title for the field, as defined
in the Master File.
|
|
Format
|
Field format, for example A4.
|
|
Description
|
Field description, as defined in the Master
File.
|
|
Segment
|
A segment of fields in the Master File.
|
|
Filename
|
Name of the data source.
|
-
Text Box
-
Type your search string. You can use an asterisk (*) as a
wildcard character. For example, type c* to find all fields that
begin with the letter "c". The character string is not case sensitive.
x
Reference: Field Selection Tab: Available Objects
x
x
The
following image shows the Available Objects that you can include
in your report from the Field selection tab. For more details, see Using Application Objects.
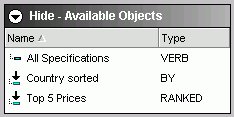
-
Name
-
Is the name of the application object.
-
Type
-
Is the type of application object. For example, if the Type
is BY it is a vertical sort field.
x
Reference: Performing a Subtotal on Sort Across Fields
Report Assistant has a new feature that allows you to perform a subtotal on your Sort across field. Select your Inner most Sort across field and select the Total option on the Field Options Sorting tab as shown in the following image.
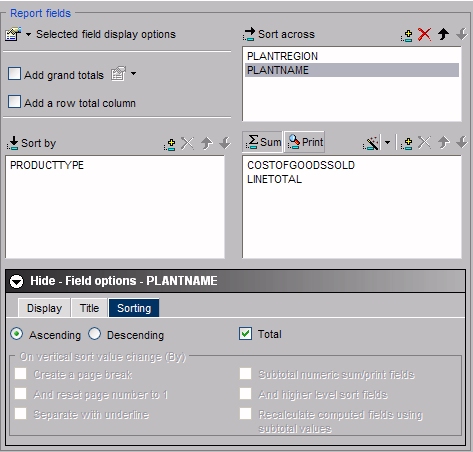
In this example, we are performing a subtotal
on the PLANTNAME field. This will generate a subtotal column for each
PLANTREGION as shown in the following image.
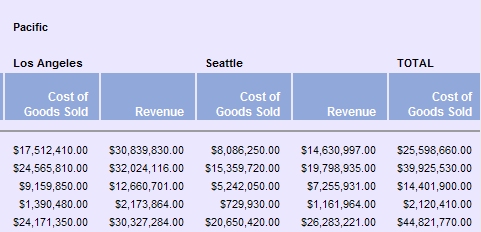
In this report, the Pacific Plant Region has two PLANTNAME values, Los Angeles and Seattle. Notice the TOTAL Column represents the Subtotal for all Plants in the Pacific Region.
x
Reference: Field Selection Tab: Show Field Options for Sort By
The
following image shows the Show field options where you choose various
styles and functions for a selected field.
The
Display subtab for a Sort by field has these options: x
-
Make this field invisible
-
Check to hide the display of a Sort By field.
x
-
Font button
-
Opens the font styling dialog box. See Font Dialog Box.
x
-
Conditional Styling button
-
Opens the conditional styling dialog box which you use to
add conditional styling in a report.
x
-
Drill Down button
-
Opens the drill-down dialog box. See Drill Down Dialog Box.
-
Format in report as
-
Is grayed out and unavailable.
-
Calculated as
-
Is grayed out and unavailable.
x
-
Include missing instances
-
Inserts '.' when no field value exists.
x
The
Title subtab for a Sort by field has this option:
-
Title
-
Is the name of the field in the Sort By list box.
x
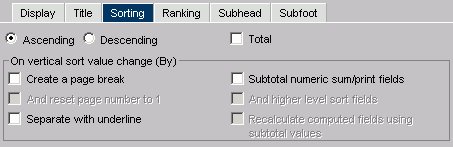
The
Sorting subtab shown in the following image for a Sort by field
has these options:
 x
x
-
Ascending
-
Click to arrange fields in ascending order.
-
Descending
-
Click to arrange fields in descending order.
-
Total
-
Applies aggregation and sorting simultaneously to numeric
columns in your report in one pass of the data. See Aggregating and Sorting Fields.
x
x
x
x
-
On vertical sort value change (By)
-
Select:
- Create a page
break (on value change).
- Separate (from
next) with underline.
- Subtotal numeric
sum/print fields.
Note:
- When you select
the Create a page break check box, the And
reset page number to 1 check box is activated.
- When you select
the Subtotal numeric sum/print fields check
box, the Subtotal tab appears and the And higher level
sort fields and the Recalculate computed
fields using subtotal values check boxes are activated.
For more information about subtotals, see How to Include Subtotals.
x
x
xThe Ranking subtab,
shown in the following image for a Sort by field has these options:
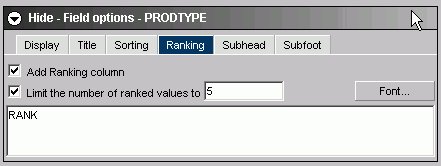
-
Add Ranking column
-
This check box is unselected by default and enables a user
to add a Ranking column.
-
Limit the number of ranked values to
-
This check box is grayed out by default and activated only
if the Add Ranking column check box is selected. It enables a user
to enter an integer value to select the number of ranked values
to display in the report (5 is the default value).
-
Text Box
-
The title of the ranking column can be changed from the default
of RANK.
-
Font button
-
Opens the font styling dialog box. See Font Dialog Box.
x
x
x
x
x
x
x
x
x
x
x
x
x
x
x
xThe
Subhead/Subfoot subtab, shown in the following image for a Sort
by field has these options:
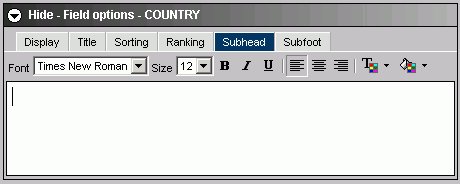
-
Formatting toolbar
-
Specify the font, font size, font style, text alignment,
text color, and background color of the subhead or subfoot.
-
Text box
-
Enter a subhead/subfoot in the text box.
The
Subtotal subtab for a Sort by field has:
-
Text box
-
Enter text to display for the subtotal.
Note: This
subtab appears when you select the Subtotal numeric sum/print fields
option on the Sorting subtab.
x
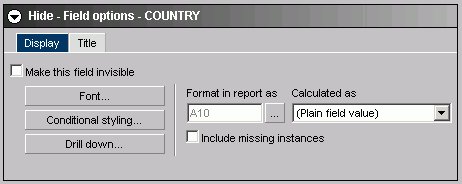
Reference: Field Selection Tab: Show Field Options for Sort Across
The
following image shows the Show field options where you choose various
styles and functions for a selected field.
The
Display subtab for a Sort across field has these options:
-
Make this field invisible
-
Check to hide the display of a Sort Across field.
-
Font button
-
Opens the font styling dialog box. See Font Dialog Box.
-
Conditional Styling button
-
Is grayed out and unavailable.
-
Drill Down button
-
Opens the drill-down dialog box. See Drill Down Dialog Box.
-
Format in report as
-
Is grayed out and unavailable.
-
Calculated as
-
Is grayed out and unavailable.
-
Include missing instances
-
Is grayed out and unavailable.
The
Title subtab for a Sort across field has this option:
-
Title
-
Is the name of the field in the Sort Across list box.
The
Sorting subtab for a Sort across field has these options:
-
Ascending
-
Click to arrange fields in ascending order.
-
Descending
-
Click to arrange fields in descending order.
Note: Other
options are grayed out and unavailable.
x
x
Reference: Field Selection Tab: Show Field Options for Column
The
following image shows the Show field options where you choose various
styles and functions for a selected field.
The
Display subtab for a Column field has these options:
-
Make this field invisible
-
Check to temporarily hide the display of a Column field.
-
Font button
-
Opens the font styling dialog box. See Font Dialog Box.
-
Conditional Styling button
-
Opens the conditional styling dialog box where you use to
add conditional styling in a report.
-
Drill Down button
-
Opens the drill-down dialog box. See Drill Down Dialog Box.
x
-
Format in report as
-
Click ... to open the change format dialog where you can
edit the field format. See Change Format Dialog Box.
-
Calculated as
-
Make a selection from the drop-down list.
-
Include missing instances
-
Inserts '.' when no field value exists.
The
Title subtab for a Column field has this option:
-
Title
-
Is the name of the field in the Columns list box.
x
Reference: Drill Down Dialog Box
The
following image shows the drill down dialog box, where you can add
drill down capability to a report.
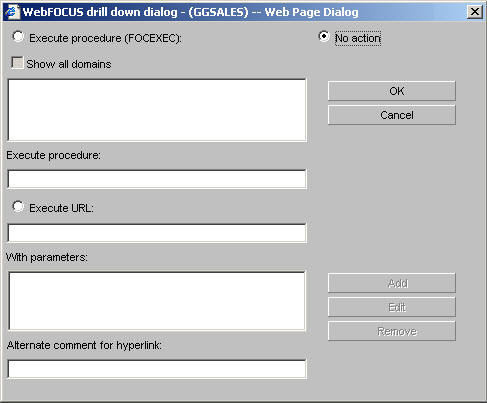
-
Execute procedure (FOCEXEC)
-
Lists the domains and procedures that are available as drill-down
reports. Click the procedure you want to execute.
-
Show all domains
-
When Execute procedure (FOCEXEC) is selected, click this
check box to gain access to procedures in the Standard
Reports folders of all available
domains.
-
No action
-
Is the default.
-
Execute procedure
-
The procedure you selected appears in this text box.
-
Execute URL
-
Enter the URL of a Web page that will open when a user drills
down.
-
With parameters
-
Once a parameter is created using the Add button, it is automatically
added to this area.
-
Alternate comment for hyperlink
-
You can place comments here. The Alternate comment for hyperlink
support is limited to specific formats.
-
Add button
-
Opens the drill down parameter dialog shown in the following image.
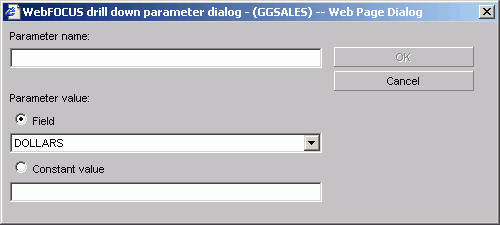
-
Parameter name
-
Enter the parameter name you created in the drill down procedure.
-
Parameter value: Field
-
Select the field the user can drill down.
-
Parameter value: Constant value
-
The parameter is set to the specified value.
-
OK button
-
Returns to the drill down dialog. The parameter is added
to the With parameters list box.
x
Reference: Font Dialog Box
The
following images shows the font dialog box.
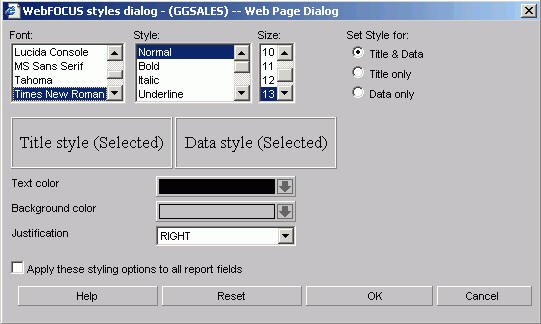
-
Font
-
Select from the list box.
-
Style
-
Select from normal, bold, italic, underline, and various
combinations.
-
Size
-
Select a font size from the list box.
-
Set Style for Title & Data, Title only, or Data only option buttons
-
Set the style for Title & Data, Title only, or Data only.
-
Text color
-
Select a color from the color palette.
-
Background color
-
Select a color from the color palette.
-
Justification
-
Select left, right, or center from the list box.
-
Apply these styling conditions to all report fields check box
-
Apply these styling conditions to all report fields.
x
Reference: Field Selection Tab: Field Creator Dialog Box
Use
the Field Creator dialog box to create or edit temporary fields,
as shown in the following image.
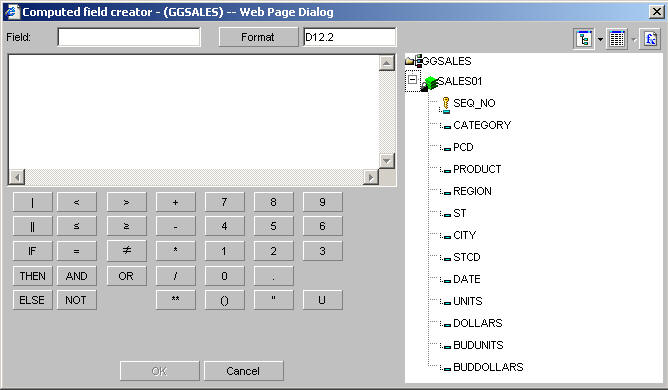
-
Field
-
Enter a name for the temporary field. Note that field names
cannot exceed 66 characters.
-
Format button
-
Displays the Change Format dialog box where you can modify
the data formats. See Change Format Dialog Box.
-
Tree or List mode buttons
-
Opens the field list in either tree or list mode.
-
Functions button
-
Displays a list
of predefined functions grouped into categories that include Character,
Data Source and Decoding, Date and Time, Format Conversion, Numeric,
and System. If you hover your cursor over a function, a brief description
appears. The following image shows the list of predefined functions
that populate the Field Creator dialog box when you select the Functions button.
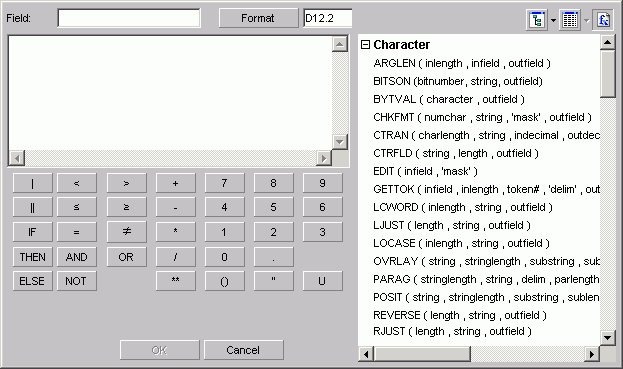
Double-click the desired function to add
it to the expression box in the Field Creator dialog box. In the
expression box, replace each of the function’s arguments with the desired
value or field name. Note that each of the available functions is
a program that returns a value. For more information about functions,
see the Using Functions manual.
-
Expression box
-
To create an expression, double-click fields or functions,
select items (operators, numbers, characters) from the Field Creator
keypad, or type directly in the expression box.
-
Concatenation operators
-
Concatenates two or more alphanumeric constants and/or fields
into a single character string. The concatenation operator has two
forms: | (weak concatenation, which preserves trailing blanks) and
|| (strong concatenation, which moves trailing blanks to the end
of a concatenated string).
-
IF... THEN... ELSE... operators
-
Creates a conditional expression. A conditional expression
assigns a value based on the result of a logical expression. The
assigned value can be numeric or alphanumeric. IF, THEN, ELSE logic
expressions take this form:
IF expression1 THEN expression2 ELSE expression3
ELSE
is an optional operator. All alphanumeric values in conditional
expressions must be enclosed in single quotation marks. For example,
IF REGION EQ 'West'.
-
Logical operators
-
Used to create relational and Boolean expressions. A relational
expression returns a value based on a comparison of two individual
values (either field values or constants). A Boolean expression
returns a value based on the outcome of two or more relational expressions.
The following
logical operators are available:
-
 adds
the less than (LT) operator to the expression. This operator returns
a value if the value on the left is less than the value on the right.
adds
the less than (LT) operator to the expression. This operator returns
a value if the value on the left is less than the value on the right.
-
 adds
the greater than (GT) operator to the expression. This operator
returns a value if the value on the left is greater than the value
on the right.
adds
the greater than (GT) operator to the expression. This operator
returns a value if the value on the left is greater than the value
on the right.
-
 adds
the less than or equal to (LE) operator to the expression. This
operator returns a value if the value on the left is less than or
equal to the value on the right.
adds
the less than or equal to (LE) operator to the expression. This
operator returns a value if the value on the left is less than or
equal to the value on the right.
-
 adds
the greater than or equal to (GE) operator to the expression. This
operator returns a value if the value on the left is greater than
or equal to the value on the right.
adds
the greater than or equal to (GE) operator to the expression. This
operator returns a value if the value on the left is greater than
or equal to the value on the right.
-
 adds
the equal (EQ) operator to the expression. This operator returns
a value if the value on the left is equal to the value on the right.
adds
the equal (EQ) operator to the expression. This operator returns
a value if the value on the left is equal to the value on the right.
-
 adds
the not equal to (NE) operator to the expression. This operator
returns a value if the value on the left is not equal to the value
on the right.
adds
the not equal to (NE) operator to the expression. This operator
returns a value if the value on the left is not equal to the value
on the right.
- AND returns
a value if both operands are true.
- OR returns
a value if either operand is true.
- NOT returns
a value if the operand is false.
-
Arithmetic operators
-
Click any of the arithmetic operators to use them in your
expression: + (addition), - (subtraction), * (multiplication), /
(division), ** (exponentiation).
Two operators cannot appear
consecutively. The following expression is invalid:
a* -1
To
make it valid, you must add parentheses:
a* (-1)
-
Parentheses
-
Adds parentheses to the expression box. Parentheses affect
the order in which the specified operations are performed. For information
on when to use parentheses, see Order of Evaluation for Expressions.
-
Quotation marks
-
Adds quotation marks to the expression box. Use single quotation
marks to enclose alphanumeric and date literals.
-
Uppercase (U key)
-
Converts entries in the expression box to uppercase. Note
that field names are case-sensitive.
x
Reference: Order of Evaluation for Expressions
WebFOCUS performs numeric operations in the following order:
- Parentheses
- Exponentiation
- Division and
multiplication
- Addition and
subtraction
When operators are at the same level, they
are evaluated from left to right. Because expressions in parentheses
are evaluated before any other expression, you can use parentheses
to change this predefined order. For example, the following expressions
yield different results because of parentheses:
COMPUTE PROFIT/D12.2 = RETAIL_PRICE - UNIT_COST * UNIT_SOLD ;
COMPUTE PROFIT/D12.2 = (RETAIL_PRICE - UNIT_COST) * UNIT_SOLD ;
In
the first expression, UNIT_SOLD is first multiplied by UNIT_COST,
and the result is subtracted from RETAIL_PRICE. In the second expression,
UNIT_COST is first subtracted from RETAIL_PRICE, and that result
is multiplied by UNIT_SOLD gives an incorrect result because UNIT_SOLD
is first multiplied by UNIT_COST, and then the result is subtracted
from RETAIL_PRICE.
x
Reference: Change Format Dialog Box
The
following image shows the Change Format dialog box.
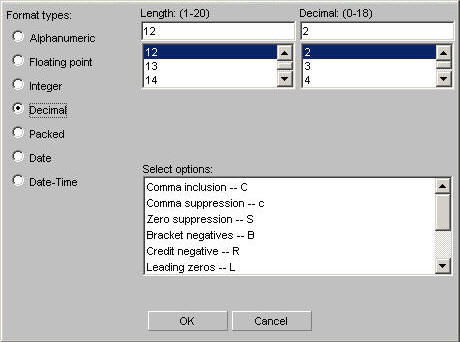
-
Format types
-
Choose:
- Alphanumeric
- Floating point
- Integer
- Decimal
- Packed
- Date
- Date-Time
-
Length
-
Choose an available number based on the format type you chose.
-
Select options
-
Choose options based on the format type you chose.