Defining Field Characteristics
To choose field options, select the field in the Sort across,
Sort by, or Column (Sum/Print) box in the Field selection tab. Click Show
field options to style each field in your report.
The following table lists and describes the available Field options
in the Display, Sorting, Ranking, Subhead, and Subfoot tabs that
appear for each selected field type. The ability to create a title
in the Title tab is available for all field types. If a Field option
tab is not available for a selected field type, "n/a" appears in
the table.
|
Field Type
|
Display
|
Sorting
|
Ranking
|
Subhead & Subfoot
|
|---|
|
Sort across
|
Make this field invisible check box
Font
button that opens styles dialog
Drill down button that opens
Drill down dialog
|
Ascending/ Descending options
Total
check box
|
n/a
|
n/a
|
|
Sort by
|
Make this field invisible check box
Font
button that opens styles dialog
Conditional styling button
that opens conditional styling dialog
Drill down button that
opens Drill down dialog
Include missing instances check box
|
Ascending/ Descending options
Total
check box
Create a page break check box (activates the 'And
reset page number to 1' check box)
Separate with underline
check box
Subtotal numeric sum/print fields check box (activates
the Subtotal tab, and the 'And higher level sort fields' and 'Recalculate computed
fields with subtotals' check boxes)
|
Add Ranking column check box (activates the
'Limit the number of ranked values to' check box, and the Font button that
opens styles dialog)
|
Select Font type, size, and style.
Select text alignment.
Set text
and background colors.
|
|
Column (Sum/ Print)
|
Make this field invisible check box
Font
button that opens styles dialog
Conditional styling button
that opens conditional styling dialog
Drill down button that
opens Drill down dialog
Format in report as button opens change format
dialog
'Calculated as' drop-down list adds prefix to column
Include
missing instances check box
|
n/a
|
n/a
|
n/a
|
You can use this table to determine which of the following options
are available for a selected field in the Field selection tab:
- Suppress the
display of a field (make a field invisible).
- Apply font
options with the styles dialog box.
- Apply conditional
styling with the conditional styling dialog box.
- Create drill
down parameters with the Drill down dialog box.
- Select format
options in the report with the change format dialog box.
- Specify how
the field will be calculated by choosing an option from a drop-down
list box.
- Include references
to missing instances in reports.
- Specify field
display titles, subheads, subfoots, and subtotals.
- Specify ascending
or descending field sorting.
- Include the
Sort by options for page breaks.
- Include the
Sort by options for subtotals, sub-totals, and recalculated subtotals.
Note:
-
Subtotal
numeric sum/print fields is not checked by default.
If checked, numeric values are summed and a subtotal is displayed
when the selected Sort by field value changes.
- If you select And
higher level sort fields, SUB-TOTAL syntax is used to
display subtotals for numeric values when the selected Sort by field
value changes and when any higher-level Sort by field value changes.
- If you are
using computed fields, select Recalculate computed fields using
subtotal values.
x
Procedure: How to Change the Display Title of a Field
-
Select the field whose title you want to change.
-
If hidden, click Show field options for
the selected field.
-
Click the Title tab.
-
Enter the title you want to display in the report output.
Note: When using HTML output, leading spaces in
the field title do not display.
x
Procedure: How to Suppress the Display of a Field
The
Field selection tab enables you to conceal the data of a selected
field in a report. To suppress the display of a field:
-
If hidden, click Show field options for the
selected field.
-
Check the Make this field invisible check box.
x
Procedure: How to Include References to Missing Instances in Reports: The ALL. Prefix
In
a report, you can include parent segment instances that lack descendants
by attaching the ALL. prefix to one or more column fields, as follows:
-
If hidden, click Show field options for the
selected field.
-
Check the Include missing instances check box.
Note:
- The ALL. prefix
and an additional prefix operator from the Column Options drop-down
list may be applied to the same field.
- The ALL. prefix
can be applied to multiple fields.
- The ALL. prefix
can be applied to both column fields and sort fields.
x
Procedure: How to Arrange Fields in Ascending or Descending Order
To
list sort field data in the report from greatest to smallest (descending)
or from smallest to greatest (ascending):
-
If hidden, click Show field options for the
selected field.
-
Select the Sorting tab.
-
Select the Ascending or Descending option
button.
-
Click Save.
If
you have multiple sort fields, you can specify a different order
for each one.
x
Procedure: How to Include Page Breaks
To
start a new report page when the value of a selected sort field
changes:
-
If hidden, click Show field options for the
selected field.
-
Select the Sorting tab.
-
Check the Create a page break check box.
-
Click Save.
x
Procedure: How to Include Subtotals
To
display a subtotal for numeric data when a selected sort field changes:
-
If hidden, click Show field options for the
selected field.
-
Select the Sorting tab.
-
Check the Subtotal numeric sum/print fields check
box.
Subtotals are activated for this report and the Subtotal
tab appears to the right of the Subfoot tab. Note that the default
*TOTAL title is displayed next to each subtotal value. For more
information, see How to Include Display Titles for Subtotals.
Additionally, the following options are activated:
- And subtotal
all higher level sort fields. Displays subtotals for numeric values
when the Sort by field value changes and when any higher-level Sort
by field value changes.
- Recalculate
computed fields with subtotal values.
-
Optionally, select the Subtotal tab
to:
- Modify the
default subtotal title text in the Current Subtotal Text field.
- Suppress subtotals
for sort fields that have only a single value.
- Apply subtotals
to a subset of the numeric fields in a report.
- Apply prefix
operators, which enables you to display the sum, average, average square,
count, first in group, last in group, minimum, or maximum value
for any or all of the numeric fields, including Computes, in a report.
For
more information, see How to Display Subtotals and Other Summary Values Using Prefix Operators.
-
Click Save.
x
Procedure: How to Include Display Titles for Subtotals
When
including subtotals, you can also specify display titles for them.
These titles appear next to each subtotal in the report. The default
subtotal display title is *TOTAL. To edit the default display title:
-
If hidden, click Show field options for the
selected field.
-
Click the Sorting tab.
-
Check the Subtotal numeric sum/print fields check
box.
The Subtotal tab appears to the right of the Subfoot tab.
-
Click the Subtotal tab.
-
Type the desired display title in the Current Subtotal Text
field in the Subtotal tab.
-
Click Save.
Note: If
the Subtotal numeric sum/print fields check box is not selected,
subtotals are not displayed in the report.
x
Procedure: How to Include Subheads/Subfoots for Sort Fields
The
Fields Options tab enables you to include subheads (which appear
above) and subfoots (which appear below) for each of the sort field's
records in the report.
-
If hidden, click Show field options for the
selected field.
-
Click the Subhead or Subfoot tab.
-
Click in the text box or press Alt+T to
enter a subhead or subfoot title.
-
Style the subhead/subfoot using the formatting toolbar.
-
Click Save.
x
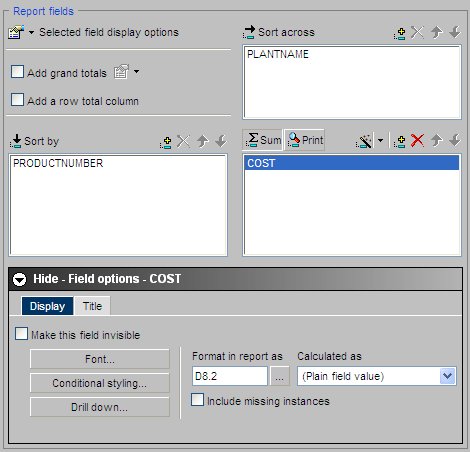
Use the report field options section on the Field selection
tab to change the field format for the Column field. The following
image shows the Field selection tab with a field selected and the
Field Options pane open.
x
Procedure: How to Change the Field Format for a Column Field
-
If hidden, click Show field options.
-
Select a field in the Sum/Print display
field list.
-
Click the browse (...)
button next to the Format in report as field
to open the Change Format dialog box.
Note: You can also edit the format by typing directly
in the Format in report as field. This is
not recommended unless you know the exact format because validation
is not performed until run time.
-
Select a Format type and the desired options for the field,
then click OK.
For
more information, see Changing a Field Format.
x
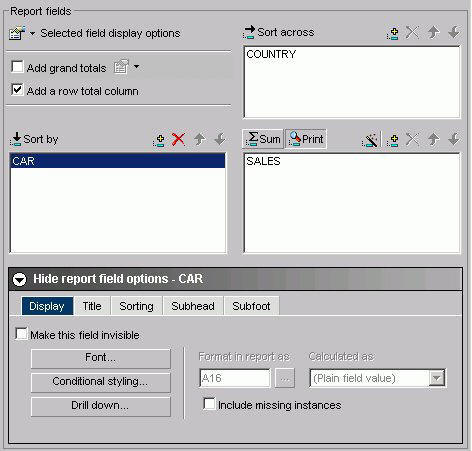
Use the styling options on the Field selection tab to style report
fields.
x
Procedure: How to Style Sort by, Sort Across, or Column Fields
-
If hidden, click Show field options.
-
Select a field and click the Display tab
in the report field options section.
The
following image shows the Display tab of the Field Options pane.
-
Click the Font button.
-
Select the desired styling options from the Font, Style, and
Size boxes.
-
In the Set Styles for box, select the Title & Data, Title
Only, or the Data Only option
button, depending on the report element you wish to style.
Note: If you select a font property (font, style,
size, text color, background color, or justification) and select
the Title & Data option button, the changes
will be reflected in both the Title Style and Data Style boxes.
However,
if you then select a different parameter for a given property using
the Title Only option button, the Title Style
will change while the Data Style will not reflect this change. To
change the Data Style, you must click the Data Only option
button and then make your change. Likewise, if you select the Data
Only option button and make a change, this change will
not be reflected in the Title Style. You must click the Title Only option
button to make your change.
-
Choose a text color from the list box.
-
Choose a background color from the list box.
-
Choose a justification (left, center, or right) from the list box.
-
Click OK.
Note: Clicking
Reset returns the styling options to the following default settings:
- Font: Times
New Roman
- Style: Normal
- Size: 13
- Text Color:
Black
- Background
Color: Transparent
- Justification:
Left
xDrilling Down to New Procedures
When you click Drill Down in the report fields options
section on the Field selection tab, the No action option button
is the default. When you select Execute Procedure, a list of procedures
contained within the Standard Reports folder displays. You can also select
procedures from different domains. Analytical
users creating Custom Reports also see a list of My Reports to select
from.
The following image
shows the drill down dialog box.
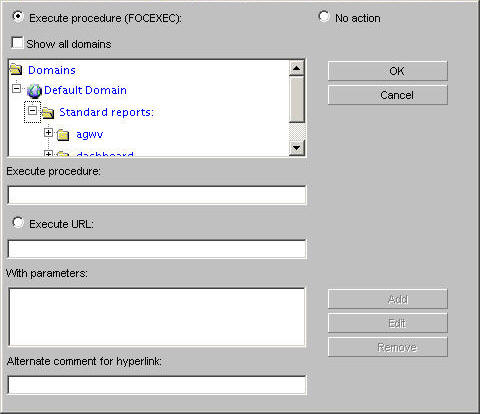
For more information, see Drill Down Dialog Box.
xEnd User Drill-down Capability
Along with Managed
Reporting administrators and developers, end users can drill down to
Standard Reports from within Reporting Objects and My Reports. End
users can also drill down from My Reports to My Reports. However,
the following limitations apply to the end user drill-down capability:
- End users can
create drill-downs to Standard Reports from Reporting Objects.
- End users can
run or delete drill-downs created by Administrators or Developers
to Standard Reports from My Reports. Delete does not alter the Reporting
Object, since it only applies to ad hoc requests.
Note: The default functionality
exists for all users.
xStyling Specified Field Values
Use the Conditional Styling dialog box to style records
based on specified field values. Conditional styling, also referred
to as stoplighting, enables you to define conditions that determine
when to apply particular fonts, point size, text style, foreground and
background color, and drill-down procedures to the data in your
report when the report is run.
You can style specified values for one or several column and
sort fields. However, you cannot style values for sort across fields.
x
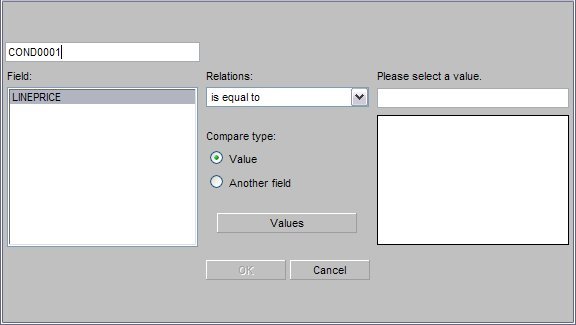
Procedure: How to Style Records Based on Specified Field Values
-
In the Report Assistant, if hidden, click Graph
Field Options.
-
Click the Display tab in the report
field options section.
-
Click the Conditional styling button.
The Conditional Styling dialog box opens.
-
Click the Add button and create a new condition.
The following image shows the edit condition dialog box
that opens where you begin to set the conditional styling.
-
Provide a meaningful and unique file name in the Condition
input box.
-
Select a field name from the Field list box and a relation
from the Relations list box.
-
To specify a value that completes the relation, first select
one of the following in the Compare Type option button group:
-
Value,
to compare the selected report field to a data source value or literal
value.
-
Another
Field, to compare the selected report field to the value
of another field. The list of report fields appears in the possible
values area. Select one of the report fields to compare to.
-
If you select Value under Compare Type, perform one of the
following to complete the relation:
- Click Values to
display existing data source values in the Value list box, and select
a value.
- Type a literal
value in the Value input box.
-
Click OK.
You return to the Conditional Styling dialog box.
x
Parameters enable you to specify criteria and conditions
for drill-down reports. By defining parameters, you can control
the amount and type of information to retrieve when you click a
hotspot.
x
Procedure: How to Create a Parameter in the Main and Drill Down Procedures
-
Select the Selection criteria tab.
-
Create an expression (WHERE statement) that defines a parameter.
For more information, see Creating a Where or Where Total Statement.
-
If hidden, click the Show field options section.
-
Select the field that you want to drill down on.
-
Click Drill Down. The WebFOCUS Drill Down Dialog opens.
-
Click Execute Procedure (FOCEXEC) or Execute
URL.
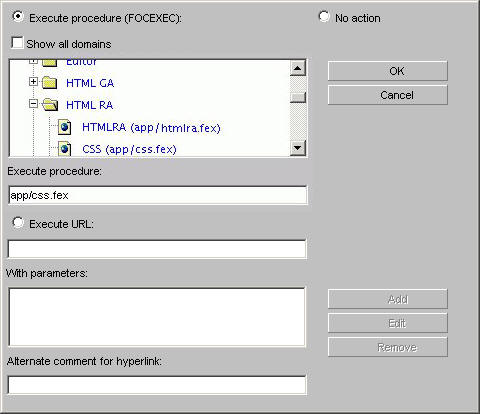
The following image shows the Execute Procedure option
button selected and the location and procedure name of the drill-down
report (app/css.fex) in the Execute procedure field.
-
Click Add. The Drill Down Parameter
Dialog box opens where you create the drill down parameter.
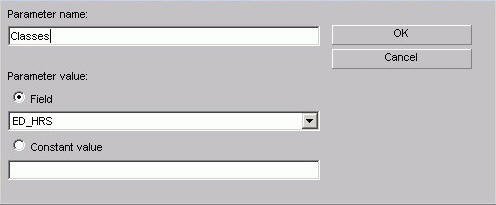
The following image shows the Drill Down Parameter dialog
box, which contains a text box where you enter the name of the parameter,
and option buttons to select the parameter as a field or a constant
value.
-
Enter the name of the parameter you created in the drill-down
procedure in the Parameter Name text box, for example, Classes.
Note: When passing parameters to a drill-down procedure,
you must use local amper variables (&variables). Global amper
variables (&&variables) cannot be used as drill-down parameters.
Also, when entering your parameter name it is not necessary to type
an ampersand (&) before the parameter name. This will create a
global amper variable that cannot be used as a drill-down parameter.
-
When you pass the parameter to the drill-down procedure, you
must set a value for it in the Drill Down Parameter dialog box.
If you select:
-
Field. The
parameter will be set to the corresponding value of the object the
user drills down on in the specified field.
-
Constant value. The
parameter is set to the specified value.
Note: If
the drill-down report contains a -DEFAULTS statement that sets a
default value to the same amper variable passed from the main report,
the amper variable value passed down overwrites the -DEFAULTS statement
in the target procedure.
-
Once a value has been supplied, click OK to return
to the Drill Down Dialog box.
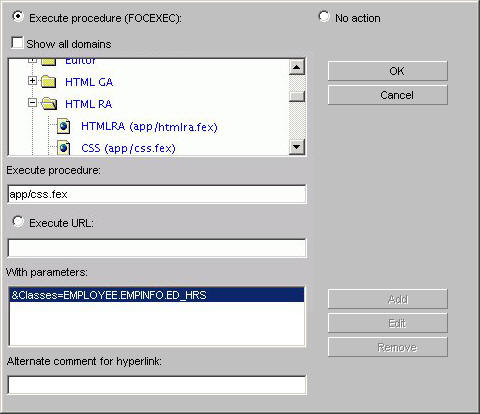
The parameter is added to the With Parameters list box
as shown in the following image.
xAggregating and Sorting Fields
You can apply aggregation and
sorting simultaneously to numeric columns in your report in one
pass of the data using the Total sort option. The Total option is
available for Sort by and Sort across fields. For the Total sort
option to work correctly, you must have an aggregating display field,
such as Sum, in the report. A non-aggregating display field, such
as Print, simply retrieves the data without aggregating it.
Note: When you add a computed field to the Sort by field,
it is automatically given the Total property.
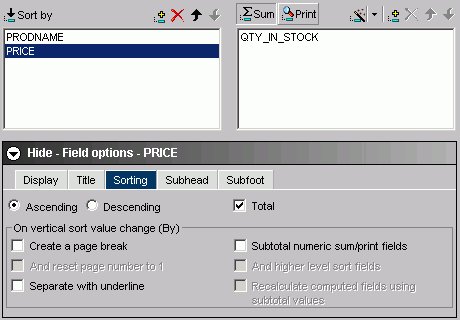
The following image shows the PRICE field with the Total option
selected in the Field options.
x
Procedure: How to Rank Data With the Total Sort Option
To
rank report data using the Total option on the Sorting tab, perform
the following steps:
-
Add multiple fields to the Sort by data field box, and highlight the
Sort by field you want to rank.
-
Add any other desired fields to the Sum/Print field box.
-
If hidden, click Show field options for
the selected field.
-
Click the Sorting tab.
-
Select the Total check box.
Tip: Select the Descending option to make the largest
number the first row of ranked data in the report. The default sorting
option is Ascending, which ranks the smallest number first.
-
Click the Ranking tab.
-
Select the Adding Ranking column check box.
Optionally, in the text box, type a custom title for the
ranking column. The default title is RANK.
-
Run the report.
Note: For
the Total sort option to work correctly, you must have an aggregating
(numeric) display field, such as Sum.
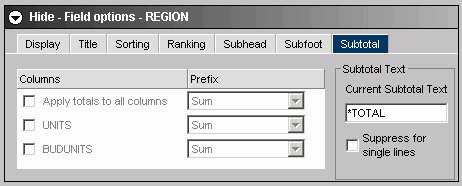
xDisplaying Subtotals and Other Summary Values Using Prefix Operators
The Subtotal tab enables you to display subtotals, and
other summary values using prefix operators, for any or all of the
numeric fields, including computed fields, for a selected Sort by
field in a report query. You can choose to display subtotals for
all numeric fields whenever a selected Sort by field value changes,
or you can select to display subtotal and other summary values for
a subset of the numeric fields.
In the Subtotal tab, as shown in the following image, you can
customize the title text used to display subtotals and other summary
values, and suppress subtotals for sort fields that have only a
single value, in addition to working with prefix operators.
Limitation: Prefix operators are not supported with EXL2K FORMULA.
x
Procedure: How to Display Subtotals and Other Summary Values Using Prefix Operators
To
access the Subtotal tab to apply subtotals, prefix operators, and
modify other subtotal text and settings, perform the following steps:
-
If hidden, click Show field options for the
selected field.
-
Select the Sorting tab.
-
Select the Subtotal numeric sum/print fields check
box.
The Subtotal tab appears to the right of the Subfoot tab.
-
Select the Subtotal tab.
-
Numeric field values are summed and displayed as subtotals
in the report by default. To display summary values other than the
default subtotals, select prefix operators using the drop-down lists
in the Prefix area that are adjacent to each of the selections in
the Columns area.
Note that the Sum prefix produces the same subtotal results
as not selecting a prefix operator.
All of
the available prefix operators are listed and described in the following table:
|
Prefix
|
Description
|
Displayed in Prefix List
|
|---|
|
SUM.
|
Compute the sum of values
|
Sum
|
|
ASQ.
|
Compute the average sum of squares
|
Average Square
|
|
AVE.
|
Compute the average value
|
Average
|
|
CNT.
|
Count the items
|
Count
|
|
FST.
|
Select the first value only
|
Show first in group
|
|
LST.
|
Select the last value only
|
Show last in group
|
|
MAX.
|
Select the maximum value only
|
Maximum
|
|
MIN.
|
Select the minimum value only
|
Minimum
|
-
To display all numeric field values as subtotals or other summary
values in the report, select the Apply totals to all
columns check box in the Columns area.
-
To display subtotals or other summary values for a subset of
the numeric fields in the report, make sure the Apply
totals to all columns check box is de-selected, then
select check boxes for the individual numeric fields in the Columns
area of the Subtotal tab.
When Apply totals to all columns is
selected, options for all individual fields in the Columns area
are inactive by default.
-
To modify the default subtotal title, which is set to *TOTAL,
type the desired text you want to display as the title for all subtotals
and any other selected summary values in the Current Subtotal Text
field.
-
To hide subtotals for sort fields that have only a single value,
select the Suppress for single lines check
box.
-
Click Save to save your settings and
selections in the report query in which you are working.