Creating Temporary Fields
A temporary field is a field whose value is not stored in the
data source, but can be calculated from the data that is there,
or assigned an absolute value. When you create a temporary field,
you determine its value by writing an expression. You can combine
fields, constants, and operators in an expression to produce a single
value. For example, if your data contains salary and deduction amounts,
you can calculate the ratio of deductions to salaries using the
following expression: deduction / salary.
You can specify the expression yourself, or you can use one of
the many supplied functions that perform specific calculations or
manipulations. In addition, you can use expressions and functions
as building blocks for more complex expressions, as well as use one
temporary field to evaluate another.
There are two types of temporary fields
(a virtual field and a calculated value) which differ in how they
are evaluated:
- A virtual field (Define) is evaluated
as each record that meets the selection criteria is retrieved from
the data source. The result of the expression is treated as though
it were a real field stored in the data source.
- A calculated value (Compute) is evaluated
after all the data that meets the selection criteria is retrieved,
sorted, and summed. Therefore, the calculation is performed using
the aggregated values of the fields.
You can create temporary fields from the Field selection tab.
x
Procedure: How to Create a Temporary Field
-
On the Field selection tab, click one
of the following:
-
New define field
 icon (located
above the fields list)
icon (located
above the fields list)
-
New computed field
 icon
(located with the Sum/Print fields)
icon
(located with the Sum/Print fields)
The Field Creator
dialog box opens.
-
Enter the name for the field in the Field box. Field names
for temporary fields cannot exceed 66 characters.
-
Enter the format for the field in the Format box. Click the Format button
for assistance in selecting a format. See Change Format Dialog Box.
-
Click in the expression box to enter an expression.
If you are familiar with coding Compute and Define expressions,
you can type the expression in the text box. Otherwise, you can
use the keypad to assist you in creating the expression. To use
the keypad:
-
Click the Tree or List button
to open the fields list, or click the Functions button
to open the WebFOCUS functions list.
The functions list displays predefined functions grouped
into categories that include Character, Data Source and Decoding,
Date and Time, Format Conversion, Numeric, and System. If you hover
your cursor over a function, a brief description appears.
-
Double-click a field or function to add it to the expression
box.
-
If you select one or more fields, complete the expression by typing
directly in the expression box or using the Field Creator keypad.
See Field Selection Tab: Field Creator Dialog Box for details on keypad operations.
If you select a function, replace
each of the function’s arguments with the desired value or field
name. Note that each function is a program that returns a value.
See the Using Functions manual for complete information
on functions.
-
Click OK. New calculated values (Compute)
are added to the column (Sum/Print) list in your report. New virtual
(Define) fields are added to the fields list, where you can select
them as if they were real fields.
Note: When
you create a defined field in Report Assistant, if you want that
field value to be blank, the blank must be contained in quotation
marks.
x
Procedure: How to Edit a Temporary Field
-
Select the temporary field.
-
Click the down arrow next to the Define
icon and select Edit define field.
or
Above the Sum/Print display field list,
click the Edit computed field menu item.
The
Field Creator dialog box opens.
-
Make your desired edits and click OK.
x
Procedure: How to Delete a Temporary Field
Select
a field in the Sum/Print display field list and click the Delete icon
(or press the Delete key).
or
Perform the following
steps:
-
Select a virtual field in the Available fields box.
-
Click the down arrow next to the Define icon.
-
Click Delete define field.
xExamples of Creating a Virtual Field and Creating a Calculated Value
The following are examples of creating a virtual field
and creating a calculated value.
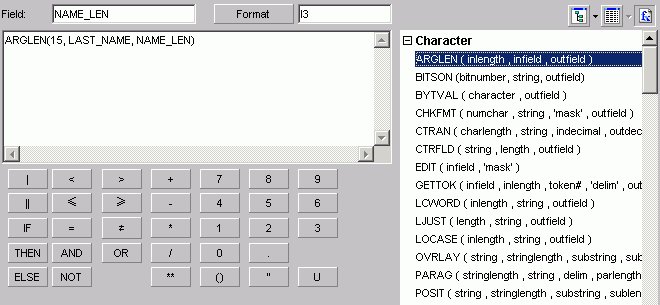
Example: Creating a Virtual (Defined) Field Using a Function
The
following image shows the Define Field Creator dialog box with a
defined field that uses a function (ARGLEN). This field uses the
EMPLOYEE sample data source.
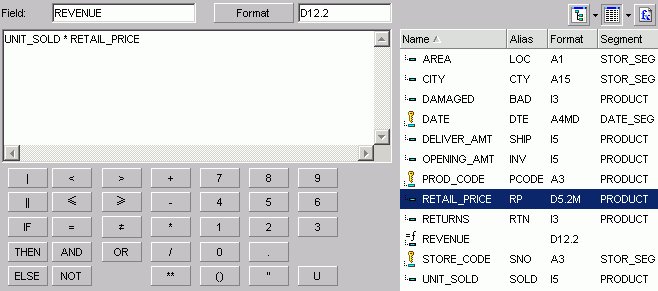
Example: Creating a Calculated (Computed) Value
The
following image shows a computed field created using the SALES sample
data source. The expression creates the computed field REVENUE based
on the product of the existing fields UNIT_SOLD and RETAIL_PRICE.
x
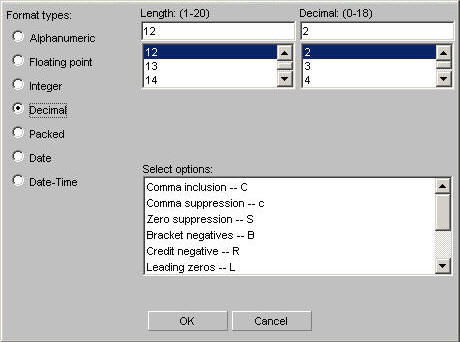
The following image shows the Change Format Dialog box,
which you use to assign a format to a virtual or column field. Refer
to the following procedures for the step-by-step instructions.
x
Procedure: How to Assign an Alphanumeric Format
-
Select the virtual or column field.
-
Click the down arrow next to the Define
icon and select Edit define field.
or
Click
the New computed field icon.
The Field Creator dialog box opens.
-
Click Format. The Change Format dialog
box opens.
-
Select the Alphanumeric option button
in the Format Types option button group.
-
To assign a different length, specify a number between 1 and
256 in the Length spin box.
-
Click OK twice to close the Change Format dialog
box and return to the Field selection window. The new format appears
in the Format column in the Available fields list.
x
Procedure: How to Assign a Numeric Format
-
Select the virtual or column field.
-
Click the down arrow next to the Define icon and select Edit define
field.
or
Click the New computed field icon.
The
Field Creator dialog box opens.
-
Click Format. The Change Format dialog
box opens.
-
Select one of the following option buttons in the Format Types
option button group:
-
Floating
Point (default length 7.2)
-
Integer (default
length 5)
-
Decimal (default
length 12.2)
-
Packed (default
length 12.2)
If the selected field matches the selected
format type, its current length appears in the Length spin box.
Otherwise, the default length appears in the Length spin box. The
Decimal spin box shows the number of decimal places for Floating
Point, Decimal, and Packed.
-
To assign a different length, specify numbers in the Length
spin box for format types as follows: 1- 9 for Floating Point, 1-
11 for Integer, 1- 20 for Decimal, and 1- 33 for Packed.
-
To assign a different number of decimal places for Floating
Point, Decimal, or Packed, specify the number in the Decimal spin
box.
-
Click OK twice to close the Change Format dialog
box and return to the Field selection window. The new format appears
in the Format column in the Available fields list.
x
Procedure: How to Assign a Date Format
-
Select the virtual or column field.
-
Click the down arrow next to the Define icon and select Edit define
field.
or
Click the New computed field icon.
The
Field Creator dialog box opens.
-
Click Format. The Change Format dialog
box opens.
-
Select the Date option button in the
Format Types option button group. The default date display format
is MDY.
-
To assign a different date display format, click the down arrow
to the right of the Date Format list box.
-
Choose a date format.
-
Click OK twice to close the Change Format dialog
box and return to the Field selection window. The new format appears
in the Format column in the Available fields list.
x
Procedure: How to Add a Percent Sign to a Numeric Field
You
can add a percent sign to the end of a numeric value (Decimal, Integer,
Floating Point format types). This numeric display option includes
a percent sign along with the numeric data, but does not calculate
the percent.
-
Select the virtual or column field.
-
Click the down arrow next to the Define icon and select Edit define
field.
or
Click the New computed field icon.
The
Field Creator dialog box opens.
-
Click Format. The Change Format dialog
box opens.
-
Click the down arrow in the Select options list box to choose Percent
sign - %.
-
Click OK twice to close the Change Format dialog
box and return to the Field selection window. The new format appears
in the Format column in the Available fields list.
Example: Using the Percent Sign Edit Option
The
following table consists of a Format column for each numeric format,
a Data column for its actual data value, and a Display column for
how it appears.
|
Format
|
Data
|
Display
|
|---|
|
I2%
|
21
|
21%
|
|
D7%
|
97
|
97%
|
|
F3.2%
|
48
|
48.00%
|
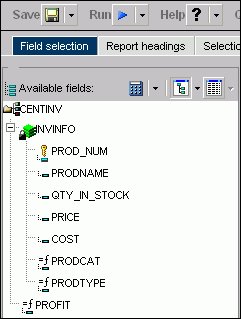
xUsing Calculated Values From the Master File
In the Report and Graph Assistants, calculated values
(COMPUTEs) that exist in the Master File appear in the fields list
with all other temporary virtual fields and calculated values. The
following image shows the fields list in the Report Assistant with
a calculated value from the Master File (PROFIT).
Calculated values from the Master File are available in all fields
lists in the Report Assistant except for the fields lists that appear
for Define fields and Joins.
x
Reference: Support for Calculated Values From the Master File
You
can use a calculated value from the Master File:
- As a Sum/Print
field.
- As a Sort
by field. You can also use a temporary calculated value as a Sort
by field.
Note: The By sort is automatically converted
to a Total field since calculated values are calculated after data
has been sorted and aggregated, but before the report is displayed.
Since sorting (BY) has already been done, the phrase BY TOTAL is
used to indicate that this sort is performed after any BY sorting.
This applies to calculated values from the Master File and temporary
calculated values.
- For conditional
styling.
- In a temporary
calculated value.
- In a page
heading or page footing (Report headings tab).
- In selection
criteria statements. You can also use a temporary calculated value
in selection criteria.
Note: When you use calculated values
for selection criteria, the Where is automatically converted to
Where Total. This occurs because the Where Total is added after
the data is retrieved and sorted, but before the report is finalized.
This applies to selection criteria created with calculated values
from the Master File and temporary calculated values.
Calculated
fields from the Master File are not supported:
x
Reference: Calculated Value Dependencies
These
dependencies apply to calculated values from the Master File and
to temporary calculated values.
When
you include a calculated value in selection criteria or in a page
heading/footing, the field must exist in the report as either a
By sort field or a Sum/Print field. If you create a selection criteria
statement with a calculated value or add a calculated value to a
page heading/footing and the field does not already exist in the
report, then it is automatically added to the Sum/Print display
field list. The Make this field invisible option
is automatically selected in the Field options dialog box so that the
calculated value does not appear in the output. When this occurs,
a message appears stating:
The field has been added to the list of fields in the report.
Note: You
do not see this message for temporary calculated values (those that
do not come from the Master File) that are added to a page heading/footing
since these already appear in the Report headings fields list.
You
can change the attributes of the calculated value from the Field
options dialog box on the Field selection tab. If you attempt to
delete the calculated value from the Sum/Print display list and
the same field exists in either selection criteria or in a page
heading/footing, you receive a one of the following messages:

or

You
must remove the field from the page heading/footing or selection
criteria before you can remove it from the Sum/Print display list.