In this section: Reference: |
Begin building your report in the Field selection tab by selecting
fields to include. A field is the smallest meaningful element of
data in a file.
WebFOCUS lists available fields in
several formats:
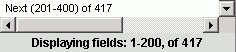
- As a list
of fields shown in the following image.
List
is the default. To enable List mode, you click the List icon in
the Available Fields box. You can view one or more options by clicking
the Options arrow and selecting: Name, Alias, Title, Format, Description,
Segment, and Filename. In List mode, you can sort any list of variables
alphabetically from a to z or from z to a by clicking the attribute,
for example, Name or Alias.
Note: If you choose an
option, such as alias, it does not appear with a DEFINE, COMPUTE,
or drill-down.
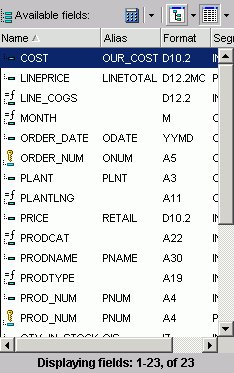
- As a tree
separated by segments (the Field Tree) when expanded, as shown in
the following image.
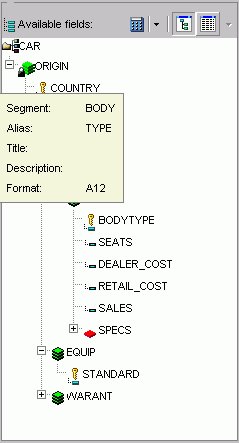
- As a tree
separated by Dimensions (the Dimension Tree), as shown in the following image.
Note: If
you are viewing a Fields List in the Dimension Tree mode and you create
a recursive join (joining a file to itself), you will not be able
to view the Dimensions in the Fields List after the join is created.
This is due to duplication of field names in a recursive join. If
you delete the join, you will be able to view dimensions again.
To enable Tree mode, you click the Tree icon in the Available
Fields box. Click the arrow next to the Tree icon to select the
Field Tree or the Dimension Tree. The following options appear in
a pop-up as you mouse over each field: Segment, Name, Alias, Title,
Description, and Format. You can change the field attributes that
appear in the tree by selecting from the list shown when clicking
on the tree icon. Select from: Name, Alias, Title or Description.
The Report fields section enables you to use the prefix with
the segment name or file name. You can also show the alias of the
field instead of the field name. You can also show the title or
description of the field instead of field name or alias, but title
and description cannot be prefixed with the segment name or file
name. The qualified field identification cannot exceed 66 characters.
Your selections in the Report Fields menu remain in effect for
your current browser session and are automatically saved with your
request.
Note: Field names that contain a hyphen (-) cannot be
used in the Report Assistant.
x
Reference: Notes on the Fields List
xFully Qualified Field Names
The Report Assistant always saves a procedure with its
fully qualified field name. If you want to view this information,
click the Prefix with the segment name and Prefix with the file
name options in the Report Fields section of the Field selection
tab.
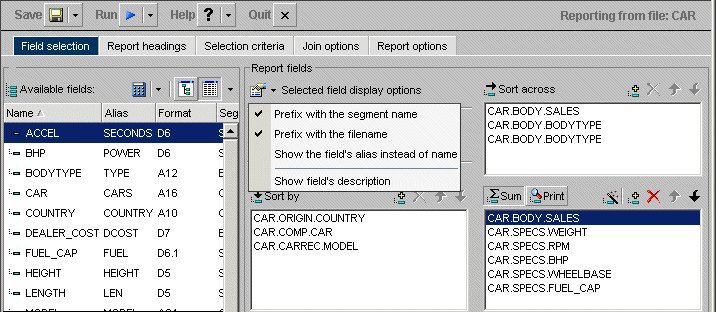
Example: Viewing Fully Qualified Field Names
Prefix
with the segment name and Prefix with the file name are checked.
Note that the fields under Sort by demonstrate the field, segment,
and file names.
The following image shows the result after
selecting both the prefix with segment name and prefix with the
file name.
If
you open a report procedure in the Editor, the fields appear with
their qualifiers prefixed to the field name or alias.
The
information for the highlighted field appears. If multiple fields
are selected, the information that appears applies to the last field
chosen.
Example: Using Sample Code With Field Qualifiers
The
following procedure shows the underlying code generated by Report
Assistant. Note that the fields referenced in the request (SALES,
COUNTRY, CAR, and MODE) are prefixed with file and segment qualifiers.
TABLE FILE CAR
SUM CAR.BODY.SALES
BY CAR.ORIGIN.COUNTRY AS 'COUNTRY'
BY CAR.COMP.CAR AS 'CAR'
BY CAR.CARREC.MODEL AS 'MODEL'
Once you have qualified
a field with an alias, segment name, or file name, the field will appear
with these prefixes in any windows in which that field is referenced
in a request. You can vary the qualifiers you select for individual fields.
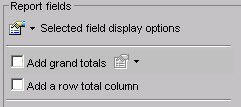
xAdding Totals and Grand Totals to a Report
You can add grand total values to the end of your report and
add a row total column by checking the appropriate boxes under Report
fields as shown in the following image. The Add grand totals drop-down
list provides two options. The Totals option displays grand total values
for each column in your report. The Recompute Totals option recalculates
computed fields before displaying the grand total values. Selecting
the Add a row total column check box adds a column to display the
totals for each row.
xUsing the Sort By, Sort Across, and Column Phrases to Organize Data
Select fields for a report by highlighting a field in
the Available fields list and clicking the Add icon above the Sort
by, Sort across, or Sum/Print field box. From either the List or
Tree view, you can also drag and drop a field on the desired field
box, or double-click a field to add it automatically.
Note: When you double-click fields, numeric fields are
added to the Sum/Print field box, and non-numeric and date fields
are added to the Sort by field box. Numeric fields include decimal,
floating point, and other formats, and non-numeric fields are usually
in alphanumeric format.
The following image shows a field selected in each of the data
field boxes, the COUNTRY field in the Sort across data field box,
the CAR in the Sort by data field box, and the SALES field in the
Sum/Print display field list.

Specifying sort phrases enables you to organize the presentation
of information in a desired sequence. Adding fields to the Sort
across fields box establishes the field you selected as a column
in your report. You can create a matrix report by combining sort
and across phrases. You can include a maximum of five ACROSS fields
in each report. If you try to enter a sixth ACROSS field, the following
message appears:
The Maximum number of horizontal dimensions is 5.
Adding fields to the Sort by fields box establishes your field
as a sort field in your report. Sort fields (also known as BY fields)
are rows in your report. Any field can be a sort field and you can
include up to 31 sort fields in a report.
The Column data fields box designates the selected field as Sum
or Print (Detail). After selecting the field, you must also decide
if you want WebFOCUS to add the values together (Sum) or print the values
individually (Print). WebFOCUS displays the field you select
in the last column of your report and performs the requested operation
on the data (Sum or Print). The default selection is Sum.
You must select at least one field for the Sort or Sum/Print
field lists to create a report.
For more information on WebFOCUS syntax
used in requesting reports, see the Creating Reports With WebFOCUS Language manual.
x
Procedure: How to Add Report Fields in Tree or List View
-
Click the Tree or List icon.
-
Select a field from the Available fields list and click the Add icon
above the Sort by, Sort across, or Sum/Print field box to add the
chosen field.
or
Click and hold the left mouse button, and drag
the field to the desired field box.
or
Double-click
a:
- Numeric field
to add it to the Sum/Print field box.
- Non-numeric
or date field to add it to the Sort by field box.
-
Optionally, you can use shortcut keys to quickly go to one
of the field boxes.
In the following table, the first column (Field Box) describes
where you go when using the shortcut keys and the second column
(Shortcut Keys) defines the shortcut key combination.
|
Field Box
|
Shortcut Keys
|
|---|
|
Sort across
|
Alt+A
|
|
Sort by
|
Alt+S
|
|
Column
|
Alt+C
|
Press Alt+M, Tab to
go to the Available Fields list, tab to the field and press Enter to
add the chosen field.
x
Procedure: How to Multi-Select Fields in List View
-
Click the List icon.
-
If the fields are:
- Adjacent to each other, click the first
field you want to select and hold down the Shift key while clicking
the last field you want to include in the report.
- Not adjacent
to each other, hold down the Ctrl key while clicking the fields
you want to include in the report.
-
Click the Add icon to the Sort across,
Sort by, or Column fields box to add the chosen fields.
Note: Selecting
multiple fields is only possible when in List mode. You must drag
and drop or use the Add icon to add individual fields when in Tree mode.
x
Procedure: How to Select a Report Type
To
select a report type, click one of the following buttons in the Sum/Print
display field list:
-
Sum. A
summary report shows the summarized values of the selected data
source fields.
-
Print. A
detailed report shows all selected records from a data source.
x
Procedure: How to Delete Report Fields
-
Select the field in the Sort Across, Sort by, or Column fields
box.
or
Use the shortcut keys to quickly go to one of
the field boxes. In the following table the first column (Field
Box) describes where you go when using the shortcut keys and the
second column (Shortcut Keys) defines the shortcut key combination.
|
Field Box
|
Shortcut Keys
|
|---|
|
Sort across
|
Alt+A
|
|
Sort by
|
Alt+S
|
|
Column
|
Alt+C
|
Use the arrow keys to move to the field
you wish to delete.
-
Click the Delete button or press the
Delete key.
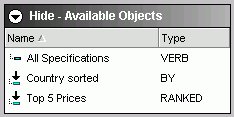
xUsing Application Objects
Application Objects enable you to add fields to your
report that have been customized for your use. For example, if you
are creating a sales report, an Application Object may have been
set up for you that enables you to easily add a sort field to your
report that lists the top 5 highest sellers for a certain year.
Note: Application Objects are only available when you
are building a report using a Reporting Object as a template. If
you do not see Application Objects, this means they have not been
developed for this Reporting Object.
The following image shows a few sample Application Objects as
they appear in the Field selection tab of the Report Assistant.
They are listed by Name and Type.
You add Application Objects to your report from the Field selection
tab in the Report Assistant. When you double-click the object you
want to add to your report, it is automatically added to the appropriate
list in the Field selection tab. For example, if it is a BY sort
object it is added to the Sort by list.
Field options are not available for Application Objects. If you
open the Field Options pane for an Application Object, the following
message appears: No options are available for Application Objects.
You can use Global Styling for these fields, which is available
in the Report options tab.
x
You can search the field list on the Field selection
tab, Report Headings tab, Selection criteria tab, and Join options
tab (for the host Master File) in the Report Assistant. You can
search by the following Master File attributes: Name, Alias, Title,
Format, Description, Segment, and Filename.
When you apply a search to a field list, your search results
appear in all other areas of the tool, until you reset the field
list. Your search results are saved when you exit the tool, so when
you open the procedure again, you only see the results of your search
in the field list.
Note:
- The field
list that appears for conditional styling is already restricted
to the fields selected for the report and is not further restricted
by the search string.
- Search options
are available when viewing fields in List mode. It is not available when
viewing fields in Tree mode.
x
Procedure: How to Search a Field List
-
In the Field selection tab, Headings tab, or Selection criteria
tab in the Report Assistant, click Show - Field list searching.
If you are searching for a field name from the Join options
tab, click the Field list searching
 icon.
icon.
The
Field list searching dialog box opens.
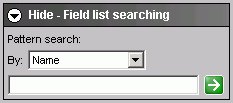
The following image
shows the Field list searching dialog box. It contains a drop-down
list for what pattern you want to search by, a text box, and a submit
button.
-
Select the Master File attribute for which you want to search.
The following table lists the pattern attributes and a description
of each.
|
Attribute
|
Description
|
DSPFFD Equivalent
|
|---|
|
Filename
|
Name of the data source.
|
File
|
|
Name
|
Name of the field.
|
Field
|
|
Alias
|
Alias for the field.
|
Alternative Name
|
|
Title
|
Display title for the field, as defined
in the Master File.
|
Column Heading
|
|
Format
|
Field format, for example A4.
|
Data Type
|
|
Description
|
Field description, as defined in the Master
File.
|
N/A
|
|
Segment
|
A segment of fields in the Master File.
|
N/A
|
-
Type your search string. You can use an asterisk (*) as a wildcard.
For example, type c* to find all fields that begin with the letter
"c". The character string is not case sensitive.
-
Click the right arrow
 and
results appear in the field list.
and
results appear in the field list.
x
Procedure: How to Reset the Field List After a Search
-
In the Field selection tab, Headings tab, or Selection criteria
tab in the Report Assistant, click Show - Field list searching.
If you are searching for a field name from the Join options
tab, click the Field list searching
icon.
The
Field list searching dialog box opens.
-
Enter a blank value (space bar) or an asterisk (*) and click
the arrow .
The field list is reset to the default display, which is
to show all fields.