How to: |
You can create subgroup folders that add an additional level of organization to Standard Reports and Reporting Objects. WebFOCUS displays subgroup folders underneath a group folder.
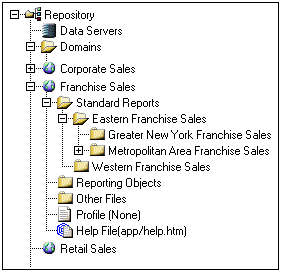
For example, in the following image, the browser view demonstrates that Metropolitan Area Franchise Sales is a subgroup folder under the Eastern Franchise Sales group folder.
Subgroup folders have the same functionality as group folders. Users can select any Standard Report listed under a subgroup folder and perform any function available to them by clicking the appropriate button.
Group folders can contain any number of subgroup folders, although subgroup folders are limited to one sublevel. Subgroup folders are an optional feature. When an Administrator or Developer creates a subgroup folder, Standard Reports can be added directly to the subgroup folder. Administrators and Developers can also continue to add Standard Reports to group folders.
- Expand the domain to which you want to add a Standard Report.
- Select the Standard Reports folder.
-
Right-click and select New Standard Report Group.
The New Standard Report Group dialog box opens.
- In the Name input box, type the name of the group folder.
-
Click OK.
The new group folder opens below the Standard Reports folder.
- Expand the domain that contains the group folder you want to review.
- Expand the Standard Reports folder.
-
Right-click in the group folder and select Properties.
The Standard Report Group Properties window opens and displays the name of the selected group folder.
- If you want, type a new name for the group folder.
- Click OK to save your changes, or click Cancel to discard your changes.
-
Right-click the Standard Reports group
folder and select New Standard Report. Then,
select New folder.
The New Standard Report Group dialog box opens.
- In the Name input box, type a descriptive name for the subgroup folder.
-
Click OK.
The new Standard Report subgroup folder appears under the group folder you selected.
- Expand the domain that contains the Standard Report you want to move or copy.
- Expand the Standard Reports group folder that contains the Standard Report.
-
Right-click the Standard Report and select Cut or Copy to
move or copy the report.
You are prompted to confirm your action. Click OK to continue.
-
Select the target Standard Reports group folder.
Tip: The Standard Reports group folder can be in the same, or a different, domain.
-
Right-click the group folder and select Paste.
One of the following scenarios occur:
- If you are pasting within the same domain and the same folder, then the new file is created with a new internal name and a copy number is appended to the new file tree name, for example, Sales Summary (Copy 1).
- If you are pasting within the same domain, but to a different folder, then the Confirm Create New File dialog box opens notifying you that the internal name of the file you are copying already exists in the destination location.
- If you are pasting to a different domain and the internal name exists in the destination location, then the Confirm File Replace dialog box opens with the option to either copy the source file and create a new internal name, or overwrite the existing file with the content, properties, and name of the source file.
Note: The internal name of a file is assigned by Managed Reporting and is used for references to -INCLUDES, drill-downs, and style sheets. For details on domains and internal names, see Using Domains in Managed Reporting.
- Depending on which dialog box appears, confirm that you want to create a new Standard Report with a new internal name, or that you want to overwrite the existing Standard Report.
- Double-click the Data Servers component.
- Double-click the server you want to use.
- Double-click Applications to expand the list of applications. Select and double-click the application of your choice.
- Right-click a procedure file and select Copy.
- Expand the domain to which you want to add the procedure file.
- Expand the Standard Reports folder and then expand the Standard Reports group folder to which you want to add the procedure file.
- Right-click the group folder and select Paste and WebFOCUS adds the selected procedure file to the Standard Reports group folder.
- Expand the domain that contains the group folder you want to delete.
- Expand the Standard Reports folder.
-
Right-click the group or subgroup folder and select Delete.
You are prompted to confirm the deletion.
-
Click OK to
delete the group folder.
Caution: If you delete a group folder, all subgroup folders and Standard Reports in the group and subgroup folders are also deleted.