Managed Reporting provides an option to import existing FOCUS procedures and application component files into Standard Reports and Other Files folders. These procedures and component files, which can originate from any version of WebFOCUS on any platform, are imported from the Managed Reporting Repository Import directory or a Domain import directory. Therefore, the procedures you want to Import must first be copied into the appropriate import directory.
When you select the import option, WebFOCUS retrieves the files in the Repository or Domain Import directory and displays them in the Import Files dialog box. The list of files in the Select Files to Import pane includes the source directory. Files residing in the repository are listed as import/filename, and files residing in a domain are listed as domain name/import/filename. From this dialog box, you choose the files to be imported and select the properties to assign to the files when they are imported.
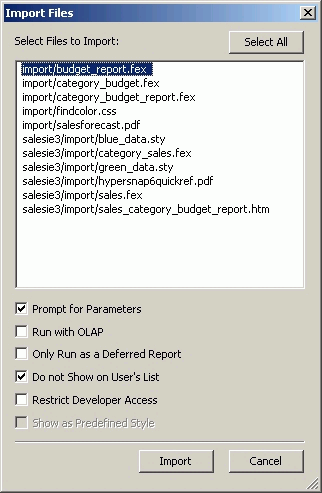
The following image shows the Import Files dialog box with examples of files to import that reside in the repository and a domain.
Important:
Information Builders recommends that the Managed Reporting Repository not be made accessible from a Web server alias or the WebFOCUS Reporting Server path because this introduces security issues with unauthorized access to the Managed Reporting Repository user and report information.
Note: –CRTFORMS is a mainframe command that generates a visual form on the terminal, invokes the FOCUS Interactive Data Entry Language (FIDEL), and clears the screen. For more details, see Designing Screens With FIDEL in the FOCUS for Mainframe Maintaining Databases manual.
This section provides procedures to import files into a Standard Reports folder from the Managed Reporting Repository Import directory or Domain Import directory, and to copy a file from the Windows Desktop to a Standard Reports folder.
To import a file into a Standard Reports folder:
Note: The Repository, the Domain directory, and the Repository Import directory reside in the /install_directory/basedir directory on the Web Server. The Domain Import directory resides in the Domain directory. (The Domain directory name appears as the first eight characters of the domain description if those eight characters are unique among the domain directory names in the repository. If they are not, then WebFOCUS generates a random Domain directory name. To view the directory name assigned to a domain, in Managed Reporting, right-click the Domain and select Properties.)
Note: In Business Intelligence Dashboard, expand the Domain you want to import to, right-click the appropriate Standard Reports group folder and select Import.
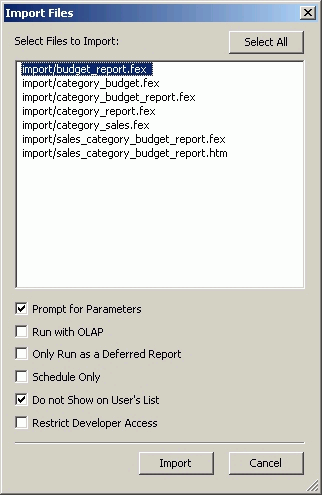
The Import Files dialog box opens, displaying a list of available files to import and the following property options:
These options are not enabled until you make a file selection. The property choices are enabled based on the type of file you select to import.
When you select a file from the list, the properties appropriate to the file selection are enabled, as follows:
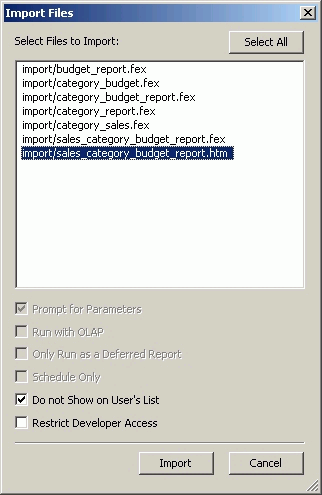
When you select an HTM file, only the Do not show on User’s list (the default selection) and Restrict Developer Access options are available, as shown in the following image.
The Import Files dialog box refreshes and remains open. The Select Files to Import list no longer includes the files that were imported.
The Managed Reporting tree refreshes and displays the imported procedures under the designated Standard Reports group folder.
How to: |
This section provides procedures to import files into an Other Files folder from the Managed Reporting Repository Import directory or Domain Import directory, and to add new HTML and styling files to the Other Files folder.
In addition to WebFOCUS procedure files (FEX) and HTML files, application component files, such as styling files (CSS and STY), image files, and static content files (PDF, Excel, and so on) can be imported into an Other Files folder. For more information on adding StyleSheets (.sty), see Applying Predefined Style Sheets to a Report. For more information on selecting a styling file when developing a report with the web development tools, see Applying Predefined Style Sheets to a Report. For more information on importing images, see Usage Notes for Importing Procedures Into Managed Reporting.
To import files into an Other Files folder:
Note: The Repository, the Domain directory, and the Repository Import directory reside in the /install directory/basedir directory on the Web Server. The Domain Import directory resides in the Domain directory. (The Domain directory name appears as the first eight characters of the domain description if those eight characters are unique among the domain directory names in the repository. If they are not, then WebFOCUS generates a random Domain directory name. To view the directory name assigned to a domain, in Managed Reporting, right-click the Domain and select Properties.)
Note: In Business Intelligence Dashboard, expand the Domain you want to import to, right-click the appropriate Other Files folder and select Import.
The Import Files dialog box opens, displaying a list of available files to import and the following property options:
These options are not enabled until you make a file selection. The property choices are enabled based on the type of file you select to import.
When you select a file from the list, the properties appropriate to the file selection are enabled, as follows:
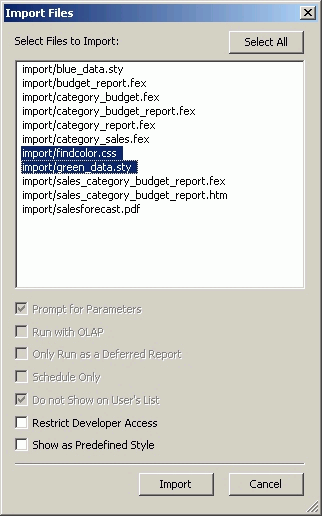
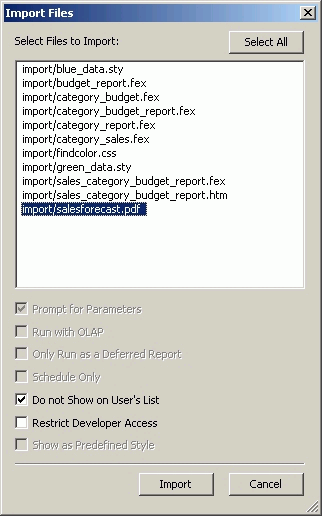
When a static content file, such as a PDF file, is selected, the Do not show on User’s list (default selection) and Restrict Developer Access options are available, as shown in the following image.
The Import Files dialog box refreshes and remains open. The Select Files to Import list no longer includes the files that were imported.
The Managed Reporting tree refreshes and displays the imported procedures under the designated Other Files folder.
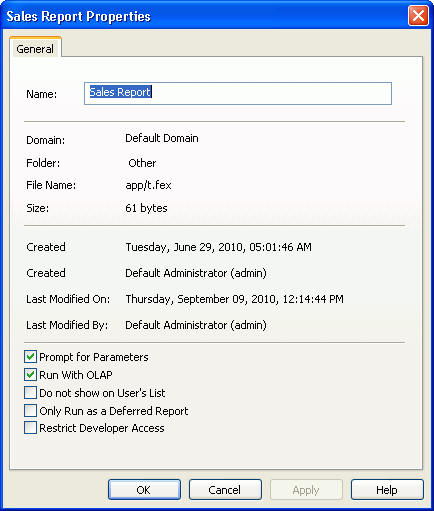
The Properties dialog boxes list the name of the file, the domain and folder it resides under, the file size, the date the report was created, who created it, the last date it was modified and by whom. In addition, several options are available depending on the file type selected and user permissions.
How to: |
Using Developer Studio, Administrators can bring a procedure (FEX) into the Managed Reporting Repository from their local machine to the user Custom Reports folder accessed from the User Management component. This is accomplished through a drag and drop action or a cut or copy and paste action. This feature applies only to Developer Studio.
In addition, the ability to create folders and cut or copy and paste procedures within or across folders within the Custom Reports folder has been added to the User Management component from Developer Studio and Domain Builder Applet and from the Domains Applet.
When a folder within a Custom Reports component or a specific Custom Report is selected, these options are enabled on the right-click menu and on the toolbar.
The Developer Studio Options dialog box opens.
Note: Alternatively, you can drag and drop the procedure from its original location to the Custom Reports folder. Note that when you do this, or when you cut the procedure instead of copy, the procedure is not removed from its original location.
| WebFOCUS |