Creating and Editing Standard Reports
In the browser, you can create Standard Reports using the following
tools and options.
|
Tool
|
Description
|
|---|
|
Power Painter
|
A graphical tool used to create page layouts,
reports, and graphs.
|
|
Report Assistant
|
A graphical tool used to create tabular
reports.
|
|
Graph Assistant
|
A graphical tool used to create graphs.
|
|
Advanced Graph Assistant
|
A graphical tool used to create advanced
graphs.
|
|
InfoAssist
|
InfoAssist is a report generation tool that
enables you to leverage ad hoc functionality to create, modify,
and run report and chart queries.
Note: This tool
is only available from Dashboard and Developer Studio Managed Reporting
Report Objects.
|
|
Alert Wizard
|
A wizard that you use to create ReportCaster
Alerts.
|
|
Editor
|
A text editor that you use to enter WebFOCUS
commands to create a report or graph.
|
|
Import External File(s)
|
An Import Files interface that list the
files you can import to a Standard Reports or Other Files folder.
|
|
URL
|
A URL window in which you can specify the
name and URL of your file. You can also specify to disable Do not
show on User’s List, which will make the report accessible to end
users.
|
When creating Standard Reports from Developer Studio, the tools
available to you are based on whether you are creating a procedure
(FEX) or an HTML file.
Before you begin creating individual reports and graphs, you
must create the Standard Reports group and subgroup folders that
will store the reports and graphs. These group and subgroup folders
appear in a hierarchical, tree-like structure and provide an additional means
of organizing your Standard Reports.
You can right-click a subgroup folder to create a new Standard
Report, or right-click a Standard Report to work with an existing
report or delete a report. In addition, you can:
- Edit Standard
Report source code.
- Run Standard
Reports to verify the report output.
- Create Web
pages for Standard Reports.
- Import procedures,
as described in Importing Procedures and Other Files Into Managed Reporting.
- Distribute
Standard Reports using ReportCaster. For more information, see the ReportCaster Administration manual.
If your Standard Reports require additional files, such as graphic
(.gif or .jpg) files, style sheet files, or additional HTML files,
use the Other Files folder to store these files. For more information,
see Importing Procedures and Other Files Into Managed Reporting.
x
Procedure: How to Create a Standard Report
-
Expand the domain that will contain the Standard Report.
-
Expand the Standard Reports folder.
-
Right-click the group or subgroup folder that will contain
the Standard Report and select New.
-
Select Procedure. The New Standard Report Procedure
dialog box opens.
-
Type the file name, select the file type, and select the tool
you want to use to create the procedure.
-
In the Options area, General tab, choose any of the following
options:
-
Prompt for Parameters. To
select amper auto prompting. (Selected by default.)
-
Run with OLAP. To
OLAP-enable the report.
-
Only Run as a Deferred Report. To
only run the report in deferred mode.
-
Schedule Only. This
option applies only to Standard Reports procedures (FEXs) and can
only be set by Administrators and by Developers when the Restrict
Developer Access option (available in this dialog box) is not enabled. When
this option is set, the Standard Report can only be scheduled using
ReportCaster. The Schedule property is applicable to end users (Analytical
Users and lesser roles) and to Developers when the Restrict Developer
Access is enabled.
-
Do not show on User’s List. To
hide the report in the Standard Reports list, making it inaccessible
to the end user. (Selected by default.)
-
Restrict Developer Access. This
option is only available (and visible) to Administrators. This option
restricts the Developer role to the capabilities of an end user
role (Analytical Users and lesser roles) and allows only Administrators
to manage FEX or HTML files (such as edit, delete, cut, copy, paste)
and set property options.
-
To change the server or application path, select the Data Server
tab.
Select the Server option and then
select the server you want from the drop-down list.
Select
the Application Path option. Select the application path(s)
in the Available list and move it to the Selected list by double-clicking
it or using the arrow located between the lists.
Note: You must have the Data
Server privilege to alter the Server and Application Path.
-
Click Create.
-
The tool you selected opens and you can create your Standard
Report. For details on using the:
- Developer
Studio tools, see the Developer Studio online documentation.
- Power Painter,
see the Creating Compound Reports With Power Painter manual.
- Report Assistant,
see the Creating Reports With Report Assistant manual.
- Graph Assistant,
see the Creating Charts With Graph Tools manual.
- Advanced Graph
Assistant, see the Creating Charts With Graph Tools manual.
- InfoAssist,
see the InfoAssist User’s Manual.
- Alert Wizard,
see the WebFOCUS Managed Reporting Administrator's Manual.
- Editor, see Creating Standard Reports.
Note:
- In the browser,
after you enter your WebFOCUS commands you can either save or run
the report. If you run before saving, the report is run against
the domain default settings. Click Save from
the editor to set a server and application. You can then run your
report against the server and application you just selected.
- Syntax and
error checking are not performed until the report or graph is executed.
x
Procedure: How to Delete a Standard Report
-
Expand the domain that contains the Standard Report you want
to delete.
-
Expand the Standard Reports folder and
then expand the Standard Reports group folder that contains the
Standard Report.
-
Right-click the Standard Report you want to delete and select Delete.
You are prompted to confirm your action.
-
Click OK to delete the Standard Report.
WebFOCUS deletes the Standard Report from the Standard
Reports group folder.
x
Procedure: How to Edit Standard Report Source Code
-
Expand the domain that contains the Standard Report you want
to edit.
-
Expand the Standard Reports folder and
then expand the Standard Reports group folder that contains the
Standard Report.
-
Right-click a Standard Report in the Standard Reports group
folder and select Edit as Text.
The text editor window opens.
-
Make your changes to the Standard Report file.
For details about WebFOCUS reporting commands and syntax,
see the Creating Reports With WebFOCUS Language manual.
Note: Syntax
and error checking are not performed until the Standard Report is
executed.
-
Save the changed Standard Report file,
and close the text editor window.
Note: If
you edit a Standard Report source code and make changes to the Standard
Report, you should not subsequently open the Standard Report with
a reporting tool. If you need to make additional changes to the
Standard Report, reopen the file in the text editor.
xCreating Standard Reports
Standard Reports, Other Files, Help Files, and Profiles
are created, edited, and run the same way. Once you run a report,
the results display in the browser window. The following procedures
demonstrate these tasks using a Standard Report as an example.
For more information about using the WebFOCUS language, see the Creating Reports With WebFOCUS Language manual.
x
Procedure: How to Create a Standard Report Using the Text Editor
You
can create a Standard Report with the Text Editor. The following
procedure uses the example of creating a Standard Report from Dashboard.
-
In the Dashboard Domain Tree, expand the Standard Reports folder
and right-click the subfolder. Select Editor from the drop-down
menu, as shown in the following image.

-
Enter code in the Text Editor window.
Note: Specify your data source in the code itself.
For example,
TABLE FILE CENTCOMP
-
From the File menu, select Save or Save
As to save your report.
In Dashboard, the Save As dialog
box opens, as shown in the following image.

-
Enter a report name and select the
server and an application path for your report.
Note: In Dashboard, you can select multiple application
paths. To move a path between the Available list and the Selected
list, double-click the item or use the arrows located between the
lists.
-
You can also choose one or more of the following options:
-
Prompt for Parameters. To
select amper auto-prompting.
-
Run with OLAP. To
OLAP-enable the report.
-
Only Run as a Deferred Report. To
only run the report in deferred mode.
-
Schedule Only. This
option applies only to Standard Reports procedures (FEXs) and can
only be set by Administrators and by Developers when the Restrict
Developer Access option (available in this dialog box) is not enabled. When
this option is set, the Standard Report can only be scheduled using ReportCaster.
The Schedule property is applicable to end users (Analytical Users and
lesser roles) and to Developers when the Restrict Developer Access
is enabled.
-
Do not show on User's list. To
hide the report in the Standard Reports list, making it inaccessible
to the end user.
-
Restrict Developer Access. This
option is only available (and visible) to Administrators. This option
restricts the Developer role to the capabilities of an end user
role (Analytical Users and lesser roles) and allows only Administrators
to manage FEX or HTML files (such as edit, delete, cut, copy, paste)
and set property options.
-
To save your report option settings, click Save in
Dashboard or click OK in the Managed Reporting
Applet Interface.
-
Click Run in the File menu to view your
report.
-
Click Exit to exit the Editor.
x
Procedure: How to Edit and Run a Standard Report Using the Text Editor
-
Right-click
the report you want to edit and then click Edit Source.
Note: If you click Open, the file will open in the
tool that was used to create the file. If you want to edit the source
code for a procedure written with one of the tools, you must click
Edit Source.
-
Make your edits and click Save from
the File menu to save your report.
-
Click Run from the File menu.
xViewing Standard Report Properties
You can use the Standard Report Properties dialog box
to review the date the report was created and the file name for
the report. You can use the Properties dialog box to change a server
and an application. You can also use the Standard Report Properties dialog
box to:
- Change the
name of the Standard Report.
- Prompt for
Parameters.
- Run with
OLAP.
- Only Run
as a Deferred Report.
- Schedule
Only.
- Do not show
on User's list.
- Restrict
Developer Access.
Note: The Schedule Only and Restrict Developer Access
options are not available from the Managed Reporting (Applet) Interface.
x
Procedure: How to View and Update Standard Report Properties
-
Expand the domain that contains the Standard Report you want
to review.
-
Expand the Standard Reports folder and
then expand the Standard Reports group folder that contains the
Standard Report.
-
Right-click the Standard Report you want to review, and select Properties.
The Standard Report Properties dialog box opens, as shown in the
following image.
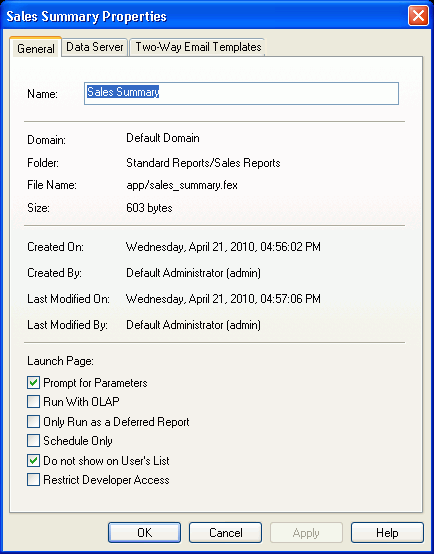
This
dialog box lists the following Standard Report properties in the
General tab: Name, Domain, Folder, File Name, Size, Created On date,
Created By name and User ID, Last Modified On date, Last Modified
By name and User ID, and selected Launch Page options. Note that
if you see the text Not Available next to
a field in the dialog, the report was created prior to Version 7
Release 6, before the properties information was available for that
field. Also, the Created By and Last Modified By properties are
not displayed in either the Managed Reporting Domain Builder or
the Domains applet.
Note: When updating files in Developer
Studio, unless all components are on a local machine, the Properties
dialog is only automatically refreshed when files are created or
deleted. For more information about Developer Studio refresh behavior, see Setting Preferences in the Developer
Studio Application Development Getting Started manual.
-
You can update the General properties.
To:
- Change the Standard Report name, in
the Name input box, type a new name.
- Select amper auto-prompting, check the Prompt
for Parameters check box.
- OLAP-enable the report, check the Run
with OLAP check box.
- Only run the
report in deferred mode, check the Only run as Deferred
Report check box.
- Only schedule
the report (using ReportCaster), check the Schedule Only check
box.
This option is only available to Administrators and Developers
when the Restrict Developer Access option (available in this dialog
box) is not enabled. The Schedule property is applicable to end
users (Analytical Users and lesser roles) and to Developers when
the Restrict Developer Access is enabled.
- Display as a Standard Report in the
user environment, uncheck the Do not show on User's List check
box.
- Restrict the
Developer role to the capabilities of an end user role (Analytical Users
and lesser roles), check the Restrict Developer Access check
box.
This option is only available (and visible) to Administrators.
By restricting the Developer role to that of an end user means that
only the Administrator can manage FEX or HTML files (such as edit,
delete, cut, copy, paste) and set property options.
-
To change the domain server and application path settings,
click the Data Server tab.
Select a server, check the Server check
box, and select a server from the drop-down list.
Select
an application, check the Application Path check box.
Select the application path(s) in the Available list and move it
to the Selected list by double-clicking it or using the arrow located
between the lists.
-
In Developer Studio, to create a new Two-Way template, click
the Two-Way Email Templates tab, then click New.
The Two-Way Email Templates tab is only available in Developer
Studio. You can create Two-Way Email templates from Developer Studio
or from the browser. An example of a Two-Way Email template appears
below in the Two-Way Email Templates tab.
The
following image shows the Two-Way Properties dialog box which has
four tabs. The Two-Way Email Templates tab window appears containing
the name, location (Href), and date of an attached template. Four
buttons are located on the right, New, Open, Delete, and Resend.

The
following image shows a New Two-Way Email Template dialog box that
has Two-Way: TW 2 as the template name.

For
more information about creating Two-Way Email templates, see the WebFOCUS Managed Reporting Administrator's Manual.
-
Click OK to save your changes to the
report properties or click Cancel to discard
your changes.
x
Procedure: How to View Standard Report Properties for an Alert
To view
standard report properties for an alert:
-
Expand the Standard Reports folder that
contains the Alert you want to review.
-
Right-click the Alert and select Properties.
The Alert Properties dialog box opens.
The following image shows the Alert Properties dialog box
in Developer Studio, which shows the alert name, path to the alert,
and date it was created, the domain server and application path,
and the Prompt for Parameters and Do not show on User's List property
options.
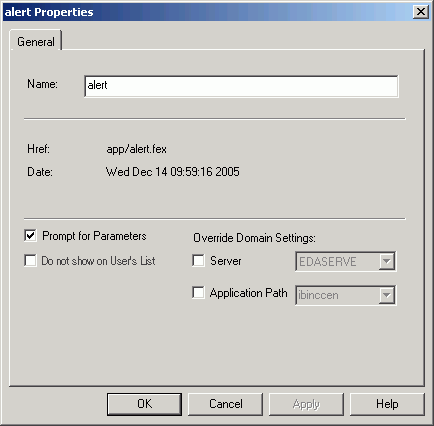
The following image
shows the Alert Properties dialog box in the Managed Reporting (applet)
Interface, which shows the same alert properties, as shown from Developers
Studio.

Note: For
more information on Standard Report Properties, see How to View Standard Report Group Properties.
x
Procedure: How to View Standard Report Properties for a URL
To view standard report properties
for a URL:
-
Expand the Standard Reports folder that
contains the URL you want to review.
-
Right-click the URL and select Properties.
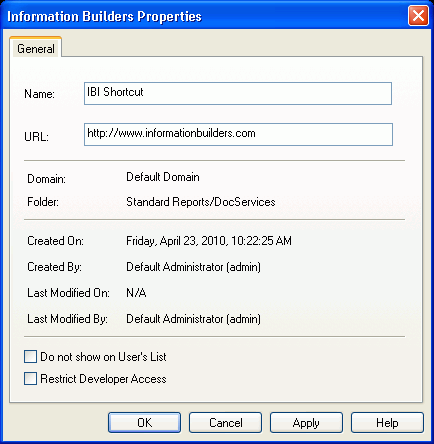
The URL Properties dialog box opens.
The following image shows the URL
Properties dialog box in Developer Studio, which contains the URL
name, the domain and folder it resides in, the date and time it
was created and modified, and the property options, Do not show
in User’s List and Restrict Developer Access (which is only available
to MR Administrators).
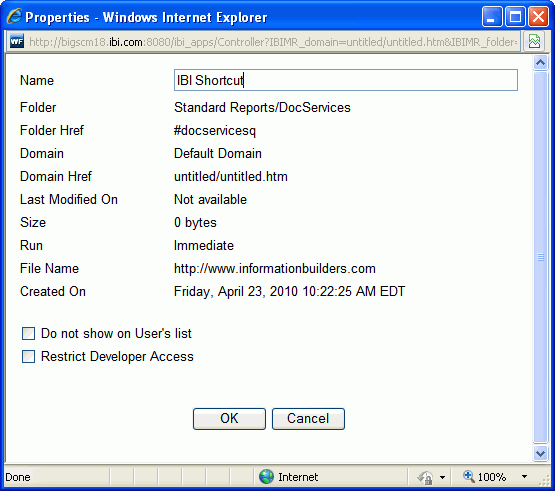
The following image shows the URL Properties
dialog box in Dashboard.
Note: For
more information on Standard Report Properties, see How to View Standard Report Group Properties.
x
Procedure: How to Run a Standard Report
-
Expand the domain that contains the
Standard Report you want to run.
-
Expand the Standard Reports folder
and then expand the Standard Reports group folder that contains
the Standard Report.
-
Right-click the Standard Report you want to run, and select Run.
-
After you review the report output, use the browser functions
to save the output to an HTML file or to discard the output and
close the browser window.