From the Add Block window, you can create content blocks that the public or group
users see when opening Dashboard.
The following are the types of content
blocks you can create:
-
Launch blocks. Can contain only
one item. When Dashboard opens, the item automatically launches.
A
launch block that is created to display a report in EXL2K, EXCEL,
or DOC formats should use scroll bars instead of scroll buttons.
-
List blocks. Can
contain many items from one or more domains. The items can be from
any folder in any domain to which a user has access. Users can run a
report or access an Internet resource by clicking a hyperlink from
the list.
-
Folder blocks. Lists the entire
contents of a folder (including its subfolders) that have been created
in Managed Reporting. Only one folder can be added to a folder block.
When the contents of a Managed Reporting folder are modified outside of
Dashboard, the folder block in Dashboard automatically updates to
reflect any changes. You can add folders from the Standard Reports,
My Reports, and Shared Reports folders. For a public view, you can only add folders
from the Standard Reports folder.
By default, all subfolders in a folder block
are expanded and cannot be collapsed. Optionally, all subfolders
can be displayed as a collapsible tree and expanded as needed. This
functionality can be set globally for all views by editing a variable
setting in the bid-config.xml file or set for specific views using
the Dashboard View Builder. For details, see How to Display a Collapsible Tree in the Folder Blocks of All Views or How to Display a Collapsible Tree in the Folder Blocks of Specific Views.
-
Output blocks. May or may not
contain default content. Reports, graphs, or Web pages can be displayed
in output blocks. When a report is run or an Internet resource is
accessed, the report output or Web page appears in the output block.
This is useful because a new browser window does not open each time
a report or graph is executed, or a Web page is launched from a
Domain Tree, Role Tree, List, or Folder block. Instead, the output
block refreshes with the new content.
When you create an output
block, scrolling options are not available. Scroll bars appear when
necessary.
-
Tree blocks. Provides
a way to add a Domain Tree to a Public View or Group View page.
The Domain Tree is displayed without the sidebar frame.
-
Favorites blocks. Lists
the reports, graphs, hyperlinks, and any other item type (except
reporting objects) that you want to quickly and easily access.
-
Watch list blocks. Adds
the Report Library Watch List interface to a page. The watch list
block type is available only when the Library tab is selected from
the Add Block page.
Note: Some Web sites bring their page to the top of a
frameset when launched and take over the browser session. When these
sites are opened in a launch or output block, Dashboard content
is lost. It is recommended that these types of Web sites not be
selected for a launch or output block.
When you add items to a content block, you can use the Domain
Search from the Add Block and Edit Block windows. For details, see How to Add Items to a Content Block Using Domain Search.
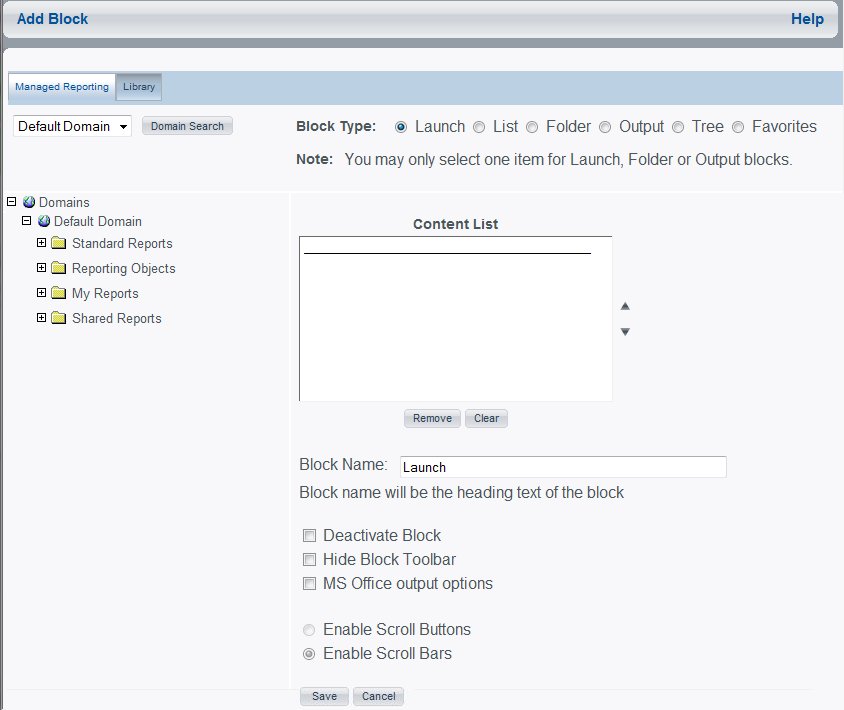
Across the top of the Add Block window is a drop-down menu for
selecting a domain, a Domain Search button, and block type option
buttons to select either a Launch, List, Folder, Output, Tree, or
Favorites block. At the left side of the window is a tree view of
the selected domain. The right side of the window contains the Content
List showing selected items with up and down arrows to the right,
and Remove and Clear buttons at the bottom.
Below the Content List is a text box
for entering the Block Name, and a series of check boxes that are
available to enable the following functionality:
- Deactivate Block
- Lock Block (available to administrators
only)
- Hide Block Toolbar
- MS Office output
options
- Automatic Block
Refresh (available to administrators only)
There are also option buttons to enable
Scroll Buttons or Scroll Bars, and Save and Cancel buttons. The
following image shows the Add Block window.
x
Procedure: How to Add a Content Block
-
From
the Content window, select the content page in which to add content.
If you need to add content pages, see How to Create Content Pages.
-
Click Add
Block.
The Add Block window opens.
-
Select
the desired Block Type option.
-
Select a domain from the drop-down
list. You can also add items to a content block using Domain Search.
See How to Add Items to a Content Block Using Domain Search.
Note: If you are creating an Output block, adding
domain items is optional because Output blocks do not require default
output.
-
Click Submit to
retrieve the contents of the selected domain.
-
Expand the domain folders you want
to select items from by clicking the plus sign (+) located next
to the folder icon.
Note: Only one report in EXL2K PIVOT format can
be active at a time. Therefore, it is not recommended to place output
of this format type into a content block. Subsequent attempts to
execute a report in this format will fail, since the original report
will still be active.
-
Select
the items in the domain folders to populate the Content List.
If you are creating a List block you can position the items
using the arrows next to the Content List.
-
Accept
the default block name or change the name in the Block Name text
box.
Note:
- If you name
your content block before you select content, the block name may
be overwritten with the name of the Domain item you select. You
can change the name after selecting content.
- If you create
an empty launch, list, or folder block and enter a block name, when
you click Save, the name is overwritten with Empty Block. This occurs
only with launch, list, and folder blocks. Output blocks retain
the name you enter.
-
Select
the Enable Scroll Buttons or Enable
Scroll Bar option button.
-
Click Save when
you have finished selecting the content for your block.
x
Procedure: How to Add Items to a Content Block Using Domain Search
-
From
the Add Block or Edit Block window, click Domain Search.
-
Enter
the criteria for your search and then click Search.
-
From
the results on the right side of the window, click an item to add
it to your content block.
View your content block to verify the items you have added.
x
Procedure: How to Display a Collapsible Tree in the Folder Blocks of All Views
-
Open the bid-config.xml file in a text
editor. For example:
C:\ibi\WebFOCUS77\worp\conf\bid-config.xml
-
Edit the following variable to change
it from:
<internal-var name="showFolderBlockAsCollapsibleTree" value="false"/>
to
<internal-var name="showFolderBlockAsCollapsibleTree" value="true"/>
Note: After
making changes to the bid-config.xml file, use the WebFOCUS Console
to clear memory cache, or restart the application. Until this is
done, the change is not effective.
x
Procedure: How to Display a Collapsible Tree in the Folder Blocks of Specific Views
-
Log
on to the Dashboard View Builder.
-
Select
a view.
-
Click Edit
Settings.
-
Click
the True option to the right of showFolderBlockAsCollapsibleTree
in the Settings pane.
-
Click Save
Settings.
-
Click Close.
For more information about
using the Edit Settings functionality in the Dashboard View Builder,
see Customizing Dashboard Pages for a Public or Group View.
xCreating a Locked Content Block
You can create a content block for a Public View that
cannot be edited or deleted by a user after they create their personal
view from the Public View.
In a personal view, the Edit option is not available for locked
content blocks. In addition, the option to delete or edit locked
blocks from the Content window is not available. A Dashboard user
cannot remove a page containing a locked block.
The locked block is designated with a lock icon in the View Builder,
Personalize option page, and Manage Users area of Dashboard. Users
receive an error message if they attempt to remove a content page
that contains a locked block.
The Lock Block check box is also available in the Manage Users
area of the View Builder.
x
Procedure: How to Create a Locked Content Block
-
From
the Public Views or the Manage Users window, select the Public View
you want to add content to and click Edit Content.
-
From
the Content window, select the content page in which to add content.
-
Click Add
Block.
The Add Block window opens.
-
Select
the block type and contents.
-
Click
the Lock Block check box.
-
Click Save.
xAdding Report Library Content to a Content Block
Dashboard administrators and authenticated users can
place Report Library content in a content block using the View Builder
or Personalize option. You can add Report Library content to a launch,
list, output, or watch list block. The latest available version
of the report always appears in the content block.
A tree of Library reports is available for selection when creating
content blocks. The tree consists of the top level domain or category.
Below the domain or category is the report. In the case of a bursted
report, an intermediate level also appears.
The Report Library has two sets of reports. Dashboard can access
both, the domain for Managed Reporting users and the category for
non-Managed Reporting users.
Note:
- If you are adding Report Library content
from the Manage Users or Group Views areas in the View Builder,
you also need to be a ReportCaster administrator.
- To view Report
Library content, you must have Report Library access.
x
From the Content window, you can remove a content block.
Note that you can remove more than one content block at a time.
x
Procedure: How to Remove a Content Block
-
From
the Content window, select the content page where the content block
is located.
-
Select
the check box next to each of the block(s) you want to remove.
-
Click Remove.
An alert window appears to confirm the removal.
-
Click OK.