Designing Gadgets

In this section:

Reference:

Gadgets are mini-graphs and data grids that display multiple metrics and can be placed together to create complex dashboard pages. Each gadget is designed to perform a specific type of business analysis, such as zoom or compare analysis. You can configure a gadget to display specific data for specific users, and PMF stores user preferences and applies them to each page. Users can select and save various parameters, determined by the gadget author, to personalize the gadgets on their pages at runtime.

To utilize gadgets in your PMF dashboard pages, you can select from the gadgets already available in PMF or create your own gadgets. When you create a new gadget, you also have to create a gadget. Overviews of all aspects of gadget design and implementation are provided in the sections that follow. For information about the forms used to design gadgets in PMF, see Manage Tab - Dashboards.

Designing a Gadget Procedure

To design a new gadget, you must first create a gadget procedure, which is usually a WebFOCUS reporting or graph procedure that reports on data from the PMF data mart (gadgets can also be designed to extract and report on data from other sources). All gadget procedures must have a name that begins with a gadget_ prefix.

When using a new or existing WebFOCUS report or graph procedure for a gadget, you can utilize standard WebFOCUS parameter names. There are three types of parameters gadgets can process: display fields, groupings, and filters.

Reference: Gadget Display Fields

Display fields, similar to PRINT or SUM fields in a WebFOCUS request, determine the data fields displayed in the gadget using parameters that indicate whether to display or hide these fields, or to use these fields as data feeds for a graph.

Each display field has the following three possible settings:

  • Not used. The field is not available to be displayed in the gadget.
  • Optional. The field, or the result of the field, can be displayed in the gadget if the user chooses to display it.
  • Required. The field, or the result of the field, must be displayed in the gadget.

The display fields you can choose to include in a gadget are listed and described in the following table:

Display Field

What it Displays

Actual

Actual measure value (raw data).

Target

Target measure value (raw data).

Pct_Reached

Percent reached for actual/target measures.

Pct_Used

Cumulative percent spent for project budget measures.

or

Cumulative percent completed for project schedule measures.

Indicator

Dashboard symbol that indicates the status of a measure, objective, or perspective. For:

  • Measures. Shows the Pct_Reached to be within or outside set tolerances.
  • Objectives. Shows the cumulative, weighted Pct_Reached for all linked measures to be within or outside set tolerances.
  • Perspectives. Shows the cumulative, weighted Pct_Reached for all linked measures and objectives to be within or outside set tolerances.

Indicator + Actual

Combines the actual value with the indicator.

Indicator + Target

Combines the target value with the indicator.

Indicator + Pct_Reached

Combines the percent reached value with the indicator.

Indicator + Pct_Used

Combines the actual measure value with the indicator.

Indicator + Actual + Pct_Reached

Combines the actual and percent reached values with the indicator.

Indicator + Target + Pct_Reached

Combines the target and percent reached values with the indicator.

High-Mid-Low: raw count totals

Shows a raw count of the total number of measures in High (Green), Mid (Yellow), and Low (Red) status for the selected grouping and filtering.

High-Mid-Low: percentages of totals

Shows a percentage of the total number of measures in High (Green), Mid (Yellow), and Low (Red) status for the selected grouping and filtering.

Reference: Gadget Grouping

Grouping involves both sorting and aggregating data values. Selected detail values are sorted using the classifications built into the group, then aggregated at the level implied by the sort.

Many sort groupings are affected by other groupings selected above them. For example, if you select to group by perspective first, and then by objective, the resulting gadget shows measure level details, the measure results are grouped first by perspective and then by objectives within each perspective, and the aggregations occur at the objective level. For each gadget, you can select up to three groupings.

Each grouping has the following two possible settings:

  • Optional. The gadget can use the grouping, and the gadget instance can include a default value for the grouping.
  • Required. The gadget must use the grouping, and a value must be specified for the grouping. Note that the default setting from the gadget instance is used, and users can optionally change the default.

The groupings you can choose to include in a gadget are listed and described in the following table:

Grouping Method

What it Does

Perspectives

Sorts results alphabetically by perspective name and aggregates field values at that level.

Objectives

Sorts results alphabetically by objective name and aggregates field values at that level.

Measures

Sorts results alphabetically by measure name and aggregates field values at that level.

User Specified Dimension

Sorts results alphabetically by level values within the dimension specified by the user and aggregates field values at that level.

User specified dimension drill downs are continuous by level, using a second drill-down on an individual value within a dimension to show data at the next dimension level.

Time

Sorts results alphabetically by level values within the time dimension and aggregates field values at that level.

Time dimension drill downs are continuous by level, using a second drill-down on an individual value within a time dimension to show data at the next time level, down to the lowest level.

Reference: Gadget Filtering

Gadget filters limit the displayed results to the values a user selects. For example, if a user specified the financial perspective as a filter, the results displayed would be limited to only the details linked to the financial perspective. For each gadget, you can specify up to five different filtering methods.

Each filter has the following two possible settings:

  • Optional. The gadget can use the filter, and the gadget instance can include a default value for the filter.
  • Required. The gadget must use the filter, and a value must be specified for the filter. Note that the default setting from the gadget instance is used, and users can optionally change the default.

The filters you can choose to include in a gadget are listed and described in the following table:

Filter

Limits the Output to ...

Scorecard

The default scorecard for the gadget. Enables users to select a default scorecard to display in the gadget. If not selected, the default selection is the default scorecard of the user.

Perspective

The default perspective for the gadget. Enables users to select a default perspective to display in the gadget. If not selected, the default selection is the PMF default perspective.

Note: Requires selection of the Scorecard filter.

Objective

The default objective for the gadget. Enables users to select a default objective to display in the gadget.

Note: Requires selection of the Scorecard filter.

Measure Series

The default measure series for the gadget. Enables users to select a default measure series to display in the gadget.

User Specified Dimension

The default level value for the gadget, for a selected dimension. Enables users to select a default dimension to display in the gadget.

Time

The default point in the time dimension for the gadget. Enables users to select a default time dimension value to display in the gadget.

Red and Yellow Indicators only

Only retrieve and display measure values, objectives, or perspectives, where the result is a very low or moderately low (red or yellow) condition. This filter blocks out any measure values with a high (green) condition.

Red indicators only

Only retrieve and display measure values, objectives, or perspectives, where the result is a very low (red) condition. This filter blocks out any measure values with a high (green) or moderately low (yellow) condition.

Creating a Gadget

How to:

For PMF to call a procedure and store parameters locally for a gadget, you must first create a gadget. The gadget enables PMF to manage the gadget. A gadget defines the input parameters for the gadget and controls how the parameters are saved for each user. The class also controls the parameters that each instance of the gadget can store and recall.

Procedure: How to Create a Gadget

Before creating a gadget, add all new gadget procedures to the WebFOCUS pmfgadgets application folder.

  1. In the Manage page in PMF, click the Gadgets panel button.
  2. Click New Gadget.

    PMF displays the New Gadget Designer panel. The following image shows the panel, with sample values in the fields.

    New Gadget Designer panel
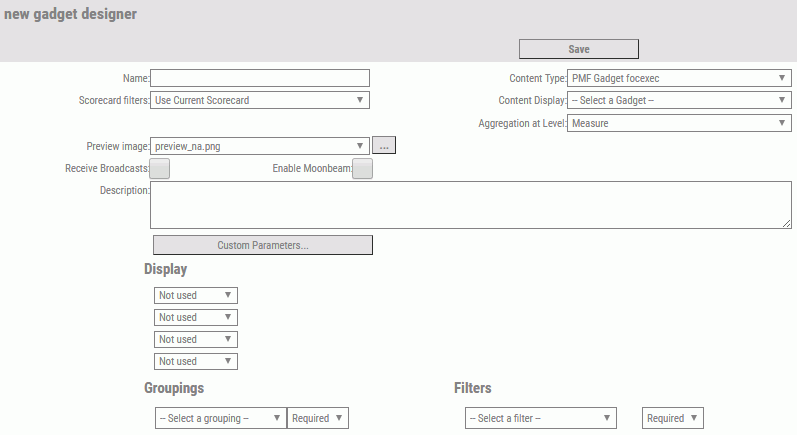
  3. In the Name field, enter a descriptive name for the new gadget.
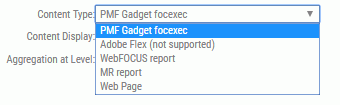
  4. From the Content Type drop-down menu, click the option that applies to the gadget. For details on the choices, see Adding Various Content Types as Gadgets.
  5. From the Content Display drop-down menu, click the option that applies to the gadget.

    For example, if the Content Type is PMF gadget focexec, the Content Display drop-down menu contains the names of all FOCEXECs that begin with gadget_ and are in the WebFOCUS pmfgadgets application folder.

  6. From the Scorecard filters drop-down menu, click one of the following options.
    • Use Current Scorecard, to apply the scorecard that is currently associated with this gadget.
    • Scorecard not used, to suppress the use of any scorecard with this gadget.
  7. From the Preview image drop-down menu, click the name of the .png file that supplies the preview image for the gadget.

    The preview image appears on the Catalog chevron in Dashboard Designer. If you do not supply a preview image of your own, you can use the default preview image, preview_na.png.

  8. Select the Receive Broadcasts or Enable Moonbeam check boxes to enable these features for the new gadget.
  9. In the Description field, optionally type a brief description of the gadget.
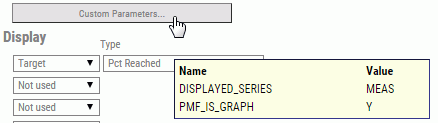
  10. From the available Display, Groupings, and Filters fields, select the applicable options for the new gadget.
  11. Click Save when you have finished creating the gadget.

    PMF displays a message saying the new gadget has been added. The Gadget Definitions navigation tree on the left is refreshed to display the new gadget.

Creating Gadgets With WebFOCUS InfoAssist

WebFOCUS InfoAssist can be used to develop new operational gadgets that display information from your operational data sources. A new property defines your custom-developed content as a PMF gadget, and allows you to optionally prompt to filter your content using PMF dimensions. For more information on how to use this, see the WebFOCUS InfoAssist User’s Manual.

Note: InfoAssist integration for setting up parameter receipt requires WebFOCUS 7.7.01 or higher. If you have an earlier version of WebFOCUS, you can still handle parameters in the report code. For more information, see Mapping Parameters to an Operational Report.

Adding Various Content Types as Gadgets

PMF allows you to directly drag content from the WebFOCUS Repository on to any Dashboard you create or edit.

The PMF Dashboard capability allows you to directly add several types of content as gadgets. These types include:

When creating a gadget, or editing a gadget, you can select the content type from a drop-down menu on the New Gadget Designer panel or the Edit Gadget Designer panel, as shown in the following image.

Content Type drop-down menu

Content Type

Description

PMF Gadget focexec

Default. Allows you to select from any FOCEXEC in your environment with gadget_ as the starting characters in the name. Typically, these are PMF gadgets. Since most of the shipped FOCEXEC gadgets are already registered in PMF, you would typically need to use this option only if you have created a custom gadget and want to register it with the system.

Adobe Flex control

This content type is no longer supported.

WebFOCUS report

Allows you to select from any FOCEXEC in your environment. Typically, you would select this option to gadgetize any existing WebFOCUS report. This allows you to pass standard PMF parameters to the report. For more information on how to receive and use those parameters, see Mapping Parameters to an Operational Report.

MR report

Allows you to integrate Managed Reporting content into PMF. Typically, you would select this option to gadgetize an existing WebFOCUS Managed Reporting report. This capability allows you to pass standard PMF parameters to the report. For more information on how to receive and use those parameters, see Mapping Parameters to an Operational Report.

Note: This content type is deprecated.

Web Page

Allows you to specify any external web application that you want to include as a gadget. You can type the entire URL for the application, including any parameters, in the URL field.

Once you have specified the type of gadget that you are registering, you can configure the passing of parameters, as appropriate to the gadget, as detailed in Designing Gadgets.

Custom Parameters for Gadgets

How to:

WebFOCUS parameters can be passed to your Gadgets, allowing you to configure components for inclusion from any external system without needing to code a procedure. This essentially causes PMF to pass the WebFOCUS amper variables to any Gadget, every time that Gadget is added to a Dashboard.

Procedure: How to Set Up a Custom Parameter for a Gadget

  1. In the Manage page, click the Gadgets panel button.
  2. Expand the Gadget Definitions folder.
  3. To set the custom parameters, choose the Gadget from the list.

    The Edit Gadget Designer panel opens.

  4. Click the Custom Parameters button.

    The Custom Parameter panel opens, as shown in the following image.

    Customer Parameters
  5. Enter a parameter name in the Name column, and its value in the Value column. Each time you add a new entry, the panel adds another row for another entry. You can enter as many parameters as you need.
  6. Click OK to save the parameters.

Tip: To see the parameters that have been set for a Gadget, hover over the Custom Parameters button, as shown in the following image.

Custom Parameters

Turning a WebFOCUS Report Into a Gadget

How to:

You can turn any WebFOCUS report into a gadget. Once you do that, you can place the content of the report on a dashboard that you design.

You can also configure metric and dimensional parameters (preferences) in order to pass them from a PMF dashboard to a WebFOCUS report. You can then use those parameters in sorting, filtering, and other content display activities. When you turn a WebFOCUS report into a gadget, you must identify which parameters need to be passed from the dashboard to the report.

You must also make sure that the report can detect, receive, and process those parameters. For more information on how to modify a report to handle parameters, see Mapping Parameters to an Operational Report.

Procedure: How to Turn a WebFOCUS Report Into a Gadget

  1. In the Manage page in PMF, click the Gadgets panel button.
  2. Click New Gadget.

    The New Gadget Designer panel opens.

  3. In the Name field, type a name for your new gadget.

    Tip: You might want to use the default title of the WebFOCUS report.

  4. From the Content Type drop-down menu, click WebFOCUS report.
  5. From the Content Display drop-down menu, click the name of the WebFOCUS report (the FOCEXEC) that you want to turn into a gadget.
  6. From the Groupings and Filters drop-down menus, supply values for the parameters that you would like PMF to pass to the WebFOCUS report.
  7. Click Save to save the WebFOCUS report as a gadget.

Once you have created a gadget from a WebFOCUS report, you can drop the gadget onto any dashboard. From the dashboard, you can set default preferences for the new gadget for use in the selection and display of data.

The new gadget can also participate in Broadcast, as any other gadget can. For an example that shows how to create a gadget from a WebFOCUS report and work with it on a dashboard, see the following example.

Example: Turning the WebFOCUS Outages Report Into a Gadget

This example uses a WebFOCUS report named process_orders_outages. The report requires one parameter, a value for the Location dimension.

The report is supplied with your product software.

This example has four parts.

Create the Gadget

  1. In the Manage page, click the Gadgets panel button.
  2. Click New Gadget.

    The New Gadget Designer panel opens.

  3. In the Name field, type Outages in Ordering Process.

    Outages in Ordering Process is the default title of the WebFOCUS report.

  4. From the Content Type drop-down menu, click WebFOCUS report.
  5. From the Content Display drop-down menu, click process_orders_outages. That is the name of the WebFOCUS report (the FOCEXEC) that you want to turn into a gadget.
  6. From the Filters drop-down menu, select User Specified Dimension. Keep the associated default value, Required, for this filter.
  7. Click Save to save the WebFOCUS report as a gadget.

Add the Gadget to a Dashboard and Set Preferences

In this procedure, you will add the new gadget to a dashboard and set preferences for it. To implement Broadcast using the new gadget, you will enable the listening filter.

  1. In the Today page in PMF, click the dashboard icon Dashboard icon.
  2. Click the Add Dashboard icon Add Dashboard icon or the Edit Dashboard icon Edit Dashboard icon.

    The Dashboard Designer opens.

  3. Click the title bar. In the Rename Dashboard panel, type WebFOCUS Outages as the name of the new dashboard.
  4. In the Gadgets list, use the scroll bar to locate your new gadget, Outages in Ordering Process.

    Tip: In the Catalog, a default preview is used if you do not provide a preview of your own. For instructions on providing your own preview, see the Performance Management Framework Developer Guide.

  5. Drag and drop the Outages in Ordering Process gadget to the desired position on the design canvas.
  6. Hover over the gadget and click the Gadget Preferences icon Gadget Preferences icon in the title bar to confirm the default preferences for the gadget.
  7. In the Filters list, confirm that Location is selected (highlighted).
  8. Confirm that EAST is selected (highlighted).
  9. Click the Save Dashboard icon Save Dashboard icon.

Configure the Gadget for Broadcast

Broadcast is always on and the gadgets placed on your dashboard will automatically listen to any filters that are set. To disable Broadcast for a specific gadget, click the Listens to filters icon on the gadget toolbar. This will change the filter status to Ignore and that gadget will not receive any broadcast information.

Preview the Live Dashboard

The PMF Today page is responsive and will instantly propagate any changes made to your dashboard.


WebFOCUS