In this section: |
The Project Properties dialog box enables you to view or modify the set of properties defined for a Transform project, such as project creation date and custom functions.
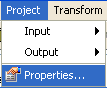
To access the Project Properties dialog box, select the Properties option from the Project menu.
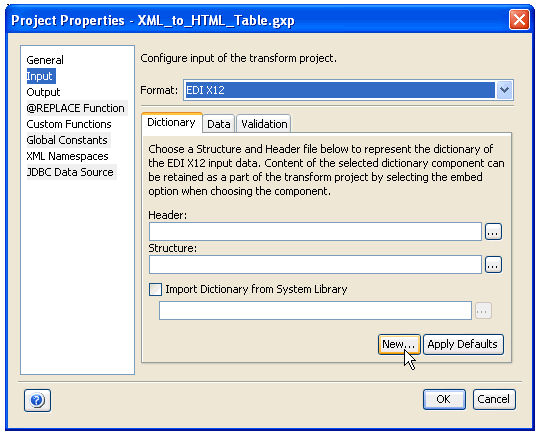
The Project Properties dialog box opens, as shown in the following image.
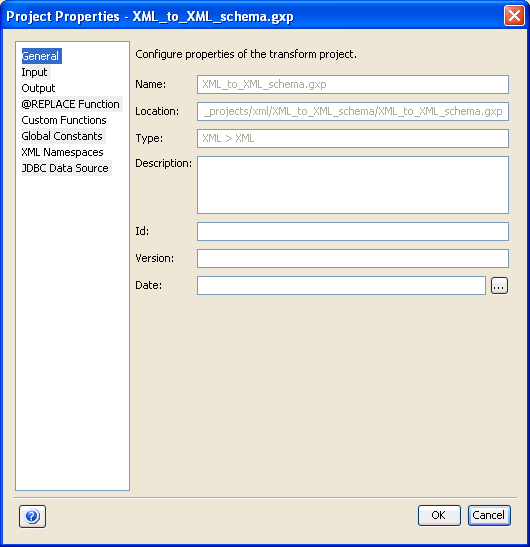
The Project Properties dialog box includes the following categories:
The General category enables you to view and change information that is specific to the particular Transform project, such as name, location, or description of the project.
This category includes the following properties:
The Input category allows you to configure the input properties for the Transform project. The following input properties are available:
The Dictionary tab allows you to configure the dictionary for your input.

For more information on using dictionaries, see Metadata Management Facility.
Configuring the Input Dictionary
On the Dictionary tab, you can specify metadata components by clicking the Browse button to locate the file on your file system, or by typing the name of the file in the component field. For supported library formats such as EDI and SWIFT, the option to select metadata from the system library is provided. For XML and iWay XML Response input formats, the option to import a schema from the iWay Registry, an iWay Service Manager configuration, iWay Web service, or Ebix archive is provided. For more information, see XML and iWay XML Response Input Properties.
Note: You can load a schema from the server registry or from a server configuration by selecting Import Schema, From Server. Another option is to load a schema from one of the available iWay Web services by selecting Import Schema, From Webservice. You can also load a schema from an Ebix archive by selecting Import Schema, From Ebix.
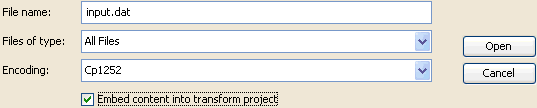
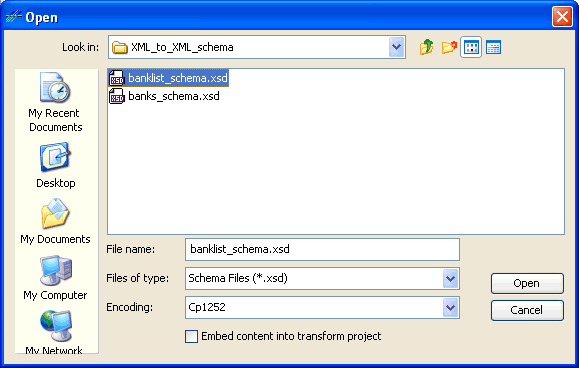
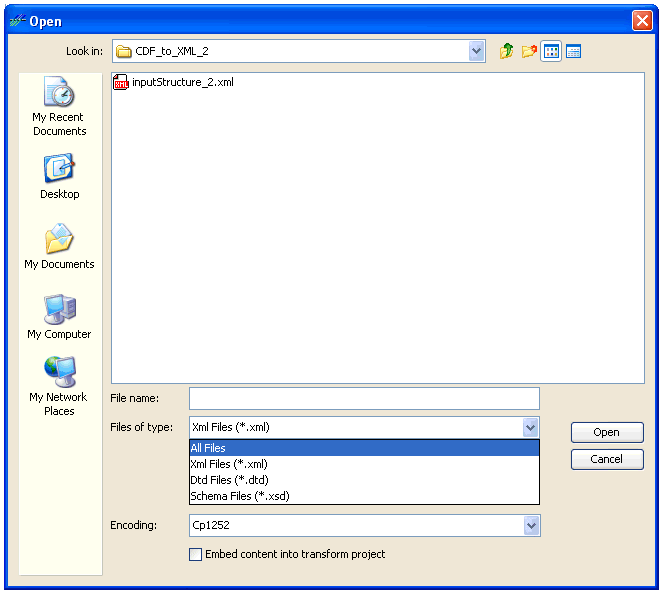
The following image shows the Open dialog box that displays when you click the Browse button next to a dictionary component field.
Dictionary Component Encoding
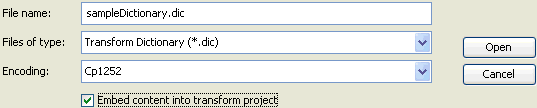
In the Open dialog box, you can use the Encoding drop-down list to set the file encoding of your dictionary component. By default, file encoding is set to the file encoding that is configured as the default in your operating system. If your dictionary component’s file encoding is different from the default, you must select the appropriate encoding type in the drop-down list to match your dictionary component’s encoding.
Embedding Dictionary Components
While specifying dictionary components, you have the option to embed their content within your Transform project in order to make it more portable. If you embed a component, for example, input_schema.xsd into your project, further changes to that file on the local disk will not be propagated into your project. An embedded component is manageable only within its project instance and cannot be shared with other projects. To embed your dictionary component, you must select the Embed content into transform project check box.
Note: This check box is not selected by default.
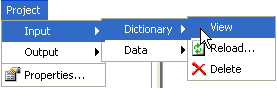
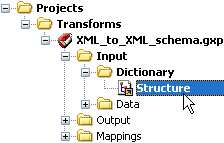
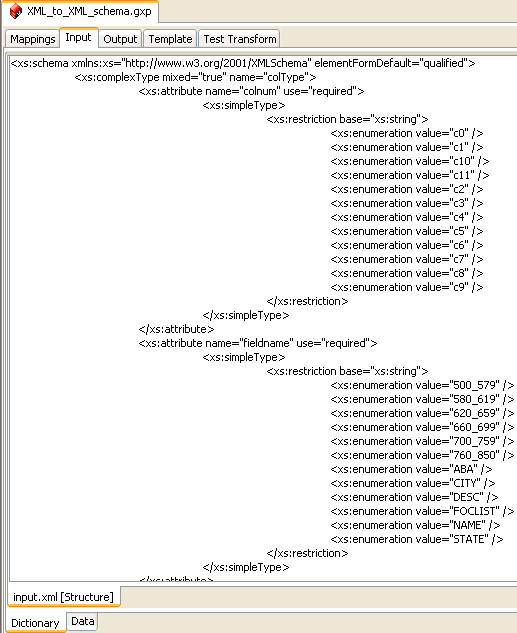
Viewing the Input Dictionary
You can view the input dictionary using one of the following GUI options:
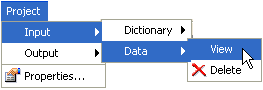
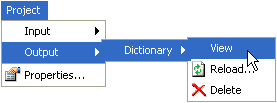
Click Project, select Input, Dictionary, and click View.
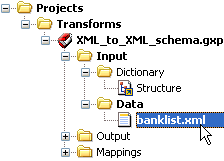
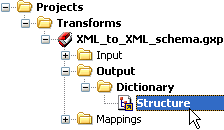
Expand the Transform project node, followed by the Input and Dictionary subfolders. Select the Structure node in the Dictionary subfolder.
Click the Input tab and select the Dictionary subtab on the bottom.
For more information on using dictionaries, see Using Dictionary Builder.
The Data tab allows you to select and configure an input data file, which contains the sample incoming document for your Transform project.
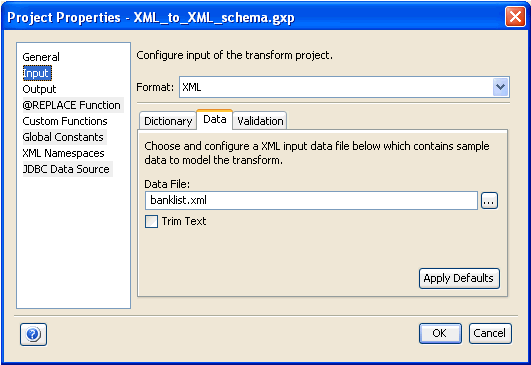
Configuring the Input Data
On the Data tab, you can specify the data file you want to use to test the Transform project. For more information, see Testing Transform and Ebix Components. You can also overwrite the default data configuration for certain formats. For more information, see Input Formats Reference.
Viewing the Input Data
You can view the input data using one of the following GUI options:
Click Project, select Input, Data, and click View.
Expand the Transform project node, followed by the Input and Data subfolders. Click the file node, for example, banklist.xml, in the Data subfolder.
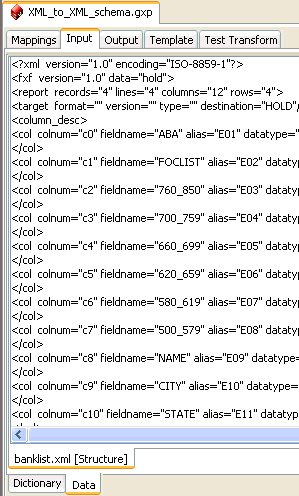
Click the Input tab and Data subtab on the bottom.
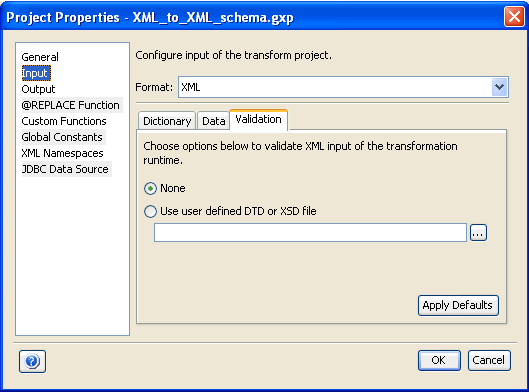
The Validation tab allows you to specify options to validate the incoming document at run time against a specific XML schema or a DTD file, or rules contained within a project’s dictionary. It is recommended to use schemas for validation, rather than DTD files.
For more information, see Input Formats Reference.
An input dictionary, is a metadata document typically of XML format, which describes the layout of your input data. The input dictionary is loaded into the Transform project and appears in the Dictionary tab of the Input pane, in the workspace. The input dictionary and the input data source files form the starting point for designing your mapping.
For certain formats, Transformer allows you to specify your input document as your data dictionary, if required.
Data dictionaries are special structure files that represent the structure of EDI or SWIFT messages via XML, which can be created and edited in Transformer using Dictionary Builder. For more information, see Using Dictionary Builder.
You can also review the sample Transform projects that are included with the iWay installation. To view sample Transform projects, navigate to the following default location on Windows:
<iWaySMHome>\tools\transformer\samples\transform_projectswhere:
Is the directory where iWay Service Manager was installed.
Note: The transform_projects folder contains subfolders (for example, csv, edi_x12, etc.) that are named according to the format that is used by the sample Transform project. For more detailed information about the available sample Transform projects, see Sample Transformations.
The following table lists and describes the major concepts and node types used in Transformer to represent input items.
Input Document The incoming document or message to which transformations apply. The following formats are supported:
Note: The CDF format is deprecated; iWay Software recommends using Fixed Width instead. The input document is displayed on the input pane as a logical tree of component items, such as groups or elements. For more information, see the Input Document Tree description on the following page. Each input item contains a name that identifies the type of the item, optionally a number of attributes, or content. |
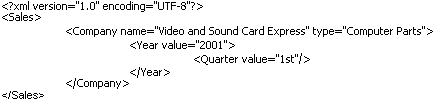
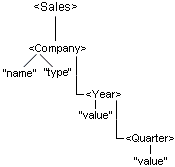
Input Document Tree Sample tree of groups, elements, and attributes encoded in the input document. Each item in this tree has exactly one parent, and may have more than one child. The following is a section of an XML input document:
The following is a tree structure representation of this:
In Transformer, the resulting input document tree is shown as follows:
|
Group Block of data that has a group element as its root. It can contain other groups or elements nested within (as children). Multiple groups can also exist on the same level. A group was formerly called a parent. |
Element Usually belongs to the group as a leaf, which cannot have any other nested groups or elements. |
Attribute Value associated with a group or element, consisting of a name, and an associated (textual) value. Attributes are used for XML input only. Each group or element can have zero to many attributes. |
Parent The input can have more than one parent (root group). Parent is a group in relation to the elements or groups contained within it. In the example above, the group, Company is a parent of the group, Year. |
Child A node A is called the child of a node B if and only if B is the parent of A. In the example above, the element, Year is a child of the Company group. |
Descendant A node A is called a descendant of a node B, if either (1) A is a child of B, or (2) A is the child of some node C that is a descendant of B. |
Ancestor A node A is called an ancestor of a node B, if and only if B is a descendant of A. |
Sibling A node A is called a sibling of a node B, if and only if B and A share the same parent. Node A is a preceding sibling if it comes before B in the input document tree. Node B is a following sibling if it comes after A in the input document tree. |
In the Dictionary tab, you can
specify a data dictionary by clicking the Browse
 button
to locate it on your file system, or by typing the name of the file
in the Structure field. For EDI and SWIFT
formats, the option to select a data dictionary from the system library
is provided. For XML and iWay XML Response input formats, the option
to import a schema from the iWay Registry, an iWay Service Manager
configuration, iWay Web service, or Ebix archive is provided. For
more information, see XML and iWay XML Response Input Properties.
button
to locate it on your file system, or by typing the name of the file
in the Structure field. For EDI and SWIFT
formats, the option to select a data dictionary from the system library
is provided. For XML and iWay XML Response input formats, the option
to import a schema from the iWay Registry, an iWay Service Manager
configuration, iWay Web service, or Ebix archive is provided. For
more information, see XML and iWay XML Response Input Properties.
While specifying a data dictionary, you have the option to embed its content in your Transform project. Embedding the content ensures that your Transform project always uses this particular structure, even if the original file (containing the input dictionary) on disk changes at some later point. This ensures portability of the Transform projects designed locally across the enterprise.
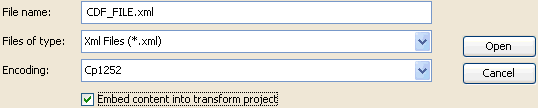
The following image shows the Open window that displays when
you click the Browse
button
in the Dictionary tab. In addition to the
field for the file name, there are drop-down lists for the type
of file and encoding option. For example, the data dictionary types
for XML transforms are XML, DTD, or XSD (schema), but you can also
specify a file type of any other format.
To embed your structural layout, you must select the check box next to Embed content into transform project.
Note: The Embed content into transform project check box is not selected by default when you specify your data dictionary.
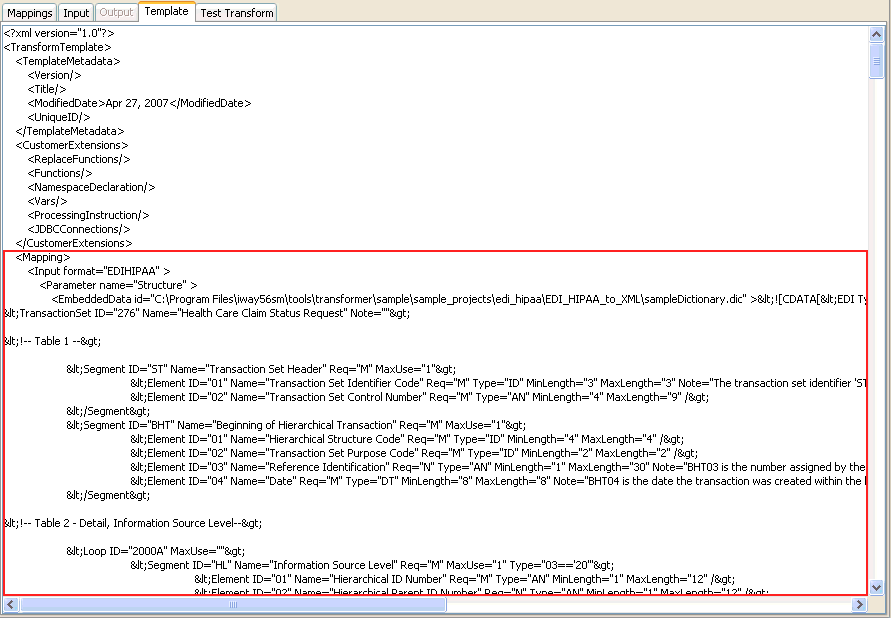
The following image shows the Template tab after the data dictionary is embedded. The content of the data dictionary is contained within the Mapping section (Parameter name="Structure").
Dictionary Components in Transform Projects
Transformer manages e-business metadata in the form of dictionary components to enable flexibility and ease of use when dealing with differences between the types of EDI and SWIFT transactions. A dictionary component is an XML representation of an EDI or SWIFT transaction.
When EDI or SWIFT is your input format for a Transform project, the input is converted to XML using the metadata defined in the appropriate dictionary. Then, another transformation is performed into the desired (non-XML) output format. If EDI or SWIFT is your output type, your input file is transformed into XML, conforming exactly to the structure as defined in the specified dictionary. Another conversion is made to the correct EDI or SWIFT transaction for your output using the same dictionary component.
The following Transform projects support dictionary components:
For more information on managing e-business metadata in Transformer, see Using Dictionary Builder.
This section provides a reference for the input formats supported by Transformer.
Note: CDF format will be deprecated, we recommend using Fixed Width instead.
The tables in this section list and describe the tabs and fields for CDF (Common Data Format) input. It is a conceptual data abstraction for storing, manipulating, and accessing multidimensional data sets.
You can edit the data dictionary for CDF input using Dictionary Builder or store the subcomponents of the data dictionary in the Library for future reuse. For more information, see Using Dictionary Builder.
Dictionary tab: Allows you to configure the dictionary for the CDF input data.
|
Field |
Description |
|---|---|
|
Structure |
Identifies the structure component to be used for the input dictionary of the Transform project. For more information on dictionaries, see Metadata Management Facility. To locate the file, type the file
name or click the Browse
The following is a sample CDF structure file, which is created when you click the New button. <TransformCDFlayout> <RecordHeader RecordCount="1" Mode="Ignore" LineFeed="nl" Format="ASCII"> <Column Name="Name" StartOffset="1" Length="8" /> <Column Name="Title" StartOffset="10" Length="17" /> </RecordHeader> <RecordDetails> <RecordLayout Type="20" StartOffset="1" Length="2"> <Column Name="Column1" StartOffset="1" Length="2"/> <Column Name="Column2" StartOffset="4" Length="7"/> <Column Name="Column3" StartOffset="12" Length="6"/> </RecordLayout> </RecordDetails> </TransformCDFlayout> You can use the Dictionary Builder tool to modify the base structure. For more information, see Using Dictionary Builder. To embed this structure into your Transform project, click the Browse button to access the Open window and then select the check box next to Embed content into transform project. For more information, see Embedding the Contents of a Data Dictionary in a Transform Project. |
|
New |
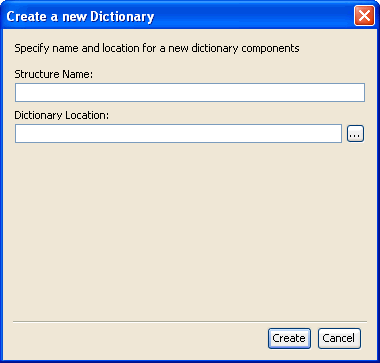
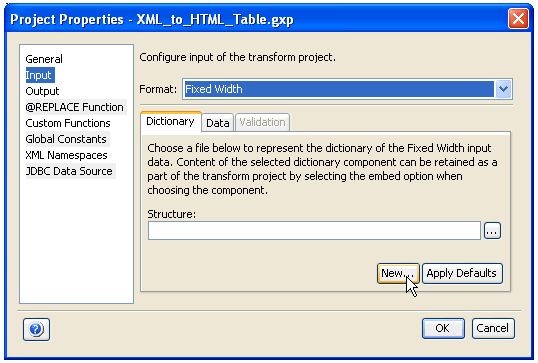
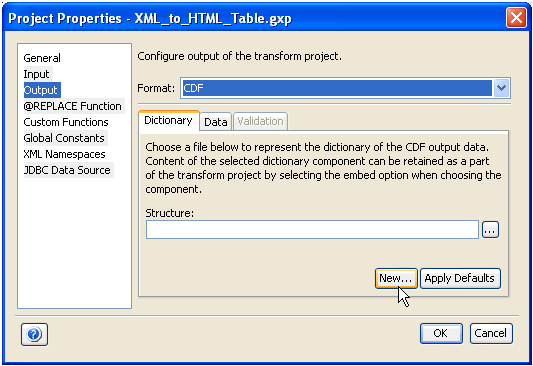
Creates a new data dictionary. Click the New button in the Input section of the Project Properties dialog box, as shown in the following image.
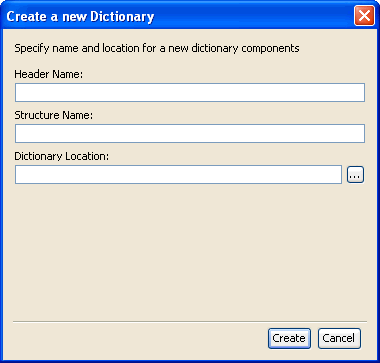
The Create a new Dictionary dialog box opens.
Provide a name and a location for the structure component of the input dictionary. After you have provided the required information, click Create. A new data dictionary is created, which consists of a default structure component that contains a sample record and a sample header. This sample data dictionary is provided as a reference in the Structure field description on the previous page. |
|
Apply Defaults |
Clears the Structure field. |
Data tab: Allows you to select and configure a CDF input data file, which contains the sample incoming document for your Transform project.
|
Field |
Description |
|---|---|
|
Data File |
To locate the file, type the file name or click the Browse button. |
|
Decode data content |
To decode data content from EBCDIC format, you select this check box. This check box is not selected by default. |
|
Apply Defaults |
Clears the Data File field. |
The tables in this section list and describe the tabs and fields for the CSV (Comma-Separated Values) input format. In a CSV file, each block of data is separated by a comma, but Transformer allows for other delimiters. For more information, see the description for the Delimiter field on the next page.
Dictionary tab: Allows you to configure the dictionary for the CSV input data. For more information on dictionaries, see Metadata Management Facility.
|
Field |
Description |
|---|---|
|
Structure |
Identifies the structure component to be used for the input dictionary of the Transform project. For more information on dictionaries, see Metadata Management Facility. This can typically be either the input data file itself, or a CSV file that has an identical structure to your intended input data file. To locate the file, type
the file name or click the Browse
To embed this structure into your Transform project, click the Browse button to access the Open window and then select the check box next to Embed content into transform project. For more information, see Embedding the Contents of a Data Dictionary in a Transform Project. |
|
Apply Defaults |
Clears the Structure field. |
Data tab: Allows you to select and configure a CSV input data file, which contains the sample incoming document for your Transform project.
|
Field |
Description |
|---|---|
|
Data File |
To locate the file, type the file name or click the Browse button. |
|
Delimiter |
Specifies the delimiter character. Delimiter is the character, which separates the elements of your CSV data. The default value is a comma (,). Transformer can also process files that use other delimiter characters that correspond to the CSV format. |
|
Header is included in the data |
You can select this check box if the header is included in the document. This check box is selected by default. The header typically contains column names. The input.csv sample file provided with iWay Transformer includes a header with the data. The header is in the first line. The following is an excerpt from this sample file: Country,"Province-Territory Name","Population (in 1000's)","Area Size (in km2)","Type" Canada,"Alberta","3097.5","661185","Province" Canada,"British Columbia","4092.8","948596","Province" . . . |
|
Apply Defaults |
Applies the default values in the Data tab by, clearing the Data File field, selecting the Header is included in the data check box, and setting the Delimiter to a comma (,). |
The tables in this section list and describe the tabs and fields for the EDI (Electronic Data Interchange) input formats, which are created in a similar fashion:
You can edit the data dictionary for EDI input using Dictionary Builder and store the components in the Library for future reuse. For more information, see Using Dictionary Builder.
Dictionary tab: Allows you to configure the metadata for the EDI message. For more information on dictionaries, see Metadata Management Facility.
|
Field |
Description |
|---|---|
|
Header |
Identifies the header component to be used for the input dictionary of the Transform project. The header contains envelope details that include trading partner information and message layout. For more information on dictionaries, see Metadata Management Facility. To locate the file, type the file name or
click the Browse
To embed this header into your Transform project, click the Browse button to access the Open window and then select the check box next to Embed content into transform project. For more information, see Embedding the Contents of a Data Dictionary in a Transform Project. |
|
Structure |
Identifies the structure component to be used for the input dictionary of the Transform project. The structure contains the layout and grammar of the document (or transaction of the EDI message). For more information on dictionaries, see Metadata Management Facility. To locate the file, type the file name or click the Browse button. To embed this structure into your Transform project, click the Browse button to access the Open window and then select the check box next to Embed content into transform project. For more information, see Embedding the Contents of a Data Dictionary in a Transform Project. |
|
Import Dictionary from System Library |
Allows you to add a data dictionary from a system library. For more information, see Using Dictionary Builder. |
|
New |
Creates a new data dictionary. Click the New button in the Input section of the Project Properties dialog box, as shown in the following image.
The Create a new Dictionary dialog box opens.
Provide a name for the header and structure components, and the location of the input dictionary. After you have provided the required information, click Create. The new data dictionary that is created consists of default header and structure components. |
|
Apply Defaults |
Clears the Header and Structure fields, and deselects the Select Dictionary from System Library check box. |
Data tab: Allows you to select and configure an EDI input data file, which contains sample incoming document for your Transform project.
|
Field |
Description |
|
Data File |
To locate the file, type the file name or click the Browse button. |
|
Segment Delimiter |
Specifies the character that indicates the end of a segment. You can select a pre-defined segment delimiter character to use from the drop-down list. The following default values are used:
|
|
Segment Suffix |
Used in combination with a segment delimiter, the segment suffix is also used to indicate the end of a segment. You can select a pre-defined segment suffix to use from the drop-down list. The following default values are used:
|
|
Element Delimiter |
Specifies the character that indicates the end of an element. You can select a pre-defined element delimiter character to use from the drop-down list. The following default values are used:
|
|
Component Element Delimiter |
Specifies the character that indicates the end of a component element. You can select a pre-defined component element delimiter character to use from the drop-down list. By default, 3A : Colon is used for EDI HIPAA, EDI X12, and EDIFACT formats. |
|
Escape Character |
Specifies the escape character to use when reading the input data. You can select a pre-defined escape character to use from the drop-down list. The following default values are used:
|
|
Apply Defaults |
Applies default values in the Data tab. |
Validation tab: Allows you to specify options to validate EDI input of the transformation run time.
|
Field |
Description |
|---|---|
|
None |
To skip validation, select this option. This option button is selected by default. |
|
Use validation rule defined by the project's input structure |
To validate the incoming document using the rule defined by the Transform project input dictionary, you select this option. This option is not selected by default. For EDI HIPAA and EDI X12, selecting this option activates the Ignore NTE Segment check box. |
|
Ignore NTE Segment |
For EDI HIPAA and EDI X12, select this check box if you do not want to validate mapping rules specific to NTE. This check box is not selected by default. This allows NTE segment translations to appear in the XML document in the same sequence as that of the input document. However if not checked, specific rules can be applied (in the dictionary) to position them accordingly. NTE is a floating segment that can occur in any place within a document and is applicable to versions prior to EDI X12 version 4010. Note: This check box is not available for EDIFACT. |
|
Apply Defaults |
Applies the default values in the Validation tab by selecting the None option. |
The tables in this section list and describe the tabs and fields for the Fixed Width input format, also called FWF. Fixed Width files are flat files that contain fixed width data fields constituting records, which are commonly separated by new line characters. Fixed Width format is very similar to the deprecated CDF format, except for features that are applicable to Fixed Width only, such as looping.
You can edit the data dictionary for Fixed Width input using Dictionary Builder and store the components in the Library for future reuse. For more information, see Using Dictionary Builder.
Dictionary tab: Allows you to select an XML file to represent the data dictionary of the Fixed Width input data.
|
Field |
Description |
|---|---|
|
Structure |
Identifies the metadata component to be used for the input data dictionary of the Transform project. For more information on dictionaries, see Metadata Management Facility. To locate the file, type the file
name or click the Browse
The following is a sample Fixed Width structure file, which is created when you click the New button. <FIXED_WIDTH>
<RecordHeader>
<Column Name="DESCRIPTION" StartOffset="1"
Length="10" />
</RecordHeader>
<RecordDetails>
<Loop ID="Loop" Req="M" Min="1" Max="1">
<RecordLayout Type="10" StartOffset="1"
Length="2">
<Column Name="Column1" StartOffset="3"
Length="5" />
<Column Name="Column2" StartOffset="8"
Length="5" />
</RecordLayout>
</Loop>
</RecordDetails>
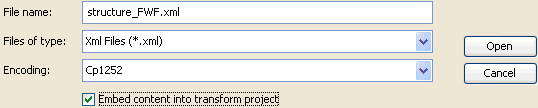
</FIXED_WIDTH>To embed this structure into your Transform project, click the Browse button to access the Open window and then select the check box next to Embed content into transform project. For more information, see Embedding the Contents of a Data Dictionary in a Transform Project. |
|
New |
Creates a new data dictionary. Click the New button in the Input section of the Project Properties dialog box, as shown in the following image.
The Create a new Dictionary dialog box opens.
Provide a name and location for the structure component of the input dictionary. After you have provided the required information, click Create. The new data dictionary that is created, consists of a default structure component that contains a sample record and a sample header. This sample data dictionary is provided as a reference in the Structure field on the previous page. |
|
Apply Defaults |
Clears the Structure field. |
Data tab: Allows you to select and configure a Fixed Width input data file, which contains sample incoming document for your Transform project.
|
Field |
Description |
|---|---|
|
Data File |
To locate the file, type the file name or click the Browse button. |
|
Record Delimiter |
To specify delimiter options from an input data file. The record delimiter is a character used to specify the boundary between records. The default value is a carriage return. |
|
Trim Columns |
Selected by default, this check box is used to trim columns from the input data file. |
|
Apply Defaults |
Clears all fields in the Data tab and selects the Trim Columns check box. |
The tables in this section list and describe the tabs and fields for the SAP IDOC (Intermediate Documents) input format. IDOCs represent a standard data structure for electronic data interchange between application programs written for SAP systems or between an SAP application and an external program.
IDOCs can be accessed using the iWay Application Adapter for mySAP ERP in iWay Explorer. For more information, see the iWay Application Adapter for mySAP ERP User’s Guide.
Note: The collected IDOC files are not supported by Transformer, due to the structural mapping. The IDOC batch documents must be split into the individual IDOC files in order to be processed correctly.
Dictionary tab: Allows you to select a file to represent the data dictionary of the IDOC input data.
|
Field |
Description |
|---|---|
|
Structure |
Identifies the structure component to be used for the input dictionary of the Transform project. For more information on dictionaries, see Metadata Management Facility. To locate the file, type the file
name or click the Browse
The following is an excerpt from a sample structure file, structure.txt, which is included in the samples provided with the product. BEGIN_RECORD_SECTION BEGIN_CONTROL_RECORD BEGIN_FIELDS NAME TABNAM TEXT Name of table structure TYPE CHARACTER LENGTH 000010 FIELD_POS 0001 BYTE_FIRST 000001 BYTE_LAST 000010 NAME MANDT TEXT Client TYPE CHARACTER LENGTH 000003 FIELD_POS 0002 BYTE_FIRST 000011 BYTE_LAST 000013 . . . To embed this structure into your Transform project, click the Browse button to access the Open window and then select the check box next to Embed content into transform project. For more information, see Embedding the Contents of a Data Dictionary in a Transform Project. |
|
Apply Defaults |
Clears the Structure field. |
Data tab: Allows you to select and configure an IDOC input data file, which contains sample incoming document for your Transform project.
|
Field |
Description |
|---|---|
|
Data File |
To locate the file, type the file name or click the Browse button. |
|
Apply Defaults |
Clears the Data File field. |
The tables in this section list and describe the tabs and fields for the SWIFT (Society for Worldwide Interbank Financial Telecommunication) input format. SWIFT is a messaging and transaction processing format used by world-wide financial organizations.
You can edit the data dictionary for SWIFT input using Dictionary Builder and store the components in the Library for future reuse. For more information, see Using Dictionary Builder.
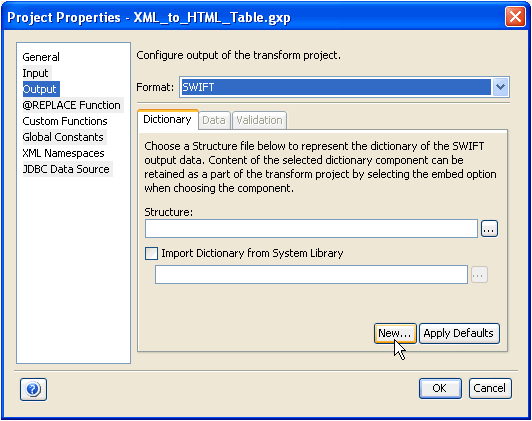
Dictionary tab: Allows you to select a data dictionary to represent the SWIFT input data.
|
Field |
Description |
|---|---|
|
Structure |
Identifies the structure component to be used for the input dictionary of the Transform project. For more information on dictionaries, see Metadata Management Facility. To locate the file, you type the
file name or click the Browse
To embed this structure into your Transform project, click the Browse button to access the Open window and then select the check box next to Embed content into transform project. For more information, see Embedding the Contents of a Data Dictionary in a Transform Project. |
|
Import Dictionary from System Library |
Allows you to add a data dictionary from a system library. For more information, see Using Dictionary Builder. |
|
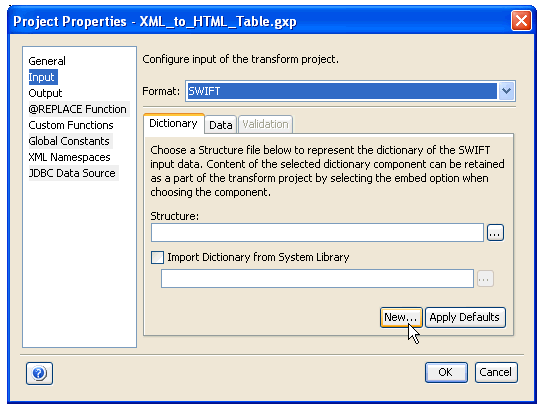
New |
Creates a new data dictionary. Click the New button in the Input section of the Project Properties dialog box, as shown in the following image.
The Create a new Dictionary dialog box opens.
Provide a name and location for the structure component of the input dictionary. After you have provided the required information, click Create. The new data dictionary that is created, consists of a default structure component. |
|
Apply Defaults |
Clears the Structure and Import Dictionary from System Library fields. |
Data tab: Allows you to select and configure a SWIFT input data file, which contains a sample incoming document for your Transform project.
|
Field |
Description |
|---|---|
|
Data File |
To locate the file, type the file name or click the Browse button. |
|
Apply Defaults |
Clears the Data File field. |
The tables in this section list and describe the tabs and fields for the XML input formats: XML and iWay XML Response, which is the commonly defined document format used in iWay Service Manager data integration services.
Dictionary tab: Allows you to select an XML, DTD, or XSD (schema) file to represent the data dictionary of the XML input data.
|
Field |
Description |
|---|---|
|
Structure |
Identifies the structure component to be used for the input dictionary of the Transform project, which is typically represented as an XSD (schema), DTD, or XML to describe your incoming message. For more information on dictionaries, see Metadata Management Facility. To locate the file, type the file
name or click the Browse
The iWay 6.0.1 Service Manager version of Transformer offers additional options to load schemas allowing for better integration with iWay Service Manager.
You can load a schema from the server registry or from a server configuration by selecting Import Schema, From Server. You can load a schema from one of the available iWay Web services by selecting Import Schema, From Webservice. You can also load a schema from an Ebix archive by selecting Import Schema, From Ebix. In the Import Schema dialog box, type the Service Provider URL and select the service to display schemas available for selection in the left pane. To embed this structure into your Transform project, click the Browse button to access the Open window and then select the check box next to Embed content into transform project. For more information, see Embedding the Contents of a Data Dictionary in a Transform Project. |
|
Contains Namespace |
Select this check box if the input contains a namespace. This check box is not selected by default. For more information, see Working With Namespaces. Note: If the Contains Namespace check box is not selected, the namespaces will not be loaded. |
|
Apply Defaults |
Clears the Structure field and deselects the Contains Namespace check box. |
Data tab: Allows you to select and configure an XML input data file, which contains sample incoming document for your Transform project.
|
Field |
Description |
|---|---|
|
Data File |
To locate the file, type the file name or click the Browse button. |
|
Apply Defaults |
Clears the Data File field. |
|
Trim Text |
Removes all leading and trailing white space characters from the XML input data file. |
Validation tab: Allows you to specify options to validate the XML input during transformation run time against schemas or DTDs.
Note: For a dictionary component, it is recommended to use schemas instead of DTDs because an updated parser is available.
|
Field |
Description |
|---|---|
|
None |
To skip validation, you select this option. This option button is selected by default. |
|
Use user-defined DTD or XSD file |
To validate the incoming document using an external dictionary, select this option. To locate the dictionary component, XSD (schema) or DTD, type the file name or click the Browse button. Note: For a dictionary component, it is recommended to use schemas instead of DTDs because an updated parser is available. |
|
Apply Defaults |
Applies the default values in the Validation tab by selecting the None option. |
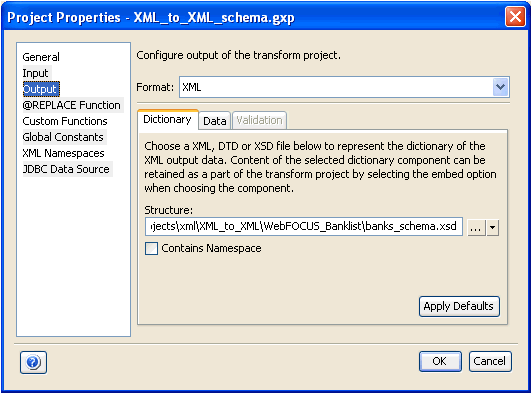
The Output category allows you to configure the output properties for the Transform project according to your expected output requirements, which typically describes the structure. The following output properties are available.
The Dictionary tab allows you to configure the dictionary of your output.
For more information on using dictionaries, see Using Dictionary Builder.
Creating a New Output Dictionary
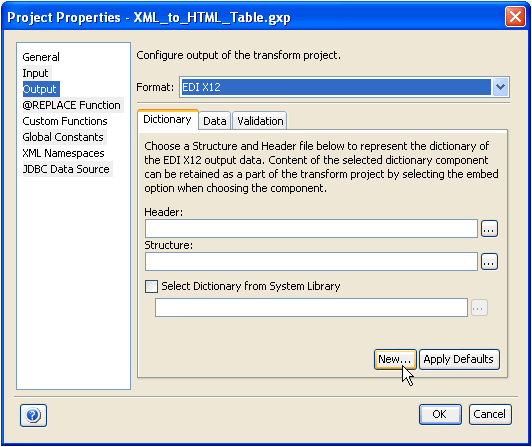
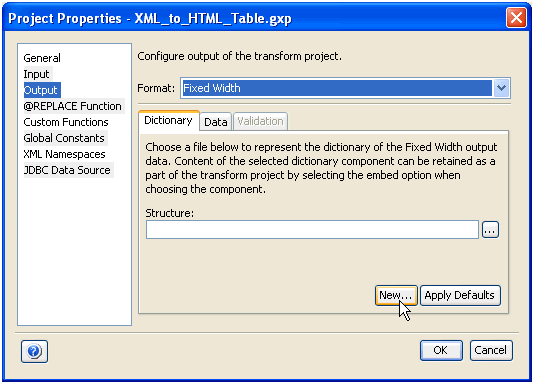
For selected formats only (CDF, EDI, SWIFT, and Fixed Width), the New button, which is located on the bottom section of the Project Properties dialog box, allows you to create a new dictionary from scratch and save it on your file system.
Configuring the Output Dictionary
In the Dictionary tab, you can specify dictionary components by clicking the Browse button to locate the file on your file system, or by typing the name of the file in the component field. For supported library formats like EDI and SWIFT, the option to select a dictionary from the system library is provided. For XML and iWay XML Response input formats, the option to import a schema from the iWay Registry, an iWay Service Manager configuration, iWay Web service, or Ebix archive is provided. For more information, see XML, iWay XML Embedded Request, and iWay XML Request Output Properties.
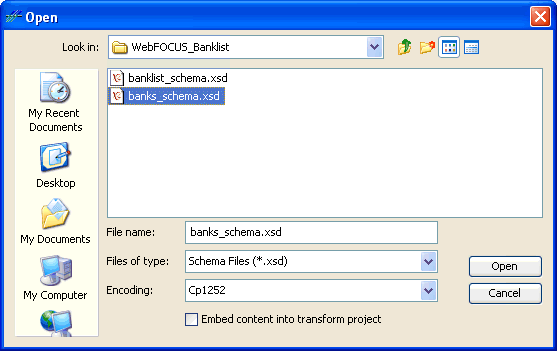
The following image shows the Open dialog box that displays when you click the Browse button next to a dictionary component field, for example, Structure.
Dictionary Component Encoding
In the Open dialog box, the Encoding drop-down list can be used to set the file encoding of your dictionary component. By default, file encoding is set to the file encoding that is used by your operating system. If your dictionary component is written with a different file encoding than the one specified in the Encoding drop-down list, you must select the appropriate encoding type to match your dictionary component's encoding.
Embedding Dictionary Components
While specifying dictionary components, you have the option to embed their content within your Transform project. An embedded component is manageable only within its project instance and cannot be shared with other projects. To embed your dictionary component, you must select the Embed content into transform project check box.
Note: This check box is not selected by default.
Viewing the Output Dictionary
You can view the output dictionary using one of the following procedures:
Click Project, select Output, Dictionary, and click View.
Expand the Transform project node, followed by the Output and Dictionary subfolders. Click the Structure node in the Dictionary subfolder.
Click the Output tab and Dictionary subtab on the bottom.
For more information on using dictionaries, see Using Dictionary Builder.
The Data tab allows you to configure output data.
Configuring the Output Data
In the Data tab, you can configure the output data for the Transform project, which will be used during run time. For more information, see Output Formats Reference.
The Validation tab allows you to specify options to validate the output document at run time.
For more information, see Output Formats Reference.
This section provides a reference for the output formats supported by Transformer.
Note: CDF format will be deprecated, we recommend using Fixed Width.
The tables in this section list and describe the tabs and fields for CDF (Common Data Format) input. It is a conceptual data abstraction for storing, manipulating, and accessing multidimensional data sets.
You can edit the data dictionary for CDF output using Dictionary Builder or store the subcomponents of the data dictionary in the Library for future reuse. For more information, see Using Dictionary Builder.
Dictionary tab: Allows you to configure the dictionary for the CDF output data. For more information on dictionaries, see Metadata Management Facility.
|
Field |
Description |
|---|---|
|
Structure |
Identifies the structure component to be used for the output dictionary of the Transform project. For more information on dictionaries, see Metadata Management Facility. To locate the file, type the file
name or click the Browse
The following is a sample CDF structure file, which is created when you click the New button. <TransformCDFlayout> <RecordHeader RecordCount="1" Mode="Ignore" LineFeed="nl" Format="ASCII"> <Column Name="Name" StartOffset="1" Length="8" /> <Column Name="Title" StartOffset="10" Length="17" /> </RecordHeader> <RecordDetails> <RecordLayout Type="20" StartOffset="1" Length="2"> <Column Name="Column1" StartOffset="1" Length="2"/> <Column Name="Column2" StartOffset="4" Length="7"/> <Column Name="Column3" StartOffset="12" Length="6"/> </RecordLayout> </RecordDetails> </TransformCDFlayout> For more information, see Sample Transformations. To embed this structure into your Transform project, click the Browse button to access the Open window and then select the check box next to Embed content into transform project.
|
|
New |
Creates a new data dictionary. Click the New button in the Output section of the Project Properties dialog box, as shown in the following image.
The Create a new Dictionary dialog box opens.
Provide a name and location for the structure component of the output dictionary. After you have provided the required information, click Create. A new data dictionary is created, which consists of a default structure component that contains a sample record and a sample header. The sample data dictionary is provided as a reference in the Structure field description on the previous page. |
|
Apply Defaults |
Clears the Structure field. |
Data tab: Allows you to configure CDF output data.
|
Field |
Description |
|---|---|
|
Padding |
Specifies the character to use for padding empty spaces. If you leave this parameter blank, Transformer uses a blank space for padding. |
|
Align |
Specifies the alignment of the output. Left-justified text (default) is aligned to the left side of each field. Right-justified text is aligned to the right side. For example, consider the following dictionary file: <TransformCDFlayout>
<RecordHeader RecordCount="1" Mode="Ignore"
LineFeed="nl" Format="ASCII">
<Column Name="ReportTitle" StartOffset="1"
Length="2"/>
</RecordHeader>
  <RecordDetails>
    <RecordLayout Type="NA" StartOffset="1"
     Length="2">
      <Column Name="MSG_ID            "
       StartOffset="1" Length="8"/>
      <Column Name="ITEM_UNIQUE_ID    "
       StartOffset="9" Length="20"/>
      <Column Name="ITEM_CASE_NUM     "
       StartOffset="30" Length="18"/>
      <Column Name="ORIGIN            "
       StartOffset="49" Length="8"/>
...
Left-aligned data is displayed as: ABC 55 777 XXX Right-aligned data is displayed as: ABC 55 777 XXX |
|
Encode |
To encode your data in EBCDIC format, select this check box. By default, this check box is not selected. |
|
Apply Defaults |
Applies the default values in the Data tab by, clearing the Padding field, selecting Left from the Align field drop-down list, and deselecting the Encode check box. |
The tables in this section list and describe the tabs and fields for the CSV (Comma-Separated Values) output format. In a CSV file, each piece of data is separated by a comma, but Transformer allows for other delimiters. For more information, see the description for the Delimiter field on the next page.
Dictionary tab: Allows you to configure the dictionary for the CSV output data. For more information on dictionaries, see Metadata Management Facility.
|
Field |
Description |
|---|---|
|
Structure |
Identifies the structure component to be used for the output dictionary of the Transform project (optional). For more information on dictionaries, see Metadata Management Facility. To locate the file, type the file
name or click the Browse
To embed this structure into your Transform project, click the Browse button to access the Open window and then select the check box next to Embed content into transform project.
|
|
Apply Defaults |
Clears the Structure field. |
Data tab: Allows you to configure CSV output data.
|
Field |
Description |
|---|---|
|
Delimiter |
Sequence of one or more characters specifying the border between column fields. The default value is a comma (,). Although CSV stands for comma-separated values, Transformer can process files that use other delimiter characters that correspond to the CSV format. |
|
Header is included in the data |
You can select this check box if the header is included in the document. This check box is selected by default. The header typically contains column names. The input.csv sample file provided with iWay Transformer includes a header with the data. The header is in the first line. The following is an excerpt from this sample file: Country,"Province-Territory Name","Population (in 1000's)","Area Size (in km2)","Type" Canada,"Alberta","3097.5","661185","Province" Canada,"British Columbia","4092.8","948596","Province" . . . |
|
Always Add Quotes |
To add quotation marks around the output values, select this check box. This check box is not selected by default. |
|
Apply Defaults |
Applies the default values in the Data tab by, setting the Delimiter to a comma (,), selecting the Header is included in the data check box, and deselecting the Always Add Quotes check box. |
The tables in this section list and describe the tabs and fields for the EDI (Electronic Data Interchange) output formats, which are created in a similar fashion:
You can edit the metadata (data dictionary) for EDI output using Dictionary Builder and store the components in the Library for future reuse. For more information, see Using Dictionary Builder.
Dictionary tab: Allows you to configure the metadata for the EDI output message. For more information on dictionaries, see Metadata Management Facility.
|
Field |
Description |
|---|---|
|
Header |
Identifies the header component to be used for the input dictionary of the Transform project. The header contains envelope details that include trading partner information and message layout. For more information on dictionaries, see Metadata Management Facility. To locate the file, type the file name or
click the Browse
To embed this header into your Transform project, click the Browse button to access the Open window and then select the check box next to Embed content into transform project.
|
|
Structure |
Identifies the structure component to be used for the input dictionary of the Transform project. The structure contains the layout and grammar of the document (or transaction of the EDI message). For more information on dictionaries, see Metadata Management Facility. To locate the file, type the file name or click the Browse button. To embed this structure into your Transform project, click the Browse button to access the Open window and then select the check box next to Embed content into transform project. |
|
Import Dictionary from System Library |
Allows you to add a data dictionary from a system library. For more information, see Using Dictionary Builder. |
|
New |
Creates a new data dictionary. Click the New button in the Output section of the Project Properties dialog box, as shown in the following image.
The Create a new Dictionary dialog box opens.
Provide a name for the header and structure components, and the location of the output dictionary. After you have provided the required information, click Create. The new data dictionary that is created consists of default header and structure components. |
|
Apply Defaults |
Clears the Header and Structure fields, and deselects the Import Dictionary from System Library check box. |
Data tab: Allows you to configure an EDI output data file.
|
Field |
Description |
|---|---|
|
Segment Delimiter |
Specifies the character that indicates the end of a segment. You can select a pre-defined segment delimiter character to use from the drop-down list. The following default values are used:
|
|
Segment Suffix |
Used in combination with a segment delimiter, the segment suffix is also used to indicate the end of a segment. You can select a pre-defined segment suffix to use from the drop-down list. The following default values are used:
|
|
Element Delimiter |
Specifies the character that indicates the end of an element. You can select a pre-defined element delimiter character to use from the drop-down list. The following default values are used:
|
|
Component Element Delimiter |
Specifies the character that indicates the end of a component element. You can select a pre-defined component element delimiter character to use from the drop-down list. By default, 3A : Colon is used for EDI HIPAA, EDI X12, and EDIFACT formats. |
|
Escape Character |
Specifies the escape character to use when reading the input data. You can select a pre-defined escape character to use from the drop-down list. The following default values are used:
|
|
Apply Defaults |
Applies default values in the Data tab. |
Validation tab: Allows you to specify options to validate EDI output of the transformation run time.
|
Field |
Description |
|---|---|
|
None |
To skip validation, select this option. This option button is selected by default. |
|
Use validation rule defined by the project's output structure |
To validate the transform using the rule defined by the Transform project output structure, select this option. This option is not selected by default. For EDI HIPAA and EDI X12, selecting this option activates the Ignore NTE Segment check box. |
|
Ignore NTE Segment |
For EDI HIPAA and EDI X12, select this check box if you do not want to validate mapping rules specific to NTE. This check box is not selected by default. This allows NTE segment translations to appear in the XML document in the same sequence as that of the output document. However if not checked, specific rules can be applied (in the dictionary) to position them accordingly. NTE is a floating segment that can occur in any place within a document and is applicable to versions prior to EDI X12 version 4010. Note: This check box is not available for EDIFACT. |
|
Apply Defaults |
Applies the default values in the Validation tab by selecting the None option. |
The tables in this section list and describe the tabs and fields for the Fixed Width output format, also called FWF. Fixed Width files are flat files that contain fixed width data fields constituting records, which are commonly separated by carriage return (new line) characters.
You can edit the data dictionary for Fixed Width output using Dictionary Builder and store the components in the Library for future reuse. For more information, see Using Dictionary Builder.
Dictionary tab: Allows you to select an XML file to represent the data dictionary of the Fixed Width output data, which describes the structure of your output message.
|
Field |
Description |
|---|---|
|
Structure |
Identifies the structure component to be used for the output dictionary of the Transform project. For more information on dictionaries, see Metadata Management Facility. To locate the file, type the file
name or click the Browse
The following is a sample Fixed Width structure file, which is created when you click the New button. <FIXED_WIDTH>
<RecordHeader>
<Column Name="DESCRIPTION" StartOffset="1"
Length="10" />
</RecordHeader>
<RecordDetails>
<Loop ID="Loop" Req="M" Min="1" Max="1">
<RecordLayout Type="10" StartOffset="1"
Length="2">
<Column Name="Column1" StartOffset="3"
Length="5" />
<Column Name="Column2" StartOffset="8"
Length="5" />
</RecordLayout>
</Loop>
</RecordDetails>
</FIXED_WIDTH>To embed this structure into your Transform project, click the Browse button to access the Open window and then select the check box next to Embed content into transform project.
|
|
New |
Creates a new data dictionary. Click the New button in the Output section of the Project Properties dialog box, as shown in the following image.
The Create a new Dictionary dialog box opens.
Provide a name and location for the structure component of the output dictionary. After you have provided the required information, click Create. The new data dictionary that is created, consists of a default structure component that contains a sample record and a sample header. This sample data dictionary is provided as a reference in the Structure field description on the previous page. |
|
Apply Defaults |
Clears the Structure field. |
Data tab: Allows you to configure a Fixed Width output data file.
|
Field |
Description |
|---|---|
|
Record Delimiter |
To specify delimiter options from an output data file. The record delimiter is a character used to specify the boundary between records. The default value is a carriage return. |
|
Padding |
Specifies the character to use for padding empty spaces. If you leave this parameter blank, Transformer uses a blank space for padding. |
|
Align |
Specifies the alignment of the output. Left-justified text (default) is aligned to the left side of each field. Right-justified text is aligned to the right side. For example, consider the following dictionary file: <RecordDetails>
<RecordLayout Type="NA" StartOffset="1"
Length="2">
<Column Name="MSG_ID "
StartOffset="1" Length="8"/>
<Column Name="ITEM_UNIQUE_ID "
StartOffset="9" Length="20"/>
<Column Name="ITEM_CASE_NUM "
StartOffset="30" Length="18"/>
<Column Name="ORIGIN "
StartOffset="49" Length="8"/>
...Left-aligned data is displayed as: ABC 55 777 XXX Right-aligned data is displayed as: ABC 55 777 XXX |
|
Trim Columns |
This option removes trailing spaces from columns in the output data file. By default, this check box is selected. |
|
Support Record ID |
This option returns the support record ID flag. By default, this check box is selected.
Note: To
conceal the record ID from being displayed for Fixed Width output,
uncheck the Support Record ID check box and reset the StartOffset
property for the first column component of the record. For example: |
|
Apply Defaults |
Applies the default values in the Data tab by, clearing the Record Delimiter field and Padding field, selecting Left from the Align field drop-down list, and selecting the Trim Columns check boxes. |
The following table lists and describes the tabs and fields for the HTML output format.
Data tab: Allows you to configure HTML output data.
|
Field |
Description |
|---|---|
|
Mode |
Specifies the format of the HTML output. Choose either Form or Table format (default). |
|
Stylesheet Type (Optional) |
Specifies the format of the stylesheet you are using. The default value is text/css. |
|
Stylesheet File (Optional) |
Identifies the stylesheet to apply to your output. To locate the file, type the file name or click the Browse button. This file must match the selected file type. |
|
Header (Optional) |
Specifies header information comments to include in the output structure as necessary. You can specify one or more lines, separated by a pipe symbol (|), for example, This information|is inserted|into the output adds the following header to your output: <!--This information--> <!--is inserted--> <!--into the output--> |
|
Footer (Optional) |
Specifies footer information comments to include in the output structure as necessary. You can specify one or more lines, separated by a pipe symbol (|), for example, This information|is inserted|into the output adds the following footer to your output: <!--This information--> <!--is inserted--> <!--into the output--> |
|
Apply Defaults |
Applies the default values in the Data tab by, selecting Form from the Mode drop-down list, selecting text/css from the Stylesheet Type drop-down list, and clearing the Stylesheet File, Header, and Footer fields. |
The following table lists and describes the tabs and fields for the SAP IDOC (Intermediate Documents) output format. IDOCs represent a standard data structure for electronic data interchange between application programs written for SAP systems or between an SAP application and an external program.
IDOCs can be accessed using the iWay Application Adapter for mySAP ERP in iWay Explorer. For more information, see the iWay Application Adapter for mySAP ERP User’s Guide.
Note: The collected IDOC files are not supported by Transformer, due to the structural mapping. The IDOC batch documents must be split into the individual IDOC files in order to be processed correctly.
Dictionary tab: Allows you to select a file to represent the data dictionary of the IDOC output data.
|
Field |
Description |
|---|---|
|
Structure |
Identifies the structure component to be used for the output dictionary of the Transform project. For more information on dictionaries, see Metadata Management Facility. An IDOC dictionary specifies exactly how the fields in the SAP IDOC file are arranged and is required to generate the output structure. To locate the file, type
the file name or click the Browse
The following is an excerpt from a sample structure file, structure.txt, which is included in the samples provided with the product: BEGIN_RECORD_SECTION BEGIN_CONTROL_RECORD BEGIN_FIELDS NAME TABNAM TEXT Name of table structure TYPE CHARACTER LENGTH 000010 FIELD_POS 0001 BYTE_FIRST 000001 BYTE_LAST 000010 NAME MANDT TEXT Client TYPE CHARACTER LENGTH 000003 FIELD_POS 0002 BYTE_FIRST 000011 BYTE_LAST 000013 . . . To embed this structure into your Transform project, click the Browse button to access the Open window and then select the check box next to Embed content into transform project.
|
|
Apply Defaults |
Clears the Structure field. |
The following table lists and describes the tabs and fields for the SWIFT (Society for Worldwide Interbank Financial Telecommunication) output format. SWIFT is a messaging and transaction processing format used by world-wide financial organizations.
You can edit the data dictionary for SWIFT output using Dictionary Builder and store the components in the Library for future reuse. For more information, see Using Dictionary Builder.
Dictionary tab: Allows you to select a data dictionary to represent the SWIFT output data.
|
Field |
Description |
|---|---|
|
Structure |
Identifies the structure component to be used for the output dictionary of the Transform project. For more information on dictionaries, see Metadata Management Facility. To locate the file, you type the
file name or click the Browse
To embed this structure into your Transform project, click the Browse button to access the Open window and then select the check box next to Embed content into transform project.
|
|
Import Dictionary from System Library |
Allows you to add a data dictionary from a system library. For more information, see Using Dictionary Builder. |
|
New |
Creates a new data dictionary. Click the New button in the Output section of the Project Properties dialog box, as shown in the following image.
The Create a new Dictionary dialog box opens. Provide a name and location for the structure component of the output dictionary. After you have provided the required information, click Create. The new data dictionary that is created consists of a default structure component. |
|
Apply Defaults |
Clears the Structure field and deselects the Import Dictionary from System Library check box. |
The tables in this section list and describe the tabs and fields for the XML, iWay XML Embedded Request, and iWay XML Request output formats.
Dictionary tab: Allows you to select an XML, DTD, or XSD (schema) file to represent the data dictionary of the XML output data.
|
Field |
Description |
|---|---|
|
Structure |
Identifies the structure component to be used for the output dictionary of the Transform project, which is typically represented as an XSD (schema), DTD, or XML to describe your outgoing message. To locate the file, type the file name
or click the Browse
The following is an example of an iWay XML Embedded Request: <?xml version="1.0" encoding="UTF-8" ?>
<Insert_DW_Customer>
<iway>
<request agent="XDJdbcAgent">
<connection>
<dsn>DW_SQL</dsn>
<user>iwaytest</user>
<password>ENCR(4485729374774629470110485)</password>
<sql>
<query>INSERT INTO StageDimCustomer (Customer,
CustomerName, Address, ARGroup, GroupName, Owner,
SalesRep, Jurisdiction, ShippingWarehouse,
DeliveryDay, CustomerCity, CustomerState,
CustomerZip, Beantown, Bullseye, WarehouseTransfer)
VALUES (555, 'DOLLAR STORE NO. 150 ', '33 BAY
VIEW ROAD ', 'H6A', SAMPLE, Inc. ', '
', 31, 0, 9, '4', '', 'NY', '13454', '', '', 'YES')</
query>
</sql>
</connection>
</request>
</iway>
</Insert_DW_Customer>You can load a schema from the server registry or from a server configuration by selecting Import Schema, From Server. Another option is to load a schema from one of the available iWay Web services by selecting Import Schema, From Webservice. You can also load a schema from an Ebix archive by selecting Import Schema, From Ebix. To embed this structure into your Transform project, click the Browse button to access the Open window and then select the check box next to Embed content into transform project. |
|
Contains Namespace |
Select this check box if the output contains namespaces. This check box is not selected by default. You can also specify a namespace for individual items. For more information, see Working With Namespaces. Note: If the Contains Namespace check box is not selected, the namespaces will not be loaded. |
|
Apply Defaults |
Clears the Structure field and deselects the Contains Namespace check box. |
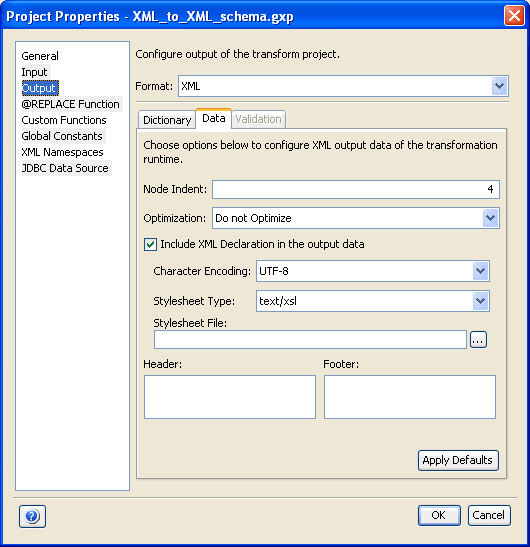
Data tab: Allows you to configure an XML output data file.
|
Field |
Description |
|---|---|
|
Node Indent |
Used to format the output, it indicates the number of spaces to indent the node. The default value is 4. For example, if node indent is 0, then all elements are aligned at the margin as follows: <a> <b> </b> <c> </c> </a> If node indent is 4, all elements except root are indented 4 spaces as follows: <a>
<b>
</b>
<c>
</c>
</a> |
|
Optimization |
Enables you to retain or omit empty elements and attributes. To retain empty elements and attributes, select Do Not Optimize. This is the default value. To omit empty elements and attributes, select Remove All Empty Nodes. To omit empty elements, including empty nested groups, select Remove Empty Group Nodes. |
|
Include XML Declaration in the output data |
Automatically inserts an XML declaration into the output data structure. This option is selected by default. |
|
Character Encoding |
Choose the character encoding from the drop-down list. By default, UTF-8 is selected. |
|
Stylesheet Type (Optional) |
Choose either text/xsl or text/css. By default, text/xsl is selected. Note: This option is an HTML property that is rarely used in plain XML format. |
|
Stylesheet File (Optional) |
To locate the stylesheet file you want to use for the output, type the full path or click Browse to navigate to the file. Note: This option is an HTML property that is rarely used in plain XML format. |
|
Header (Optional) |
Define the header information you want in the output. Note: This option is an HTML property that is rarely used in plain XML format. |
|
Footer (Optional) |
Define the footer information you want in the output. Note: This option is an HTML property that is rarely used in plain XML format. |
|
Apply Defaults |
Applies the default values in the Data tab. |
The following section describes the general Transform project properties that are available in the Project Properties dialog box.
The @REPLACE Function category is accessible via the Project Properties dialog box. It provides a way to match and replace certain input data values instantaneously. Each individually configured replace function works similar to custom functions in that you must first define the function and then, apply it in the output node mapping value definition that you want to affect. For more information, see Using Functions.
The Custom Functions category is accessible via the Project Properties dialog box. It enables you to manage the list of custom functions that you can build on-demand, when a Transformer pre-defined function does not exist to perform the task you require. Custom functions must be written in Java and stored in the following directory to be available for use with Transformer during design time:
<iWaySMHome>\tools\transformer\custom_functionswhere:
Is the directory where iWay Service Manager was installed.
Custom functions must be configured differently for use at run time. For more information about using functions, see Using Functions.
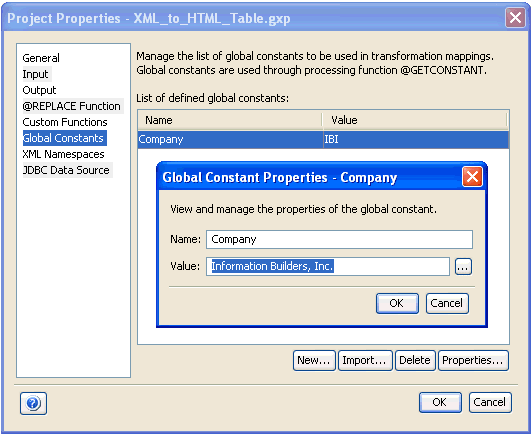
The Global Constants category is accessible via the Project Properties dialog box. It enables you to manage the list of global constants that can be utilized for your output node values. Using constants improves readability and usability of your output. You can use a defined constant in the output nodes mapping value through the @GETCONSTANT function.
Usage:
Click New to open the Global Constant Properties dialog box. In the Name column, type the name of the global constant you want to create. In the Value column, type its initial value.
Note: To define a pre-defined function (for example, @SREG) as the value, click the Browse button to the right of the Value field, which opens the Mapping Builder.
The main advantage of using global constants is reusability that ensures accuracy of your output. If the value of a particular constant should change, all instances of the constant can be changed in your mappings by modifying its value in the Global Constants Properties dialog box. Therefore, the mappings are untouched while the constant’s value is changed in every place the @GETCONSTANT function is used.
For example, a global constant called Company is defined with a value set to IBI, which will be referenced throughout a project. At some point a request to provide the company name as Information Builders, Inc. is received. If you change the value in the Global Constants Properties dialog box as shown in the following image, all instances of the Company global constant referenced in the mappings are changed automatically, without launching the Mapping Builder.
The XML Namespaces category is accessible via the Project Properties dialog box. It enables you to load XML namespaces from other projects or to create your own. For more information on the XML Namespaces tab, see Working With Namespaces.
The JDBC Data Source category is accessible via the Project Properties dialog box. It enables you to manage the list of JDBC lookups used by the @JDBCLOOKUP function during transformation mappings. You can define multiple JDBC connections or add a connection from an existing project. In addition, you can define any pre-defined function (for example, @SREG) as the URL. For more information, see Using Functions.
| iWay Software |