-
In the ReportCaster Development
Interface Distribution Lists tab, click New.
The New Distribution List window opens, as shown in the following image.
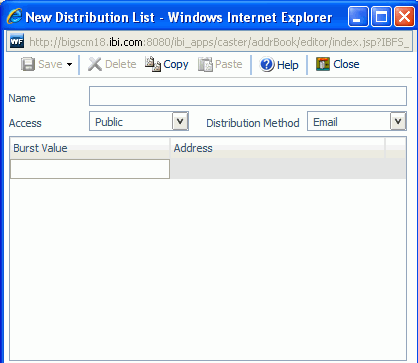
- In the Name field, type a descriptive name for the Distribution List.
- From the Access drop-down list, select Public or Private. Only the owner and ReportCaster administrators can view a Private Distribution List, whereas, all ReportCaster users can view a Public Distribution List. The values in the Access drop-down list are dependent on your ReportCaster configuration.
-
From the
Distribution Method drop-down list, select the distribution method
of the list. Email is the default value.
-
If you select E-mail, you
must provide a list of e-mail addresses and, optionally, burst values
associated with an address. For details on entering burst values,
see Bursting a Report.
In the Address field, specify the e-mail addresses of the recipients (for example, chuck_hill@ibi.com). Be careful typing this information because there is no edit checking. The maximum number of e-mail addresses you can specify in a Distribution List is 9999. You can specify a maximum of 800 characters within a single Address line.
You can specify multiple e-mail addresses within a single Address field. For more information, see Specifying Multiple E-mail Addresses.
-
If you select FTP,
you must specify the names of the FTP files that will hold the report
(including the extension) and, optionally, burst values associated with
FTP file.
The extension specified here should be appropriate for the format selected when creating the schedule. For example, if you selected Excel or EXL2K on a Windows platform, the file should be drive:\directory\filename.xls. The maximum number of FTP files you can specify in a Distribution List is 9999.
When using FTP to transfer Cascading Style Sheet (CSS) files from any platform to z/OS UNIX and the z/OS UNIX httpd.conf file contains the default MIME type of 8-bit for CSS files, then the CSS files must be transferred in binary mode.
-
If you select Printer,
you must specify the printers that will receive the distribution
and, optionally, burst values associated with the printer. For details on
entering burst values, see Bursting a Report. For more information
on creating printer Distribution Lists, see Considerations When Creating a Printer Distribution List.
In the Printer input field, specify the printer using the following format:
queue@printserver
where:
- queue
Is the name of the printer queue.
- printserver
Is the host name or IP address of the printer.
Although ReportCaster supports specifying only the print server (host name or IP address), we recommend that you specify both the print queue and print server. (ReportCaster differentiates between the printer queue and the printer server by detecting the presence of the '@' separator.)
Note: You need to double click burst value field to enter a burst value. Use the tab key to move to the next field. Use the Enter key to add a new line.
-
If you select E-mail, you
must provide a list of e-mail addresses and, optionally, burst values
associated with an address. For details on entering burst values,
see Bursting a Report.
- Click Save.
- If you are finished creating a Distribution List, click Close.
Note: To create another list, you must close the New Distribution List window for the list you just created, then click New to open a refreshed New Distribution List window.
You can also create a new list by cloning an existing list and modifying it. To do this, in the Distribution Lists tab, select an existing Distribution List and click Clone. The Clone window opens, as shown in the following image.
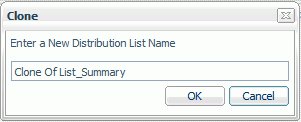
Type a name for the cloned Distribution List and click OK. The cloned Distribution List appears in the Distribution List column in the Distribution Lists tab. You can then edit the Distribution List to contain the properties you want.