You can choose to display your data as a different graph
type. These graph types are contained in the following categories:
3D, bar, line, area, pie, scatter, stock (Hi-Lo), and a special
category that includes polar, radar, and histogram charts. Each
category offers multiple types of graphs, and appropriate customization
options for that graph type.
x
Procedure: How to Access and Use the Graph Editor
Caution: It
is recommended not to use this feature as you may get unpredictable
results. However, if you are using GRAPHENGINE=OLD, the Graph Editor
can be used.
Before creating a graph, set {GRAPHENGINE=OLD]
by using the SET tool from the Procedure viewer window of Developer
Studio. For details on how to use the SET tool, see the Developing Reporting Applications manual.
-
Click
the Edit button located on the Graph Assistant Graph
Types tab.
Note: To avoid receiving an error message, deselect
the Automatic Positioning option on the Graph
Types tab before you click the Edit button.
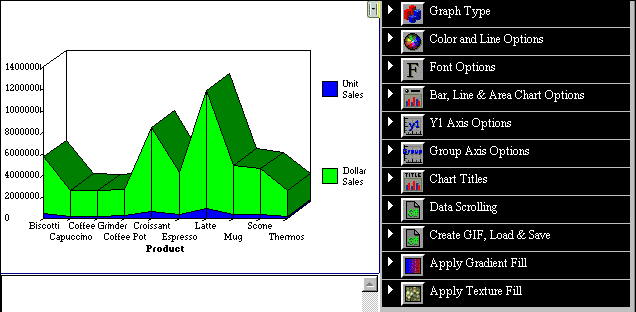
The graph opens in the Graph Editor.
-
Click
the small button at the top right of the graph pane to open the Graph
Editor menu on the right, and a message/input box below the graph.
-
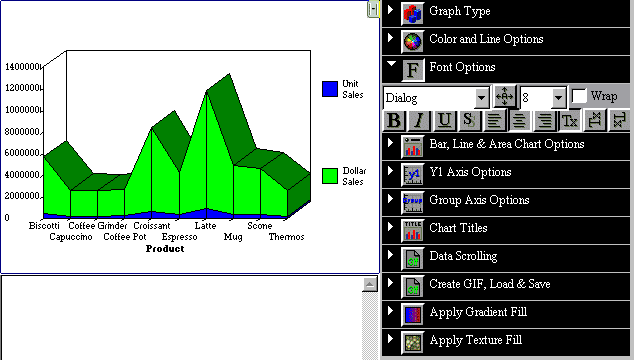
Click
a menu button to expand the menu. When you select an item in the
menu, a dialog box displays a list of parameters you can apply to
the chart.
-
Make
your modifications. Depending on your changes, the Graph Editor immediately
applies the modifications to the graph or does so when you click
the Apply button. You can continue to customize
the graph to your exact specifications.
Tip: Some menu selections may cause the dialog box
to extend beyond the available display. Use the Up and Down arrow
scroll bars to reposition the dialog box.
-
Examine
your modifications, then click Exit from
the File menu to close the Graph Editor. The Save Query dialog box opens.
-
Select Yes to
save your changes.
You
return to the Graph Assistant. When you close the Graph Assistant
you can save your changes to a file.
Tip: If you wish
to see the changes you have made to the WebFOCUS graph code, right-click
the graph procedure in the Procedure viewer window and select Edit
Text. Notice that the Java™ code generated by the Graph
Editor has been inserted into WebFOCUS graph StyleSheet code.
x
Procedure: How to Select a Graph Type
-
From
the Graph Editor, select Graph
Type.
The Bar tab appears with a dialog box showing the tabs of the other
supported graph types across the top of the box.
Tip: When you move the mouse pointer over a chart
in the list, the message area at the bottom of the dialog box describes
the chart.
-
Click
on the graph type you want to assign to the chart in the main window.
The
chart automatically updates to reflect the selected graph type.
In addition, the Graph Editor menu changes to reflect the options
that are available for the selected graph type.
x
Syntax: How to Add Graph Editor Syntax for 3D Charts
A selection
in the 3D graphs dialog box adds the GraphType property to the code
that describes the chart.
setGraphType ( value );
where:
- value
Is a number in the range 0-2, 4-7, 9-10, 12-14.
x
Reference: 3D Graphs-Graph Editor Syntax
The
3-D icon tab displays the following dialog box:
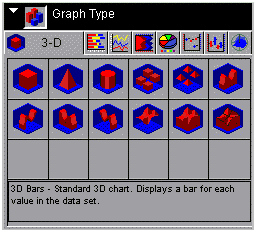
When
choosing among the styles of 3-D charts, use the thumbnail as an
approximation of how your 3-D graph will look. The descriptions
for each style match your graph with its purpose.
From left
to right and top to bottom, selections include the following:
- 3D Bars (GraphType=0)
- 3D Pyramid (GraphType=1)
- 3D Octagon (GraphType=2)
- 3D Floating Cubes (GraphType=4)
- 3D Floating Pyramids (GraphType=5)
- 3D Connected Series Area (GraphType=6)
- 3D Connected Series Ribbon (GraphType=7)
- 3D Connected Group Area (GraphType=9)
- 3D Connected Group Ribbon (GraphType=10)
- 3D Surface (GraphType=12)
- 3D Surface with Sides (GraphType=13)
- 3D Honeycomb Surface (GraphType=14)
Note: For descriptions of graph
types, see Selecting a Graph Type.
x
Syntax: How to Add Graph Editor Syntax for Bar Charts
A selection
in the Bar charts dialog box adds the GraphType property to the
code that describes the chart.
setGraphType ( value );
where:
- value
Is a number in the range 17-30.
x
Reference: Bar Graphs-Graph Editor Syntax
The
Bar tab displays the following dialog box:
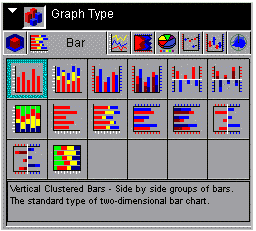
When
choosing among the styles of bar charts, use the thumbnail as an
approximation of how your bar graph will look. The descriptions
for each style match your graph with its purpose.
From left
to right and top to bottom, selections include the following:
- Vertical Clustered Bars (GraphType=17)
- Vertical Stacked Bars (GraphType=18)
- Vertical Dual-Axis Clustered Bars (GraphType=19)
- Vertical Dual-Axis Stacked Bars (GraphType=20)
- Vertical Bi-Polar Clustered Bars (GraphType=21)
- Vertical Bi-Polar Stacked Bars (GraphType=22)
- Vertical Percent Bars (GraphType=23)
- Horizontal Clustered Bars (GraphType=24)
- Horizontal Stacked Bars (GraphType=25)
- Horizontal Dual-Axis Clustered Bars (GraphType=26)
- Horizontal Dual-Axis Stacked Bars (GraphType=27)
- Horizontal Bi-Polar Clustered Bars (GraphType=28)
- Horizontal Bi-Polar Stacked Bars (GraphType=29)
- Horizontal Percent Bars (GraphType=30)
Note: For descriptions of graph
types, see Selecting a Graph Type.
x
Syntax: How to Add Graph Editor Syntax for Line Graphs
A selection
in the Line charts dialog box adds the GraphType property to the
code that describes the chart.
setGraphType ( value );
where:
- value
Is a number in the range 41-54.
x
Reference: Line Graphs-Graph Editor Syntax
The
Line tab displays the following dialog box:
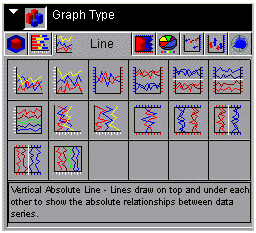
When
choosing among the styles of line charts, use the thumbnail as an
approximation of how your line graph will look. The descriptions
for each style match your graph with its purpose.
From left
to right and top to bottom, selections include the following:
- Vertical Absolute Line (GraphType=41)
- Vertical Stacked Line (GraphType=42)
- Vertical Dual-Axis Absolute Line (GraphType=43)
- Vertical Dual-Axis Stacked Line (GraphType=44)
- Vertical Bi-Polar Absolute Line (GraphType=45)
- Vertical Bi-Polar Stacked Line (GraphType=46)
- Vertical Percent Line (GraphType=47)
- Horizontal Absolute Line (GraphType=48)
- Horizontal Stacked Line (GraphType=49)
- Horizontal Dual-Axis Absolute Line (GraphType=50)
- Horizontal Dual-Axis Stacked Line (GraphType=51)
- Horizontal Bi-Polar Absolute Line (GraphType=52)
- Horizontal Bi-Polar Stacked Line (GraphType=53)
- Horizontal Percent Line (GraphType=54)
Note: For descriptions of graph
types, see Selecting a Graph Type.
x
Syntax: How to Add Graph Editor Syntax for Area Graphs
A selection
in the Area charts dialog box adds the GraphType property to the
code that describes the chart.
setGraphType ( value );
where:
- value
Is a number in the range 31-40.
x
Reference: Area Graphs-Graph EditorSyntax
The
Area tab displays the following dialog box:
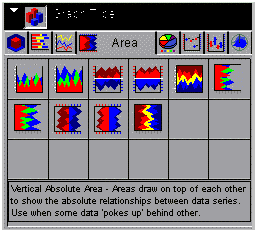
When
choosing among the styles of area charts, use the thumbnail as an approximation
of how your area graph will look. The descriptions for each style
match your graph with its purpose.
From left to right and
top to bottom, selections include the following:
- Vertical Absolute Area (GraphType=31)
- Vertical Stacked Area (GraphType=32)
- Vertical Bi-Polar Absolute Area (GraphType=33)
- Vertical Bi-Polar Stacked Area (GraphType=34)
- Vertical Percent Area (GraphType=35)
- Horizontal Absolute Area (GraphType=36)
- Horizontal Stacked Area (GraphType=37)
- Horizontal Bi-Polar Absolute Area (GraphType=38)
- Horizontal Bi-Polar Stacked Area (GraphType=39)
- Horizontal Percent Area (GraphType=40)
Note: For descriptions of graph
types, see Selecting a Graph Type.
x
Syntax: How to Add Graph Editor Syntax for Pie Charts
A selection
in the Pie charts dialog box adds the GraphType property to the
code that describes the chart.
setGraphType ( value );
where:
- value
Is a number in the range 55-60.
x
Reference: Pie Charts-Graph Editor Syntax
The
Pie tab displays the following dialog box:
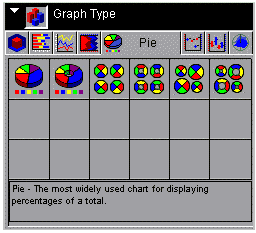
When
choosing among the styles of pie charts, use the thumbnail as an
approximation of how your pie graph will look. The descriptions
for each style match your graph with its purpose.
From left
to right and top to bottom, selections include the following:
- Pie (GraphType=55)
- Ring Pie (GraphType=56)
- Multi Pie (GraphType=57)
- Multi Ring Pie (GraphType=58)
- Multi Proportional Pie (GraphType=59)
- Multi Proportional Ring Pie (GraphType=60)
Note: For descriptions of graph
types, see Selecting a Graph Type.
x
Syntax: How to Add Graph Editor Syntax for Scatter Charts
A selection in the Scatter charts
dialog box adds the GraphType property to the code that describes
the chart.
setGraphType ( value );
where:
- value
Is a number in the range 61-64, 89-92.
x
Reference: Scatter Charts-Graph Editor Syntax
The
Scatter tab displays the following dialog box:
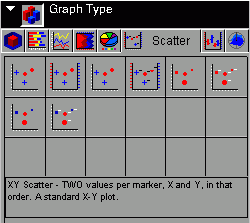
When
choosing among the styles of scatter charts, use the thumbnail as
an approximation of how your scatter graph will look. The descriptions
for each style match your graph with its purpose.
From left
to right and top to bottom, selections include the following:
- XY Scatter (GraphType=61)
- XY Scatter Dual-Axis (GraphType=62)
- XY Scatter with Labels (GraphType=63)
- XY Scatter with Labels Dual-Axis (GraphType=64)
- Bubble Chart (Graph Type=89)
- Bubble Chart with Labels (Graph Type=90)
- Bubble Chart Dual-Axis (Graph Type=91)
- Bubble Chart with Labels Dual-Axis (Graph Type=92)
Note: For descriptions of graph
types, see Selecting a Graph Type.
x
Syntax: How to Add Graph Editor Syntax for Stock Charts
A selection
in the Hi-Lo dialog box adds the GraphType property to the code
that describes the chart.
setGraphType ( value );
where:
- value
Is a number in the range 70-84, 88.
x
Reference: Stock (Hi-Lo) Charts-Graph Editor Syntax
The
Hi-Lo tab displays the following dialog box:

When
choosing among the styles of stock charts, use the thumbnail as
an approximation of how your stock graph will look. The descriptions
for each style match your graph with its purpose.
From left
to right and top to bottom, selections include the following:
- Stock Hi-Lo (GraphType=73)
- Stock Hi-Lo Dual-Axis (GraphType=74)
- Stock Hi-Lo Bi-Polar (GraphType=75)
- Stock Hi-Lo Close (GraphType=76)
- Stock Hi-Lo Close Dual-Axis (GraphType=77)
- Stock Hi-Lo Close Bi-Polar (GraphType=78)
- Stock Hi-Lo Open-Close (GraphType=79)
- Stock Hi-Lo Open-Close Dual-Axis (GraphType=80)
- Stock Hi-Lo Open-Close Bi-Polar (GraphType=81)
- Stock Hi-Lo with Volume (GraphType=82)
- Stock Hi-Lo Close with Volume (GraphType=88)
- Stock Hi-Lo Open-Close with Volume (GraphType=83)
- Open-Hi-Lo-Close Candle Stock Chart (GraphType=70)
- Open-Hi-Lo-Close Candle Stock Chart with Volume (GraphType=71)
- Candle Stock Open-Close Chart (GraphType=72)
- Candle Stock Open-Close Chart with Volume (GraphType=84)
Note: For descriptions of graph
types, see Selecting a Graph Type.
x
Syntax: How to Add Graph Editor Syntax for Special Charts
A selection
in the Special charts dialog box adds the GraphType property to
the code that describes the chart.
setGraphType ( value );
where:
- value
Is a number in the range 65-69, 85-87.
x
Reference: Special Graph Types-Graph Editor Syntax
The Special tab displays the following
dialog box:
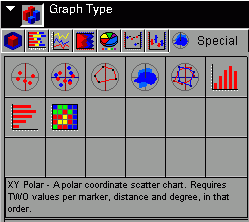
When
choosing among the styles of special charts, use the thumbnail as
an approximation of how your special graph will look. The descriptions
for each style match your graph with its purpose.
From left
to right and top to bottom, selections include the following:
- XY Polar (GraphType=65)
- XY Polar Dual-Axis (GraphType=66)
- Radar Line (GraphType=67)
- Radar Area (GraphType=68)
- Radar Line Dual-Axis (GraphType=69)
- Vertical Histogram (GraphType=85)
- Horizontal Histogram (GraphType=86)
- Spectral Map (Graph Type=87)
Note: For descriptions of graph
types, see Selecting a Graph Type.