Managing Active Technologies Form Controls
Active Technologies form controls enable you to create
complex filter relationships among the report and chart components
on an active dashboard. This topic describes the capabilities that
are available to you when you incorporate active form controls into
the design of your active dashboards.
Active Technologies form controls are available for an active
dashboard in HTML and for an active dashboard for Adobe Flash Player
and for PDF.
For details on the WebFOCUS code that supports the implementation
of active form controls, see Configuring Active Technologies Form Controls With WebFOCUS Syntax. For the procedures used
in Document Composer to add active form controls to an active dashboard, see Creating Active Technologies Dashboards in Document Composer. For the procedures
used in InfoAssist to add active form controls to a compound document,
see Adding Active Technologies Form Controls to a Compound Document.
xTypes of Active Technologies Form Controls
The following are the types of active form controls
that you can use to apply filters to an active dashboard.
- List box
- Drop-down list
- Text input field
- Check box
- Radio button
xAdding Active Technologies Form Controls and Establishing Relationships
The following general guidelines apply to active form
controls.
- The active form controls
do not support the use of ACROSS sort fields in active reports or
charts. For example, in Document Composer, if you associate an active
report that has an ACROSS field with an active form control, the
Columns list in the Properties and settings dialog box will not
include the ACROSS field.
- You can add active
form controls to any PAGELAYOUT when the active dashboard contains
multiple tabs.
- An active form control
can have a relationship with another active form control within
the same PAGELAYOUT, but not across different PAGELAYOUTs.
- An active form control
can apply a filter to a component within the same PAGELAYOUT, but
not across different PAGELAYOUTs.
- When the Coordinate
option is set (MERGE=AUTO), the Global Filter drop-down list is
the top-most parent of all the other active form controls on the
active dashboard.
- If active form controls
have a chained or nested relationship, all the target reports and
charts of the chained filter must contain all the fields, either
shown or hidden, used in the active form controls of the chain.
- If active form controls
have a chained or nested relationship, each control in the same
chain must have the same set of target reports and charts.
xSpecifying the Source Report and Target Report
A source report (ARDATA_REPORT='name_of_source_report') contains
the data that populates an active form control with selection values
from which you choose at run time. A target report or target chart (ARFILTER_TARGET='target_report_name1,target_report_name2,...')
is the report or chart component that is filtered by the control.
The following features apply to the source report and target
report.
- The source report
and target report for an active form control can be the same report
or chart component, or a different report or chart component. For
example, the source report for an active form control can be the
report1 component, and the target report for that active form control
can also be the same report1 component. Alternatively, the source
report for an active form control can be the report1 component, and
the target report for that active form control can be the report2
component, and/or the report3 component, and so on.
- The data source for
the source report and target report can be different, as long as a
common field exists in both reports, on which to apply the filter.
xSpecifying the Report Column
A report column (ARDATA_COLUMN='column_name')
in a source report populates the data selection values in a list,
drop-down list, check box, or radio button. For a text input field,
the report column is the column to which the filter condition is applied.
The following features apply to the report column.
- The ARDATA_COLUMN
field can be a NOPRINT field, or a field with the attribute HIDE=ON
in the WebFOCUS StyleSheet.
- The ARDATA_COLUMN
field, either shown or hidden, must exist in both the source report
and target report.
xUsing Independent Active Technologies Form Controls
If you do not set chained or nested relationships among
active form controls, the controls will be independent of each other.
At run time, only one filter condition will be in effect. The filter
condition from the control that is selected will overwrite the filter condition
from another, unselected control, providing an OR condition between
the two controls.
For example, if the first control is for the YEAR column, and
the second control is for the REGION column, when you select the
value 2001 from the YEAR control, the target reports and charts
will be filtered based on the condition YEAR = 2001. When you select
the value Northeast from the REGION control, the target reports
and charts will be filtered based on the condition REGION = Northeast
for any YEAR value, as those controls are not related to each other.
In the target reports and charts, you can display the result of
either YEAR = value or REGION = value, but not both.
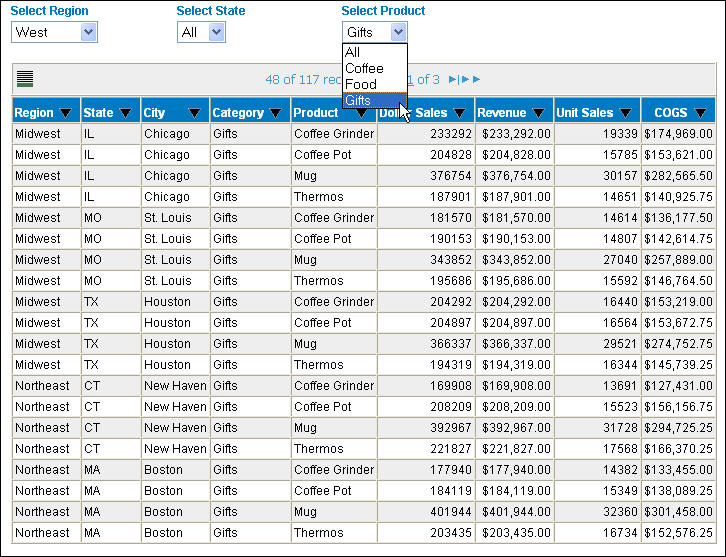
Using another example, you can change the data displayed in the
following active report by using independent active form controls
that provide data for REGION = West or CATEGORY= Gifts. In the following
image, CATEGORY = Gifts in the right-most active form control overwrites
REGION = West in the left-most active form control.
xNesting Active Technologies Form Controls
You can set a second active form control to be the
child of a prior active form control, to create a nested filter
relationship. In the second active form control, specify the name
of the prior active form control as the parent. By specifying a
filter component name in the ARFILTER_PARENT property (ARFILTER_PARENT='name_of_parent_object'),
you can chain the active form controls to provide a nested filter
with a parent/child relationship between the controls.
At run time, when you select a value from the first control,
the values in the second control are filtered, based on the value
selected in the first control.
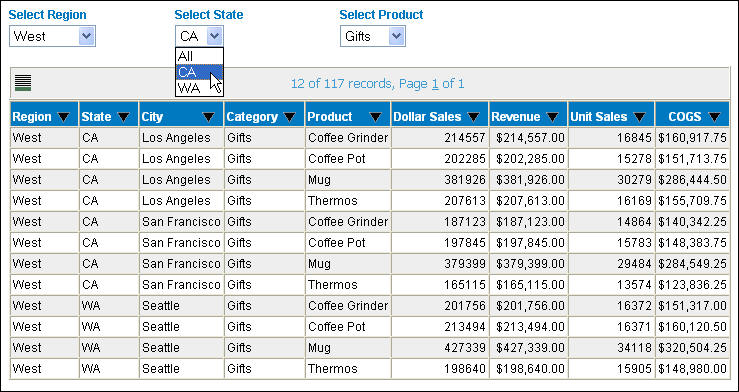
In the following example, all three drop-down lists are chained,
with the precedent filter component name set as the parent. When
you select a value from the first drop-down list, which is populated
with values for REGION, the values in the other active form controls
will change, based on the value selected in the first drop-down
list.
For example, when you select the value West from the first drop-down
list, the report is filtered by REGION = West. The second drop-down
list, which is populated with values for STATE, dynamically changes
to display only the STATE values, CA and WA, for the West REGION.
You can now select a STATE value, such as CA, and the report is
filtered to display data for STATE = CA within REGION = West.
You can also nest the third drop-down list, which is populated
with values for PRODUCT, to display the data for PRODUCT = Gifts
in STATE = CA within REGION = West in the report, as shown in the
following image.
xChaining Two Groups of Filter Conditions
When there are two groups of filter conditions and the
filtered result must meet any combination of those conditions, you
can chain all the controls so that they act together. For example,
consider two chained groups.
- The first chained
group contains the YEAR, QUARTER, and MONTH columns.
- The second chained
group contains the REGION, STATE, and CITY columns.
The two groups are shown in the following diagram.

In this example, depending on which control
you use, you can have any combination of the filtered result in
the report. For instance, you can have:
- 2001 + Q3 + September
+ Pacific + CA + LA
- Q3 + LA
- September + CA
xChaining Three Groups of Filter Conditions
When there are three groups of filter conditions, you
can chain all of them as you would do with two groups, to meet any
combination of conditions. Alternatively, the chain can have two
nodes to provide two different combinations of filter conditions,
based on the data in the source report and target report.
For example, consider three chained groups.
- The first chained
group contains the YEAR, QUARTER, and MONTH columns.
- The second chained
group contains the REGION, STATE, and CITY columns.
- The third chained
group contains the PRODUCT, CATEGORY, and TYPE columns.
The three groups are shown in the following diagram.
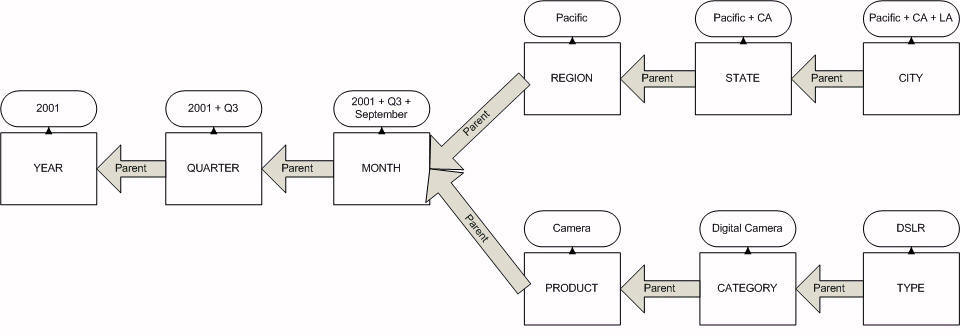
In this example, depending on which control you use, you can
have a combination of filtered conditions, based on one of the
following.
- Time and location,
for instance:
- 2001 + Q3 + September
+ Pacific + CA + LA
- Q3 + LA
- September + CA
- Time and product,
for instance:
- 2001 + Q3 + September
+ Camera + Digital Camera + DSLR
- Q3 + DSLR
- September + Digital
Camera
xDisplaying the All Selection Value
The following features apply to the All selection value.
- You can optionally
suppress the display of the string value "[ALL]" as a selection
value when the active form control is a list box, drop-down list,
check box, or radio button (ARFILTER_SHOWALL=OFF). The default behavior
is to display the selection value All in those controls.
- You can remove a
filter from a list box, drop-down list, check box, or radio button by
selecting the value All. All the values in the reports and charts
will be displayed on the active dashboard.
- Selecting the value
All displays all the values in the reports and charts on the active dashboard,
regardless of the filter condition specified.
- The All selection
value does not apply to a text input field. You can delete a value from
a text input field to remove the filter and display all the values
in the reports and charts on the active dashboard.
- If you run a report
without specifying the name of a source report for the active form control
(ARDATA_REPORT='name_of_source_report'), the control displays
only the string value "[ALL]" in the list of data selection values,
or is blank if ARFILTER_SHOWALL is set to OFF (ARFILTER_SHOWALL=OFF).
xSelecting Multiple Values
You can optionally allow the selection of multiple values
at run time if the active form control is a list box or check box
(ARFILTER_MULTIPLE=ON). The default is single-value selection, prohibiting
multiple-value selection at run time.
When multiple-value selection is set to ON, you can select more
than one value in a list box by holding down the Shift key or Ctrl
key. You can select multiple check boxes for the check box control
at run time.
xTyping a Value in a Text Input Field
The text input field (OBJECT=TEXTINPUT) for an active
dashboard is case-sensitive. The value that is typed in the text
input field at run time must match the exact case of the value that
is stored in the database.
For example, typing TV City (the value stored in the database)
is valid and will return data for an active report or chart, whereas
typing TV CITY is invalid and will not return data.
xAdding Active Technologies Form Controls to a Compound Document
You can insert active form controls into a compound
document to act as filters on the reports of the document. You can
also cascade (chain) controls to populate based on the selections
of the previous controls. The output format of the compound document
must be active report, active Flash, or active PDF in order to insert
active form controls.
x
Procedure: How to Add an Active Technologies Form Control to a Compound Document
-
With InfoAssist
open in the Document view, select an active output type (active
report, active Flash, active PDF) from the Output Types group of
the Format tab.
-
Select the Insert tab
from the Control Panel.
-
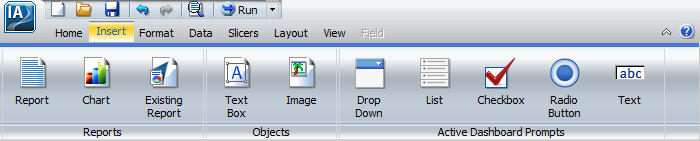
Select a
form control to insert from the Active Dashboard Prompts group,
as shown in the following image.
An
active form control appears in the top-left corner of the canvas.
You
can now add the field that the form control filters on. For more
information, see Associating a Field With a Control.
Note: Once an active
form control is added to the canvas, the compound document is locked
in an active output format. You cannot change out of active report, active
Flash, or active PDF format if there are controls present on the
canvas. To switch to a non-active output format, all controls must
be removed.
x
Associating a Field With a Control
You can bind a field to an inserted active form control
from the Query pane, by dragging the desired column directly from
the report on the canvas, or through the Active Dashboard Properties
dialog box. Setting the target reports, cascading controls, and changing
the filter conditions can only be done through the Active Dashboard
Properties dialog box. For more information, see Using the Active Dashboard Properties Dialog Box.
x
Procedure: How to Associate a Field With a Control From the Query Pane
-
With InfoAssist
open in the Document view and at least one report on the canvas,
add an active form control, as described in How to Add an Active Technologies Form Control to a Compound Document.
-
Click the
report.
The fields of the report will be populated in the Query
pane.
Note: If the report is included as an existing
report, you are not able to bind its fields to a control.
-
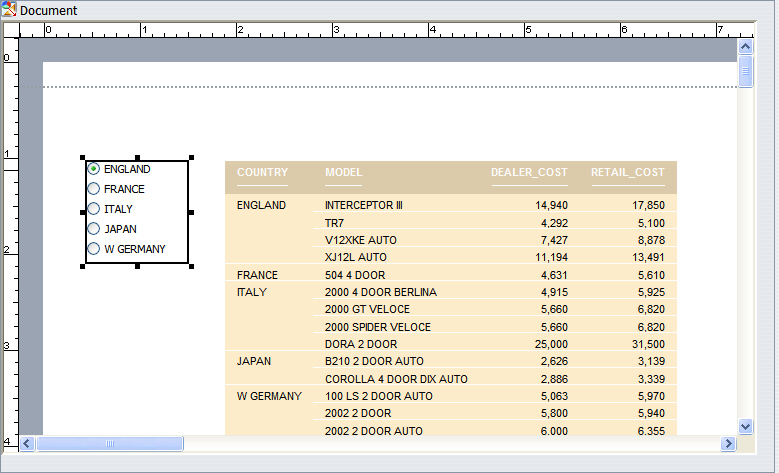
Select a
data source field from the Query pane and drag it onto the Layout
Canvas. Make sure that you drop the data source field onto the active
form control that you want the field to be bound to.
The control updates with the options from the field, as
shown in the following image.
x
Procedure: How to Associate a Field With a Control From a Report on the Canvas
-
With InfoAssist
open in the Document view and at least one report on the canvas,
add an active form control, as described in How to Add an Active Technologies Form Control to a Compound Document.
-
Right-click
the report you wish to add a filter column from and select Edit
Report.
Note: If the report is included as an existing report,
you are not able to bind its fields to a control.
-
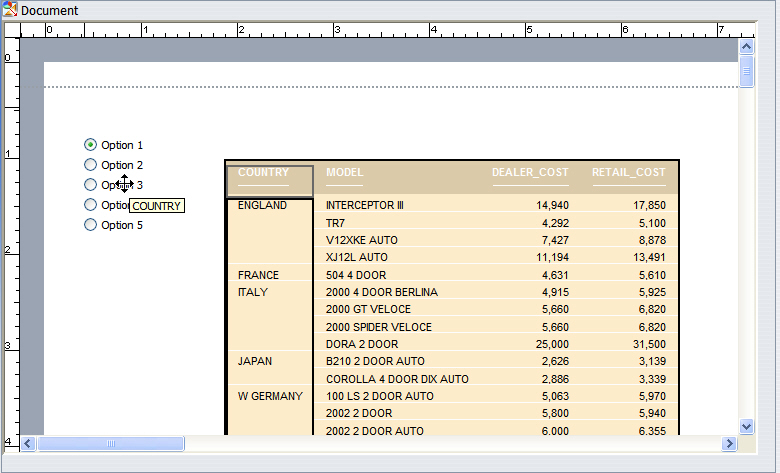
You can
now select fields within the report. Click and drag the desired field
from the report and drop it onto the active form control you want
the field to be bound to, as shown in the following image.
x
Procedure: How to Associate a Field With a Control From the Active Dashboard Properties Dialog Box
-
With InfoAssist
open in the Document view and at least one report on the canvas,
add an active form control, as described in How to Add an Active Technologies Form Control to a Compound Document.
-
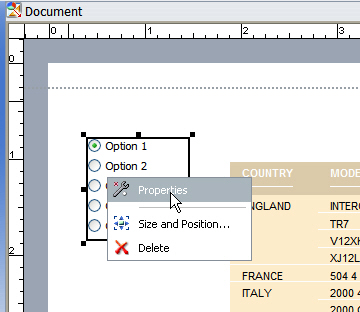
Right-click
the active control you wish to add a filter column to and select Properties,
as shown in the following image.
-
The Active
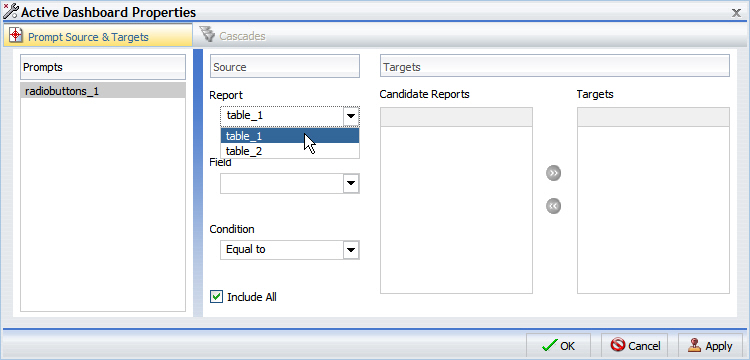
Dashboard Properties dialog box appears. Select the report that
contains the field you wish to filter on from the Report drop-down
menu, as shown in the following image.
-
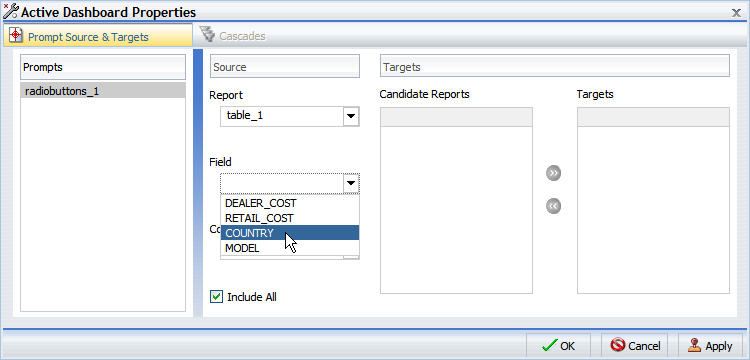
Select the
field you wish to filter on from the Field drop-down menu, as shown
in the following image.
-
Select OK.
The active form control is updated with the selected options.
x
Using the Active Dashboard Properties Dialog Box
You can use the Active Dashboard Properties dialog box
to bind a field to an active form control, change the filter condition
of an active form control, set the target for the form control filters,
and set up cascading form controls.
x
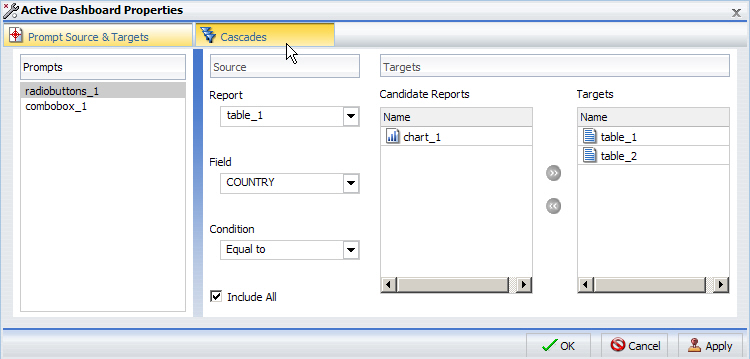
Procedure: How to Set Target Reports
You
can add or remove target reports from an active form control through
the Active Dashboard Properties dialog box. When you bind a field
to an active form control, the default target report is the report
you dragged the field from. More target reports can be added from
the Active Dashboard Properties dialog box.
Reports that can
be target reports must meet one of the following requirements:
- The report contains
a field with the same name as the source field (actual field name
or AS name).
- The Master File of
the report has a field with the same name as the source field.
If
a report is eligible to be a target report because of an AS name
and that AS name is changed, the report is automatically removed.
-
With InfoAssist
open in the Document view, bind an active form control to a field,
as described in Associating a Field With a Control.
-
Right-click
the active form control you wish to add a filter column to and select Properties,
as shown in the following image.
-
From the
Active Dashboard Properties dialog box, select the reports from
the Candidate Reports list box that you wish to add as target reports,
as shown in the following image.
Note: You can multi-select candidate reports by
pressing the Ctrl key and selecting multiple reports.
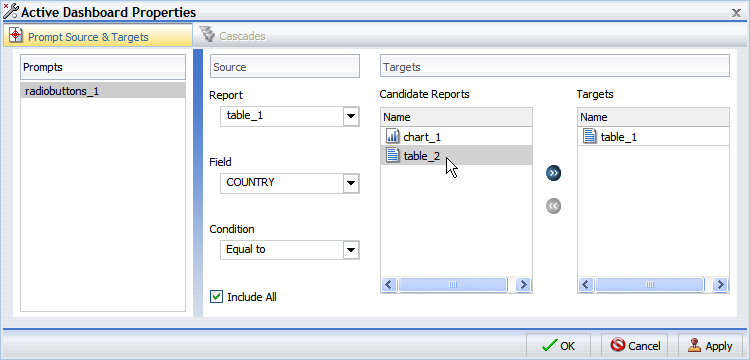
-
Click the Add
to List arrow to move the selected reports to the Targets
list box, as shown in the following image.
Note: You can remove reports from the Targets list
box by selecting reports there and clicking the Remove
from List arrow.

-
Select OK.
x
Procedure: How to Change the Filter Condition
-
With InfoAssist
open in the Document view, bind an active form control to a field,
as described in Associating a Field With a Control.
-
Right-click
the active form control you wish to change the filter condition for
and select Properties, as shown in the following image.
-
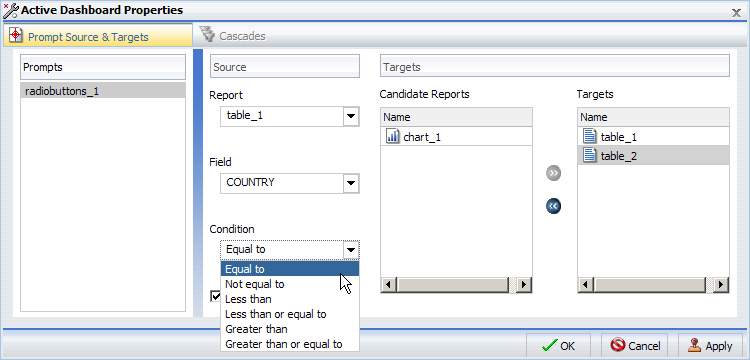
From the
Active Dashboard Properties dialog box, select the desired filter
condition, as shown in the following image.
x
Procedure: How to Cascade Controls
When
you have more than one control on the canvas you can cascade controls
to populate based on the selections of the previous controls. Cascading controls
have a parent-child relationship, in which the parent filters the
available options of the child. An active form control can be the
parent of more than one other control but cannot be a child of more
than one control.
-
With InfoAssist
open in the Document view, bind at least two active form controls
to fields, as described in Associating a Field With a Control.
-
Right-click
an active form control and select Properties,
as shown in the following image.
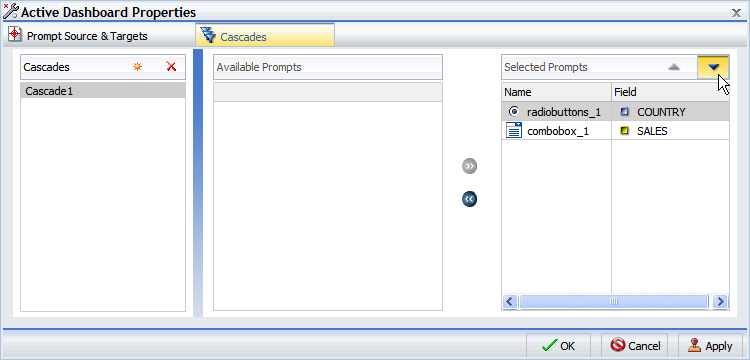
-
Select Cascades from
the Active Dashboard Properties dialog box, as shown in following
image.
By
default, a cascade named Cascade1 will appear in the Cascades section
of the Active Dashboard Properties dialog box.
You can click
the Create a new cascade
 button
to create a new cascade.
button
to create a new cascade.
You can click the Delete
selected cascade
 button
to delete the selected cascade.
button
to delete the selected cascade.
-
Select the
cascade you wish to add controls to.
-
Select the
control you wish to add from the Available Prompts list box.
-
Click the Add
to List arrow to move the selected control to the Selected
Prompts list box, as shown in the following image.
Note: You can remove controls from the Selected
Prompts list box by selecting controls there and clicking the Remove
from List arrow.
-
Add any
additional controls you wish to be part of the cascade by repeating
steps 5 and 6.
By default, the hierarchy of the controls is determined
by the order they are added to the Selected Prompts list. The cascade
of the controls is from the top, down. The controls that come first
in the Selected Prompts list are the parents of the lower controls.
-
You can
change the hierarchy of the controls by selecting a control in the
Selected Prompt list box and clicking the Move Up and Move Down
arrows, as shown in the following image.