- Open the Scheduling Tool, as explained in About the Single Page Scheduling Tool.
- In the Description field at the top of the tool, type a name for the schedule. This field is required.
-
In the Distribution section, select the method to distribute
the report from the Distribute report by drop-down list. The distribution
methods are:
- Printer
- Managed Reporting
- Report Library
For options related to each distribution method, see Distribution Options in the Single Page Scheduling Tool.
-
Make the following selections in the Frequency section.
-
From the Run Interval drop-down list, select the time interval
that the schedule will use to run the report.
You can set the interval to run the schedule once, or every specified minutes, hours, days, weeks, months, or years.
-
From the Start Schedule options, select the date (from the drop‑down
calendar) and time you want the schedule to begin running.
Note: To change the time setting, select either the hour or minutes and use the arrows to increase or decrease the value.
- If applicable, from the End Schedule options, select the date and time you want the schedule to stop running.
- If applicable, from the Every option, use the up and down arrows to set the number of times you want the schedule to run for the selected interval, for example, three times each month.
- Select the remaining options associated with the chosen run interval. For a description of the run interval options, see Frequency Options in the Single Page Scheduling Tool.
-
From the Run Interval drop-down list, select the time interval
that the schedule will use to run the report.
-
In the Report Options section:
- Select the format of the report. The valid formats are AHTML, ALPHA, COM, COMMA, COMT, DFIX, DHTML, DOC, EXCEL, EXL2K TEMPLATE, EXL2K, EXL2K FORMULA, EXL2K PIVOT, EXL97, Flash, GIF, HTML, HTML ODP, JPEG, PDF, PNG, PPT, PPT Template, PS, SVG, TAB, TABT, VISDIS, WK1, WP, and XML. For information on these formats, see the ReportCaster Administration manual.
- Select whether or not you want to burst the report.
-
If needed, change the value of an existing report parameter.
For details on changing a report parameter, see Report Parameters.
-
In the Notification section, select whether or not you want
to send a notification when the schedule runs and under what conditions
to send it. The notification options are:
- Never.
- Always. Send a notification each time the schedule runs.
- On Error. Only send a notification when there is an error running the schedule.
-
In the Advanced Options section, select the following options:
-
Priority Level for the Job. Use
the drop-down list to select the priority for running the job, with
1 being the highest priority and 5 the lowest priority. The default
priority level is 3.
The ReportCaster Distribution Server queue sorts scheduled jobs by priority and then by time. If multiple jobs share the same priority and time, ReportCaster arbitrarily schedules the jobs.
- Enabled. Select this option to activate the schedule to run.
- Delete this schedule if it is not scheduled to run again. This option is useful for test purposes.
-
Priority Level for the Job. Use
the drop-down list to select the priority for running the job, with
1 being the highest priority and 5 the lowest priority. The default
priority level is 3.
-
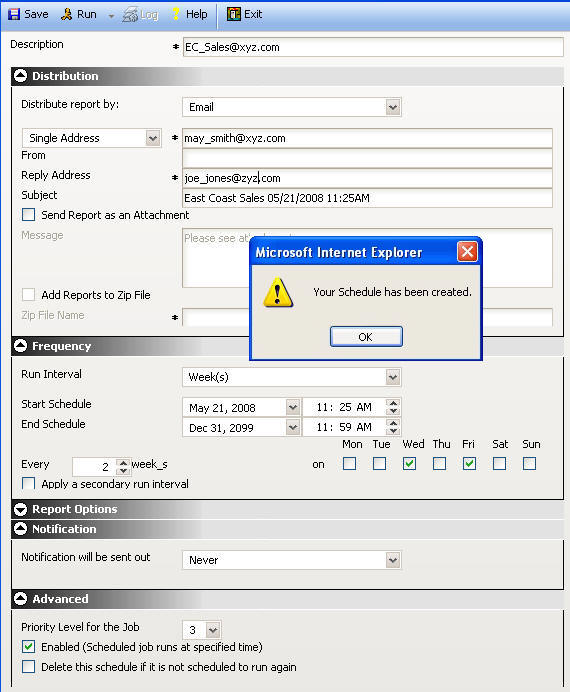
To save the schedule, click Save at
the top of the Scheduling Tool.
The Scheduling Tool validates the fields and displays a status message in a separate window. If the schedule was created successfully, the following status message appears, as shown in the following image.
If the schedule was not created, the following message appears in a separate window:
Please enter valid information in all required fields.
An alert icon appears next to the field that is invalid, and the field name appears in red. The following image shows an invalid schedule with the Reply Address option appearing in red to indicate this value is missing.
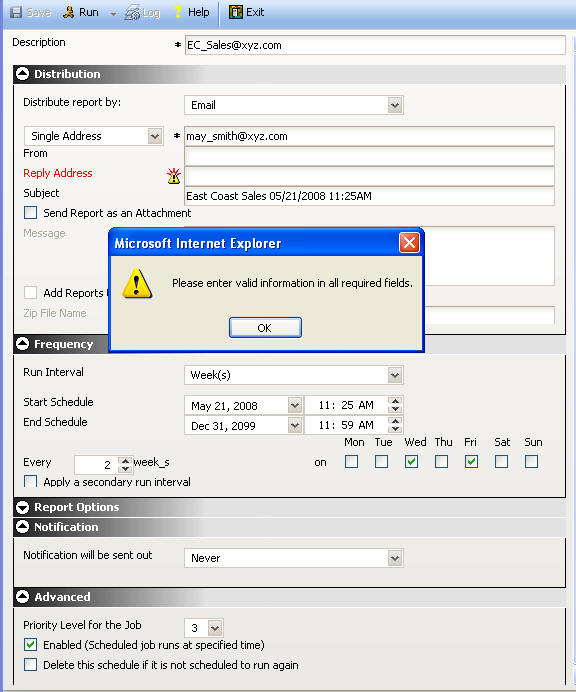
Re-enter the information in the fields that have alerts and click Save.