How to: Reference: |
When you distribute a report through e-mail, you can include the report in the body of the e‑mail (known as an inline e-mail message) or send it as an attachment. Distributing a report as an inline e-mail message is particularly useful when you distribute the report to mobile devices, fax machines, or through e-mail systems that do not support attachments. You can also distribute a report to a Fax machine, as explained later in this section.
Note:
- The availability of the inline message option when you create a schedule depends on the Inline Report Distribution setting in the ReportCaster Server Configuration tool.
- The display of a report that is distributed as an inline e-mail message can be affected by settings in the e-mail client.
The following image shows the e-mail distribution options in the Distribution Options section of the Scheduling Tool.

- From the Distribute report by drop-down list, select Email.
-
From the drop-down list under Distribute report by, select
the form of the e-mail address and type, or select the accompanying
value in the text box next to the selection. The options are:
-
Single Address. The
report will be sent to a single e-mail address. Type the e-mail
address in the accompanying text box. ReportCaster cannot validate
the e-mail address. An incorrect or unresolved address may not be noted
in the log file. This depends upon the ability of the SMTP mail
server to validate the e-mail address. The SMTP mail server returns
undeliverable e-mail messages to the reply address you specify for
the schedule.
Tip:
- You can specify multiple e-mail addresses within a Single Address. Separate each e-mail address with a comma or a semicolon. The e-mail addresses will appear in the To line of a single e-mail when you distribute the scheduled output. Each individual e-mail address can be a maximum of 130 characters according to the SMTP specification. The total maximum length of this field is 800 characters.
- Additionally, you can use group mail lists (defined on your mail server) with the Single Address option. Group mail lists enable you to distribute a report or notification to multiple recipients without having to maintain multiple e-mail addresses in the ReportCaster Repository. The format of the group mail list depends upon the mail server being used. For example, if you are using a Microsoft Exchange Server and your group mail list is defined as #group1, you would enter group1@listdomain in the Single Address field. If the group mail list contains a space within its name, it must be enclosed within quotation marks. For more information, see your mail server administrator.
- Distribution List. The report will be sent to all e-mail addresses on the selected distribution list. Select a distribution list from the drop-down list, which is activated when you select the Distribution List option.
-
Single Address. The
report will be sent to a single e-mail address. Type the e-mail
address in the accompanying text box. ReportCaster cannot validate
the e-mail address. An incorrect or unresolved address may not be noted
in the log file. This depends upon the ability of the SMTP mail
server to validate the e-mail address. The SMTP mail server returns
undeliverable e-mail messages to the reply address you specify for
the schedule.
- In the From field, type any value (for example, the name of the person creating the schedule). ReportCaster does not require this field, but your e-mail system may require it.
- In the Reply Address, type a valid e-mail address. If recipients reply to the e-mail, their messages are sent to this address. If your e-mail system is unable to deliver the content, the undeliverable output message is also returned to this address. ReportCaster requires this field.
-
In the Subject field, type the text you want to appear in the
e‑mail subject line. ReportCaster does not require this information,
but your e-mail system may need it. The value you entered in the
schedule Description field becomes the default Subject value.
When creating a schedule, you can place multiple parameters and burst values from the scheduled procedure in an e-mail subject line. This enables the subject to be dynamically created in order to personalize e-mails to recipients. Parameters referenced in the subject line must be stored with the schedule information in the ReportCaster tables.
You must specify parameters in the format '&parmname' (where parmname is the name of the parameter). You must specify burst values using the syntax '%BURST'.
Note:
- The parameter name cannot be the name of an existing report procedure. You can specify an unlimited number of parameters.
- If you have multiple burst values in a Distribution List, only the first value sent to the ReportCaster Distribution Server is included in the subject.
For an example of specifying parameters and burst values in an e-mail subject line, see E-Mail Distribution Examples.
-
Specify whether or not you want the report to be sent as an
e-mail attachment or within the body of the e-mail (inline) by selecting
or clearing the Send Report as an Attachment option. (The availability
of the inline option depends on your ReportCaster configuration.)
If you select the Send Report as an Attachment option, you can also:
- Type a message to appear in the e-mail body.
- Zip the attachment by selecting the Add the Reports to Zip File option. Provide a name for the file in the Zip File Name field.
This section provides an example of using burst values and multiple parameters when sending the report in an e-mail, and distributing a report to a Fax machine using e-mail.
The following schedule specifies burst values and multiple parameters in the e-mail subject line.
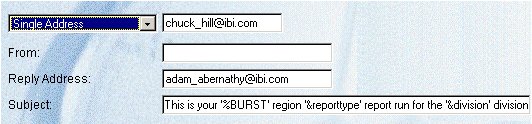
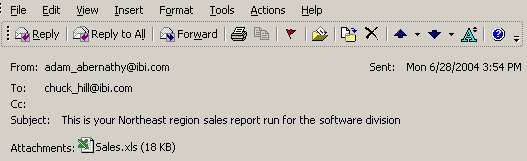
The following image shows an example of a resulting e-mail subject line.
To distribute an inline e-mail message to a fax machine, you must register your e-mail address with a third-party e-mail distribution provider. The features offered by providers, (such as supported area codes and file formats), in addition to requirements on the structure of e-mail parameter values, may vary. It is important that you select a provider whose features are compatible with ReportCaster.
Note: You cannot distribute an e-mail attachment to a Fax machine.
The following example shows how to distribute a report directly to a fax machine. The e-mail address, john_doe@xyz.com, was registered with the e-mail distribution provider called emfax.com. During the processing of the request, ReportCaster generates the scheduled report output and then distributes it using the e-mail address of emfax.com. The reply address specified in ReportCaster is the registered e-mail address that is validated by emfax.com. If the e-mail address is valid, emfax.com distributes the report to the fax number 12129999999. The validation of the registered e-mail address is performed by emfax.com, not by ReportCaster.
Note: The syntax used in this illustration is specific to this example. The required syntax for your provider may be different.
The following image shows the Distribute section of the Scheduling Tool, which contains the name of the report to be distributed, fields, drop-down lists, and option buttons that enable you to specify the destination(s) for the scheduled report, and an e-mail address to which report recipients can reply.
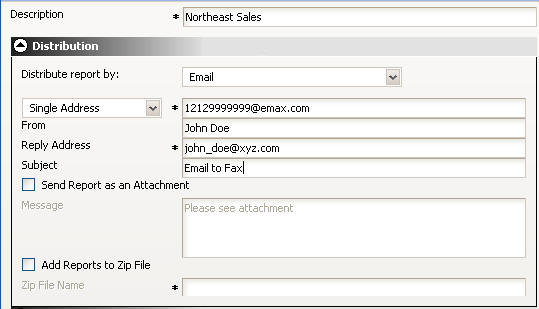
- From the Distribute report by drop-down list, select Email.
- From the mail
drop-down list, select Single Address.
In the accompanying text box, type the e-mail address to be used by the e-mail provider according to their requirements. In this example, it is phone-number@emfax.com or 12129999999@emfax.com (where emfax.com is the name of your e-mail provider).
Note: You can also select a Distribution List. However, be sure to use the syntax required by your provider.
- In the From field, type any value (for example, the name of the person creating the schedule). ReportCaster does not require this field, but your e-mail system or the e-mail provider may require it.
- In the Reply Address field, type your registered e-mail address. If your e-mail system is unable to deliver the content, the undeliverable output message is returned to this address. ReportCaster requires this field.
- In the Subject field, type the text you want to appear in the message subject line. ReportCaster does not require this information, but your e-mail system or e-mail provider may require it.
- Continue selecting the remaining schedule options, then click Save to save the schedule.