From the Domain window, you can run Standard Reports,
My Reports, Custom Reports, and Shared Reports. You can run each
type of report immediately or as a Deferred Receipt report. To run
a report immediately, see How to Run a Standard Report. To run a report in deferred mode, see Running a Deferred Receipt Report.
You can view a Shared Report, but you cannot edit it when you
run it from the Shared Reports tab. To edit a Shared Report, you
must first copy and save it to your My Reports tab, which includes
the Custom Reports folder where applicable. For more information,
see How to Copy a Shared Report.
x
Procedure: How to Run a Standard Report
-
Select
a Domain from the left-hand pane of the Domains Interface.
-
In the
Standard Reports tab, select the Standard Report you want to run.
-
Click Run on
the toolbar.
If your Administrator has defined filters for the Standard
Report, WebFOCUS opens the Filters selection window.
-
If filters
are available and you want to use them to limit data displayed in
the report, perform the following steps:
-
Expand the Filters group folders in the Filters Selection window.
-
Select the filters you want to use and click Add.
For more information on building filtering criteria, see Filtering Data.
WebFOCUS displays the filter icon with a red check mark
and adds the selection criteria to the Filter Criteria box (lower
box in the Filter Selection dialog box).
-
Click OK to apply the filters to the report
and return to the Standard Reports tab.
Notice that the filters you selected appear below the Standard Report.
-
Click Run.
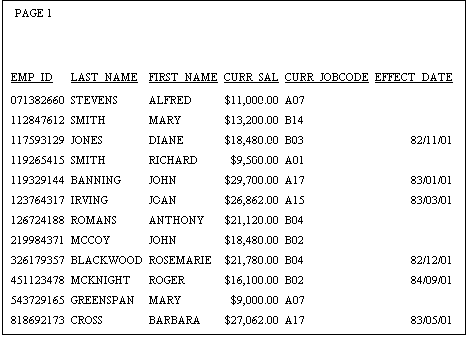
WebFOCUS displays the report.
-
Close
the browser to return to the Standard Reports tab.
Example: Running a Standard Report
Suppose
you want to run a report computing salaries in the Sales Department.
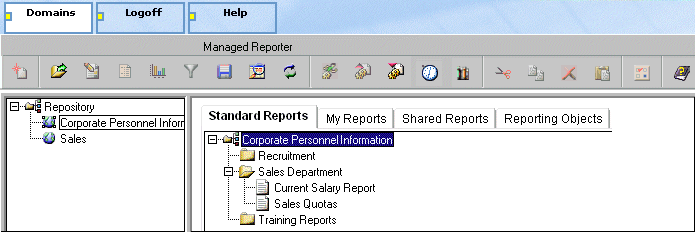
- Open the Corporate
Personnel Information domain, as shown in the following
image.

- Open the Sales
Department group folder under the Standard Reports tab.
- Select Current
Salary Report, as shown in the following image.

- Click Run.
You
may be prompted to supply a WebFOCUS Reporting Server ID. For more information,
see Signing on to a Server.

- Close Current
Salary.
You return to the Standard Reports tab.
x
Procedure: How to Run a My Report or Custom Report
-
Click
the My Reports tab in the Domain window.
- My Reports
are listed under the Reporting Object folder from which they were
created.
- Custom Reports
are listed in the Custom Reports folder in the My Reports tab.
-
Select
the report or graph name.
-
Click Run.
WebFOCUS displays saved reports.
x
Procedure: How to Run a Shared Report
-
Click
the Shared Reports tab in the Domain window.
WebFOCUS displays folders with the names of users who have
contributed reports.
-
Double-click
a user name.
The user name expands to display the Reporting Object group
folders that were used to create the Shared Reports.
-
Double-click
the Reporting Object group folder and then
the subgroup folder that contains the Shared Report you want to
run.
Note that the Shared Report  icon appears next
to the name of the report.
-
Select
the report and then click Run.
WebFOCUS displays the report.
-
Close
the browser to return to the Shared Reports tab.
xRunning a Deferred Receipt Report
Deferred Receipt allows you to submit reports for processing
and to retrieve the results later. You do not have to wait for a
report to process and return to your browser. You can submit a report
in any format, including OLAP-enabled reports and reports flagged
for On-demand Paging for Deferred Receipt.
A Managed Reporting Administrator can also designate a Standard
Report or Reporting Object to run only in deferred mode. To determine
whether a Standard Report or Reporting Object is designated as a
Deferred Receipt report, see How to View Report Properties.
After you submit a report for Deferred Receipt, use the Deferred
Report Status Interface to:
- Monitor the
status of a Deferred Receipt report.
- View the report
output.
- Delete a report.
- Save a Deferred
Receipt report.
- Review or change
parameters in a Deferred Receipt report.
For more information, see Using the Deferred Report Status Interface.
x
Procedure: How to Submit a Report for Deferred Receipt
-
Log
on to Managed Reporting.
-
Expand
the domain containing the report you want to run in deferred mode.
WebFOCUS opens the domain in the right hand pane of the
Domains Interface.
-
Select
a group folder from the Standard Reports tab, the My Reports tab,
or the Shared Reports tab.
-
Select a Standard Report, My Report,
or Shared Report and click Run Deferred.
You may
be prompted to supply a WebFOCUS Reporting Server ID. For more information,
see Signing on to a Server.
-
If the
report contains variables, when the intermediate window (HTML form)
opens (to prompt you for a value), enter a value in the input box.
-
Click Submit.
The Deferred Report Notification window opens to display
notification of successful or unsuccessful submission of the deferred
request.
-
Close
the Deferred Report Notification window to return to Managed Reporting.
-
Click Deferred
Status to view the status of the Deferred Receipt request
using the Deferred Report Status Interface.
For
more information about monitoring and viewing Deferred Receipt requests,
see Using the Deferred Report Status Interface.
Example: Submitting a Deferred Report
Suppose
you want to run a report computing salaries in the Sales Department
while you continue to work on other Managed Reporting applications.
- Open the Corporate
Personnel Information domain.
- Open the Sales
Department group folder under the Standard Reports tab.
- Select Current
Salary Report.
- Click Run
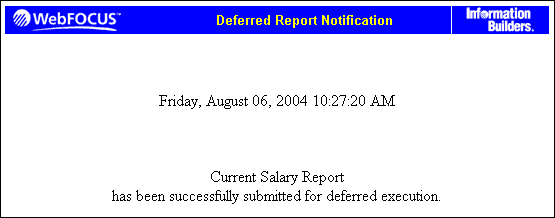
Deferred on the toolbar. The Deferred Report Notification
window opens, confirming that Current Salary has been successfully submitted
for Deferred Receipt. The following image shows the Deferred Report Notification
window which contains the day, date, and time that the report has successfully
been submitted for deferred execution.

- Close the Notification
window to return to the Standard Reports tab.
- When you want
to view Current Salary, access the Deferred Report Status Interface by
clicking Deferred Status. For more information,
see Using the Deferred Report Status Interface.
The following image shows the
Deferred Report Status window containing the day, date, and time
displayed in the title bar. To view report status, you can use the
Refresh button, Sort By list box (in ascending or descending order),
and Help button. Refresh can also be automatically scheduled by
entering the number of seconds for refresh and selecting the Enable
Refresh check box. The bottom part of the window lists
the completed deferred reports containing Date/Time Submitted, Domains,
Description, Expires in, and Options information.

- Click View under
the Options column to view Current Salary or click Save to
save Output of Current Salary to the Output folder under your My
Reports tab.
x
Procedure: How to View Report Properties
You
can view report properties to determine whether your Administrator
has designated a Standard Report or Reporting Object as a Deferred
Receipt report.
-
Select
a report from the Standard Reports tab.
-
Click Properties on
the Domain window toolbar.
If the report is a Deferred Receipt report, Run Deferred
appears in the Properties dialog box after the folder name.
-
Click Cancel to
exit the Properties dialog box and return to the Domain window.
xSaving Deferred Receipt Reports
You can save Deferred Report output when the report
status is Completed. When you save Deferred Report output, WebFOCUS
removes the report from the Deferred Report Status Interface and
creates a new group folder, Deferred Reports Output, on the My Reports
tab. WebFOCUS then saves the Deferred Report output to this group
folder.
There is one Deferred Reports Output group folder for each domain.
Report output contained within the Deferred Reports Output folder
is static and can only be viewed. WebFOCUS disables the Run Deferred
option for any report contained in the Deferred Receipt Report Output
group.
x
Procedure: How to Save a Deferred Receipt Report
-
Open
a domain.
-
Select
the Standard Reports or My Reports tab.
-
Click Deferred
Status.
The Deferred Report Status Interface opens.
-
Select
a Deferred Receipt report from the Completed tab.
-
Click Save in
the Options column for this report.
WebFOCUS saves the Deferred Receipt report results to the
My Reports tab and the Deferred Reports Output group folder, and
deletes the Deferred Receipt report from the Deferred Report Status
Interface. The My Report name is the description that WebFOCUS displayed
in the Deferred Report Status Interface as well as the date and time
the My Report was created.
-
Close
the Deferred Report Status Interface.
xReviewing Deferred Request Parameters
You can review or change parameters and then resubmit
a Deferred Receipt report from the Deferred Report Status Interface
when the report status is Completed. This option allows you to retrieve
specific data contained within the report.
x
Procedure: How to Retrieve Deferred Receipt Request Parameters
-
Open
a domain.
-
Select
the Standard Reports or My Reports tab.
-
Click Deferred
Status.
The Deferred Report Status Interface opens.
Note: Click Refresh to
obtain the most current status of deferred requests.
-
In the
Completed or Unknown tabs, identify the report containing the parameters
to review. In the Options column for that report, click Parameter.
The WebFOCUS Auto Prompt Facility window opens.
-
In the WebFOCUS
Auto Prompt Facility window, do one of the following:
- Review
and accept the original parameters, and close the browser window.
- Change a parameter
by entering a new value in the input box.
-
Click Submit.
The Deferred Report Notification window opens to display
notification of successful or unsuccessful submission of the deferred
request.
-
Close
the Deferred Report Notification window to return to the Deferred Report
Status Interface.


 icon appears next
to the name of the report.
