In this section: How to: |
From the Edit Block window, you can edit existing content blocks. When you select the edit option, the name of the content block and its attributes appear in the Edit Block window. You can edit the block type, block contents, block name, scrolling options, and several optional features.
You can also deactivate a content block. This is useful when you want to temporarily remove a content block from a Dashboard view. When a content block is deactivated, it is designated in the Content window with a red icon. A green icon designates an active content block.
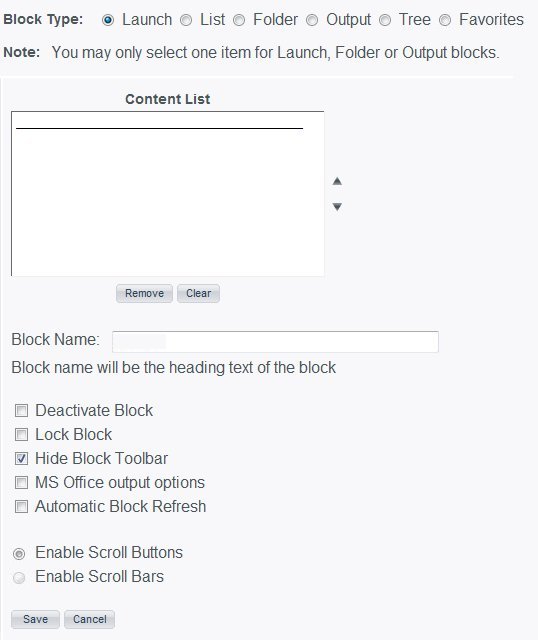
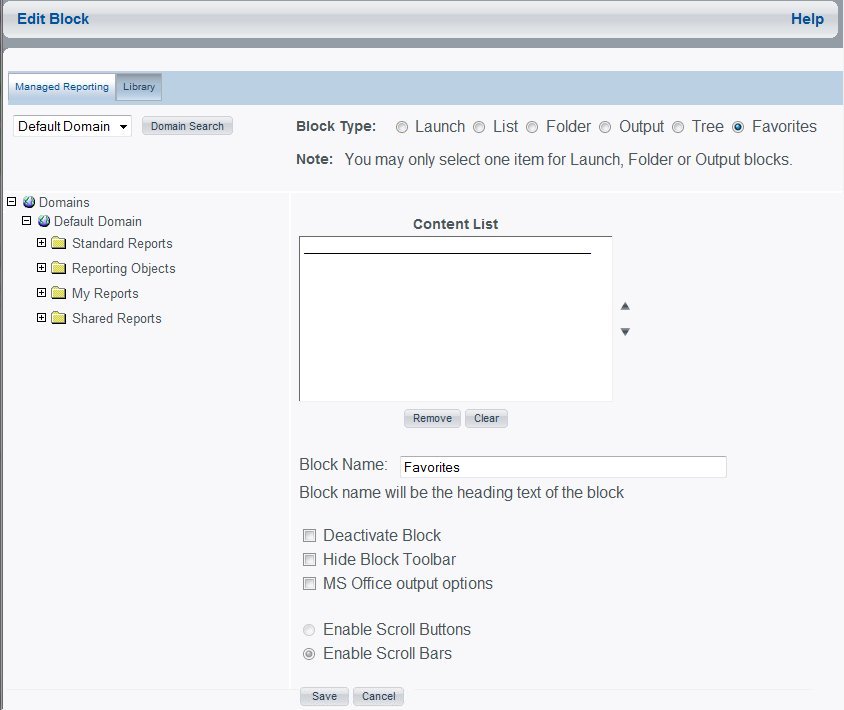
Across the top of the Edit Block window is a drop-down menu for selecting a domain, a Domain Search button, and block type option buttons to select either a Launch, List, Folder, Output, Tree, or Favorites block. At the left side of the window is a tree view of the selected domain. The right side of the window contains the Content List showing selected items with up and down arrows to the right, and Remove and Clear buttons at the bottom.
Below the Content List is a text box for entering the Block Name, and a series of check boxes that are available to enable the following functionality:
There are also option buttons to enable Scroll Buttons or Scroll Bars, and Save and Cancel buttons. The following image shows the Edit Block window.
Note: When you change the content block type, all of the items in the block are removed and the block name clears.
Note: The block name may be overwritten with the name of the Domain item you select. You can change the block name after selecting content.
How to: |
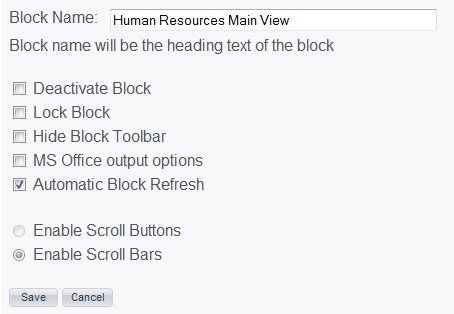
Administrators can enable automatic block refresh functionality on a per block basis to provide users with the option of setting a time interval (in seconds) when content blocks are automatically refreshed. The Automatic Block Refresh check box is displayed to administrators in the Edit Block and Add Block windows for all block types, and is hidden to users who are editing content for their personal views. Note that users who log in for the first time to their personal views, from a view that contains a block enabled for refresh, will inherit automatic block refresh functionality from that view.
The following image shows the Automatic Block Refresh check box selected for the Human Resources Main View content block.
Note: Selecting the Hide Block Toolbar check box disables Automatic Block Refresh functionality for the selected block.
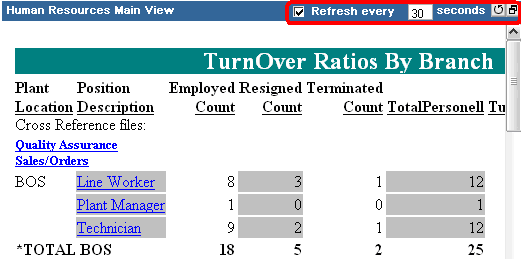
When automatic block refresh functionality is enabled for a content block, a Refresh check box and refresh time interval field are displayed in the block toolbar. The Refresh check box is unselected by default every time a user logs in to the view. Users have the option to set automatic block refresh by entering a refresh value in seconds (or using the default value) and then selecting the Refresh check box, as shown in the following image:
The minimum refresh value is set to 30 (seconds) by default. The default minimum refresh value can be changed by editing the bid-config.xml file. For details, see How to Change the Default Minimum Refresh Value.
If a user enters a non-integer value or a value less than the minimum refresh value, an appropriate error message is generated. When a user selects the Refresh check box, the refresh time interval field is disabled, which prevents the value from being changed. Deselecting the Refresh check box enables the refresh time interval field again.
You can change the default minimum refresh value that appears in the block toolbar for all content blocks that have automatic block refresh functionality enabled. Users will not be able to set a refresh time interval value that is less than the default minimum value.
C:\ibi\WebFOCUS77\worp\conf\bid-config.xml
<internal-var name="autoReloadMinInterval" value="30"/>
The autoReloadMinInterval value must be an integer value that represents the minimum number of seconds when content blocks can be set to automatically refresh. For example, to set the default minimum refresh value to two minutes, enter 120 for the value of this variable.
Automatic Block Refresh functionality can only be enabled by administrators in the Edit Block and Add Block windows for all block types. If your organization wants to disable this functionality for all views, perform the following.
Note: The Automatic Block Refresh check box will not be visible to administrators.
C:\ibi\WebFOCUS77\worp\conf\bid-config.xml
<internal-var name="allowAutoReload" value="false"/>
Note: After making changes to the bid-config.xml file, use the WebFOCUS Console to clear memory cache, or restart the application. Until this is done, the change is not effective.
How to: |
You can select either scroll buttons or scroll bars for launch blocks, list blocks, and folder blocks. Scroll buttons cannot be selected for output blocks and launch blocks that launch Web pages. Output blocks automatically contain scroll bars when necessary.
When scroll buttons are enabled, up, down, left, and right arrows display in the toolbar allowing you to navigate the content block. Up and down arrows display for all content block types. Left and right arrows only display for launch blocks. In folder blocks and list blocks information automatically wraps, therefore eliminating the need to scroll to the left or right.
When scroll bars are enabled, scroll bars display when content exists that cannot be viewed within the displayed window. When this option is selected, scroll buttons do not display in the toolbar.
Note: A launch block that is created to display a report in EXL2K, EXCEL, or DOC formats should use scroll bars instead of scroll buttons.
How to: |
When you hide the content block toolbar, automatic block refresh functionality is not available. Additionally, scrolling is automatically set to use scroll bars because scroll buttons are not available when the block toolbar is hidden.
| WebFOCUS |