Using Menus

In this section:

How to:

Reference:

The menu control enables you to create a menu bar with pull-down menus in your form. You may create only one menu bar per form.

Using the menu control requires two steps:


Top of page

x
Procedure: How to Place a Menu Bar on Your Form
  1. Click the Menu Menu control button control in the Controls palette.
  2. Draw a rectangle on your form approximately where you want your menu bar to be, at approximately the size you want. You can create a horizontally or vertically aligned menu.
  3. Give your Menu Bar a more meaningful name than MenuBarn (optional).
  4. If necessary, readjust the size and placement of your menu bar.
  5. Double-click the menu bar rectangle or select Properties for the menu control to open the Menu Items dialog box. Specify all the pull-down menus and sub menus you wish to include. For more information on specifying menu items and their associated commands, see How to Create Pull-Down Menus and Submenus.
  6. When all desired menu items have been specified in the Menu Items dialog box, click OK.

Top of page

x
Procedure: How to Create Pull-Down Menus and Submenus

To create a pull-down menu or submenu, complete the following steps from the Menu Items dialog box. This procedure assumes that you have already placed a menu bar on your form. For information on how to place a menu bar on your form, see How to Place a Menu Bar on Your Form.

  1. Double-click the menu bar you have placed on your form in order to access the Menu Items list box.
  2. To create a pull-down menu, click the Add to list button.
  3. Type the name of the pull-down menu as you want it to display on the menu bar in the Text box.
  4. Type the name you want to use to identify the menu bar to your procedure in the Name box.
  5. To create a sub menu, select the name of the pull-down menu to which you are adding the sub menu. Repeat steps 1-3 for each sub menu desired.
  6. Repeat steps 1-4 until all desired pull-down menus and sub menus have been specified in the Menu Items dialog box.
  7. Click OK.
  8. Assign a Click action to the lowest level menu items using the Event Handler editor. You can access the Event Handler editor one of the following ways:
    • Right-click the menu bar and select Edit event handlers from the pop up menu.
    • Select the Events tab in the Properties box and click the Browse button.

    For more information on assigning actions to events, see Defining Events and Event Handlers.


Example: Creating a Menu Bar With Pull-Down Menus and Submenus

The following example demonstrates how to create a pull-down menu that contains submenus.

  1. Select the Menu control from the Controls Palette.
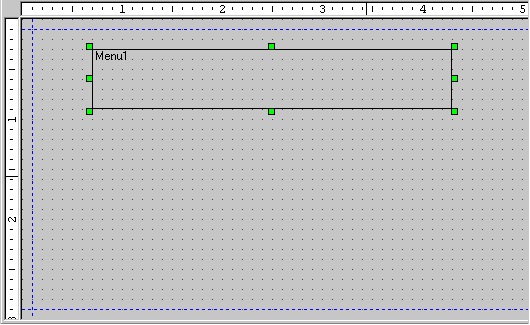
  2. Draw a horizontal rectangle on your form in order to create a horizontal menu bar.

    Creating a Menu Bar image

    Note: You can change the orientation of the menu control by changing the Orientation property in the property sheet.

  3. Double-click the menu bar to open the Menu Items dialog box.
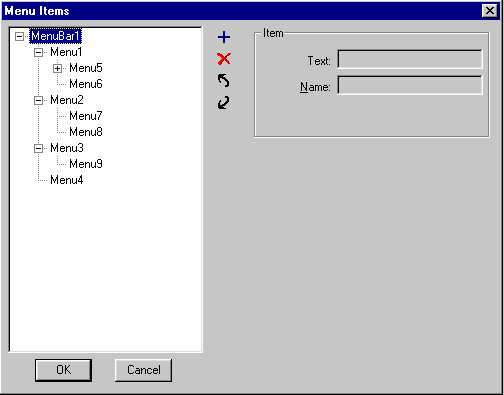
  4. Create menu items on your form by selecting MenuBar1 and clicking the Add button. Type the text you want to appear on the menu bar in the Text box and the name you will use to identify the menu item in the procedure in the Name box.

    Menu Items dialog box

  5. Create submenus by selecting a menu item and clicking the Add button. Type the name you want to give your submenu (for example, Menu5) in the Text box, and type the name you will use to identify the menu item in the procedure in the Name box. When all submenus have been specified, click OK.

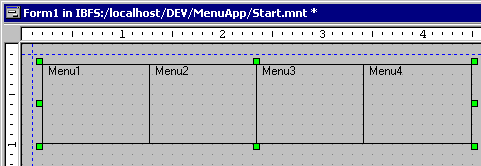
    The highest level menu items will appear on your form. Readjust the size and placement of your menu bar if necessary. An arrow on a menu item indicates that the menu item contains submenus.

    Form example

  6. For each lowest level menu item, assign a click action using the Event Handler editor.

For more information on assigning actions to events, see Defining Events and Event Handlers.


Top of page

x
Reference: The Menu Items Dialog Box

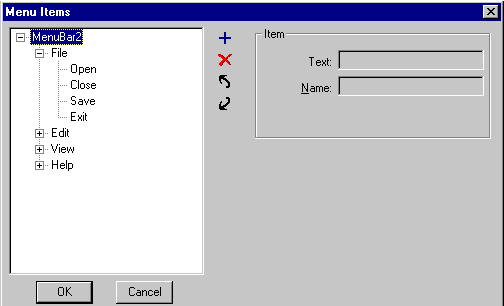
You use the Menu Items dialog box to determine the menu items that will appear on your menu bar, including pull-down menus and sub menus.

Menu items dialog box

The Menu Items dialog box contains the following elements:

Text

Enables you to specify the prompt text for each item.

Name

Enables you to specify the name of each item.

Enables you to add a selected item to the list of menu items.

Deletes a selected item from the list of items.

Moves a selected item up in the list of items.

Moves a selected item down in the list of items.


Top of page

x
Changing Menu Bar Properties

When you select your menu control, you will see a list of control properties in the property sheet. Changing these properties will change what your menu bar looks like and what it does at run time.

Many of the styling properties can also be changed using a Cascading Style Sheet. For more information on Cascading Style Sheets, see Using Cascading Style Sheets.

Do you want...

Then use...

to change the name of the menu bar that identifies it to the procedure?

the (Name) Property property.

to change the color of the menu bar?

the BackColor Property property to determine the color of the box.

the ForeColor Property property to determine the color of the text in the box.

a style sheet.

to add a border to the menu bar?

the Border Property property.

a style sheet.

to add a border to an individual menu item?

the ItemBorder Property property.

a style sheet.

to change the size or location of the menu bar?

the Bottom Property, Left Property, Right Property, and Top Property properties.

a style sheet.

(You can also move or resize the menu bar directly in the form.)

to change what the cursor looks like when it is on top of the menu bar?

the CursorPointer Property property.

a style sheet.

to change the color of the text or the background when the cursor is on top of the menu bar?

the BackColorOver Property and ForeColorOver Property properties.

a style sheet.

to make the menu bar inactive or make it invisible?

the Enabled Property property to determine whether the menu bar is active or not. (If the menu bar is inactive, it will be grayed out and nothing will happen when the end user clicks it.)

the Visible Property property to determine whether the menu bar is visible to the end user.

a style sheet.

to assign a help topic to the menu control?

the Help property. For more information, see Assigning Help to Your Forms and Controls.

to move the menu bar to another layer?

the Layer property. For more information, see Layering Controls.

to change the alignment of your menu bar from vertical to horizontal, or vice versa?

the Orientation Property property.

to display a tool tip when the cursor is on top of the menu controls?

the ToolTipText Property property.


WebFOCUS