Using Edit Boxes and Multi-Edit Boxes

In this section:

How to:

Reference:

Edit boxes and multi-edit boxes enable end users to view, enter, and edit data for a stack or user-defined field. Edit boxes allow only single lines of text; multi-edit boxes allow multiple lines.


Top of page

x
Procedure: How to Place an Edit Box or Multi-Edit Box on Your Form
  1. Select the Edit Edit button box or Multi-edit box Multi-Edit box button control in the Controls palette.

    Draw a rectangle on your form approximately where you want your edit box or multi-edit box to be at approximately the size you want.

  2. (Optional, but recommended.) Give your edit box or multi-edit box a more meaningful name than EditBoxn or MultiEditBoxn.
  3. If necessary, readjust the size and placement of your check box.
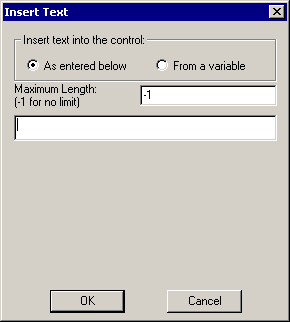
  4. Double-click the edit box or multi-edit box or select the Text property to open the Insert Text dialog box. You will use the dialog box to determine the data source for your edit box or multi-edit box.
  5. To directly set the initial text for the edit box or multi-edit box, select As entered below, and then enter the text in the box.

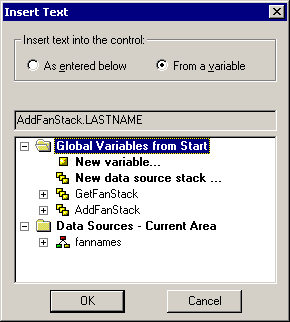
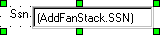
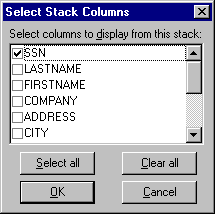
    To assign the contents of the edit box or multi-edit box to a variable, select From a variable. Then select a variable or data source stack column. (You can create a new variable or data source stack by clicking New variable or New data source stack. For more information, see How to Create a Variable in a Procedure.)

  6. Click OK.

Note:


Top of page

x
Reference: Insert Text Dialog Box

Use the Insert dialog box to populate edit and multi-edit boxes with data.

Insert Text Dialog Box

This dialog box contains the following elements:

Insert text into the control

Select As entered below to set the text directly.

Select From a variable to set the value from a variable.

Maximum length (-1 for no limit)

(Only if you selected As entered below.) Enter the maximum number of characters this edit box or multi-edit box can contain.

Insert Text Dialog Box

New variable...

(Only if you selected From a variable.) Opens the New Variable dialog box, where you can create a variable.

New data source stack...

(Only if you selected From a variable.) Opens the Stack Editor, where you can create a stack.

List of data source stacks and variables in your procedure

(Only if you selected From a variable.) Contains a list of the existing stacks, variables, and database fields in your procedure.

Either select a variable, or expand a data source stack or database and select a column.

Data Sources - Current Area

(Only if you selected From a variable.) Lists the fields from the data sources used in this procedure.

Note: We recommend that you not use the Current Area. Data source stacks are a superior way of accessing and manipulating data source values, and they function more intuitively than the Current Area.


Top of page

x
Changing Edit or Multi-Edit Box Properties

When you select your edit box or multi-edit box, you will see a list of edit box or multi-edit box properties in the property sheet. Changing these properties will change what your edit box or multi-edit box looks like and what it does at run time.

Many of the styling properties can also be changed using a Cascading Style Sheet. For more information on Cascading Style Sheets, see Using Cascading Style Sheets.

Do you want...

Then use...

to change the contents of the edit box or multi-edit box?

the Text property to open the Insert Text Dialog Box dialog box.

to change the name of the edit box or multi-edit box that identifies it to the procedure?

the (Name) Property property.

to change the size or location of the edit box or multi-edit box?

the Bottom Property, Left Property, Right Property, and Top Property properties.

a style sheet.

(You can also move or resize the edit box or multi-edit box directly in the form.)

to change the color of the edit box or multi-edit box?

the BackColor Property property to determine the color of the box.

the ForeColor Property property to determine the color of the text in the box.

a style sheet.

to change the font in the edit box or multi-edit box?

the Font Property property.

a style sheet.

to change the case of text entered in the edit box or multi-edit box before being returned to the bound variable?

the CaseStyle Property property.

to display only asterisks instead of actual characters when an end user enters information into an edit box?

the Password Property property. (This property does not apply to multi-edit boxes.)

to make the contents of the edit box or multi-edit box read-only?

the ReadOnly Property property. (You could accomplish this by disabling the Enable property, but this method does not gray the control.)

to remove the border or add a border to the edit box or multi-edit box?

the Border Property property.

to make the edit box or multi-edit box inactive or make it invisible?

the Enabled Property property to determine whether the edit box or multi-edit box is active or not. (If the edit box or multi-edit box is inactive, it will be grayed out and nothing will happen when the end user clicks it.)

the Visible Property property to determine whether the edit box or multi-edit box is visible to the end user.

a style sheet.

to change what the cursor looks like when it is on top of the edit box or multi-edit box?

the CursorPointer Property property.

a style sheet.

to display a tool tip when the cursor is on top of the edit box or multi-edit box?

the ToolTipText Property property.

to assign a help topic to the edit box or multi-edit box?

the Help property. For more information, see Assigning Help to Your Forms and Controls.

the end user to be able to tab to the edit box or multi-edit box?

the Tabstop Property property.

to move the edit box or multi-edit box to another layer?

the Layer property. For more information, see Layering Controls.

to enable automatic validation of data formats at run time?

the IBIValidation property.

to control the display order of the edit box or multi-edit box when more than one control is overlaid?

the ZIndex Property.

Note: IE7 or equivalent required.


x
Using Prompted Edit Boxes

Reference:

A prompted edit box consists of two controls grouped together: an edit box and a text control describing the edit box.

prompted edit box

WebFOCUS Maintain generates prompted edit boxes for you automatically during the following situations:

For more information on grouping controls, see Grouping Controls.

WebFOCUS Maintain includes a special alignment command for aligning prompted edit boxes along the left sides of the edit boxes. For more information, see How to Align Prompted Edit Boxes Along the Left Sides of the Edit Boxes.


x
Reference: Select Stack Columns Dialog Box

When you drag a data source stack from the Project Explorer into the Form Editor, WebFOCUS Maintain displays the Select Stack Columns dialog box. You use this dialog box to determine which columns in the data source stack to create prompted edit boxes for.

Select Stacks Columns Dialog Box

This dialog box has the following options:

Select columns to display from this stack

Select the columns in this data source stack that you want to display on your form. Clear the columns you do not want to display.

Select all

Selects all the columns in the data source stack.

Clear all

Clears all the columns in the data source stack.


x
Reference: Select Segment Fields Dialog Box

When you drag a segment from a data source in the Project Explorer into the Form Editor, WebFOCUS Maintain displays the Select Segment Fields dialog box. You use this dialog box to determine which fields in the data source segment WebFOCUS Maintain should create prompted edit boxes for and what their data source should be.

When you finish specifying information in this dialog box and click OK, WebFOCUS Maintain will do the following:

Select Segment Fields dialog box

This dialog box has the following options:

Select fields to display from this segment

Select the fields in this data source segment that you want to display on your form. Clear the fields you do not want to display.

Select all

Selects all the fields in the segment.

Clear all

Clears all the fields in the segment.

Bind fields to

Select Current Area to specify that the data source for the edit fields will be the Current Area.

Select New stack to specify that the data source for the edit fields will be the data source stack you specify here. WebFOCUS Maintain suggests a name for this data source stack, but you can type another name here.

Note: We recommend that you not use the Current Area. Data source stacks are a superior way of accessing and manipulating data source values, and they function more intuitively than the Current Area.

Tip: You cannot enter the name of a data source stack that already exists. If you want to use an existing data source stack as the data source for your prompted edit fields, click Cancel and drag the data source stack you want from the Project Explorer into the Form Editor.

Select a single path to include in your stack

Enables you to select all of the fields in a single segment of a hierarchical database. (If you have a flat file or relational database this enables you to select all of the fields.)


WebFOCUS