Using the Synonym Editor for Cube Data Sources

How to:

Reference:

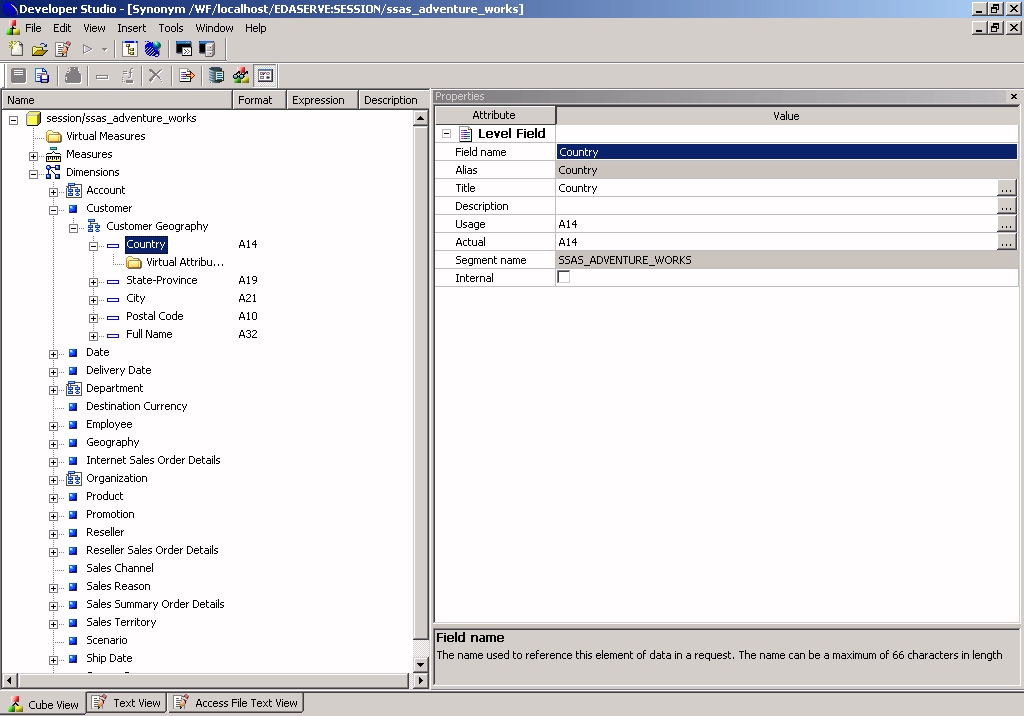
The Synonym Editor enables you to make further modifications to your Cube synonym definitions. The Cube synonym is displayed in the Cube View tab. If you select a component of the synonym, its properties appear in the right pane.

Cube data source example

You can use the Synonym Editor to:

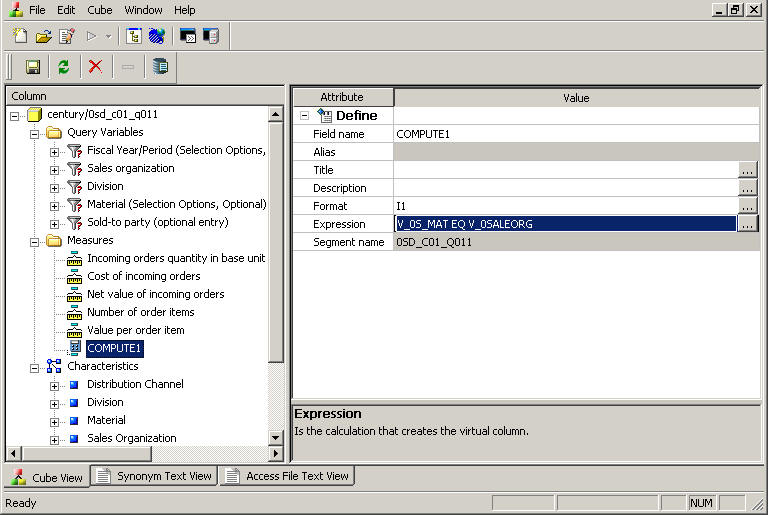
The following image is an example of a Cube data source in the Synonym Editor.

Characteristics

Note: The Synonym Text View tab and the Access File View tab are identical for all types of data sources. For more information about these tabs, see Synonym Editor - Text View Tab and Synonym Editor - Access File Text View Tab.


Top of page

x
Reference: Cube View Tab Objects

The following objects appear on the Cube View tab.

Object

Description

Characteristics

Characteristics. Contains the Properties and Hierarchies folders.

Optional variable

Optional variable.

Mandatory Variable

Mandatory variable that is not satisfied (selection criteria has not been created).

Mandatory Variable satisfied

Mandatory variable that is satisfied (selection criteria has been created).

Measure

Measure.

Hierarchy

Hierarchy.

Attribute

Attribute.

Leaf node

Represents a leaf node in a parent/child hierarchy. A leaf node is a member of a hierarchy that does not have any children.

Represents Level 1 in a level hierarchy.

Level 2 Hierarchy

Represents Level 2 in a level hierarchy.

Level 3 Hierarchy

Represents Level 3 in a level hierarchy.

Level 4 Hierarchy

Represents Level 4 in a level hierarchy.

Level 5 Hierarchy

Represents Level 5 in a level hierarchy.

Level 6 Hierarchy

Represents Level 6 in a level hierarchy.

Level 7 Hierarchy

Represents Level 7 in a level hierarchy.

Level 8 Hierarchy

Represents Level 8 in a level hierarchy.

Level 9 Hierarchy

Represents Level 9 in a level hierarchy.

Level 10 Hierarchy

Represents Level 10 in a level hierarchy.

Level 11 Hierarchy

Represents Level 11 in a level hierarchy.

Level 12 Hierarchy

Represents Level 12 in a level hierarchy.

Level 13 Hierarchy

Represents Level 13 in a level hierarchy.

Level 14 Hierarchy

Represents Level 14 in a level hierarchy.

Level 15 Hierarchy

Represents Level 15 in a level hierarchy.

Level 16 Hierarchy

Represents Level 16 in a level hierarchy.

For more information about other standard objects that may appear in the Synonym Editor, see Synonym Editor Main Attributes.


Top of page

x
Procedure: How to Edit Field Names and Titles

To edit field names and titles:

  1. From the Projects or Data Servers area, open a synonym by double-clicking a Cube Master File from the Master Files folder.

    Note: You may also right-click the synonym and select Edit in Synonym Editor.

    By default, the Synonym Editor opens to the last view used.

  2. Select an attribute from the Cube View tab.

    Note: The attributes available depend on the type of synonym.

  3. Click the FIELD NAME, TITLE, or CAPTION value field on the right-hand side of the workspace.

    Note: The Synonym Editor does not let you make any changes that would render the Master File unusable. Therefore, you cannot edit any value field that is highlighted gray.

  4. Manually edit the Field Name, Title, or Caption by typing in the value field.

    The edits are updated instantaneously in the Cube View tab.

  5. Click Save to save the synonym.
  6. To close the synonym, select Close from the File menu or click the control button in the upper-right corner.

Top of page

x
Procedure: How to Edit Titles for Multiple Languages

To edit the title for multiple languages:

  1. From the Projects or Data Servers area, open a synonym by double-clicking a Cube Master File from the Master Files folder.

    By default, the Synonym Editor opens to the last view used.

  2. Select an attribute from the Cube View tab.
  3. Click the browse (...) button, located on the far right of the TITLE or CAPTION value field.

    The Multilingual Titles dialog box opens.

    The Multilingual Titles dialog box

  4. You may add, edit, or delete a title for this field.

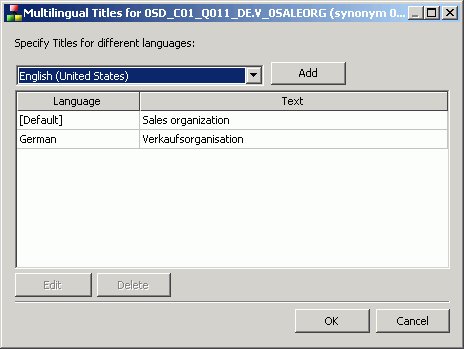
    To add an additional language for the title:

    1. Select a language from the drop-down list.
    2. Click Add.
    3. Type a description for the title field.

    To edit an existing specified title:

    1. Select the title and click Edit.

      You may also double-click the title.

    2. Manually type a title name.

    To delete a specified title:

    1. Select the title and language to be deleted.
    2. Click Delete.
  5. Click OK to close the Multilingual Titles dialog box.
  6. Click Save from the File menu to save the synonym.
  7. To close the synonym, select Close from the File menu or click the control button in the upper-right corner.

Top of page

x
Procedure: How to Delete Measures, Dimensions, or Parent/Child Hierarchies

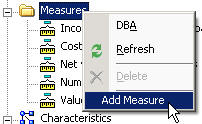
To delete measures, dimensions, or parent/child hierarchies:

  1. From the Projects or Data Servers area, open a synonym by double-clicking a Cube Master File from the Master Files folder.

    By default, the Synonym Editor opens to the last view used.

  2. Select the attribute name that you want to delete.
  3. Right-click and select Delete from the context menu.

    The attribute is deleted from the Cube View tab.

  4. Click Save to save the synonym.
  5. To close the synonym, select Close from the File menu or click the control button in the upper-right corner.

Top of page

x
Procedure: How to Create Virtual Measures With COMPUTE Fields

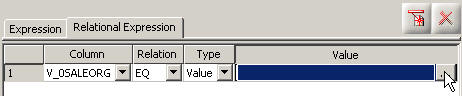
To create virtual measures with COMPUTE fields:

  1. From the Projects or Data Servers area, open a synonym by double-clicking a Cube Master File from the Master Files folder.

    By default, the Synonym Editor opens to the last view used.

  2. Select the Measures folder from the Cube View tab.
  3. Right-click and select Add Measure from the context menu.

    Add Measure

    The Compute Calculator opens.

    The Compute Calculator

  4. From the Compute Calculator, type a name for the column in the Column input field.
  5. You may type a descriptive title for the measure (COMPUTE) in the Title input field.

    Tip: From the Synonym Editor, click the browse (...) button at the right of the TITLE and DESCRIPTION value fields to specify multiple language titles.

  6. Use the Expression tab and the calculator buttons to build the expression for the Measure (COMPUTE field).

    or

    Use the Relational Expression tab to build the expression.

    1. From the Relational Expression tab, use the drop-down lists to select the filter Column, Relation, and Type.

      Note: Parameters are not supported.

    2. Click the browse (...) button at the right of the Value input field.

      Value Input field

      The Value Selection dialog box opens.

    3. Select from the available values and use the arrows to add or remove values.
    4. Click OK to close the Value Selection dialog box and return to the Relational Expression tab.

      The expression is added to the value field.

    5. To add another filter, double-click a column or variable from the Columns/Variables tab on the right side of the Compute Calculator. The filter is added to the Relational Expression tab, where you can add the expression value.
    6. To delete an expression, click in the row number column of the expression that you are deleting, right-click and select Delete selected row(s). The expression is removed from the Relational Expression tab.
  7. You may select the Check expression and Sample Data buttons, located on the top right of the Compute Calculator, to verify that the expression is valid and to view sample data for the filter.
  8. Click OK to close the Compute Calculator and return to the Synonym Editor.

    Note: To edit the Compute, Title, or Expression, you may do so directly from the Synonym Editor or you may click the browse (...) button at the right of the EXPRESSION value field to relaunch the Compute Calculator.

    Edit


WebFOCUS