In this section: |
This chapter focuses primarily on the WebFOCUS Environments, Data Servers area of the Developer Studio Explorer, where you can access data and develop applications directly on a remote WebFOCUS Reporting Server using Developer Studio tools. The chapter describes the graphical tools that enable you to access data and create metadata, as well as several configuration variations that affect your selection and use of these tools.
Project-area options for data access and development are described in the Developer Studio Application Development Getting Started manual and all aspects of Managed Reporting administration are described in the Managed Reporting Administrator's Manual. Note that the procedures for accessing data and creating synonyms for use in the Projects and Managed Reporting environments are similar to those described in this chapter for WebFOCUS Environments.
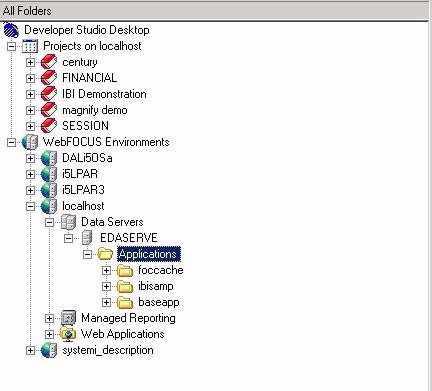
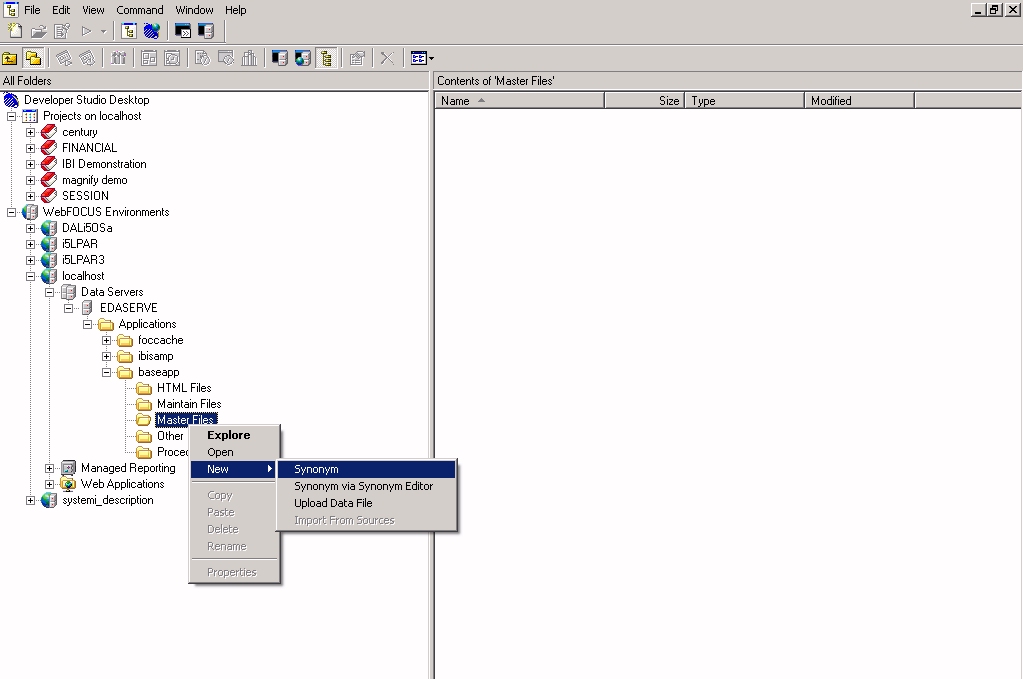
The image below displays the WebFOCUS Environments, Data Servers area of the Developer Studio Object Explorer.
The Data Servers area displays each WebFOCUS Reporting Server that the WebFOCUS Client can access and permits development against multiple Reporting Servers, which may be configured on any supported platform (as shown in the above image).
The Data Servers folder is always accessible from the Developer Studio Object Explorer. The folder lists the applications you have access to and the resources (files) stored in these applications.
The default WebFOCUS Reporting Server (named EDASERVE) is created during installation and is displayed in the Data Servers area.
In the previous image, notice that several remote servers have been added. An Applications folder beneath each WebFOCUS Reporting Server displays the directories based on the Application Root directory (APPROOT) for that WebFOCUS Reporting Server (on Windows, drive:\ibi\apps by default). For this example, a server called FLATIRON (UNIX Dev WF Reporting Server) is shown with its Applications folder expanded. Any directory located under APPROOT appears under the Data Servers Applications folder. In addition, you can map an application that is not under APPROOT (but resides elsewhere in the file system) to be accessible as a virtual application. The mapped application is displayed for use, along with the applications that are physically under APPROOT.
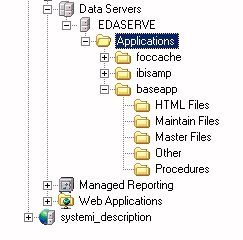
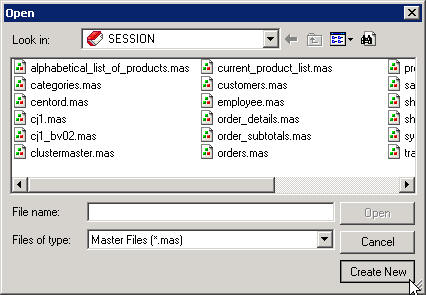
The Data Servers area gives you access to the file resources on all WebFOCUS Reporting Servers in your environment. You can create and manage metadata, procedures, HTML files, and WebFOCUS StyleSheets. You can also perform operations on GIF images and other files, such as FOCUS data sources. For organizational purposes, these application files are displayed in virtual folders labeled HTML Files, Master Files, Procedures, Maintain File, and Other.
The virtual folders appear this way by default. However, if you wish, you can hide the virtual folders from the Object Explorer toolbar.
If you are developing applications using a remote WebFOCUS Environment, you must first set up your environment to be able to create synonyms (Master and Access Files) and access the associated data on a remote WebFOCUS Reporting Server. For details on how, when, and where to create this metadata, see Data Access Configuration Variations.
How to: |
While working in the WebFOCUS Environments area of Developer Studio you can configure the Application Path for a Reporting Server if you have the required user privileges.
The Application Configuration dialog appears as shown in the following image.
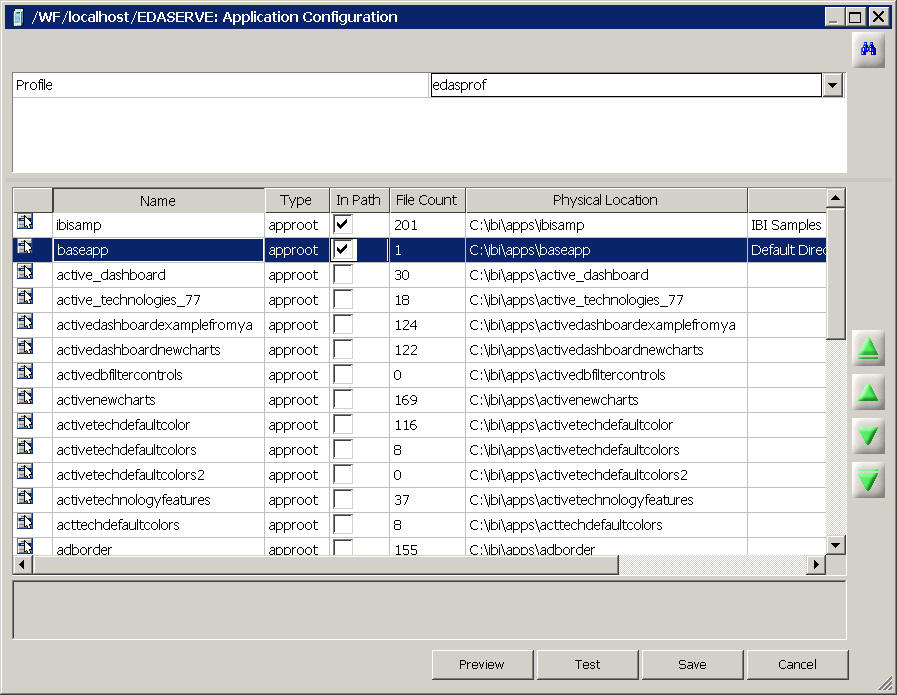
The following options are available in the Application Configuration dialog.
If APPLOCK is set on the server, the option to configure the Application Path will not be available. In this case, you will see only applications that you are allowed to access and in addition other commands such as New Application, Create, Delete, Rename will be disabled.
How to: |
By default Developer Studio displays all applications available for the Reporting Servers based on Reporting Servers APPROOT directory configuration.
You can select to view only applications that are in the Reporting Servers Application Path by selecting a server under the Data Servers area.
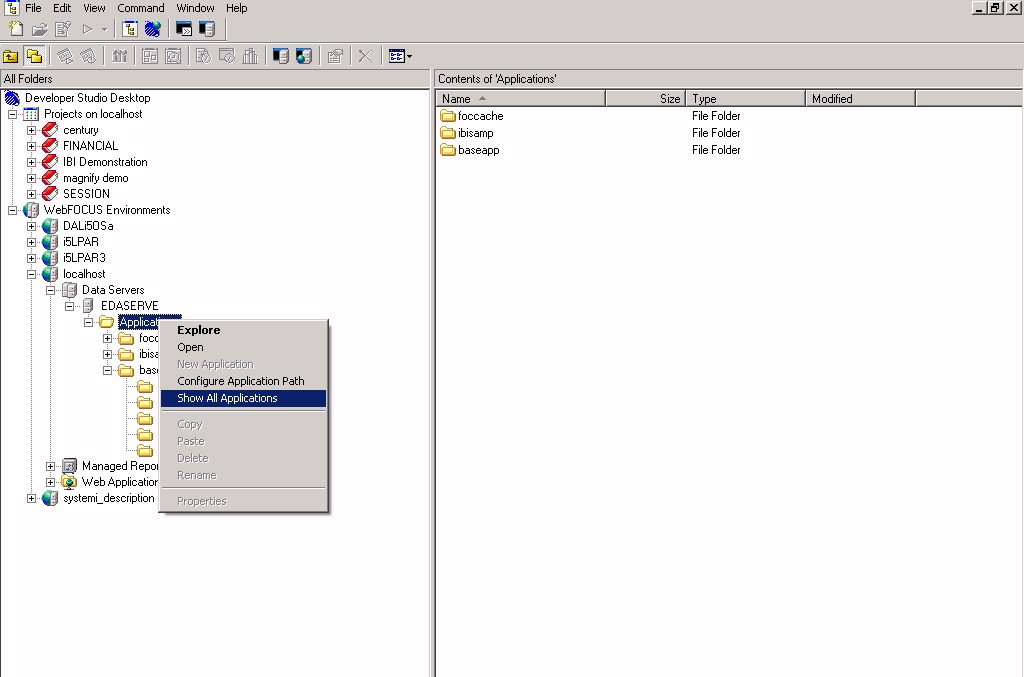
If APPLOCK is set on the server, the options to control how applications are displayed is not available. In this case you will see only applications that you are allowed to access and in addition other commands such New Application, Create, Delete, Rename will be disabled.
How to: |
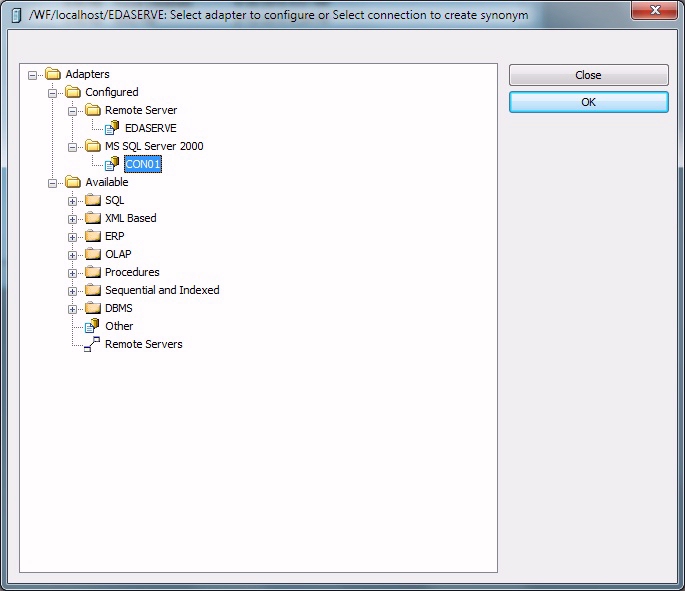
If you are working on the platforms served by Developer Studio (UNIX, Windows, OpenVMS, IBM i, and z/OS), you can use the Developer Studio Create Synonym tool to set up access to your data. This process involves configuring adapters, adding remote servers if necessary, and then creating the required synonyms.
Tip: Authorized administrators who prefer to work in a thin-client environment can complete these tasks from the Reporting Server Web Console, which is accessible from the Developer Studio Object Explorer toolbar. Both approaches edit the same underlying server files, so it does not matter which you use. For more information, see Using the Reporting Server Web Console for Data Access and Synonym Preparation.
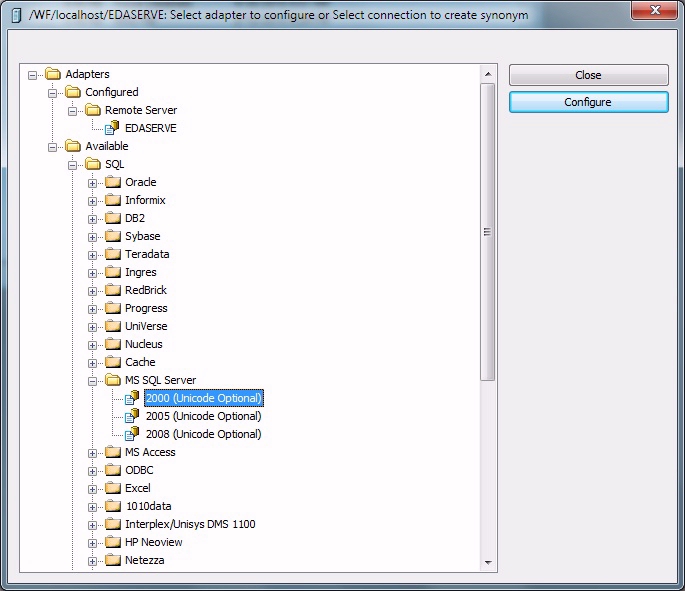
For example, if you wish to report against data in an Oracle database, you need to configure the Adapter for Oracle, which enables you to create the synonyms you need to access and read your Oracle data. To access Microsoft SQL Server data, you need to configure the Adapter for Microsoft SQL Server, and so on. An adapter must be configured on each Reporting Server that accesses the corresponding type of data.
For details, see Configuring Adapters and Remote Servers in Developer Studio.
In order to understand when this step is required, it is useful to start by understanding when it is not required. If you have configured adapters and your data is directly accessible from your default WebFOCUS Reporting Server, as represented in the image below, a remote server has no role in your configuration.

With this setup, once adapters are available on the default WebFOCUS Reporting Server, you can create the required synonyms. (The same is true if you are working in the Projects area from a stand-alone Developer Studio installation, where a default Reporting Server is automatically available on your local machine.)
Remote servers are required in the following situations:
At many sites, some of the data that applications need to access resides on another server or servers, often referred to as remote servers. The following are typical configurations.
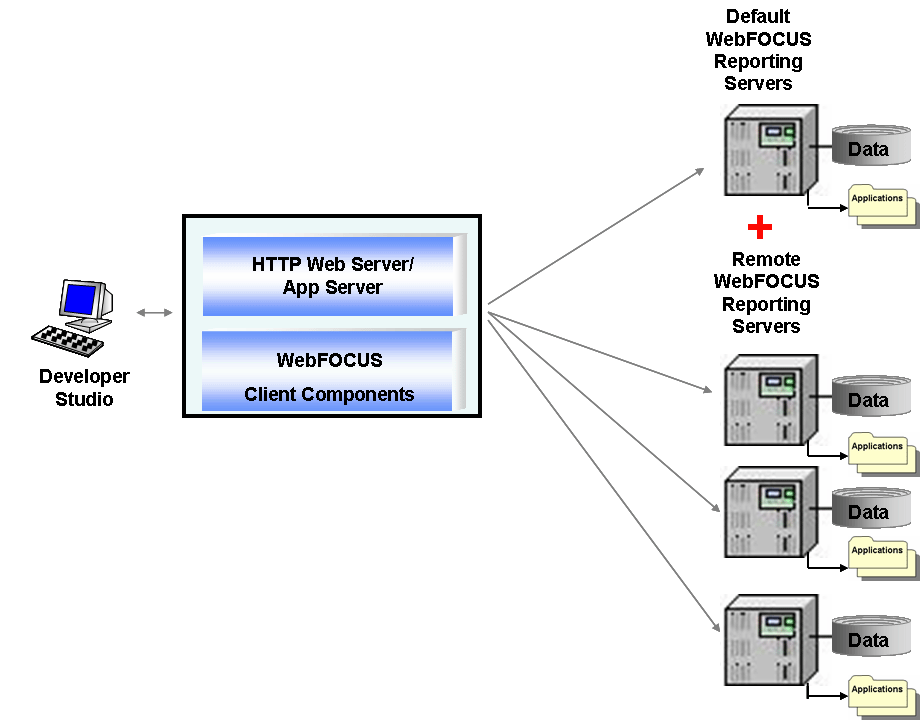
This modular server configuration provides great flexibility for in-place development on various types of application resources using Developer Studio tools. For example, if a self-service application resides on the FLATIRON UNIX server, you may want to edit some of its components (maybe a procedure or an HTML file) directly on that server, or you may want to take advantage of the Developer Studio graphical tools to work with application files on a Mainframe server, such as PDS_SRV1 or USS_SRV2.
In this situation, you must add the servers to your default Reporting Server configuration, but you must also specify the same servers in your WebFOCUS Client configuration because that is what adds the distinct server names to the Data Servers folder. Only then can you perform operations directly on those servers. This includes creating synonyms and using Developer Studio tools to work with application files (synonyms, procedures, HTML files, and so on), organized by application under each remote server.
To expedite the client-side remote server configuration, you can access the WebFOCUS Administration Console directly from Developer Studio. For details about adding servers to the WebFOCUS Client configuration, see How to Add a Remote Server to the WebFOCUS Environment.
Keep in mind, however, that in order to use the data on each of these remote servers, the appropriate adapters and synonyms must exist on those servers. Sometimes they are already available there, but if not, you must configure the adapters and generate the synonyms, as described later in this chapter.

In this case, you must add each remote server to your default Reporting Server configuration before you can create synonyms that point to tables on the remote servers and report against the combined data (which can be of different types and even on different platforms).
This assumes, however, that the required synonyms already exist on the remote servers. If that is not the case, you must first create synonyms for the data accessed by the remote servers, which may, in turn, require configuring the adapter needed to create those synonyms.
Once your default Reporting Server (for example, EDASERVE) can communicate with the remote servers and access the data stored there, you can use Developer Studio tools to work with various types of application resources (Master Files, procedures, HTML files, and so on), organized for your convenience in virtual folders under each application.
It is important to note that in this setup the remote servers do not appear in the Data Servers folder. Since they can only be accessed through the default Reporting Server, they are not exposed as separate servers in Developer Studio.
For each data source the server will access, you must create a synonym that describes the structure of the data source and the server mapping of its data types. The synonyms define unique names (or aliases) for each table, view, or other type of object that is accessible from the server.
Synonyms are useful because they hide the underlying location and identity of the data source from client applications. They also provide support for extended metadata features of the server, such as virtual fields and additional security mechanisms. Using synonyms allows an object to be moved or renamed while allowing client applications to continue functioning without modification. The only modification required is a redefinition of the synonym on the server. The result of creating a synonym is a Master File and, usually, a corresponding Access File, which represent the server metadata.
Appropriate synonyms must be available on the server where the data resides.
For details, see Creating Synonyms in Developer Studio.
To launch the Create Synonym tool from the WebFOCUS Environments area of the Explorer:
If you wish to use the data source in multiple applications, or have not yet created your application, you can use the baseapp application, where resources can be stored for sharing and access by other applications.
Tip: If you are developing from the Projects area of the Explorer, expand the project, and right-click the Master Files folder, then proceed as described.
The Create Synonym tool opens. By default, no adapters are available. Your first task is to configure an adapter in order to be able to access a relational, multidimensional, or other type of data source.
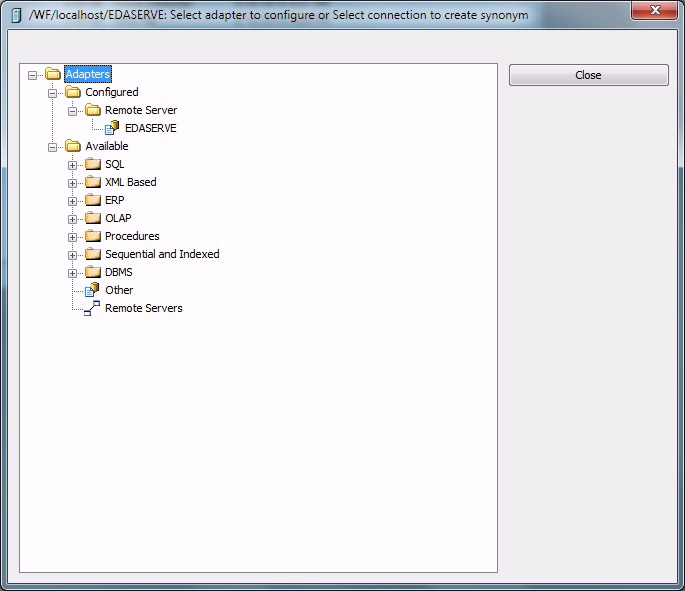
Note: If any adapters have already been configured for the server they will be listed under the Configured folder.
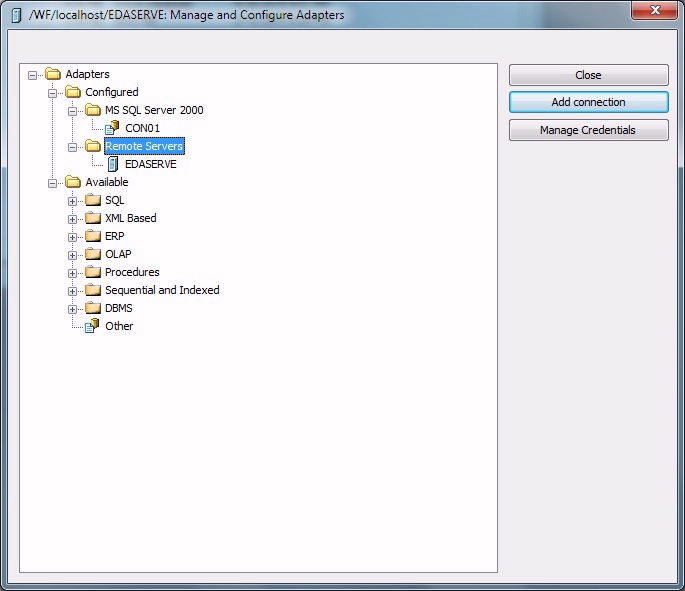
Depending upon your needs, you can use this window to start configuring an adapter, adding a remote server, or both.
You can use the Configured folder to add new connections and create synonyms.
When building a report, you can access the Create Synonym Tool directly from any of the Developer Studio reporting tools when you want to report against a synonym that is not available in the list.

Note: When accessing a Developer Studio Tool in the Managed Developer Edition, the Create New button will not appear for developers without Data Server privileges. The Data Server privilege is optional for Developers and standard for Content Managers and Managed Reporting Administrators. This restriction does not apply to the full edition of Developer Studio.
The Create Synonym Tool opens.
When you have completed the synonym creation process, the new synonym appears in the list of available synonyms. You can then select it and continue to create your report request.
How to: |
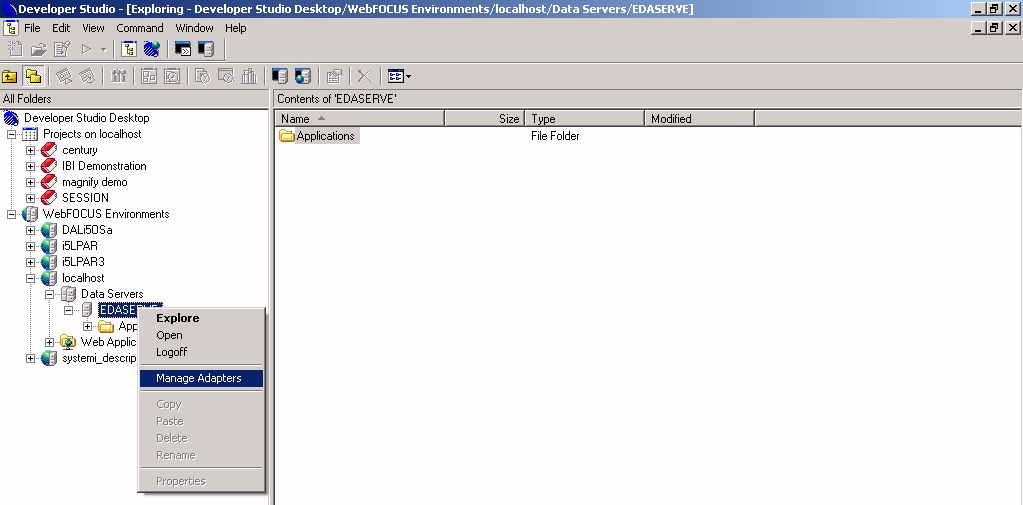
While working from the WebFOCUS Environments, Data Servers area, or from the Projects area, you can manage Adapters by performing the following task.
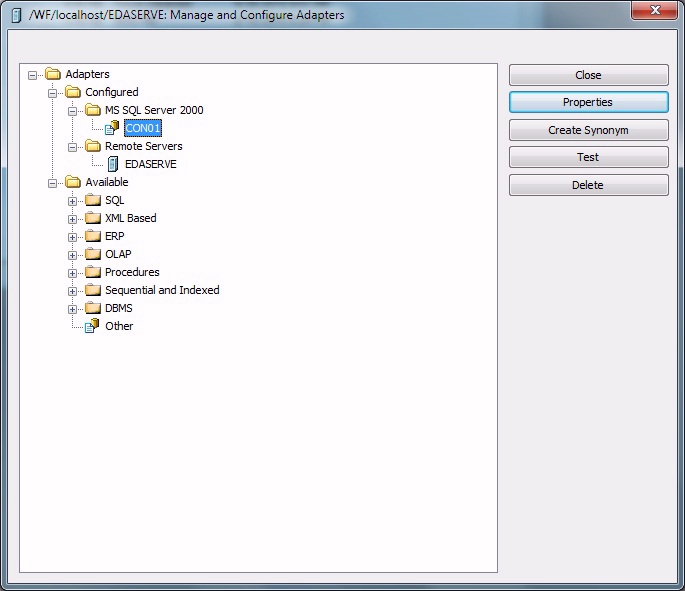
The Manage and Configure Adapter dialog appears.
The Adapter Configuration dialog appears as shown in the following image.
An MS SQL Server adapter is issued for this configuration example.
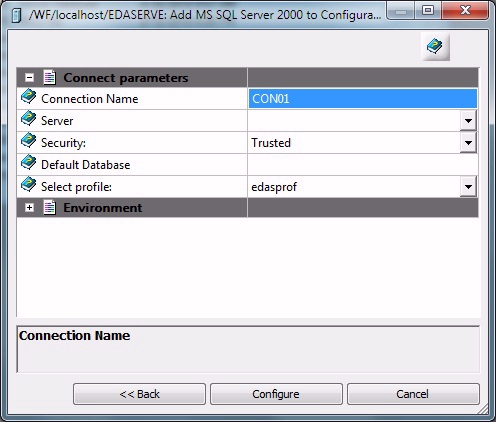
This dialog enables you to define connection parameters for the adapter including Connection Name, Server, Security, profile, and default database.
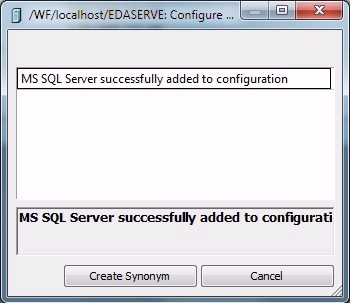
A dialog appears to inform you that the adapter was successfully added to configuration.
From the Manage and Configure Adapters dialog you can also manage existing adapter connections, change properties, add connections, test connections, delete connections, and create synonyms.
How to: |
If your machine has access to your data sources, you can configure adapters to access data directly. However, some adapters may require you to configure your environment before adding them. To determine if this is required for an adapter you wish to configure, see the Adapter Administration for UNIX, Windows, OpenVMS, IBM i, and z/OS manual.
When you configure an adapter, information is added to the edasprof.prf and edaserve.cfg server files.
From the Projects area, right-click on the root folder Projects On... and select Manage Adapters.
The Adapter Configuration dialog opens.
A message from the Reporting Server confirms that the adapter has been added to your configuration.
When you open the Manage and Configure Adapters dialog the following options appear when you select a configured adapter: Create Synonym, Test, Delete, and Properties buttons appear.
If you typed the correct connection parameters, sample data should appear.
If the test fails, click the connection, choose Properties, and adjust your information accordingly.
From the Projects area, right-click on the root folder Projects On... and select Manage Adapters.
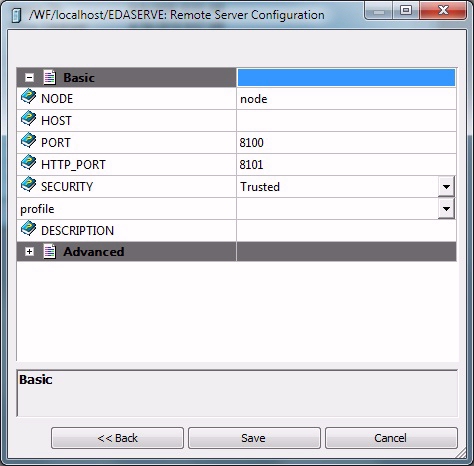
A window appears containing fields to define the connection.
|
Basic Parameters |
Description |
|---|---|
|
NODE |
Type a name by which you will refer to the server. The name is your choice, but cannot be the same as any other server. It must begin with a letter and cannot be more than eight characters. |
|
HOST |
Specify the host name or IP address for the server. |
|
PORT |
Specify the base TCP port for the server. The default is normally 8120, not 8100. |
|
HTTP_PORT |
Specify the HTTP port for the server. This is normally one more than the base TCP port. The default is normally 8121, not 8101. |
|
SECURITY |
Specify how a user should log on to the remote server:
If the server is not on Windows and runs with security ON, providing an explicit user ID and password is required to create synonyms. |
|
user |
If security is set to Explicit, enter a specific user ID. |
|
password |
If you entered a user, provide a password. |
|
domain |
For a server on Windows, you can specify the domain where the user ID is defined. |
|
DESCRIPTION |
Optionally, type a description for the node. This description displays in the WebFOCUS front-end tools. |
|
Advanced Parameters |
Description |
|---|---|
|
SERVICE NAME |
CLIENT (servicename) Defines how to send outbound communications to a remote server. Servicename is optional. If servicename is provided, it must match the value of SERVICE in the service block of the server. |
|
HTTP_SSL |
Defines whether the Secure Sockets Layer protocol is used in the Web Console listener of the remote server. Enter:
|
|
COMPRESSION |
Activates data compression in a data transfer between the client and server. Enter:
|
|
ENCRYPTION |
Defines the encryption. Enter:
Note: Encryption is not supported for the PIPE protocol. Only 0 and DES are supported for the HTTP protocol. |
|
CONNECT_LIMIT |
Defines the maximum time, in seconds, that the client will wait for a TCP connection response from the server. Enter:
|
|
MAXWAIT |
Defines the time, in seconds, that the client will wait for a response from the server: -1 indicates indefinite timeout. |
A message indicates that a new server was added.
If the remote server is started and you typed the correct connection parameters, sample data should appear.
If the test fails, click the server, choose Properties, and provide an explicit user ID and password. Then click Save and try the test again.
Your next step depends on your objectives and your server configuration:
| WebFOCUS |