How to: Reference: |
As you load dimensions, ensure that the metrics in PMF show the correct level of responsibility in the hierarchy. The Dimension Loader tools allow you to quickly map the tables and fields that will serve as the source for the dimensions you will need to load.
The Dimension Loader controls the levels for dimensions used throughout PMF. When you first create a new dimension, determine its logical levels. For example, a Customer dimension might include country, region, state, and city.
The mainstreet_century data mart supplied with PMF uses four typical business dimensions: Location, Organization, Product, and Time. All PMF applications must include a Time dimension.
Important: If you have existing measures, and dimensions are loaded or reloaded, changing this information has a ripple effect throughout the system, so make changes carefully. If you change the intended value member or number of levels in any dimension, you will probably need to reload all data for that dimension, as well as reload all measures.
Note: If your procedures and metadata are not located in the Mainstreet application, make sure you have added the WebFOCUS application containing them to the WebFOCUS Reporting Server APP PATH setting before you attempt a load operation. You can do this using the Web Console.
The following procedure outlines the steps required when designing a simple dimension load. For information about designing a complex dimension load when customizing the Time dimension, see Designing a Custom Time Dimension Load.
- In the Manage tab click the Dimensions panel button.
-
Click
a dimension, for example, L-Location.
The Dimension Loader panel opens, as shown in the following image.
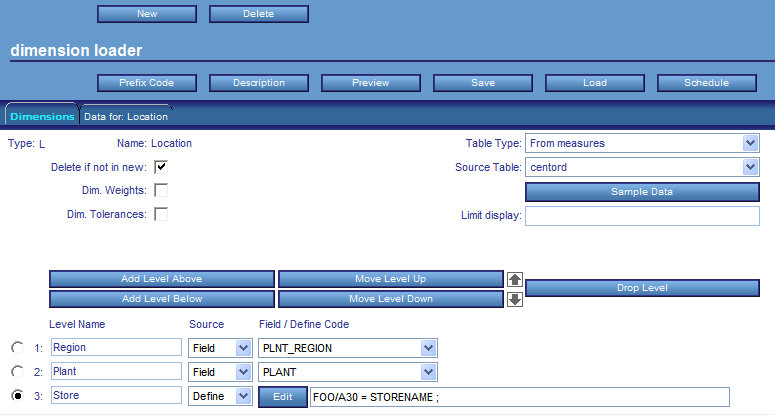
Note: The Dimension Loader automatically loads and displays the levels defined for the metadata and checks the dimension to make sure it is correctly set up. If anything is wrong, the Load status list displays the error.
-
From
the Table Type drop-down list, select one of the following options:
- Separate table. Activates the Key Field drop-down list from which you can select a uniquely identifiable key field that will link the source table, when the dimension is loaded, to the measures you will load later.
- From measures. Selecting this option means that the table from which the measures are loaded contains the values for the dimensionality. This option is normally used when loading data from an OLAP cube that is not normalized.
- Custom coding. Activates the Define Procedure drop-down list from which you can select a procedure that provides the customized code for loading the dimension.
- Time AutoGen. This option is only available for the Time dimension. You can automatically generate a standard Time dimension by selecting a value in each of the Start Month, Start Year, and End Year fields before loading the dimension.
- From the Source Table drop-down list, select a source table or Master File for the dimension. Optionally, specify a key field or define a procedure.
- In the Level Name field, type a dimension level name for each dimension you add.
-
From
the Source drop-down list, select Top, Field,
or Define.
Note: This field is only available if you have selected either the From measures or Separate table option from the Table Type drop-down list.
-
Do one
of the following:
- If you selected Top from the Source drop-down list, in the Field/Define Code field box, type the name you want to display as the top level dimension value, for example, Company-wide or All. You will most likely want to add a new level above all existing levels before using the Top option.
- If you selected Define from
the Source drop-down list, type the code in the Field/Define Code
field box. Code can span multiple lines, and this field can only
display one line of code at a time.
To view, and optionally edit, multiple lines of code displayed at the top of the Dimension Loader, click the Edit button. Click the OK button to save any changes, otherwise click the Cancel button.
- If you selected Field from
the Source drop-down list, select a field from the Field/Define
Code drop-down list.
Note: If you select a text field longer than 30 characters, the loader displays the following message and generates a WebFOCUS function to automatically truncate the field. You can also edit the code to perform more complex text manipulation.

Note: If you select an integer field, the loader displays the following message and generates a WebFOCUS function to automatically convert the field to text.

For information about additional fields and options available in the Dimension Loader, see Additional Options in the Dimension Loader.
Note: Whenever you make any changes in the Dimension Loader, the changes will not be effective until you save the changes, and load the dimension and any associated measures.
When you design a dimension load, the following options are available in the Dimension Loader.
|
Option |
Description |
|---|---|
|
Prefix Code |
This button opens a field box in which you can type FOCUS or SQL code that will run before the dimension is loaded. Click OK to save the code or Cancel to close the field box without saving your changes. If the table you are using is DBA protected, you can type the command SET USER = user_DBA_ password before you select the source table. For example, the sample Century Corp data uses the password WEBFOCUS. |
|
Description |
This button opens a field box in which you can type a description of the dimension load. Click OK to save the description or Cancel to close the field box without saving your changes. |
|
Preview |
This button runs and displays the Dimension Loader report in the "Data for" tab of the Dimension Loader. This report shows you how the load will be performed. For more information, see Interpreting the Dimension Loader Report. Note: You must select at least a Level 1 field in order to activate this option. |
|
Save |
This button saves metadata information for this dimension. You must save any changes you make before you can perform a dimension load. |
|
Load |
This button performs the dimension load. Use this to load dimensions after you add new or edit existing information in the Dimension Loader. |
|
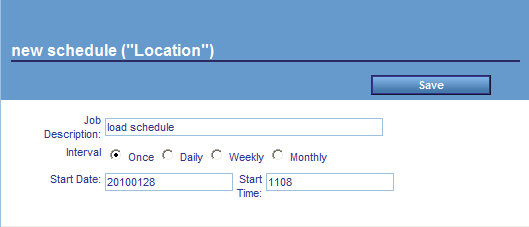
Schedule |
This button opens the dimension load schedule form where you can schedule a one-time or recurring dimension load. For more information, see Running and Scheduling a Dimension Load. |
|
Sample Data |
This button displays a report in a new browser window, showing sample data for the source table you selected in the Source Table drop-down list. For more information, see Sample Data From Source Tables. |
|
Add Level Below |
This button adds an additional dimension level field below the field currently selected with the option button to the left of the Level Name. |
|
Add Level Above |
This button adds an additional dimension level field above the field currently selected with the option button to the left of the Level Name. |
|
Drop Level |
This button deletes the dimension level field currently selected with the option button to the left of the Level Name. |
|
Move Level Up |
This button moves the dimension level field currently selected up one level. Use the option button to the left of the Level Name to select a field to move. |
|
Move Level Down |
This button moves the dimension level field currently selected down one level. Use the option button to the left of the Level Name to select a field to move. |
|
Delete if not in new (check box)
|
This check box controls how the loader handles records in the dimension load with corresponding dimension values that are no longer in the dimension series. If you select this check box, records are deleted, archived, and not restored after the load is completed. If you deselect this check box, records are deleted, archived, and restored after the load is completed. |
|
Dim. Tolerances (check box)
|
Selecting this check box activates dimensional tolerances for this dimension. This enables you to select a measure and configure tolerances for each dimension level value. Note: This option will only be available if Dimensional Measure Tolerances in the Tolerances settings is enabled. For more information, see How to Set Dimensional Measure Tolerances. |
|
Dim. Weights (check box)
|
Selecting this check box activates dimensional measure-to-objective weighting for this dimension. This enables you to select an objective and configure tolerances for each dimension level value. Note: This option will only be available if Dimensional Measure Weights in the Tolerances settings is enabled. For more information, see How to Set Dimensional Measure-to-Objective Weighting. |
Note: As you load dimensions, make sure to document them in the Description field box.