To install iWay Data Profiler on Windows:
-
Double-click
the iDPv9.0.1.ga-mm-dd-yyyy-winXX.exe file.
where:
- mm-dd-yyyy
-
Specifies the date of the iDP build.
- XX
-
Specifies the 64-bit version of Windows.
For example, iDPv9.0.1.ga-12-15-2014-win64.exe.
Note: For iDP version 9.0.1T, double-click the iDPv9.0.1T.ga-mm-dd-yyyy-winXX.exe file.
The Installer Language dialog box opens, as shown in the following image.
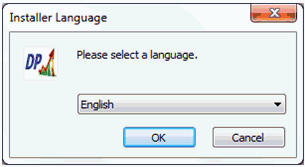
Note: The Installer Language dialog box opens only when you have the specified language pack that is supported by iWay Data Profiler installed on your system.
-
Select your
language from the drop-down list and click OK.
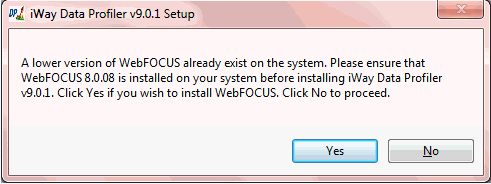
Note: A confirmation dialog box opens if WebFOCUS is not currently installed on your system, as shown in the following image.
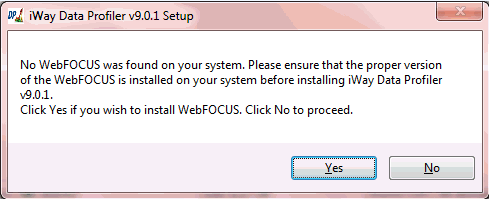
If you want to continue with the iDP installation and install WebFOCUS, click Yes. WebFOCUS Reporting Server Release 8.0 Version 08M and WebFOCUS Client Release 8.0 Version 08 will be installed along with iDP.
If you click No, WebFOCUS Server and Client will not be installed.
Note: The iDP installation only installs WebFOCUS Reporting Server Release 8.0 Version 08M and WebFOCUS Client Release 8.0 Version 08.
The iWay Data Profiler v9.0.1 Setup Wizard window opens, as shown in the following image.
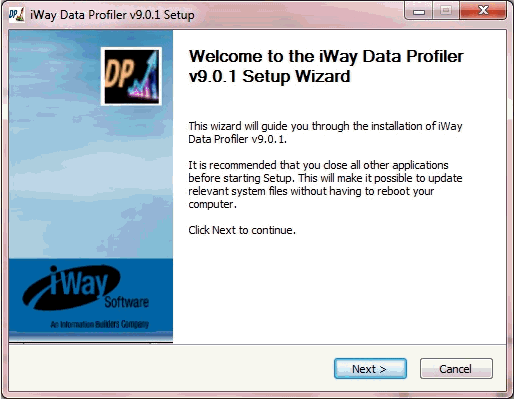
-
Click Next.
The License Agreement pane opens, as shown in the following image.
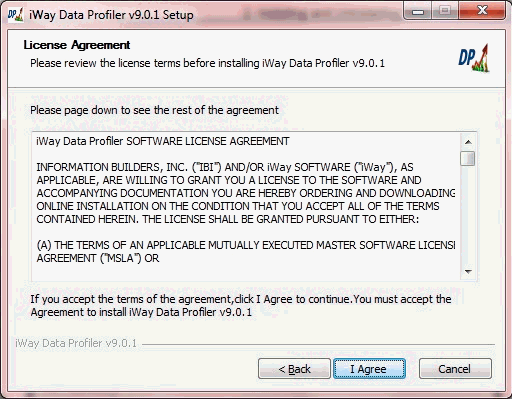
-
Review the license agreement and click I Agree when
you are ready.
The Installation Type pane opens.
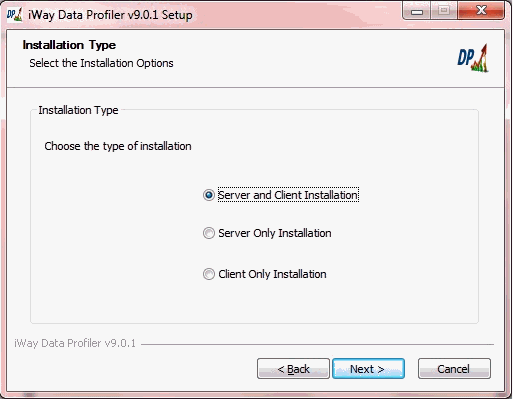
-
Select one
of the following options in the Installation Type pane:
- iDP Server and IDP Client Installation. If the WebFOCUS Reporting Server and WebFOCUS Client are installed on the same system, select this option to install iWay Data Profiler Server and Client.
- iDP Server Only Installation. If only the WebFOCUS Server is installed on this system, select this option to install iWay Data Profiler Server.
- iDP Client Only Installation. If only the WebFOCUS Client is installed on this system, select this option to install iWay Data Profiler Client.
-
Click Next.
The Choose Install Location pane opens, as shown in the following image.
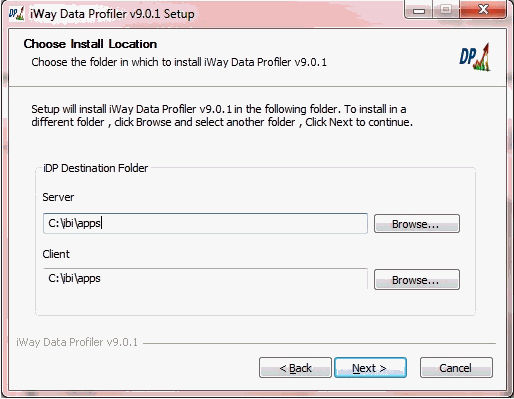
-
Click Browse and navigate to the
location where WebFOCUS is installed and then go to the apps subfolder.
For example:
C:\ibi\apps
Note: If an earlier version of WebFOCUS is already installed on your system, a confirmation message dialog is displayed, as shown in the following image.
Note: If an earlier version of iDP already exists in the path provided, a confirmation message dialog is displayed, asking you to upgrade to the latest iDP version or install a separate iDP version to coexist with the existing version, as shown in the following image.
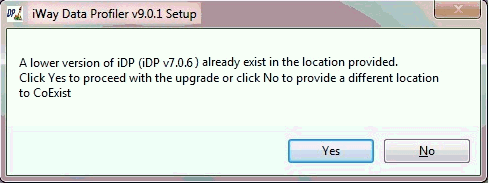
- Upgrade refers to the replacement of the existing version of iDP with a newer version of iDP.
- CoExist refers to retaining an earlier version of iDP with a newer version of iDP on the same system.
If the same version of iDP already exists in the path that is provided, a message is displayed prompting you to reinstall iDP, as shown in the following image.
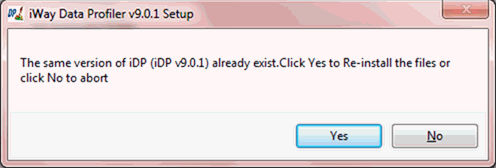
If you click Yes, the installer will replace the existing files in the path that is provided. If you click No, the iDP installation will be aborted.
-
Click Next.
The Select the Web/Application Server pane opens, as shown in the following image.

-
Select Apache Tomcat as the Web/Application Server to
configure iDP.
Note: Do not select IBM Websphere as Web/Application server. iDP v9.0.1 release does not support IBM Websphere.
-
Click Next.
The WebFOCUS Server pane opens, as shown in the following image.

-
Enter the credentials for the WebFOCUS Reporting Server.
The following table lists and describes the WebFOCUS Reporting Server credentials (parameters).
Parameter
Description
Edahome
The home directory for the WebFOCUS Reporting Server.
Port
The base TCP port for the server (for example, 8120).
Host
The host name of the server (for example, localhost).
Program Folder
This is the Windows program folder and service name (for example, WebFOCUS 80 Server).
-
Click Next.
The WebFOCUS Client License pane opens, as shown in the following image.
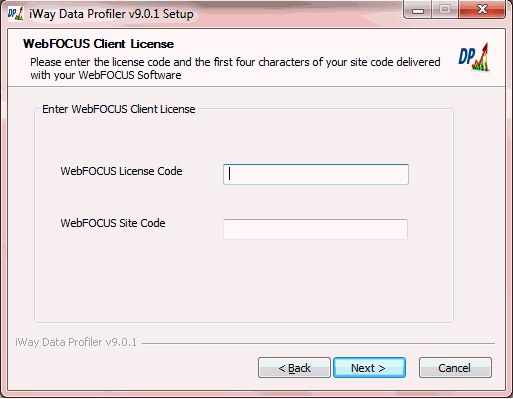
-
Enter the credentials for the WebFOCUS Client License.
The following table lists and describes the WebFOCUS Client License.
Parameter
Description
WebFOCUS License Code
Provide a License code for WebFOCUS Client.
WebFOCUS Site Code
Provide a Site code for WebFOCUS Client.
Note: Provide the valid License and Site code for a successful WebFOCUS client installation. This will be provided in the email received, after downloading iWay Data Profiler from http://techsupport.ibi.com.
-
Click Next.
The WebFOCUS Client pane opens, as shown in the following image.
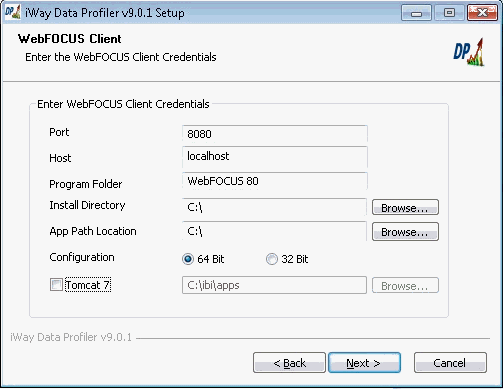
-
Enter the credentials for the WebFOCUS Client.
The following table lists and describes the WebFOCUS Client credentials (parameters).
Parameter
Description
Port
Provide a port that is used by the web server (for example, 8080 for Apache Tomcat).
Host
Provide the hostname of the web server (for example, localhost).
Program Menu
Provide the Windows program folder and service name (for example, WebFOCUS 80).
Install Directory
The home directory for the WebFOCUS Client.
Note: For iWay Data Profiler (iDP) Version 9.0.1, do not change the default home directory. Accept the default directory (C:\) during the installation.
App Path Location
The applications directory for the WebFOCUS Client.
Note: For iWay Data Profiler (iDP) Version 9.0.1, do not change the default application directory. Accept the default directory (C:\) during the installation.
Configuration
This is optional for 64-bit systems. The installation will default to 64-bit Java.
Note: Do not select 32-bit configuration.
Tomcat 7
This check box is automatically disabled if Apache Tomcat is already installed in your system.
If Apache Tomcat is not installed, select this option and provide the installation path.
-
Click Next.
Note: Skip steps 17 to 35, if you selected the Server Only Installation option.
-
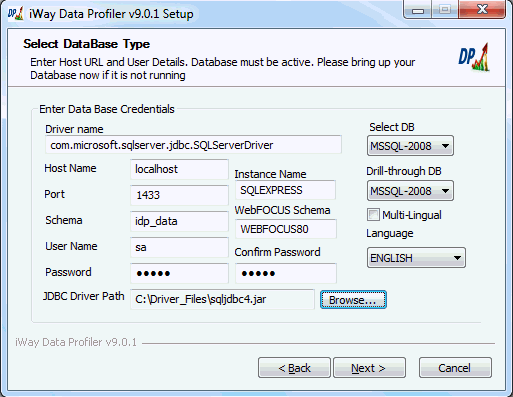
The Select
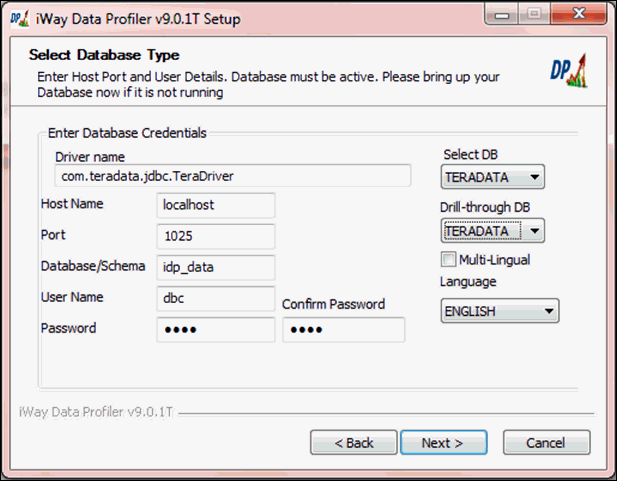
DataBase Type pane opens, as shown in the following image.
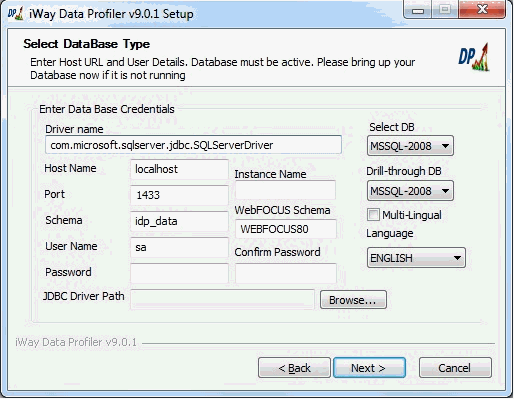
- Select a database from the Select DB drop-down list to display the driver name and host name in the corresponding fields.
-
Perform the following steps if the selected database
is MSSQL-2005 or MSSQL-2008,
as shown in the following image.
-
In the Schema field, provide the MSSQL database name,
which by default, is idp_data.
Note: If an iDP coexisting installation is being configured, then a unique database name must be provided that is different from the existing database name.
- In the WebFOCUS Schema field, provide the database name for the WebFOCUS client. Make sure that the provided database name exists in the database for a successful WebFOCUS client installation. The default database name is WebFOCUS80.
- In the Instance Name field, provide an MSSQL database instance name. This instance name field is enabled only for MSSQL DB (optional).
-
In the Schema field, provide the MSSQL database name,
which by default, is idp_data.
-
Perform the following steps if the selected database
is Oracle, as shown in the following image.
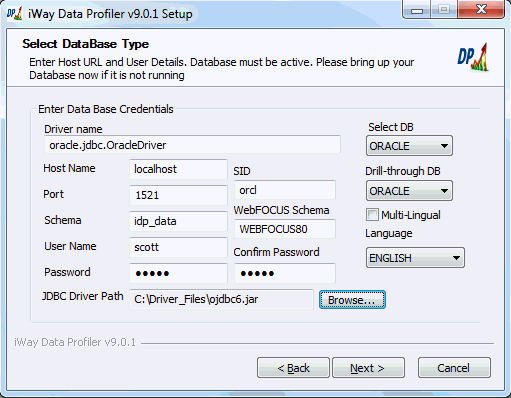
- In the SID field, provide the Oracle System ID (SID) value.
-
In the Schema field, provide the Oracle database schema name,
which by default, is idp_data.
Note: If an iDP coexisting installation is being configured, then a unique database schema name must be provided that is different from the existing database schema name.
- In the WebFOCUS Schema field, provide the Oracle database schema name for the WebFOCUS client. Make sure that the provided database schema name exists in the database for a successful WebFOCUS client installation. The default database schema name is WebFOCUS80.
-
If you require access to be configured for an Oracle
RAC database, then specify the Oracle SID value or Service Name
in the SID field.
Note: If you specify an Oracle SID value, then no additional post-installation changes are required. However, if you specify an Oracle Service Name value, then you must perform the additional configuration steps as described in How to Configure Access to Oracle RAC Databases Using a Service Name Value.
If you should need to change the Oracle SID value in the future (after iDP has been installed), then you must perform the configuration steps as described in How to Configure Access to Oracle RAC Databases Using a System ID (SID) Value.
-
Perform the following steps if the selected database
is MYSQL, as shown in the following image.
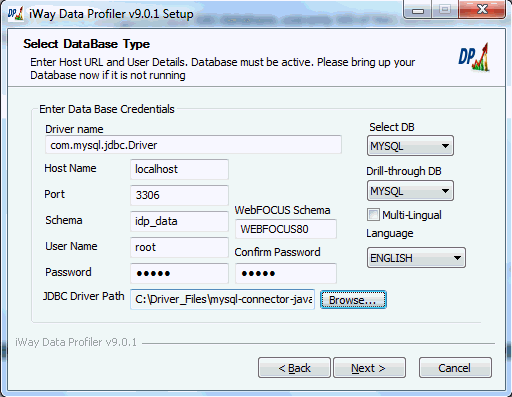
-
In the Schema field, provide the MYSQL schema name,
which by default, is idp_data.
Note: If an iDP coexisting installation is being configured, then a unique schema name must be provided that is different from the existing schema name.
- In the WebFOCUS Schema field, provide the schema name for the WebFOCUS client. Make sure that the provided schema name exists in the database for a successful WebFOCUS client installation. The default schema name is WebFOCUS80.
-
In the Schema field, provide the MYSQL schema name,
which by default, is idp_data.
-
Perform the following step if the selected database is
TERADATA, as shown in the following image (applicable only for iWay
Data Profiler - Version 9.0.1T).
-
In the Database/Schema field, provide the TERADATA
database name, which by default, is idp_data.
Note: If an iDP coexisting installation is being configured, then a unique database name must be provided that is different from the existing database name.
-
In the Database/Schema field, provide the TERADATA
database name, which by default, is idp_data.
-
Select a
drill-through database from the Drill-through DB drop-down list.
Note: This drill-through database is used by iDP to access the drill-through tables created by iWay Data Quality Server (DQS).
- Enter a valid user name and password to access your database in the corresponding fields.
- Confirm your database password by retyping it exactly in the Confirm Password field.
-
Select the language in which iWay Data Profiler has to
be installed from the Language drop-down list.
The Multi-Lingual check box is automatically checked if any other language is selected other than English for the Language option.
- In the JDBC Driver path, enter the full path to the jar file for the selected database.
-
Click Next.
The Select Drill-through and Plan Database Type pane opens, as shown in the following image.
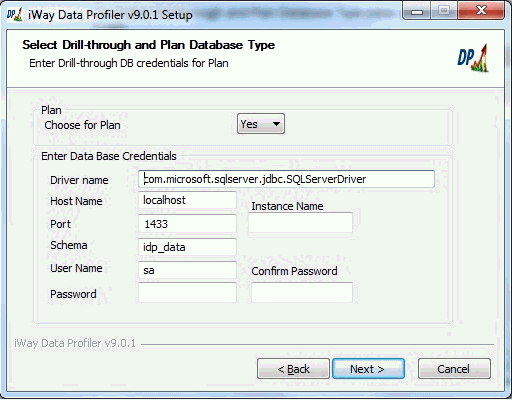
-
From the Choose for Plan, select Yes or No.
Selecting Yes enables the Plan module in iWay Data Profiler.
- In the Driver name and Host Name fields of the selected database, type the name of the drill-through database from the Drill-through DB drop-down list in the Select Database Type pane.
- In the Schema field, enter the schema name used by iDP to access the drill-through tables created by iWay Data Quality Server (DQS).
-
In the Instance Name field, provide the MSSQL database
instance name.
The Instance Name field is enabled only for the MSSQL database (optional).
- Enter a valid user name and password in the corresponding fields to access your database.
-
Confirm your database password by retyping it exactly
the same in the Confirm Password field.
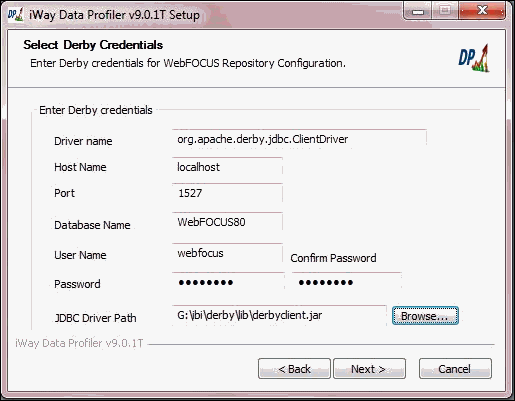
The Derby Configuration page opens as shown in the following image.
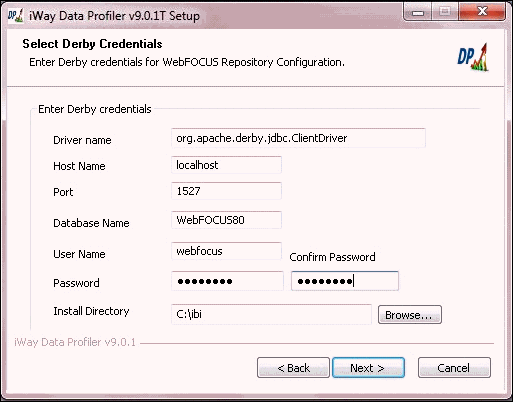
Important: Skip steps 35 through 39 if you select MSSQL-2008, MSSQL-2005, MYSQL or Oracle database. Steps 35 through 39 are only applicable for iWay Data Profiler - Version 9.0.1T (TERADATA database).
Since WebFOCUS Release 8.0 Version 08 does not support TERADATA as a repository database, Derby is being used. Derby comes with WebFOCUS Release 8.0 Version 08 Client as an in-build database.
- In the Database Name field, enter the database name which, by default, is WebFOCUS80.
- Enter a valid username and password to access your derby database.
- Confirm your password by retyping it exactly in the Password field.
-
In the Install Directory field, provide the home directory
for the Derby.
Note: If the installer detects an existing Derby installation on the computer, the Driver Name and Host Name fields will automatically become editable to configure, and the JDBC Path will be populated automatically instead of the Install Directory, as shown in the following image.
For more information about WebFOCUS Client installation with a Derby database configuration, see the WebFOCUS and ReportCaster Installation and Configuration for Windows.
-
Click Next.
The Email Type pane opens, as shown in the following image.
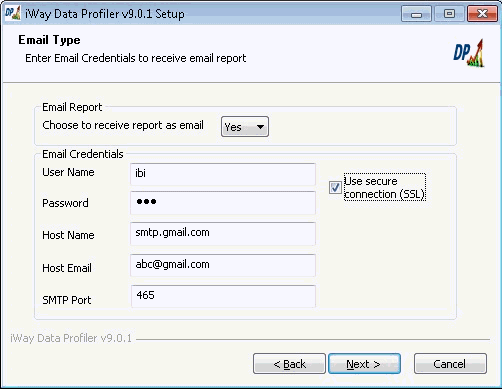
-
From the
Choose to receive report as email, select Yes or No.
Selecting Yes enables the option to send
a profile report as an email attachment in the Export profile page.
Note: This option should be enabled only for Server and Client Installation and Client Only Installation options.
-
Enter the
appropriate email credentials to receive the email reports.
- Username. Enter a valid user name for the mail server.
- Password. Enter a valid password to access the mail server.
- Host name. Provide the host name of the mail server.
- Host Email. Provide a valid email address of the sender, from which all emails will be sent.
- SMTP Port. Provide the SMTP Port number pertaining to the host name.
- Use secure Connection (SSL). If enabled, you can send an email using Secure Sockets Layer (SSL) connection to the mail server.
-
Click Next.
The Server Manager pane opens, as shown in the following image.
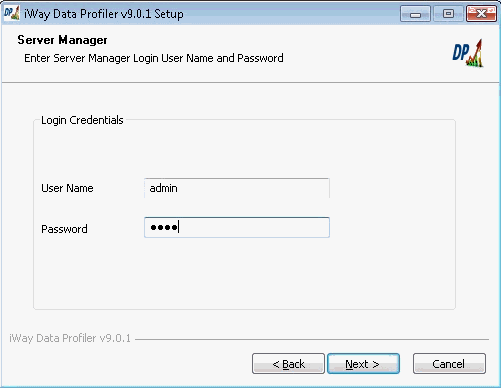
-
Enter a
valid user name and password to access iWay Data Profiler Server
Manager and click Next.
The Installation Details pane opens, as shown in the following image.
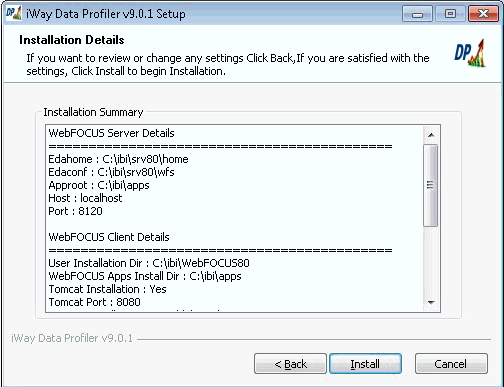
-
Review the
details and click Install to start the iDP
installation process on your system.
Note: You can click Cancel to cancel the installation process. You can click Back to review and change any of the previous settings.
The Installation of iWay Data Profiler v9.0.1 in progress pane opens, as shown in the following image.
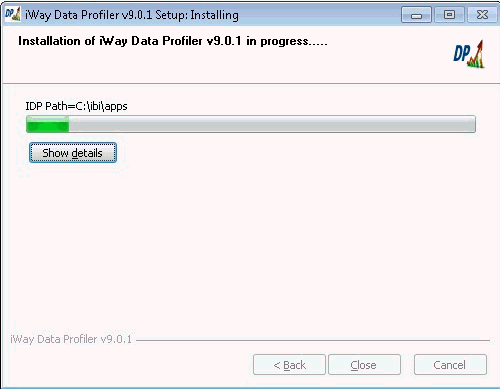
Note: Click Show details to view the installation summary. If WebFOCUS Reporting Server and WebFOCUS Client are also being installed, then the overall installation time will be extended.
When the installation process has finished, the Installation of iWay Data Profiler v9.0.1 Completed pane opens, as shown in the following image.
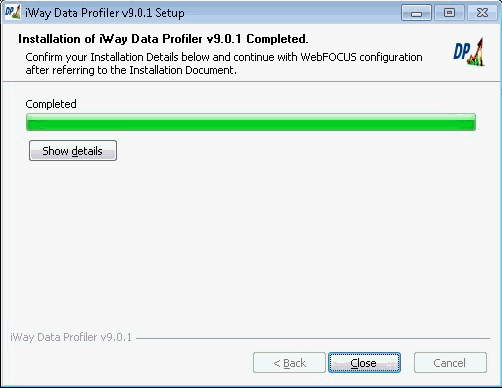
- Click Close to exit the iWay Data Profiler v9.0.1 Setup Wizard.