Follow the procedure for your platform:
- For Windows, see How to Install iWay 6.1.7 SM on Windows Platforms.
- For UNIX, OS/400, and z/OS, see How to Install iWay 6.1.7 SM on UNIX, OS/400, and z/OS Platforms.
You must be an administrator for the local machine to run the installation.
-
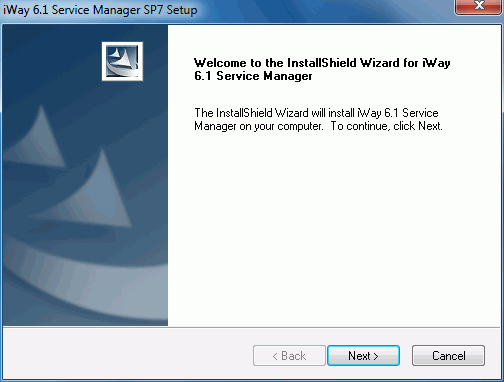
Start
the installation by executing the iway61.exe installation program.
The installation begins by temporarily copying files and analyzing your environment. This may take some time. When this process completes, the Welcome window opens.
Note: If you receive an error, ensure you are installing as an administrator and there is at least 2 GB of free space on your operating system drive.
If you are installing iWay 6.1.7 SM on Windows 2008 and Vista, note that the User Account Control (UAC) mode is enabled by default. UAC is a special mode of operation available on Windows 2008 and Vista that affects the functionality of administrator accounts. To avoid any errors that deny access, you must grant permission to the iWay 6.1.7 SM installation program to use administrator privileges. As a workaround, right-click the iway61.exe file and select Run as administrator from the context menu.
-
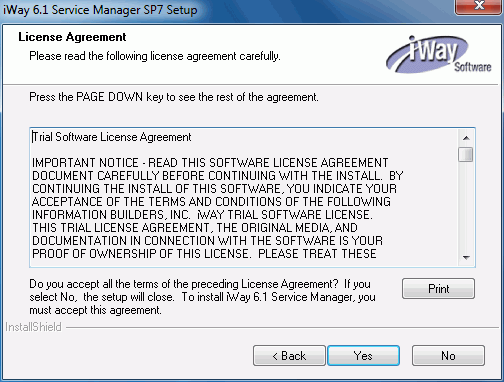
Click Next.
The License Agreement window opens.
-
Review
the information, and click Yes if you agree
to the terms.
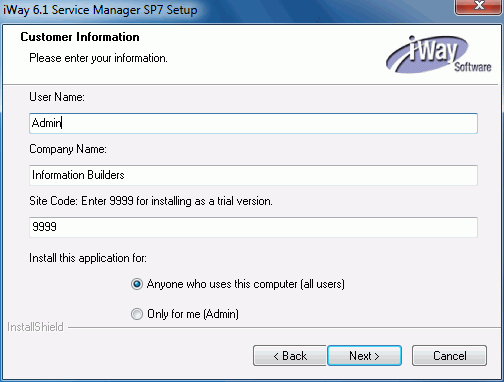
The Customer Information window opens.
-
Provide
your User Name, Company Name,
and Site Code.
Important: The site code is a unique company identifier associated with a specific machine. Be sure to enter a valid and accurate site code in this step because this entry is used when generating your permanent license during the registration process. If you need assistance with the site code, contact your iWay Software sales representative.
-
Click Next.
The Setup Type window opens.

- Select the setup type (Typical, Runtime, or Custom) according to your requirements.
-
Click Next.
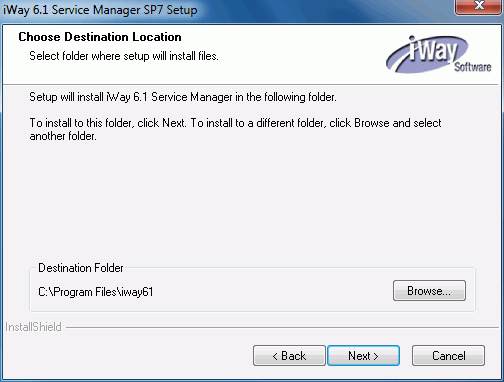
The Choose Destination Location window opens.
-
Accept
the default location, which is C:\Program Files\iway61\, or click Browse to
specify a new location. Then, click Next.
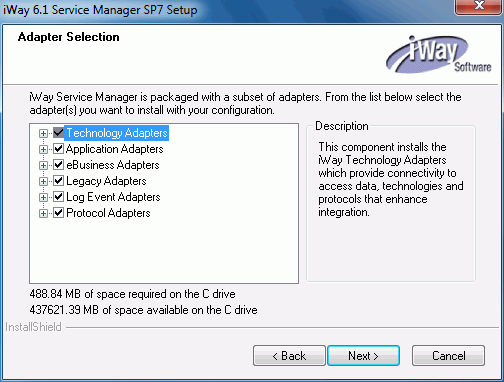
The Adapter Selection window opens where you can select the specific iWay adapters that you want to install. Ensure that you expand all of the categories to view the available adapters.
-
Select
the adapters you want to install.
The following adapters are available for installation:
Technology Adapters
- iWay
- Java
- RDBMS
- ESRI
- Microsoft .NET
Application Adapters
- J.D. Edwards EnterpriseOne
- J.D. Edwards World
- Microsoft Exchange
- Microsoft Dynamics CRM 2007
- MySAP
- MySAP JCO 3.0
- Oracle E-Business Suite
- PeopleSoft
- Siebel
- Salesforce.com
- VistA MUMPS
eBusiness Adapters
- EDI/X12
- Excel
- FIX
- HIPAA
- HL7
- SWIFT
Legacy Adapters
- COBOL Data Conversion
- CICS
- IMS
- Terminal Emulation
Log Event Adapters
- Informix Dynamic Server 11.50
- Oracle 10g and 11g
- SQL Server 2000, 2005, and 2008
Protocol Adapters
- AQ
- Extended AS2
- AS2 Compatible with 5.x Servers
- ConnectDirect
- IBI CS3 Protocol
- LDAP
- MSMQ
- SFTP
- Sonic JMS
- Tibco RV
- Tuxedo
-
Click Next.
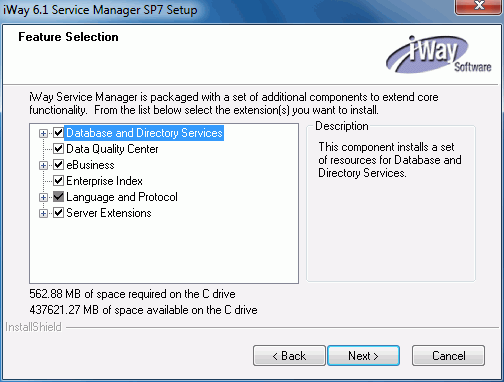
The Feature Selection window opens where you can select the specific iSM features that you want to install. Ensure that you expand all of the categories to view the available features.
-
Select the
features you want to install.
The following features are available for installation:
Database and Directory Services
- iWay XML Archive
- LDAP High Water Mark Listener
- Real-Time Data Replication
- RDBMS High Water Mark Listener
Data Quality Center
eBusiness
- Business Activity Monitor
- Trading Partner Manager
Enterprise Index
Language and Protocol
- PGP Encryption Components
- FTP Server
- Schema Validation Services
- SNMP Agent
- SOAP/JMS Transport
- XQuery
Server Extensions
- Gateway
- Hot Backup
- Migration Tools
- Telnet Control Console
- Scheduler
- Security Developers Tools
- 5.x Compatibility
-
Click Next.
The iWay Service Manager Configuration options window opens.
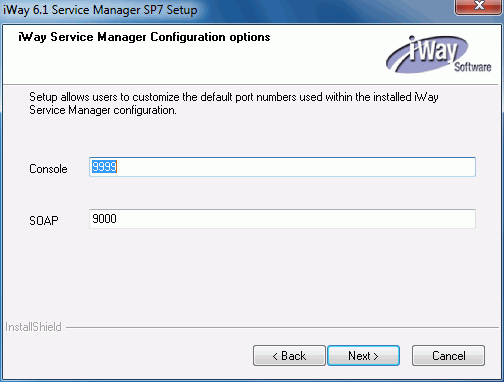
You are prompted to specify the following ports that iWay Service Manager uses:
Name
Default Port
Purpose
Console Listener
9999
HTTP listener for the iWay Service Manager Administration Console.
SOAP Listener
9000
SOAP listener for iBSP and iWay Explorers.
-
Accept
the default port values or specify new values and then click Next.
Note: Be sure to specify ports that are not being used by other programs or by another instance of iWay. If necessary, contact your system administrator for assistance in identifying available TCP ports.
The Start Copying Files window opens.
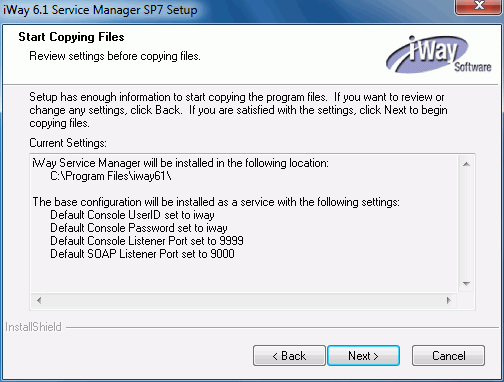
-
Review
the settings and then click Next to start the
installation.
Files are copied to your system in the directory you specified.
You have the option to start the Service Manager when installation completes. If you choose this option, the iWay Service Manager Administration Console launches in your default web browser. You can log on to the iWay Service Manager Administration Console using the default user name, admin, and password, admin. You can change the user name and password, as explained in Configuring iWay Components.
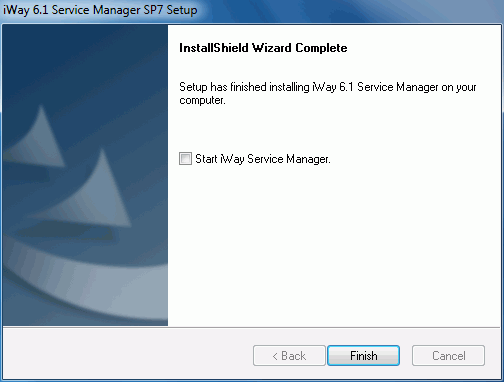
- Click Finish to complete the installation Wizard.
- Proceed to Post-Installation Topics and Tasks. For maximum performance, it is strongly recommend that you follow the post‑installation procedure for Configuring iWay Service Manager Service as a Separate Process.
On UNIX/Linux, installing as root is not recommended. Creating a dedicated iWay user ID and group with appropriate rights is preferable.
On OS/400, your user ID must have *ALLOBJ, *JOBCTL, and *SAVSYS authority.
On z/OS, the iway61SM.jar file must be placed in the USS file system.
The new unified iWay installer can enable silent, unattended installation. Contact iWay Customer Support for more information.
- Use FTP in binary mode to transfer the installation file to your UNIX or OS/400 machine. For OS/400, place the file in a directory under QSH.
- Navigate to the directory containing the installation file. On OS/400, you must be running under QSH.
-
Ensure the installation file is executable,
for example:
chmod 755 iway61SM.jar
-
Start
the installation by executing:
java -jar iway61SM.jar
The installation initializes, which may take some time. When initialization is complete, a Welcome prompt appears:
Welcome to the iWay 6.1.7 Service Manager Setup Wizard. This setup program installs iWay 6.1.7 Service Manager on this system.
6.1.7 - sp7.40137
Setup is using Windows 7 6.1 x86 Settings
File encoding is Cp1252, XML encoding is UTF-8
Copyright (C) 2003-2013, iWay Software/Information Builders, Inc. All Rights Reserved.
Press 1 for Next, 2 to Cancel [1]
Note: If the installation does not launch, ensure that /JAVA_HOME/bin is in your $PATH variable. See Java Requirements for information on setting up your Java environment.
-
Press Enter to
continue.
A license agreement appears.
-
Review
the agreement and press Enter until you see the following prompt:
Please choose from the following options:
[ ] 1 - I accept the terms of the license agreement.
[X] 2 - I do not accept the terms of the license agreement.
To select an item enter its number, or 0 when you are finished: [0]
-
If you
accept the terms, type 1 and press Enter.
The prompt repeats showing the new value.
[X] 1 - I accept the terms of the license agreement.
[ ] 2 - I do not accept the terms of the license agreement.
To select an item enter its number, or 0 when you are finished: [0]
-
Type 0,
then press Enter.
The Customer Information prompts appear:
Customer Information
Please enter your information.
User Name: []
-
Enter
a user name for the product registration and then press Enter. This
user name does not affect product operations.
Company Name: []
-
Enter
your company name for the product registration and then press Enter.
Site Code: []
-
Enter
your site code and press Enter.
Important: The site code is a unique company identifier associated with a specific machine. Be sure to enter a valid and accurate site code in this step because this entry is used when generating your permanent license during the registration process. If you need assistance with the site code, contact your Information Builders sales representative.
The Navigation prompt appears:
Press 1 for Next, 2 for Previous, 3 to Cancel or 4 to Redisplay [1]
-
Press
Enter to continue.
The installation directory prompt appears:
Destination Location
Setup will install iWay 6.1.7 Service Manager in the following location. Setup allows users to enter a different location.
Directory: [/iway/install/iWay61]
Note: On Linux systems, you may need to change the default directory that appears. The default directory normally should be named iWay61, but some Linux environments do not follow this default.
-
Specify
where to install iWay on your system and then press Enter. Ensure
this is a directory to which you have write access.
The navigation prompt appears.
Press 1 for Next, 2 for Previous, 3 to Cancel or 4 to Redisplay [1]
-
Press
Enter.
The following prompt for iWay adapter selection appears.
iWay Adapters
iWay 6.1.7 Service Manager is packaged with a subset of iWay adapters.
From the list below select the adapter(s) you want to install with your
configuration.
[x] 1 - Technology Adapters
[ ] 2 - Application Adapters
[ ] 3 - eBusiness Adapters
[ ] 4 - Legacy Adapters
[ ] 5 - Protocol Adapters
Enter a number, (a)ll, (n)one or 0 to finish: [0]
Note: The X next to an adapter category indicates one or more adapters are selected.
The Technology Adapters category provides the following adapters for selection:
- JAVA Adapter
- Enterprise Java Beans
- Microsoft .NET Adapter
- ESRI Adapter
- Log Event Adapter for Informix Dynamic Server 11.50
- Log Event Adapter for Oracle 10g and 11g
- Log Event Adapter for SQL Server 2000, 2005 and 2008
The Application Adapters category provides the following adapters for selection:
- J.D. Edwards EnterpriseOne Adapter
- J.D. Edwards World Adapter
- MySAP Adapter
- MySAP Adapter [JCO30]
- Oracle E-Business Suite
- Siebel Adapter
- PeopleSoft Adapter
- Salesforce.com Adapter
- Remedy Adapter
- Khalix Adapter
- VistA MUMPS Adapter
- Microsoft Exchange Adapter
- Microsoft CRM Adapter 2007 (Windows only)
The eBusiness Adapters category provides the following adapters for selection:
- EDI/X12/HIPAA Services
- SWIFT Services
- FIX Adapter
- Excel Adapter
- Trading Manager
- Business Activity Monitor
The Legacy Adapters category provides the following adapters for selection:
- CICS
- IMS
- Provides support for legacy (COBOL) data layout
The Protocol Adapters category provides the following adapters for selection:
- AQ Components
- Extended AS2 (nAS2)
- AS2 Compatible with 5.x Servers
- IBI CS3 Protocol
- MSMQ Components
- Sonic JMS
- Tibco RV Components
- FTP Server
- LDAP Adapter
- SSH File Transfer Protocol Client Services
-
Type
the number of the adapter you want to install and press Enter.
Note: You can only enter one adapter number at a time.
-
When
you are finished with your selections, type 0 and
press Enter.
You are returned to the iWay Adapters selection prompt.
iWay Adapters
iWay 6.1.7 Service Manager is packaged with a subset of iWay adapters.
From the list below select the adapter(s) you want to install with your
configuration.
[x] 1 - Technology Adapters
[ ] 2 - Application Adapters
[ ] 3 - eBusiness Adapters
[ ] 4 - Legacy Adapters
[ ] 5 - Protocol Adapters
Enter a number, (a)ll, (n)one or 0 to finish: [0]
-
Type 0 and
press Enter.
The navigation prompt appears.
Press 1 for Next, 2 for Previous, 3 to Cancel or 4 to Redisplay [1]
-
Type 1 and
press Enter to continue.
The Extensions menu appears.
Extensions
iWay 6.1.7 Service Manager comes with a set of additional components that can be used to extend standard functionality. From the list below
select the extension(s) you want to install.
[ ] 1 - Gateway
[ ] 2 - Enterprise Index
[ ] 3 - LDAP High Water Mark Listener
[ ] 4 - RDBMS High Water Mark Listener
[ ] 5 - SOAP JMS
[ ] 6 - Telnet Control Console
[ ] 7 - Hot backup
[ ] 8 - 5.x Compatibility
[ ] 9 - PGP Encryption Components
[ ] 10 - Security Developers Tools
[ ] 11 - Data Quality Center
[ ] 12 - Migration Tools
[ ] 13 - Real-Time Data Replication
[ ] 14 - XQuery
[ ] 15 - Simple Network Management Protocol Agent (SNMP)
[ ] 16 - Schema Validation Services
[ ] 17 - iWay XML Archive
Enter a number, (a)ll, (n)one or 0 to finish: [0]
-
Type
the number of the extension you want to install and press Enter.
Note: You can only enter one extension number at a time. When you press Enter, the Extensions menu reappears with your selection checked.
-
When
you are finished with your selections, type 0 and
press Enter.
The navigation prompt appears.
Press 1 for Next, 2 for Previous, 3 to Cancel or 4 to Redisplay [1]
-
Type 1 and
press Enter to continue.
You are prompted for the iWay port assignments. You can accept the default value listed with each prompt or type a new value appropriate for your installation, and press Enter.
Resource Assignments
Setup allows users to customize the default port numbers used within
the installed iway 6.1.7 Service Manager configuration.
Console Port [9999]
SOAP Port [9000]
Press 1 for Next, 2 for Previous, 3 to Cancel or 4 to Redisplay [1]
-
Press Enter to continue with the installation.
A notice and summary are displayed to inform you that you have provided enough information to start copying files.
Start Copying Files
Setup has enough information to start copying the program files. If you
want to review or change any settings, now is the time to do so.
iWay 6.1.7 Service Manager will be installed in the following location:
/opt/iway/iWay61
The base configuration will be installed with the following settings:
   Default console userid is set to iway
   Default console password is set to iway
   Default console port is set to 9999
   Default SOAP port is set to 9000
Press 1 for Next, 2 for Previous, 3 to Cancel or 4 to Redisplay [1]
-
Press
Enter to start the installation.
The Setup Status information is displayed.
Setup Status
Setup is configuring your new software installation.
 |----------|----------|----------|----------|
0%        25%        50%        75%      100%
||||||||||||||||||||||||||||||||||
Once installation has finished, a message appears indicating that the setup is complete.
Setup Completes
Setup has finished installing iWay 6.1.7 Service Manager on your system.
Press 1 to Finish Setup [1]
- Proceed to Post-Installation Topics and Tasks for information on customizing the iWay Service Manager profile and other settings.