Using the Package Manager
Packages are specially designed files that contain components,
metadata, and configuration information and can be used to move
runtime components such as SREGS and providers. Packages can be
added or removed from a specific server instance. This section describes
how to use the Package Manager to manage the addition and deletion
of functionality within an iWay Service Manager run-time configuration.
Packages are archive files that contain components, metadata
and configuration information. Packages can be are installed/uninstalled
to apply their contents to a specific server instance.
Note: Creating archives instead of packages is recommended
when migrating between different environments (for example, development,
test, and production). For more information on how to create an
archive, see Using the Archive Manager.
x
In order to install a package, it must be in a predefined
location within the server machine's file system. Add will take
a package zip file from any location accessible by your browser
and copy (upload) it to the appropriate directory on the server
machine.
x
Procedure: How to Add a Package
-
Select
the Add/Create/Download/Delete Packages button.
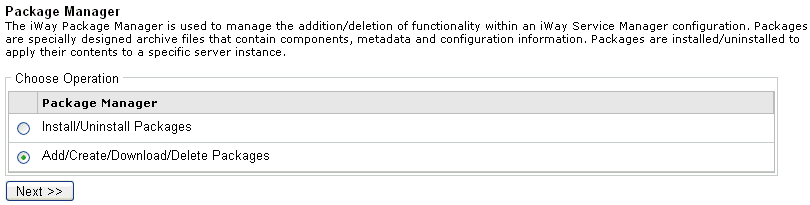
The following image shows the Package Manager - Choose
Operation page with the Add/Create/Download/Delete Packages button
selected.
-
Click Next.
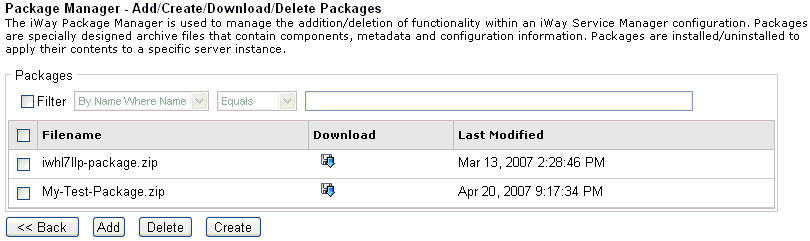
A list of already uploaded Package files is displayed,
as shown in the following image.

-
Click Add to
proceed to the Package upload page.
You will be prompted for the package to upload, as shown
in the following image. You may either enter the fully qualified
file name or click Browse to navigate to
the file’s location.

-
Click Browse to
see a list of packages.
Packages must exist on your system ready to be uploaded.
Alternatively, you can copy packages into the following directory:
<iwayhome>\etc\manager\packages
where:
- <iwayhome>
Is the location on your system where iWay Service Manager
is installed.
In this example, the package
file, My-Test-Package.zip, is available for upload, as shown in
the following image.
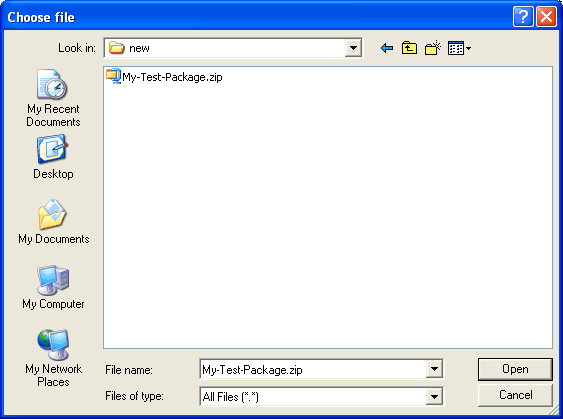
Note: The
actual appearance of the Choose File window will depend on your
browser.
-
Select the package to upload, and click Open.
The chosen file name populates the upload field, as shown
in the following image.

-
Click Upload.
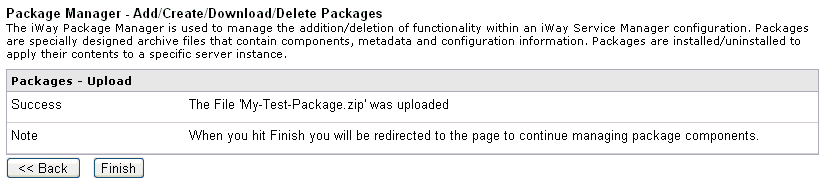
The following image shows a Success confirmation page of
the uploaded package and a note to click the Finish button to continue
managing package components.
-
Click Finish to
return to the list of available packages.
The newly uploaded package name appears on the list of
available packages, as shown in the following image.

Note: At
this time your package is not installed, but has been made available
to the Package Installation process.
x
iWay Package files contain a set of related iWay Service
Manager components to enable a particular enterprise integration
objective. When you install a package on a managed server, you are
in effect installing all of the components contained in that package.
The exception is when there is duplication of the components (for
example, one or more components are previously installed). It is
at your discretion whether the old version is overwritten or preserved.
Installing a package affects the runtime instance configuration
directly.
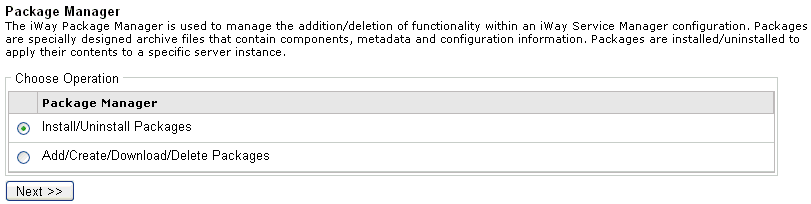
The following image shows the Package Manager, which lists two
operations you can choose from, Install/Uninstall Packages and Add/Create/Download/Delete
Packages.
x
Procedure: How to Install a Package
To install
a package:
-
Select
the Install/Uninstall Packages button, and
click Next.
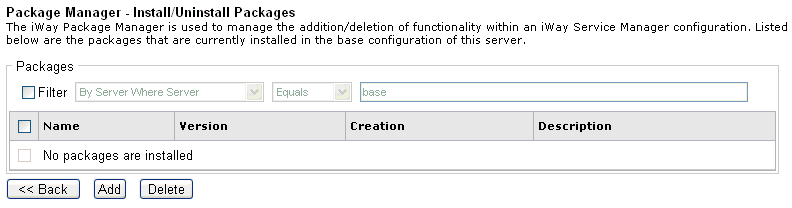
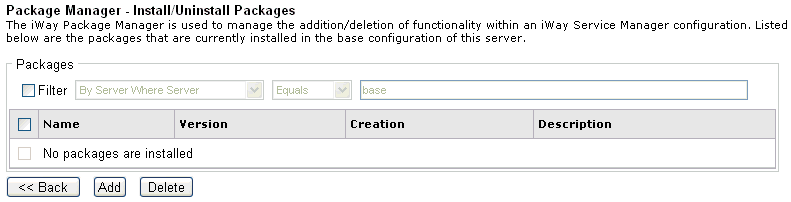
As shown in the following image, Package Manager displays
that no packages are installed.
-
Click Add to
proceed to the list of available packages.
iWay Service Manager is shipped with the iwhl7llp package,
which adds support for the HL7 MLLP protocol. You can choose which
packages will be copied to your server during the iWay Service Manager
installation. This page shows you the packages that are available
for installation on the server including those transferred at installation
time and any you have manually copied to [IWAYHOME]/etc/manager/packages
in your server file system.
-
Select
the package you want to install and click Next.
The version pane for the selected package opens.
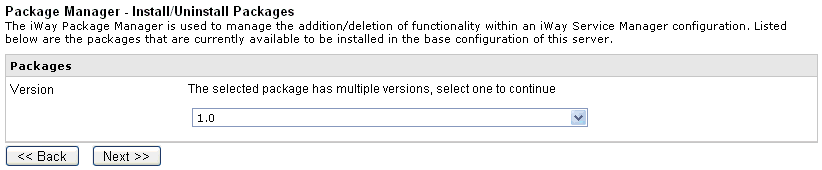
-
Choose
one of the listed versions and click Next.
The Configuration page allows you to select the target
configuration for the package and how to apply the package if there
are pre-existing components. If the package exists in the selected
configuration, you may choose to preserve pre-existing components
or to overwrite and save any pre-existing components.
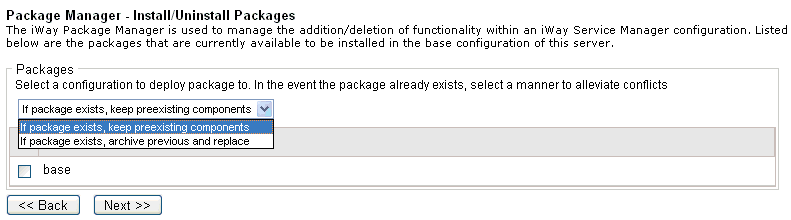
-
Select
the server configuration you wish to install the package to, and the
method to handle pre-existing components.
-
Click
the box for the base configuration, and click Next.
The Package installation status page displays that the
package was successfully added, as shown in the following image.
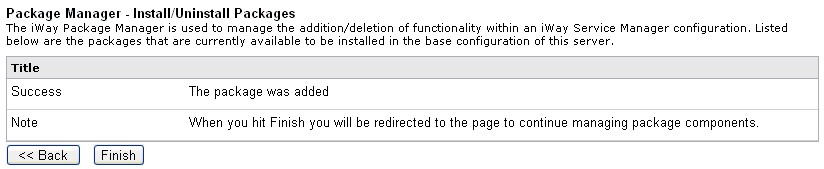
-
Click Finish.
The server
must be restarted for the components, providers, and SREGS to become
available.
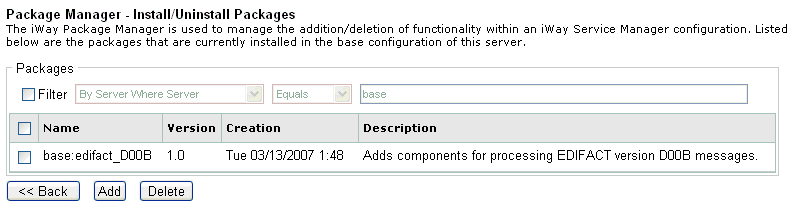
As shown in the following image, the list of packages
reflects the result of this process, and the newly added EDIFACT
package is listed as installed in the base configuration.
x
There are two scenarios that are described on-screen
as "deleting a package." The first is the removal of a package's
installed components from a configuration. This will affect the
run-time behavior of the server, since functionality is removed.
In the second case, a package file is deleted from the host server’s
file system. This does not directly affect run-time behavior, but
will make the package unavailable for future installation. For more
information on deleting a package, see Deleting a Package.
x
Procedure: How to Uninstall a Package
-
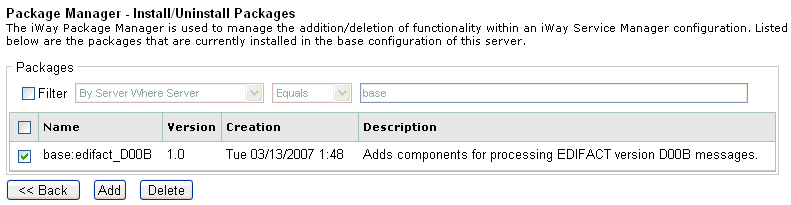
Select
the package to be deleted.
The following image shows a sample Package Manager - Install/Uninstall Packages
page with the base:edifact_DOOB check box selected.
-
Click Delete.
A confirmation dialog box opens, prompting you to confirm
the deletion of the package.
-
Click OK if
you wish to delete the package.
Note: Deleting a package is permanent. There is
no undo (short of re-installing the package) if you mistakenly
delete a package.
The following image shows a Success confirmation
page of the deleted package and a note to click the Finish button
to continue managing package components.
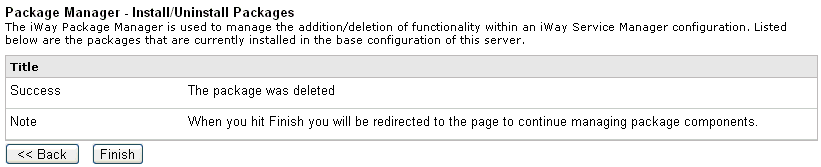
-
Click Finish.
As shown in the following image, there is no package installed,
further confirming that the base:edifact component was deleted.
x
You can create a package to
enable the exporting of components to another managed server/repository
on the same host or a remote host. For example, you can clone part
of a configuration, export it, and then import it to a different
server for execution.
Note: Creating archives instead of packages is recommended
when migrating between different environments (for example, development,
test, and production). For more information on how to create an
archive, see Using the Archive Manager.
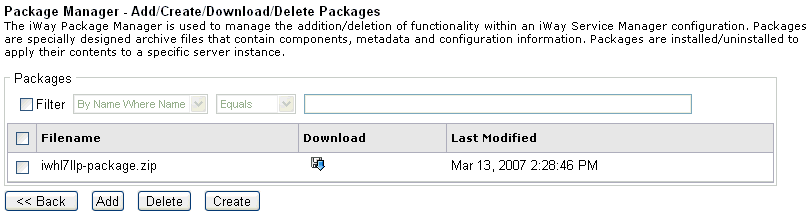
The following image shows the Package Manager - Add/Create/Download/Delete Packages
pane.
x
Procedure: How to Create a Package
-
Click Create.
The Package Manager - Create window opens. The following
image shows the New Package page, where you provide basic information
about the new package.
The
following table lists and describes the properties for this page.
|
Property
|
Description
|
|---|
|
Name
|
Name of the package to create.
|
|
Destination Directory
|
Where the package file will be written upon
creation.
|
|
Version
|
Version of the package.
|
|
Description
|
Brief description of the package.
|
|
Overwrite Existing Package
|
If checked, the new package will overwrite
any preexisting one with the same name.
|
|
Add Version to Existing Package
|
Add this version to the existing package.
|
|
Remove Version from Existing Package
|
Remove the existing package.
|
|
Add Files and Directories
|
Add component files and/or directories to
the package file (these directories are relative to and accessible
by the iWay server, not your browser).
|
|
Include Subdirectories
|
If the above option is selected, include
subdirectories when adding files and/or directories.
|
-
Click Next to
continue to a series of component selection pages. Component selection
pages are presented in the following order:
- Adapters
- Agents
- Preemitters
- Emitters
- Preparsers
- Encryptors
- Ebix
- Reviewers
- Exits
- Transforms
- Validation
- Schemas
- Stored Procedures
- PFlows (Process
Flows)
- Listeners
- Global Documents
- Special Registers
-
Select
the check box for the component you want to export.
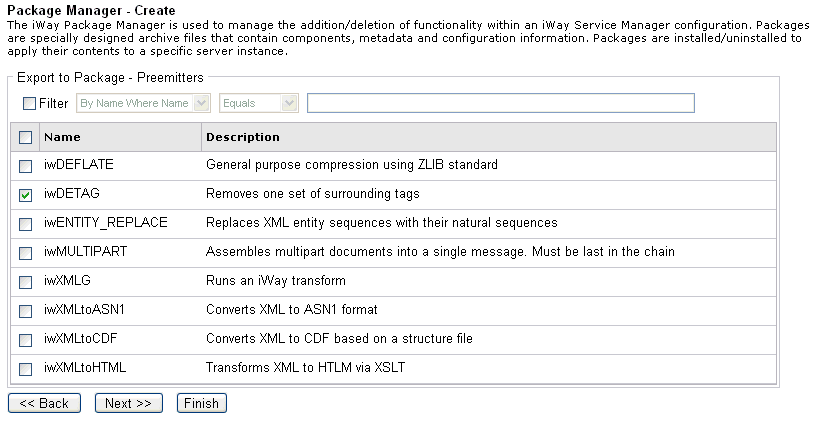
The following image shows the Export to Package - Preemitters
page, which lists the components. The iwDETAG check box is selected.
It
is the user's responsibility to export all related components (including dependencies),
so that the finished package is complete and consistent.
-
Click Next to
proceed to the next component selection page. A list showing the
order of component selection pages is available in Step 2.
Note: From any of the component selection pages,
you may click Finish to skip to the Create
Package summary page.
-
Click Finish.
The following image shows a summary page of the package
information and selected components for export.
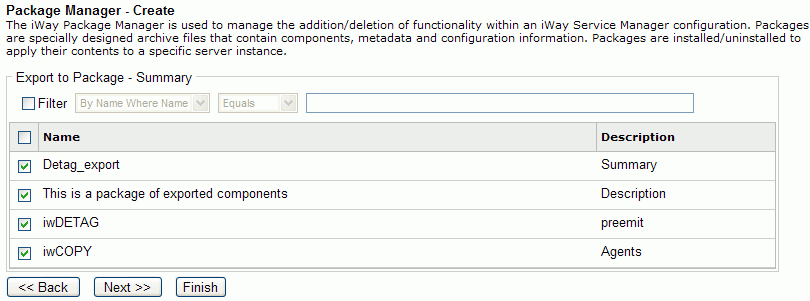
-
Click Finish.
The following image shows a status page indicating that
the agent and preemitter components were successfully added to the
Detag_export-package.zip file.
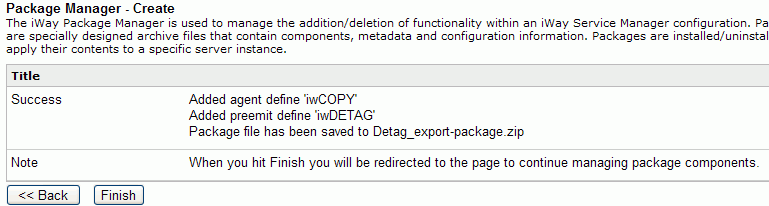
-
Click Finish to
return to the Package listing page.
The new package, Detag_export-package.zip, is added to
the list of pre-existing package files.
x
You may wish to copy a package
from your server to your workstation for backup, in preparation
for an installation to another server, or to email it.
x
Procedure: How to Download a Package
-
Click
the Download icon which corresponds to the
package you wish to download.
The File Download dialog box is displayed, asking whether
to open or save the selected file.
-
Click Save to
download the file.
The following image shows the Save As dialog box with the
selected file in the File name field.
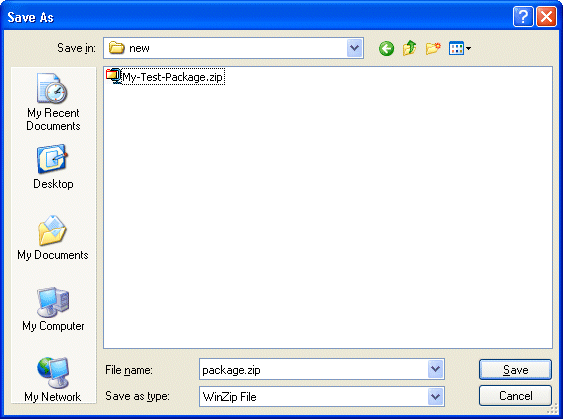
Note: The
actual appearance of the dialog box will depend on your browser.
-
Specify
the location and click Save.
The browser will copy the file to the specified location.
x
You may wish to delete a package to clean up the server
or shorten the list of package files being displayed.
Caution: Deleting a package actually deletes it from the
host server's file system. This does not directly affect run-time
behavior, but will make the package unavailable for future installation.
You can also uninstall a package from the configuration. Uninstalling
a package removes the package from the configuration, but leaves
it on the file system on the host server. For more information,
see Uninstalling a Package.
x
Procedure: How to Delete a Package
-
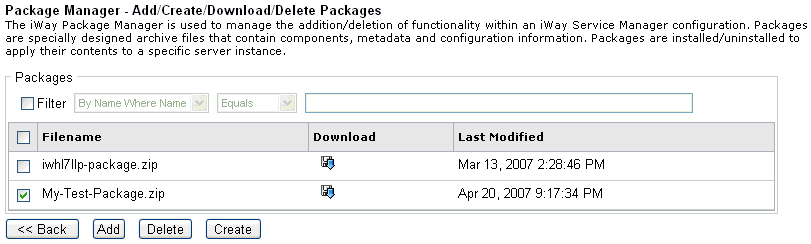
Select the package to be deleted.
The following image shows the Package Manager - Add/Create/Download/Delete
Packages page which lists the available packages for deletion with
the My-Test-Package.zip file selected.
-
Click Delete.
The status page is displayed, as shown in the following
image, confirming that the .zip file has been deleted.

-
Click Finish to continue to the
list of available package files.
As shown in the following image, the My-Test-Package.zip
is not listed as an available archive file, confirming its deletion.