Defining a Route With iWay Designer

How to:

This topic describes how to create a process flow with iWay Designer and bind it to a sample channel as a route. These instructions replace Defining a Route.

For details on the full features of iWay Designer, and additional information on using its capabilities, see the iWay Designer User's Guide.

You will complete the following high-level steps to define the route.

  1. Using iWay Designer, create a new project and start a new process flow.
  2. Add a copy service object to the process flow.
  3. Add a Validation Report service object to the process flow.

    Note: A Validation Report is used to determine if your SWIFT message is compliant with SWIFT-defined standards. SWIFT tagging validation and network validation will be performed.

  4. Validate the process flow and publish it to the Registry of the iWay Service Manager Administration Console. See the iWay Designer User's Guide for instructions on validating and publishing.
  5. Add a route to the Registry and associate the process flow with that route.

Top of page

x
Procedure: How to Create an iWay Designer Project and Start the Process Flow
  1. From the Windows Start menu select Programs, iWay 6.0 Service Manager, tools, and then iWay Designer.
  2. Connect to the repository from which you want to work, for example, iWay.
  3. Right-click the iWay node and select New Project from the drop-down list.

    The Designer Project Information dialog box opens, prompting you for a project name and optional description.

  4. In the Name field, type SWIFT_Process as the project name.

    In the Description field, type Defining a route for SWIFT inbound processing using iWay Designer to describe the project.

  5. Click Next.

    The Designer Project Bindings dialog box opens.
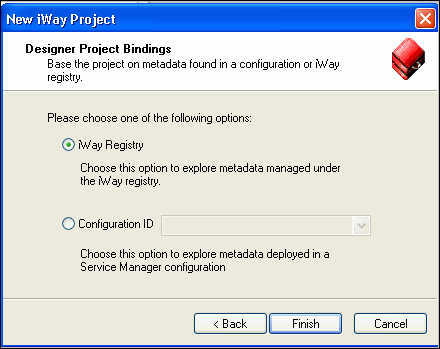
  6. To create the project in the iWay Registry, select iWay Registry and click Finish. The choice of project association depends on where you intend to publish (deploy) your process flow. If you are developing a process flow for use as part of a channel, you must publish it to the Registry for subsequent deployment.
  7. The SWIFT_Process project node appears under the repository in which it was created (in this example, it appears under iWay).
  8. To save the project to the repository, right-click the project node and select Save from the drop-down list.
  9. Expand the SWIFT_Process project node to expose the project elements (Processes, Services, Transforms, and so on).
  10. Right-click the Processes folder and select New Process from the drop-down list.

    The iWay Process Configuration dialog box opens.

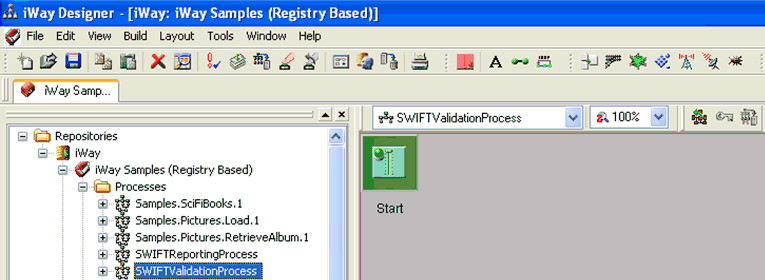
  11. In the Name field, type SWIFTValidationProcess as the process flow name.

    In the Description field, type Process flow for SWIFT route for channel for inbound processing.

  12. Click Finish.

    The new SWIFTValidationProcess node appears under the Processes folder, and the workspace displays a Start object.

You are ready to build the SWIFTValidationProcess by adding objects to it and specifying their relationships.


Top of page

x
Procedure: How to Add a Copy Service Object

The copy service redirects an output document to a destination.

  1. Drag and drop the Service object from the toolbar to the workspace.

    The Service Name and Description dialog box opens.

  2. In the Name field, type CopyService, and leave the default value (Service object) in the Description field.
  3. Click Next.

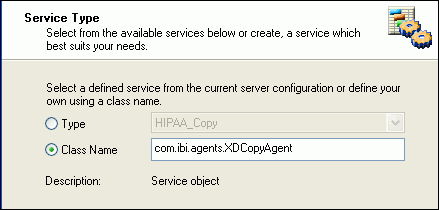
    The Service Type dialog box opens.

  4. Select Class Name and enter com.ibi.agents.XDCopyAgent.
  5. Click Next.

    The Define Service dialog box opens.

    Do not select the check box, since you do not want to use this service in other process flows.

  6. Click Next.

    The Properties dialog box opens.

  7. Click Finish to accept the default values and close the dialog box.

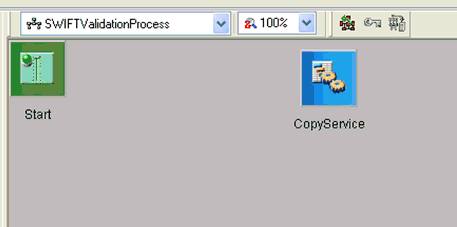
    The new CopyService object appears in the workspace.

    Now you need to connect the Start object to the CopyService object.

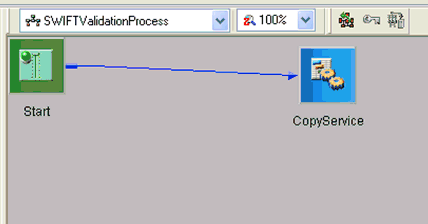
  8. Select the Start object, right-click the CopyService object, and select Relation from the drop-down list.

    The Line Configuration dialog box opens.

  9. From the Event drop-down list, select OnCompletion and click OK.

    This option indicates that there are no conditions that affect the path, and that the path between the two objects will always be followed.

    A line appears between the objects to indicate that a relationship has been established.


Top of page

x
Procedure: How to Add an End Object for the Copy Service Object

All processing paths must terminate with an End object.

  1. Drag and drop the End object from the toolbar to the workspace.
    The End Name and Description dialog box opens.

  2. In the Name field, type End, and leave the default value (End object) in the Description field.
  3. Click Next.

    The End Name Schema dialog box opens.

  4. Since no schemas are used in this processing path (that is, the process flow will not be exposed as a Web service), from the Schema drop-down list, select None.
  5. Click Next.

    The Properties dialog box opens.

  6. Click Finish to accept the default values and close the dialog box.

    The new End object appears in the workspace.

  7. Select the CopyService object, right-click the End object, and select Relation from the drop-down list.

    The Line Configuration dialog box opens.

  8. From the Event drop-down list, select OnCompletion and click OK.

    This option indicates that there are no conditions that affect the path and that the path between the two objects will always be followed.

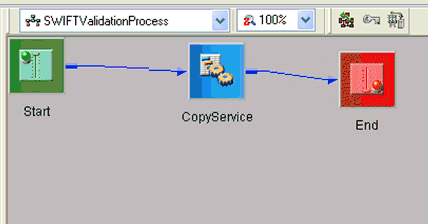
    Your process flow will look similar to the following. The CopyService object is a unit of work that redirects the XML output to a defined destination through a custom emit. The End object terminates this single process.

    You can reposition the objects as desired.


Top of page

x
Procedure: How to Add a Validation Report Service Object

You will add a Validation Report service to execute a SWIFT validation report.

  1. Drag and drop the Service object from the toolbar to the workspace.
    The Service Name and Description dialog box opens.

  2. In the Name field, type SWIFTValidationService, and leave the default value (Service object) in the Description field.
  3. Click Next.

    The Service Type dialog box opens.

  4. Select Class Name and enter com.ibi.agents.XDSWIFTValidationReportAgent.
  5. Click Next.

    The Define Service dialog box opens.

    Do not select the check box, since you do not want to use this service in other process flows.

  6. Click Next.

    The Properties dialog box opens.

  7. Click Finish to accept the default values and close the dialog box.

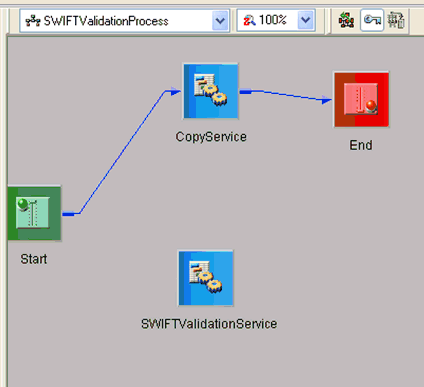
    The new SWIFTValidationService object appears in the workspace. The process flow will look similar to the following.

  8. Select the Start object, right-click the SWIFTValidationService object, and select Relation from the drop-down list.

    The Line Configuration dialog box opens.

  9. From the Event drop-down list, select OnCompletion and click OK.

    A line appears between the objects to indicate that a relationship has been established.


Top of page

x
Procedure: How to Add an End Object for the Validation Report Service Object

All processing paths must terminate with an End object.

  1. Select the SWIFTValidationService Service object, right-click the End object, and select Relation from the drop-down list.
  2. From the Event drop-down list on the Line Configuration dialog box, select OnCompletion and click OK.

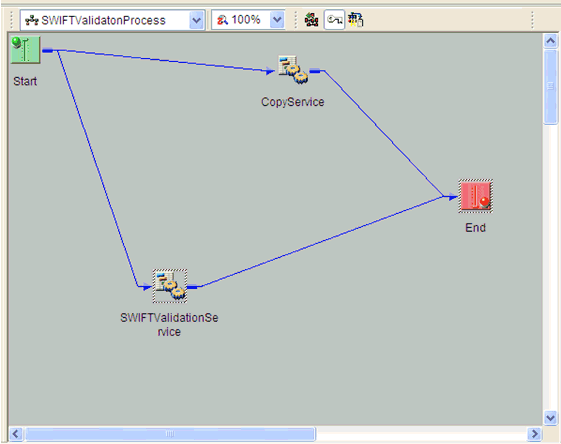
    The process flow is now complete. It will look similar to this.

  3. To save the process flow, right-click the SWIFTValidationProcess node and select Save from the drop-down list.
  4. Now you need to validate the process flow and publish it to the Registry of the iWay Service Manager Administration Console for use in the route in the channel for inbound processing.

    Validating a process flow ensures that its structure is correct. Publishing a process flow makes it available in the Registry for use in channel configuration.

    For instructions on validating and publishing the process flow, see the iWay Designer User's Guide.

  5. Close iWay Designer.

Your next step is to add a new route to the Registry of the iWay Service Manager Administration Console and associate the process flow with it.


Top of page

x
Procedure: How to Define a Route and Associate the Process Flow With It
  1. From the Registry menu options in the iWay Service Manager Administration Console, click Routes.
  2. On the Route Definitions pane, click Add to add a route.
  3. On the New Route Definition pane, enter a name for the route and an optional description, as shown in the following table. Then click Finish.

    Parameter

    Value

    Name *

    SWIFTtoXML_Route_PFlow

    Description

    Route for SWIFT to XML using process flow.

  4. On the Construct Route pane, click Add.

    You are prompted for the type of component to associate with the route.

  5. Select Process and click Next.
  6. The next pane prompts you to select a process. Select the process flow you created earlier with iWay Designer, SWIFTValidationProcess, and click Finish.

    The route, with its associated process flow, has been successfully defined.

    Note: This is the simplest possible route to configure. In most cases, users may have more complex business logic in their environment.


x
Procedure: How to Add a Process Flow Route to a Channel

To add a process flow route to a channel:

  1. Logon to the iWay Service Manager Administration Console.
  2. Click Registry in the blue shaded area below the iWay Service Manager banner.
  3. Click Channels in the left pane.

    A list of available channels is displayed.

  4. Select the channel that you will assign the process flow as a route, for example, SWIFTtoXML_Channel.

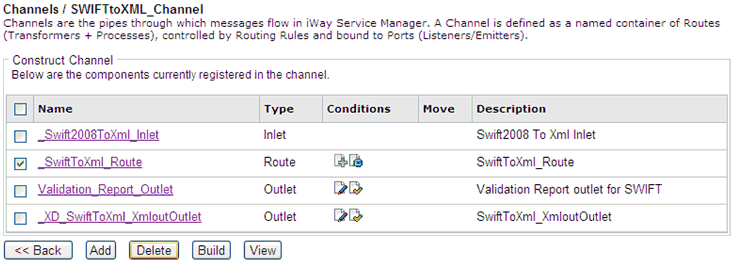
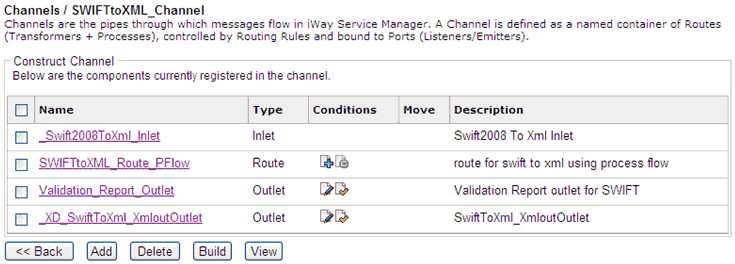
    The Construct Channel pane opens, as shown in the following image.

    Notice that an existing route (_SwiftToXml_Route) is already defined for the channel. You must delete the existing route before adding a new route that contains a process flow.

  5. Select the check box to the left of the existing route and click Delete.
  6. Click Add.

    The Channel Component Types pane opens, as shown in the following image.

  7. Select Route and click Next.

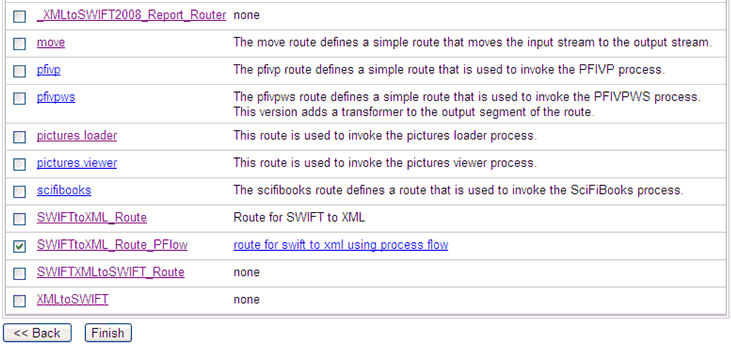
    A list of available routes is displayed, as shown in the following image.

  8. Select the check box to the left of the new route that contains a process flow, for example, SWIFTtoXML_Route_PFlow.
  9. Click Finish.

    You are returned to the Construct Channel pane.

  10. Click the minus sign (-) in the Conditions column next to the name of the new route to set it as the default.


iWay Software