Sample Configuration for Inbound Processing: SWIFT to XML
This topic provides step-by-step instructions on how
to configure a basic inbound message flow for the iWay Integration
Solution for SWIFT. The message flow represents the movement and
tasks in the conversion of a message from SWIFT FIN format to XML
format.
x
Accessing the iWay Service Manager Administration Console
To access the iWay Service Manager Administration Console,
you must first make sure that the iWay Service Manager service is
running.
For instructions on starting iWay Service Manager, see the iWay
Service Manager User's Guide.
x
Procedure: How to Access the iWay Service Manager Administration Console on Windows
-
From the Windows desktop, select Start, All
Programs, iWay 6.0 Service Manager,
and Console,
or,
from a browser such as Microsoft Internet Explorer,
enter the following URL,
http://host:port
where:
- host
- Is the host machine on which iWay Service Manager is installed.
The default value is localhost.
- port
- Is the port number on which iWay Service Manager is listening.
The default value is 9999.
The following image
shows the URL with the default values.

-
When prompted, enter your user name and password, and clickOK.
Note: The default user name and password is iway.
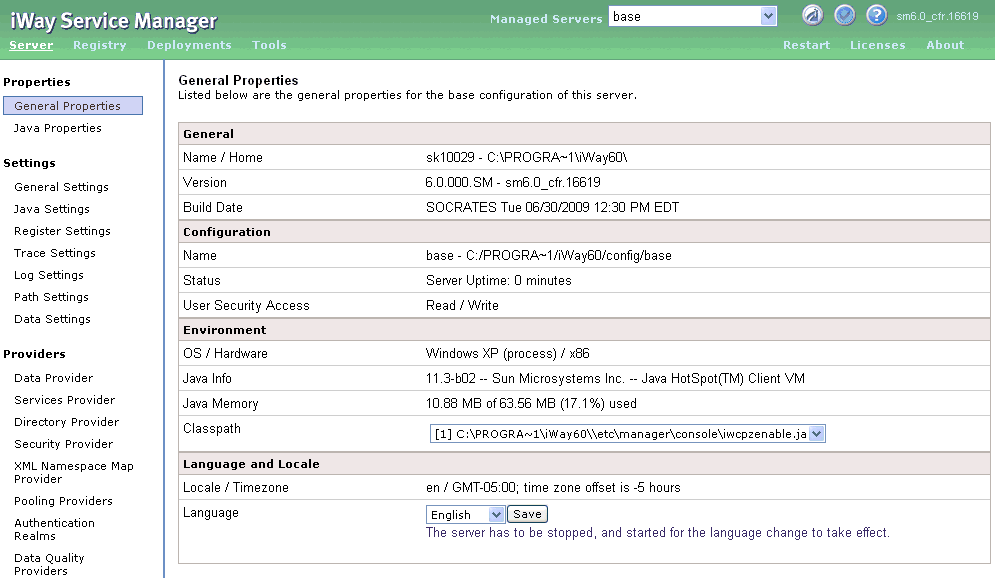
The iWay Service Manager Administration Console opens,
as shown in the following image.
x
Adding an Ebix to the Registry
The iWay e-Business Information Exchange (Ebix) framework
supplies several Ebix files for the iWay Integration Solution for
SWIFT.
An Ebix file for SWIFT is named SWIFT_ccyy.ebx, where ccyy is
the release year. For example, an Ebix file for the 2009 SWIFT FIN
message is named SWIFT_2009.ebx.
For details on the supported SWIFT FIN messages, see Ebix-Supported Transaction Sets.
This topic describes how to add an Ebix to the Registry on Windows
and UNIX.
Note: Ebix archives are not packaged with the iWay Service
Manager installation. You can download all Ebix archives from the
following Web site, which is hosted and maintained by iWay Software:
http://techsupport.informationbuilders.com
x
Procedure: How to Add an Ebix to the Registry on Windows
-
To access the Registry, select the Registry option
in the blue shaded area below the iWay Service Manager banner, as
shown in the following image.

-
Under Components in the left pane of the Registry, select Ebix.
The Ebix pane opens,
as shown in the following image.

-
Click Add to add a new Ebix.
The New Ebix pane opens.

-
Browse to the directory in which the Ebix is located and select
the name of the file, for example, SWIFT_2009.ebx.
-
Once you have selected the Ebix, click Next.
You are prompted for the name of the Ebix and an optional
description.

-
Enter a name for the Ebix, for example, SWIFT_2009,
and an optional description, for example, SWIFT 2009
Ebix.
Note: This step must be repeated for each SWIFT
document that is added to the Registry.
-
Click Finish.
On the Ebix pane, you will see that the Ebix was successfully
added. Later you will associate it with the channel for inbound
processing.
x
Procedure: How to Add an Ebix to the Registry on UNIX and z/OS
Depending
on your system configuration, there are two methods that you can
use to add an Ebix to the Registry on UNIX and z/OS.
- If you have
a Web browser on the UNIX machine, follow the instructions for Windows.
- Use FTP to
download the Ebix from the iWay60/etc/manager/packages directory
to your Windows machine and follow the instructions for Windows.
x
An inlet defines how a message enters a channel. It
typically contains a:
- Listener.
A listener is a component that picks up input on a channel from
a configured end point.
- Decryptor.
A decryptor is a component that applies a decryption algorithm to
an incoming message and verifies the security of the message. The
configuration example in this topic does not include a decryptor,
which is an optional component.
- One or more
preparsers. A preparser is a component that converts incoming messages
into processable documents. Typically a preparser converts a document
into XML format. Other preparsers may perform data decryption or reformatting.
x
Procedure: How to Add a Listener
-
From the Registry menu options on the left pane, select Listeners under
Components.
-
On the Listeners pane on the right, click Add to add
a new listener.
-
For the purpose of this example, we will show the configuration
with a File listener. For details on supported protocols, see the iWay
Service Manager Protocol Guide.
Select File from the Type drop-down
list and click Next.
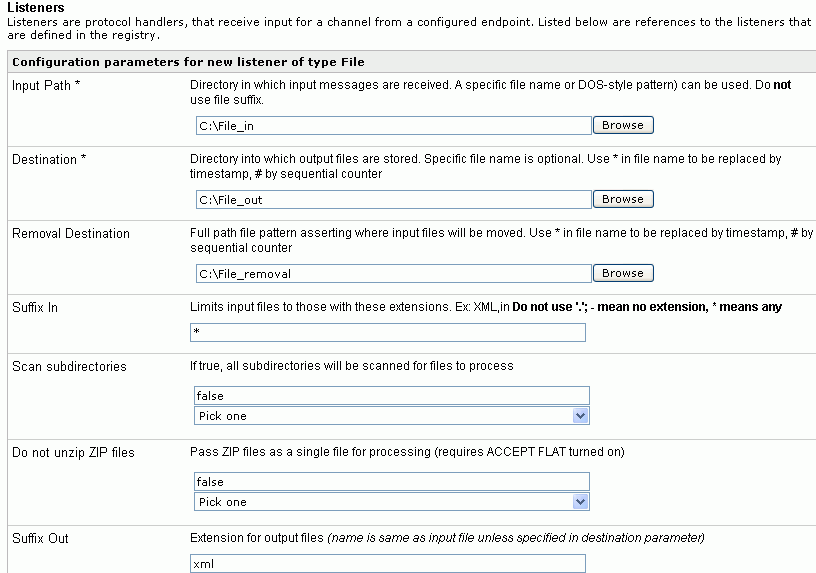
The configuration
parameters pane opens.
-
Supply configuration parameters for the new File listener as
follows. An asterisk indicates that a parameter is required. For
parameters not listed in the following table, accept the default
value.
|
Parameter
|
Value
|
|---|
|
Input Path *
|
C:\File_in
This value is the directory
in which input messages are received.
Make sure that you have
created this directory; otherwise, errors will occur during deployment.
|
|
Destination *
|
C:\File_out
This value is the directory
in which output files are stored after transformation.
Make
sure that you have created this directory; otherwise, errors will
occur during deployment.
|
|
Removal Destination
|
C:\File_removal
This value is the
directory to which input messages are moved if they fail during transformation.
Make
sure that you have created this directory; otherwise, errors will
occur during deployment. It is recommended to configure a removal
destination when you are constructing a basic channel.
|
|
Suffix In
|
*
Input files with any file extension
are allowed.
|
|
Suffix Out
|
xml
The extension for
output files is .xml.
|
|
Accepts non-XML (flat) only
|
true
If true, listener expects flat
(non-XML). Automatic parsing is not performed.
|
-
Click Next.
You are prompted for the name of the listener and an optional description.

-
On the Listeners pane, enter the name of the new listener, SWIFTtoXML_Listener,
and an optional description. Then click Finish to
add the listener.
In a later step, you will associate this listener with the inlet.
x
Procedure: How to Add a Preparser
-
From the Registry menu options, select Preparsers under
Components.
-
On the Preparsers pane, click Add to
add a new preparser.
You are prompted for the type of preparser.

-
Select XDSWIFTpreParser {com.ibi.preparsers.XDSWIFTpreParser} from
the Type drop-down list.
The XDSWIFTpreParser parses a SWIFT input message into
an XML output.
For details on the supported SWIFT FIN messages,
see Ebix-Supported Transaction Sets.
-
Click Next.
The Preparsers configuration parameters pane opens.
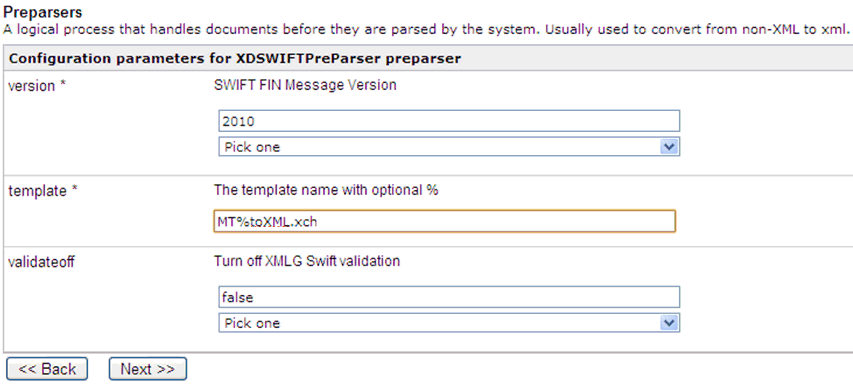
The following table
lists and describes the available configuration parameters for the
preparser:
|
Parameter
|
Description
|
|---|
|
version *
|
Represents the SWIFT release you are using.
|
|
template *
|
Represents the template to use for the SWIFT
to XML transform. Enter the following:
MT%toXML.xch |
|
validateoff
|
Select false to validate the
structure.
|
-
Click Next.
You are prompted for a name and optional description for
the new preparser.

-
Enter a name for the new preparser, for example, SWIFTtoXML_Preparser,
and an optional description.
-
Click Finish to add the preparser.
In the next procedure, you will associate this preparser with
an inlet.
x
Procedure: How to Define an Inlet
Now
that you have added a File listener and a preparser to the Registry,
you are ready to add and define an inlet. You will associate the
previously created listener and preparser with the inlet.
-
From the Registry menu options, select Inlets under
Conduits.
-
On the Inlet Definitions pane, click Add to
add an inlet.

-
On the New Inlet Definition pane, enter the name of the new
inlet and an optional description, as shown in the following table.
Then click Finish to add the inlet.
|
Parameter
|
Value
|
|---|
|
Name *
|
SWIFTtoXML_Inlet
|
|
Description
|
Inlet for SWIFT to XML.
|
-
On the Construct Inlet pane, click Add to associate
the listener and preparser with the inlet.
The next pane prompts you for the component type.

-
Select Listener and click Next.
The next pane prompts you to select a listener.

-
Select SWIFTtoXML_Listener, which is
the listener you added earlier, and click Finish.
The listener is associated with the inlet. Now you need
to associate the preparser created earlier with the inlet.
-
On the Construct Inlet pane, click Add.
The next pane prompts you for the component type.

-
Select Preparser and click Next.
On the next pane, you are prompted to select a preparser.

-
Select SWIFTtoXML_Preparser, which is
the preparser you added earlier, and click Finish.
You have now successfully completed definition of the inlet.
x
A route defines the path a message takes through a channel.
The route for the channel for inbound processing consists of
a process. A process is a stateless, lightweight, short-lived microflow
executed by iWay Service Manager on a message as it passes through
the system. A service is an executed procedure that handles the
business logic of a message.
This section describes how to create a process flow with iWay
Designer and bind it to a sample channel as a route.
For details on the full features of iWay Designer, and additional
information on using its capabilities, see the iWay Designer
User's Guide.
You will complete the following high-level steps to define the
route.
- Using
iWay Designer, create a new project and start a new process flow.
- Add a copy
service object to the process flow.
- Add a Validation
Report service object to the process flow.
Note: A Validation
Report is used to determine if your SWIFT message is compliant with
SWIFT-defined standards. SWIFT tagging validation and network validation
will be performed.
- Validate
the process flow and publish it to the Registry of the iWay Service
Manager Administration Console. See the iWay Designer User's
Guide for instructions on validating and publishing.
- Add a route
to the Registry and associate the process flow with that route.
x
Procedure: How to Create an iWay Designer Project and Start the Process Flow
-
From the Windows Start menu select Programs, iWay
6.0 Service Manager, tools, and
then iWay Designer.
-
Connect to the repository from which you want to work, for
example, iWay.
-
Right-click the iWay node and select New
Project from the drop-down list.
The Designer Project Information dialog box opens, prompting
you for a project name and optional description.
-
In the Name field, type SWIFT_Process as
the project name.
In the Description field, type Defining a route
for SWIFT inbound processing using iWay Designer to
describe the project.
-
Click Next.
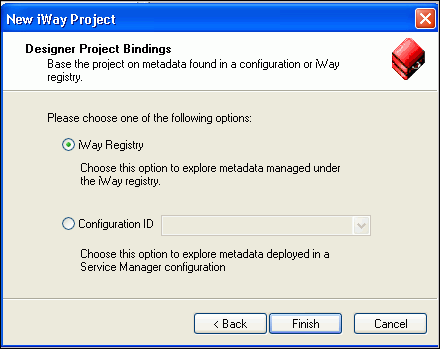
The Designer Project Bindings dialog box opens.
-
To create the project in the iWay Registry, select iWay Registry and
click Finish.
The choice of project association depends on where you intend
to publish (deploy) your process flow. If you are developing a process
flow for use as part of a channel, you must publish it to the Registry
for subsequent deployment.
-
The SWIFT_Process project node appears under the repository
in which it was created (in this example, it appears under iWay).
-
To save the project to the repository, right-click the project
node and select Save from the drop-down list.
-
Expand the SWIFT_Process project node to expose the project
elements (Processes, Services, Transforms, and so on).
-
Right-click the Processes folder and
select New Process from the drop-down list.
The iWay Process Configuration dialog box opens.
-
In the Name field, type SWIFTValidationProcess as
the process flow name.
In the Description field, type Process flow
for SWIFT inbound route processing channel.
-
Click Finish.
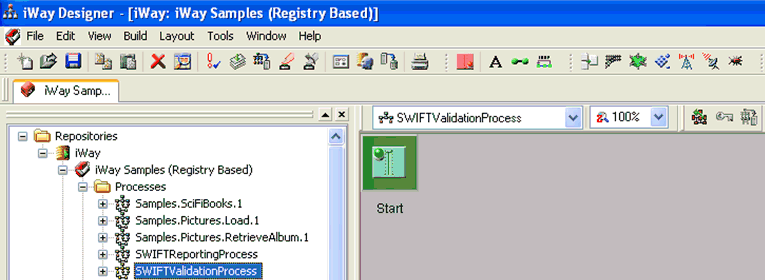
The new SWIFTValidationProcess
node appears under the Processes folder, and the workspace displays
a Start object.
You
are ready to build the SWIFTValidationProcess by adding objects
to it and specifying their relationships.
x
Procedure: How to Add a Copy Service Object
The
copy service redirects an output document to a destination.
-
Drag and drop the Service object
 from the toolbar to the workspace.
The Service Name and Description dialog box opens.
-
In the Name field, type CopyService,
and leave the default value (Service object) in the Description
field.
-
Click Next.
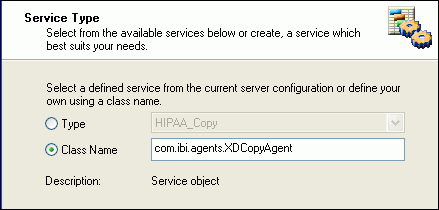
The Service Type dialog box opens.
-
Select Class Name and enter com.ibi.agents.XDCopyAgent.
-
Click Next.
The Define Service dialog box opens.
Do not select
the check box, since you do not want to use this service in other process
flows.
-
Click Next.
The Properties dialog box opens.
-
Click Finish to accept the default values
and close the dialog box.
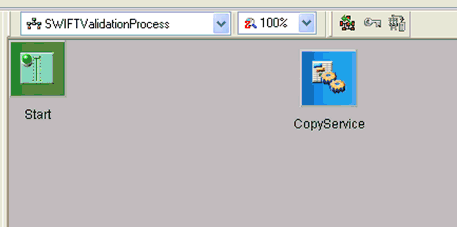
The new CopyService
object appears in the workspace.
Now you need to connect the
Start object to the CopyService object.
-
Select the Start object, right-click
the CopyService object, and select Relation from
the drop-down list.
The Line Configuration dialog box opens.
-
From the Event drop-down list, select OnCompletion and
click OK.
This option indicates that there are no conditions that
affect the path, and that the path between the two objects will
always be followed.
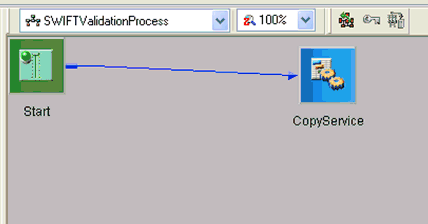
A line appears between
the objects to indicate that a relationship has been established.
x
Procedure: How to Add an End Object for the Copy Service Object
All
processing paths must terminate with an End object.
-
Drag and drop the End object
 from the toolbar to the workspace.
The End Name and Description dialog box opens.
-
In the Name field, type End, and leave
the default value (End object) in the Description field.
-
Click Next.
The End Name Schema dialog box opens.
-
Since no schemas are used in this processing path (that is,
the process flow will not be exposed as a Web service), from the
Schema drop-down list, select None.
-
Click Next.
The Properties dialog box opens.
-
Click Finish to accept the default values
and close the dialog box.
The new End object appears in the workspace.
-
Select the CopyService object, right-click
the End object, and select Relation from the
drop-down list.
The Line Configuration dialog box opens.
-
From the Event drop-down list, select OnCompletion and
click OK.
This option indicates that there are no conditions that
affect the path and that the path between the two objects will always
be followed.
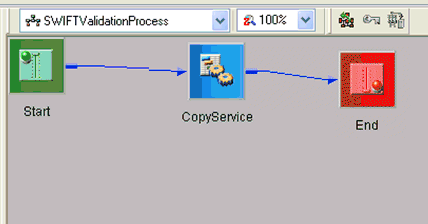
Your process flow will look similar to the following.
The CopyService object is a unit of work that redirects the XML
output to a defined destination through a custom emit. The End object
terminates this single process.
You can reposition the objects
as desired.
x
Procedure: How to Add a Validation Report Service Object
You
will add a Validation Report service to execute a SWIFT validation
report.
-
Drag and drop the Service object from the toolbar to the workspace.
The Service Name and Description dialog box opens.
-
In the Name field, type SWIFTValidationService, and
leave the default value (Service object) in the Description field.
-
Click Next.
The Service Type dialog box opens.
-
Select Class Name and enter com.ibi.agents.XDSWIFTValidationReportAgent.
-
Click Next.
The Define Service dialog box opens.
Do not select
the check box, since you do not want to use this service in other process
flows.
-
Click Next.
The Properties dialog box opens.
-
Click Finish to accept the default values
and close the dialog box.
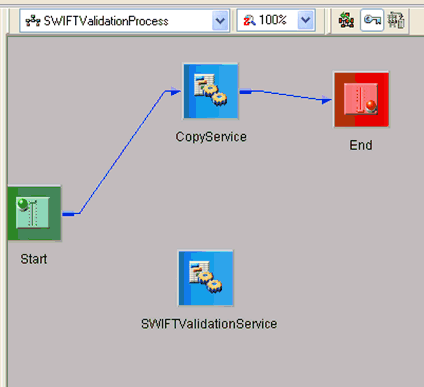
The new SWIFTValidationService object appears in the workspace.
The process flow will look similar to the following.
-
Select the Start object, right-click
the SWIFTValidationService object, and select Relation from
the drop-down list.
The Line Configuration dialog box opens.
-
From the Event drop-down list, select OnCompletion and
click OK.
A line appears between the objects to indicate that a relationship
has been established.
x
Procedure: How to Add an End Object for the Validation Report Service Object
All
processing paths must terminate with an End object.
-
Select the SWIFTValidationService Service
object, right-click the End object, and select Relation from
the drop-down list.
-
From the Event drop-down list on the Line Configuration dialog
box, select OnCompletion and click OK.
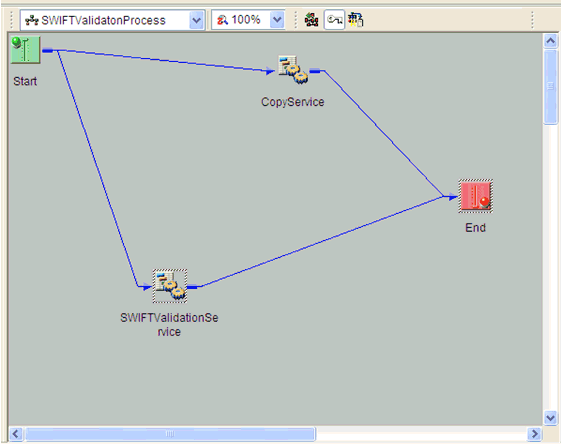
The process flow is now complete. It will look similar
to this.
-
To save the process flow, right-click the SWIFTValidationProcess node
and select Save from the drop-down list.
-
Now you need to validate the process flow and publish it to
the Registry of the iWay Service Manager Administration Console
for use in the route in the channel for inbound processing.
Validating a process flow ensures that its structure is
correct. Publishing a process flow makes it available in the Registry
for use in channel configuration.
For instructions on validating
and publishing the process flow, see the iWay Designer User's
Guide.
-
Close iWay Designer.
Your
next step is to add a new route to the Registry of the iWay Service Manager
Administration Console and associate the process flow with it.
x
Procedure: How to Define a Route and Associate the Process Flow With It
-
From the Registry menu options in the iWay Service Manager
Administration Console, click Routes.
-
On the Route Definitions pane, click Add to add
a route.
-
On the New Route Definition pane, enter a name for the route
and an optional description, as shown in the following table. Then
click Finish.
|
Parameter
|
Value
|
|---|
|
Name *
|
SWIFTtoXML_Route_PFlow
|
|
Description
|
Route for SWIFT to XML using process flow.
|
-
On the Construct Route pane, click Add.
You are prompted for the type of component to associate
with the route.
-
Select Process and click Next.
-
The next pane prompts you to select a process. Select the process
flow you created earlier with iWay Designer, SWIFTValidationProcess,
and click Finish.
The route, with its associated process flow, has been successfully defined.
x
An outlet defines how a message leaves a channel. An
emitter is a transport protocol that sends a document to its recipient.
In the sample configuration, we will use a File emitter. For details
on supported protocols, see the iWay Service Manager Protocol
Guide.
For the channel in this example, you will add two emitters to
the Registry. Then you will define two outlets, associating one
emitter with each outlet.
When you associate the outlets with the channel in later steps,
you will apply a condition to each one to dynamically direct the
flow of the output document based on its content.
In the example, you will add:
- An emitter
for the XML output data. When you add the XML outlet to the channel,
you will set the condition _isXML(). This condition tests the output
data for XML format. If it is in XML format, it is routed to the
specified destination.
- An emitter
for the Validation Report.
x
Procedure: How to Add an Emitter for XML Output
-
From the Registry menu options, select Emitters.
-
On the Emitters pane, click Add to add
an emitter.
The next pane prompts you for the emitter type.
-
For this example, select File from the
drop-down list and click Next.
The configuration parameters pane opens.

-
Supply configuration parameters for the new File emitter as
follows, then click Next.
|
Parameter
|
Value
|
|---|
|
Destination *
|
C:\File_out\SWIFT\_SREG(basename)_*.xml
This
value is the directory to which the XML output goes.
Make
sure that you have created this directory; otherwise, errors will
occur during deployment.
SREG(basename) is a special register
reserved by iWay Service Manager, which uses a file name without
an extension. For more information on how to configure a special
register (SREG), see the iWay Service Manager User's Guide.
On
output, an asterisk (*) in the destination file name is replaced
by a date and time stamp.
|
|
Create Directory
|
false
|
-
On the Emitters pane, enter the name of the new emitter and
an optional description, as shown in the following table. Then click Finish to
add the emitter.
|
Parameter
|
Value
|
|---|
|
Name *
|
XML_Out_Emitter
|
|
Description
|
Emitter for XML output for SWIFT.
|
x
Procedure: How to Add an Emitter for Validation Report Output
-
On the Emitters pane, click Add to add
another emitter.
The next pane prompts you for the emitter type.
-
For this example, select File from the
drop-down list and click Next.
The configuration parameters pane opens.

-
Supply configuration parameters for the second File emitter
as follows, then click Next.
|
Parameter
|
Value
|
|---|
|
Destination *
|
C:\File_out\Report\_SREG(basename)_*.xml
This
value is the directory to which the report validation output goes.
You can use an extension other than .xml, for example, .SWIFT or
.data.
Make sure that you have created this directory; otherwise,
errors will occur during deployment.
On output, an asterisk
(*) in the destination file name is replaced by a date and time
stamp. For details on the special register (SREG) used in the preceding
file name, see the iWay Service Manager User's Guide.
|
|
Create Directory
|
false
|
-
On the Emitters pane, enter the name of the new emitter and
an optional description, as shown in the following table. Then click Finish to
add the emitter.
|
Parameter
|
Value
|
|---|
|
Name *
|
Validation_Report_Emitter
|
|
Description
|
Emitter for Validation Report output for SWIFT.
|
x
Procedure: How to Define an Outlet for XML Output
Now
that you have added an XML and Validation Report emitter to the
Registry, you are ready to add and define the outlets. You will
associate the previously created emitters with the outlets (one
emitter for each outlet).
-
From the Registry menu options, select Outlets.
-
On the Outlet Definitions pane, click Add to add
an outlet.

-
On the New Outlet Definition pane, enter the name of the new
outlet and an optional description, as shown in the following table.
Then click Finish to add the outlet.
|
Parameter
|
Value
|
|---|
|
Name *
|
SWIFT_XML_Outlet
|
|
Description
|
XML outlet for SWIFT.
|
-
On the Construct Outlet pane, click Add to associate
the XML emitter with the XML outlet.
The next pane prompts you for the component type.

-
Select Emitter and click Next.
The next pane prompts you to select an emitter.

-
Select XML_Out_Emitter, which is the
XML emitter you added earlier, and click Finish.
The XML emitter is associated with the outlet. Now you
need to define the second outlet for the validation report output.
x
Procedure: How to Define an Outlet for Validation Report Output
-
From the Registry menu options, select Outlets.
-
On the Outlet Definitions pane, click Add to add
an outlet.

-
On the New Outlet Definition pane, enter the name of the new
outlet and an optional description, as shown in the following table.
Then click Finish to add the outlet.
|
Parameter
|
Value
|
|---|
|
Name *
|
Validation_Report_Outlet
|
|
Description
|
Validation Report outlet for SWIFT.
|
-
On the Construct Outlet pane, click Add to associate
the validation report emitter with the validation report outlet.
The next pane prompts you for the component type.

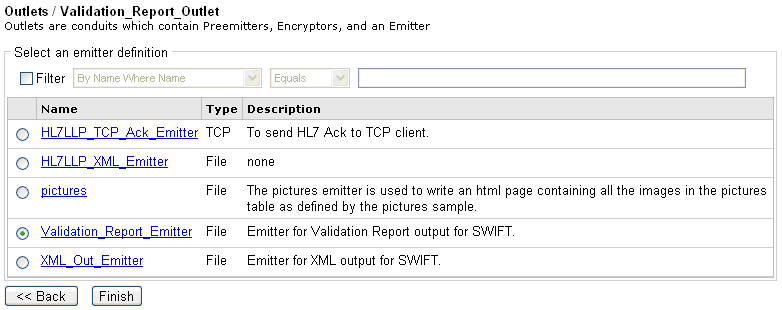
-
Select Emitter and click Next.
The next pane prompts you to select an emitter.
-
Select Validation_Report_Emitter, which
is the validation report emitter you added earlier, and click Finish.
Now you have defined the two outlets.
x
Now that you have defined the inlet, route, and outlets
for the channel, you are ready to add the channel to the Registry
and associate the conduits with it.
x
Procedure: How to Define a Channel
-
From the Registry menu options, select Channels.
-
On the Channel Definitions pane, click Add to add
a channel.

-
On the New Channel Definition pane, enter the name of the new
channel and an optional description, as shown in the following table.
Then click Finish to add the channel.
|
Parameter
|
Value
|
|---|
|
Name *
|
SWIFTtoXML_Channel
|
|
Description
|
Channel for SWIFT to XML inbound processing.
|
-
On the Construct Channel pane, click Add to associate
the inlet, route, and outlets defined previously with the channel.
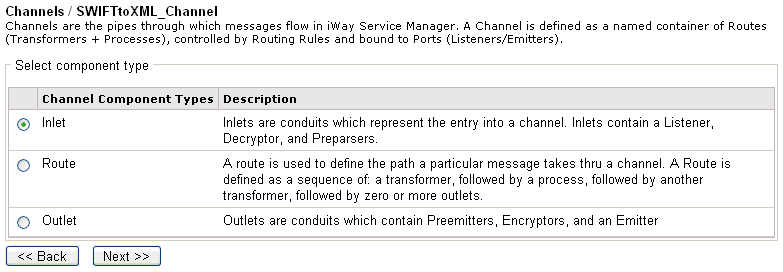
You are prompted to associate components with the channel.
-
Select Inlet and click Next.
The next pane prompts you to select an inlet.

-
Select SWIFTtoXML_Inlet, which is the
inlet you defined earlier, and click Finish.
The inlet is added to the channel.

Now you need to associate
the route defined earlier with the channel.
-
On the Construct Channel pane, click Add.
The next pane prompts you for the component type.

-
Select Route and click Next.
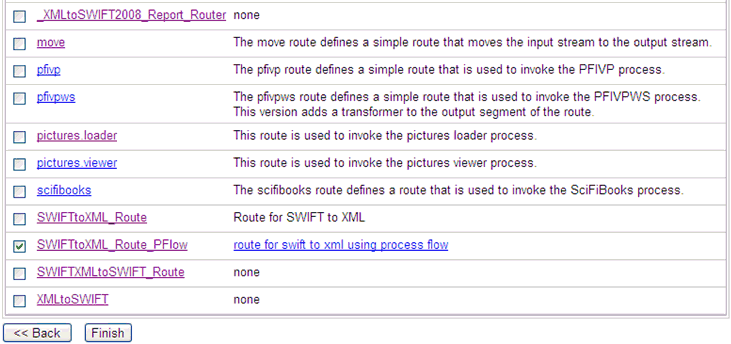
On the next pane, you are prompted to select a route.
-
Select SWIFTtoXML_Route_PFlow, which
is the route created earlier, and click Finish.

-
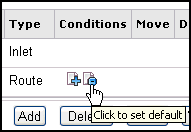
On the Construct Channel pane, click the minus sign (-)
under Conditions next to the name of the route to set it as the default.
-
On the Construct Channel pane, click Add to add
the outlets.

-
On the next pane, select Outlet and
click Next.

-
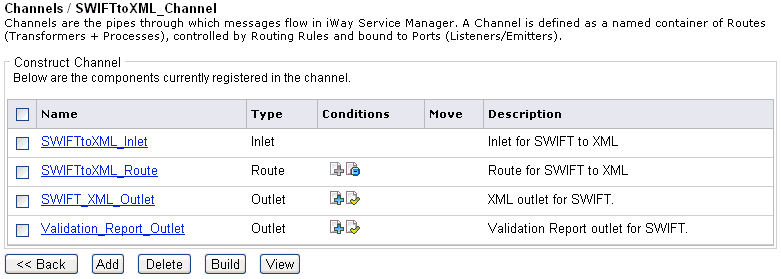
Select the two outlets defined earlier, SWIFT_XML_Outlet and Validation_Report_Outlet,
and click Finish.
-
To set a condition for the SWIFT_XML_Outlet, on the Construct
Channel pane, click the plus sign (+) under
Conditions for the SWIFT_XML_Outlet.
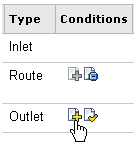
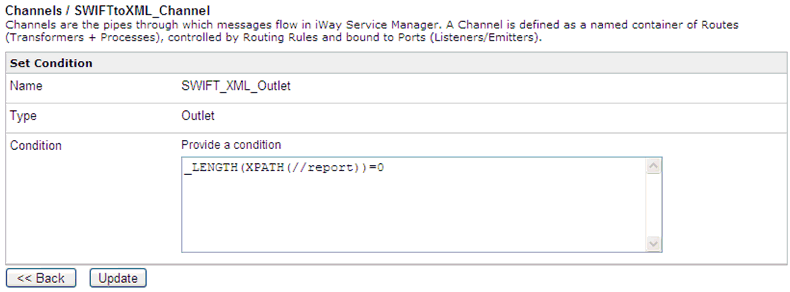
The Set Condition pane opens.
-
In the Condition input field, enter _LENGTH(XPATH(//report))=0,
and click Update.
This condition tests the output data for SWIFT XML format.
If it is in SWIFT XML format, it is routed to the destination specified
when you added the emitter for XML output.
You will see that
the Conditions plus sign icon has changed. You can click this icon to
edit the condition.
For details on supported conditions,
see the topic on using functions in the iWay Service Manager
User's Guide.
-
To set a condition for the Validation_Report_Outlet, on the
Construct Channel pane, click the plus sign (+)
under Conditions for the Validation_Report_Outlet.
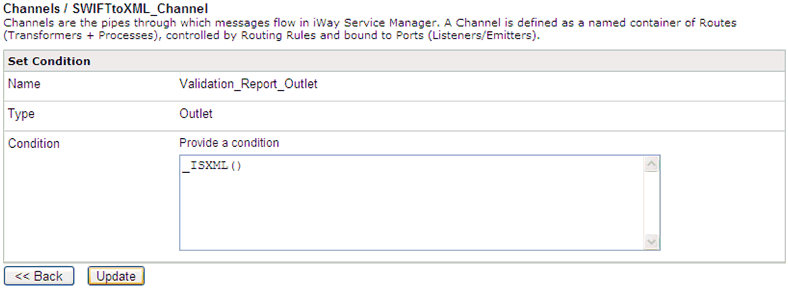
The Set Condition pane opens.
-
In the Condition input field, enter _ISXML(), and
click Update.
This condition tests the output data for XML format. If
the data is in XML format, it is routed to the destination specified
when you added the emitter for validation report output.
x
Procedure: How to Add the Ebix to the Channel
-
From the Registry menu options, select Channels.
The Channel Definitions pane opens.

-
Click the link in the Ebix column for the SWIFTtoXML_Channel.
The Add Ebix components pane opens.

-
Click Add.
The following pane opens.

-
Select SWIFT_2009, which is the name
of the Ebix you added previously, and click Finish.
Now that you have associated all the components with the
channel, you are ready to build it.
x
Procedure: How to Build the Channel
-
From the Registry menu options on the left pane, select Channels under
Conduits.

-
On the Channel Definitions pane, select the channel defined
previously, SWIFTtoXML_Channel, and click Build.
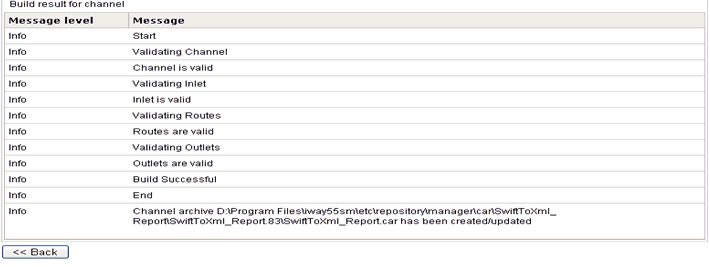
The results of the build are displayed on the right pane.
-
Review the results of your build and then click Back.
If an error or errors are displayed in the Message column,
take the appropriate action as instructed.
x
Procedure: How to Deploy the Channel
Deployment
is the mechanism by which a channel moves from being stored in the
Registry to becoming active in iWay Service Manager. For more information
on deployment, see the iWay Service Manager User's Guide.
-
Select the Deployments option in the blue
shaded area below the iWay Service Manager banner.
-
On the Channel Management pane, click Deploy.
-
On the Available Channels pane, select the channel you defined previously, SWIFTtoXML_Channel,
and click Deploy.
The Channel Management pane reopens.
-
Select SWIFTtoXML_Channel and click Start.
The red X under Status changes to a green check mark to
indicate that the channel has been started. If an error or errors
are displayed, take the appropriate action as instructed.

x
Procedure: How to Verify the Channel
To
make sure that the channel is working as expected, perform the following
steps:
-
Place a SWIFT document as test data in the C:\File_in directory.
This is the path in which SWIFT messages are received, which you
specified for the listener associated with the inlet for the channel.
The following table contains links to SWIFT files that
are attached to this PDF and can be used to verify your channel.
|
SWIFT MT950 (Statement of Cash)
|
SWIFT MT535 (Statement of Holding)
|
SWIFT MT541 (Receive Against Payment)
|
|---|
|
.
MT950.txt
|
.
MT535.txt
|
.
MT541.txt
|
Note: For file association compatibility
only, each SWIFT file that is attached to this PDF has been renamed
to include a .txt extension. However, please note that the actual
SWIFT output file that is placed in the C:\File_in directory will
not carry a .txt extension.
-
Check for the XML file and the validation report in the C:\File_out\SWIFT
and C:\File_out\Report directories. This is the destination path
you specified for the emitters associated with the outlets for the
channel. The listener will detect the presence of the file in the
input directory, and the copy service will copy it to the output
directory, replacing the asterisk in the file name with a time stamp.
For example, if you specified the destination file name
for the XML emitter as _SREG(basename)_*.xml per the configuration
example, a SWIFT input file named MT950.txt is named MT950_2009-03-03T19_33_26.684Z.xml
on output.
The following table contains links to sample XML validation
reports that are attached to this PDF and can be used to verify
your output.
|
SWIFT MT950
|
SWIFT MT535
|
SWIFT MT541
|
|---|
|
.
MT950_rpt.xml
|
.
MT535_rpt.xml
|
.
MT541_rpt.xml
|
The following table contains links to SWIFT FIN message
report files that are attached to this PDF and can be used to verify
your output.
|
SWIFT MT950
|
SWIFT MT535
|
SWIFT MT541
|
|---|
|
.
950.xml
|
.
535.xml
|
.
541.xml
|
x
Reusing Your Channel Configuration
Using the Archive Manager feature of iWay Service Manager,
you can archive your channel configuration with its associated components
and import them into another Registry. They will then be available
from that Registry for modification or reuse.
For details on this feature, see the iWay Service Manager
User's Guide.


 from the toolbar to the workspace.


 from the toolbar to the workspace.


