Using FIDEL in MODIFY

In this section:

The following standard MODIFY functions and concepts work with FIDEL in the building of CRTFORMs (for additional information on these functions):

MODIFY also has additional screen control options such as clearing the screen, setting the height and width parameters, and changing the default size of the TYPE message area in order to enlarge the CRTFORM (see Additional Screen Control Options).

Conditional and Non-Conditional Fields

When you run a MODIFY request, FOCUS keeps track of which transaction fields are active or inactive during execution. In order to add, update, and delete segment instances, the fields must be active (see Active and Inactive Fields, for a full discussion of active and inactive fields).

You can define data entry and turnaround fields as either conditional or non-conditional. A conditional field is conditionally active. That is, it becomes active only if there is incoming data present for the field. Otherwise, it remains inactive. A non-conditional field is always active whether there is incoming data present or not.

When you are performing update operations, there are several important points to keep in mind when you choose whether to specify a field as conditional or non-conditional:

Example: Conditional and Non-Conditional Display and Turnaround Fields

The following example illustrates the display and turnaround field features as well as the use of a non-conditional turnaround field (both carets). The first CRTFORM asks for a key field value, in this case EMP_ID. If a matching record is obtained, then some data source values are displayed and others are shown for turnaround update.

Note how the non-conditional turnaround field functions in the following example. Whether the displayed value is changed or not, the value in the data source is active. The VALIDATE uses the display value, whether it was changed or not.

    MODIFY FILE EMPLOYEE 
1.  CRTFORM
       "ENTER EMPLOYEE ID#: <EMP_ID"
       "PRESS ENTER BEFORE CONTINUING"
       "--------------------------------------------------"
    MATCH EMP_ID
       ON NOMATCH TYPE
          "EMPLOYEE ID NOT IN DATABASE. PLEASE REENTER."
       ON NOMATCH REJECT 
2.     ON MATCH CRTFORM LINE 4
          " "
          "EMPLOYEE ID #:  <D.EMP_ID"
          "LAST NAME:  <D.LAST_NAME"
          "HIRE DATE:  <D.HIRE_DATE"
          "SALARY:  <T.CURR_SAL>"
          "DEPARTMENT:  <T.DEPARTMENT>" 
3.     ON MATCH VALIDATE
          SALTEST = IF CURR_SAL GT 0 THEN 1 ELSE 0;
          ON INVALID TYPE
          "SALARY MUST BE GREATER THAN 0"
          "CORRECT SALARY AND PRESS ENTER TWICE"
       ON MATCH UPDATE CURR_SAL DEPARTMENT
    DATA
    END

The example processes as follows:

  1. When the procedure executes, the top part of the CRTFORM appears as follows:
    ENTER EMPLOYEE ID #:
    PRESS ENTER BEFORE CONTINUING
    -------------------------------------------------------

    If the employee ID entered does not match an ID in the data source, the transaction is rejected and a TYPE statement appears at the bottom of the screen.

    Assume the operator enters the following employee ID:

    ENTER EMPLOYEE ID #: 818692173
    PRESS ENTER BEFORE CONTINUING
    -------------------------------------------------------
  2. If the ID entered matches an ID in the data source, FOCUS successfully retrieves a record. The ON MATCH CRTFORM causes a second CRTFORM to be displayed on line 4. This CRTFORM contains both display and turnaround fields. The data source values of the fields appear on the second CRTFORM, and the cursor is positioned at the start of the CURR_SAL field which is the first unprotected field. Note that both CURR_SAL and DEPARTMENT are automatically highlighted for turnaround:
    ENTER EMPLOYEE ID #: 818692173
    PRESS ENTER BEFORE CONTINUING
    -------------------------------------------------------
    EMPLOYEE ID #:   818692173
    LAST NAME:       CROSS
    HIRE DATE:       811102
    SALARY:          27062.00
    DEPARTMENT:      MIS

    Assume the operator updates DEPARTMENT, does not change CURR_SAL, and transmits the CRTFORM:

    ENTER EMPLOYEE ID #: 818692173
    PRESS ENTER BEFORE CONTINUING
    -------------------------------------------------------
    EMPLOYEE ID #:   818692173
    LAST NAME:       CROSS
    HIRE DATE        811102
    SALARY:          27062.00
    DEPARTMENT:      ois
  3. When the operator presses Enter, the transaction is processed. If the value of CURR_SAL is greater than 0, the VALIDATE will evaluate as 1 (true) and processing continues. Although a value was not entered for CURR_SAL, the field is active because it is specified as a non-conditional field. Thus, the VALIDATE reads the current value in the T. field (27062.00), and validates the field. The transaction is then processed.

If you specify the turnaround field as conditional (only the left caret), the field is inactive if no data is entered. Assume the same transaction as above. The operator updates the DEPARTMENT and does not enter new data for the CURR_SAL field. The VALIDATE does not read the T. value because the field is inactive and instead reads a 0. The field is invalidated and the following error message occurs:

ENTER EMPLOYEE ID #: 818692173
PRESS ENTER BEFORE CONTINUING
--------------------------------
EMPLOYEE ID #:   818692173
LAST NAME:       CROSS
HIRE DATE:       811102
SALARY:          27062.00
DEPARTMENT:      ois
(FOC421)TRANS 1 REJECTED INVALID SALTEST
INVALID SALARY
SALARY MUST BE GREATER THAN 0

Using FIXFORM and FIDEL in a Single MODIFY

A MODIFY procedure can mix data sources from CRTFORMs and FIXFORMs.

The rules are:

This feature is useful in situations where a known set of records is wanted and the keys for these records reside on an external fixed format data source. (The data source may have been produced by a prior TABLE and SAVE or HOLD command.) The procedure first reads a key, fetches the matching record, and displays it on the CRTFORM specified.

This is also convenient when the FIXFORM is included in a START case.

In the following example, FIXFORM is used with FIDEL. To run this example on your machine, you must first create a sequential data source with data. To do so, run this TABLE request:

TABLE FILE EMPLOYEE
PRINT EMP_ID PAY_DATE
IF PAY_DATE GE 820730
ON TABLE SAVE AS PAYTRANS
END

This creates the transaction data source PAYTRANS. Then run the following MODIFY request:

    MODIFY FILE EMPLOYEE 
1.  FIXFORM ON PAYTRANS EMP_ID/9 PAY_DATE/6 
2.  MATCH EMP_ID
      ON NOMATCH REJECT
      ON MATCH CONTINUE
    MATCH PAY_DATE 
3.    ON MATCH/NOMATCH CRTFORM
         "EMPLOYEE ID #:<D.EMP_ID"
         "PAY DATE:<D.PAY_DATE"
         "MONTHLY GROSS:<T.GROSS>"
      ON NOMATCH INCLUDE
      ON MATCH UPDATE GROSS
    DATA
    END

The example processes as follows:

  1. First the data is read in from the sequential data source PAYTRANS.
  2. The EMP_ID from PAYTRANS is matched against EMP_IDs in the EMPLOYEE data source. If the EMP_IDs match, PAY_DATE is matched.
  3. The CRTFORM shows display values for EMP_ID and PAY_DATE. If there is a match on PAY_DATE, GROSS is displayed as a turnaround field and the operator can update it. If there is no match on PAY_DATE, both PAY_DATE and GROSS are included:
    EMPLOYEE ID #:   071382660
    PAY_DATE:        820831
    MONTHLY GROSS:         916.67

The procedure ends when there are no more transactions to read on the external data source. It can also be terminated by the operator by pressing the PF1 or PF3 key.

Generating Automatic CRTFORMs

You can use several simple but powerful statements with the FOCUS MODIFY facility to allow immediate generation of data management requests. You do not need to learn the complete FOCUS MODIFY language. Without using field names, you can write general-purpose requests and customize them for more detailed situations.

The statements can be used with multi-segment data sources as well as simple data sources. They can also be used from the Screen Painter (see Generating CRTFORMs Automatically). These statements automatically specify conditional fields. They include:

CRTFORM * [SEG n]

Design screen for all real data fields in segment n, where n is either the segment name or number.

CRTFORM * KEYS [SEG n]

Design screen for all key fields in segment n.

CRTFORM * NONKEYS [SEG n]

Design screen for all non-key fields in segment n.

CRTFORM T.* [SEG n]

Design screen using T.fields in segment n

CRTFORM D.* [SEG n]

Design screen using D.fields in segment n.

Note: The use of CRTFORM * on a COMBINE data source name is illogical and may produce unpredictable results.

Note that you can optionally specify the segment name or number for each of the CRTFORMs. To obtain the segment names and numbers, enter the following command where file is the name of the data source:

CHECK FILE file PICTURE

The names and numbers appear on the top of each segment in the diagram. You may also list segment names and numbers by entering the command:

? FDT filename

See the Describing Data manual and the Developing Applications manual for more information on the CHECK FILE command and ? FDT query.

If you are modifying all of the segments in the data source (except for unique segments), you can write the request without using Case Logic. The following example adds and maintains data for the EMPLOYEE data source. The segments are as follows:

(Segment 2 is a unique segment. Segments 4, 5, and 6 are cross-referenced segments that are not part of the EMPLOYEE data source.)

The request is:

MODIFY FILE EMPLOYEE
CRTFORM
   "THIS PROCEDURE ADDS NEW RECORDS AND UPDATES EXISTING RECORDS </1"
   "INSTRUCTIONS"
   "1. ENTER DATA FOR EACH FIELD"
   "2. USE TAB KEY TO MOVE CURSOR"
   "3. PRESS ENTER WHEN FINISHED"
   "4. WHEN YOU FINISH ALL RECORDS, PRESS PF1 </1"
CRTFORM * KEYS
MATCH * KEYS SEG 01
   ON MATCH/NOMATCH CRTFORM T.* NONKEYS SEG 01
   ON MATCH UPDATE * SEG 01
   ON NOMATCH INCLUDE
MATCH * KEYS SEG 03
   ON MATCH/NOMATCH CRTFORM T.* NONKEYS SEG 03
   ON MATCH UPDATE * SEG 03
   ON NOMATCH INCLUDE
MATCH * KEYS SEG 07
   ON MATCH/NOMATCH CRTFORM T.* NONKEYS SEG 07
   ON MATCH UPDATE * SEG 07
   ON NOMATCH INCLUDE
MATCH * KEYS SEG 08
   ON MATCH/NOMATCH CRTFORM T.* NONKEYS SEG 08
   ON MATCH UPDATE * SEG 08
   ON NOMATCH INCLUDE
MATCH * KEYS SEG 09
   ON MATCH/NOMATCH CRTFORM T.* NONKEYS SEG 09
   ON MATCH UPDATE * SEG 09
   ON NOMATCH INCLUDE
DATA
END

When the procedure executes, the screen appears as follows:

THIS PROCEDURE ADDS NEW RECORDS AND UPDATES EXISTING RECORDS
 
INSTRUCTIONS
1. ENTER DATA FOR EACH FIELD
2. USE TAB KEY TO MOVE CURSOR
3. PRESS ENTER WHEN FINISHED
4. WHEN YOU FINISH ALL RECORDS, PRESS PF1
EMP_ID:      :
DAT_INC:     :
TYPE:    :
PAY_DATE:     :
DED_CODE:    :
LAST_NAME:        :                     FIRST_NAME:        :
HIRE_DATE:     :                        DEPARTMENT:        :
CURR_SAL:       :                       CURR_JOBCODE:    :
ED_HRS:     :
PCT_INC:     :                          SALARY:        :
JOBCODE:   :
ADDRESS_LN1:         :
ADDRESS_LN2:         :
ADDRESS_LN3:         :
ACCTNUMBER:      :
GROSS:       :

Notice that the fields are divided into five groups. The first group consists of all the key fields in the data source. Each subsequent group consists of all non-key fields in a particular segment. Fill in each group from top to bottom and press Enter before filling in the next group. When you do this, the request uses the values to match on the segments specified later in the request.

The first CRTFORM statement generates the first group of fields, which are all the key fields in the data source:

CRTFORM * KEYS

The MATCH statements in the request modify each of the segments in the data source. Each statement contains a CRTFORM phrase that prompts for all non-key fields in the segment:

CRTFORM T.* NONKEYS SEG xx

Note that the CRTFORM phrase displays the fields as turnaround fields. After you fill in the fields in the group and press Enter, FOCUS uses the field values to update the segment.

You can add the following enhancements to the request:

If you want to modify some but not all segments in the data source, use Case Logic to write the request. Place each MATCH statement in a separate case. For example, this request modifies data in Segments 1, 3, and 7:

MODIFY FILE EMPLOYEE
CRTFORM
   "THIS PROCEDURE MAINTAINS EMPLOYEE"
   "JOB DATA, SALARY HISTORIES, AND ADDRESSES"
   " "
CRTFORM * KEYS
   "FILL IN EMP_ID, DAT_INC, AND TYPE FIELDS"
   "THEN PRESS ENTER"
GOTO EMPLOYEE
 
CASE EMPLOYEE
MATCH * KEYS SEG 01
   ON NOMATCH REJECT
   ON MATCH CRTFORM T.* NONKEYS SEG 01 LINE 10
   ON MATCH UPDATE * SEG 01
   ON MATCH GOTO MONTHPAY
ENDCASE
 
CASE MONTHPAY
MATCH * KEYS SEG 03
   ON MATCH/NOMATCH CRTFORM T.* NONKEYS SEG 03 LINE 10
   ON MATCH UPDATE * SEG 03
   ON MATCH GOTO DEDUCT
   ON NOMATCH INCLUDE
   ON NOMATCH GOTO DEDUCT
ENDCASE
 
CASE DEDUCT
MATCH * KEYS SEG 07
   ON MATCH/NOMATCH CRTFORM T.* NONKEYS SEG 07 LINE 10
   ON MATCH UPDATE * SEG 07
   ON NOMATCH INCLUDE
ENDCASE
DATA
END

Using Multiple CRTFORMs: LINE

You can choose which screen line the CRTFORM will begin on by using the LINE option. By default, the first CRTFORM begins on line 1. The next CRTFORM in the procedure begins on the line following the end of the previous CRTFORM. For example, if one screen uses 12 lines, the next CRTFORM automatically begins on the 13th line.

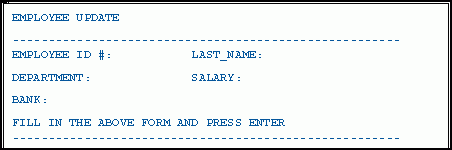
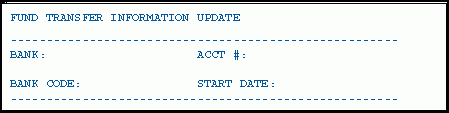
In the following example, there are two logical forms: EMPLOYEE UPDATE and FUND TRANSFER INFORMATION UPDATE. It illustrates the placement of CRTFORMs when the default is in effect (that is, the LINE option is not used):

    MODIFY FILE EMPLOYEE 
1.  CRTFORM
       "EMPLOYEE UPDATE"
       " "
       "-----------------------------------------------"
       "EMPLOYEE ID #: <EMP_ID    LAST_NAME: <LAST_NAME"
       "
       "DEPARTMENT:    <DEPARTMENT <28 SALARY: <CURR_SAL"
       " "
       "BANK: <BANK_NAME"
       " "
       "FILL IN THE ABOVE FORM AND PRESS ENTER"
       "-----------------------------------------------"
    MATCH EMP_ID
       ON NOMATCH REJECT
       ON MATCH UPDATE LAST_NAME DEPARTMENT CURR_SAL
       ON MATCH CONTINUE TO BANK_NAME
         ON NOMATCH INCLUDE 
2.       ON MATCH/NOMATCH CRTFORM
       "</1"
       "FUND TRANSFER INFORMATION UPDATE"
       " "
       "-----------------------------------------------"
       "BANK: <D.BN   ACCT #: <T.BA"
       " "
       "BANK CODE: <T.BC <30 START DATE: <T.EDATE"
       "-----------------------------------------------"
           ON MATCH UPDATE BA BC EDATE
DATA
END

This produces the following screen when the request is executed:

EMPLOYEE UPDATE
-------------------------------------------------------
EMPLOYEE ID #:           LAST_NAME:
DEPARTMENT:              SALARY:
BANK:
FILL IN THE ABOVE FORM AND PRESS ENTER
-------------------------------------------------------
FUND TRANSFER INFORMATION UPDATE
-------------------------------------------------------
BANK:                    ACCT #:
BANK CODE:               START DATE:
-------------------------------------------------------

Note that when the default is in effect, each logical form is displayed one after the other on the screen, the instant the MODIFY procedure is executed. That is, all the distinct CRTFORMs are concatenated into one visual form.

The LINE option enables you to control both the placement of a CRTFORM on the screen and the timing with which it appears on the screen. Using LINE gives you the following options:

The syntax is

CRTFORM [LINE nn]

where:

nn

Is the starting line number for the CRTFORM.

To completely replace one screen with the next, both CRTFORMs must start on the same line. Note the following change in the previous example:

    MODIFY FILE EMPLOYEE 
1.  CRTFORM
       "EMPLOYEE UPDATE"
       " "
       "-----------------------------------------------"
       "EMPLOYEE ID #:  <EMP_ID LAST_NAME: <LAST_NAME"
       " "
       "DEPARTMENT:     <DEPARTMENT <30 SALARY: <CURR_SAL"
       " "
       "BANK:           <BANK_NAME"
       " "
       "FILL IN THE ABOVE FORM AND PRESS ENTER"
       "-----------------------------------------------"
    MATCH EMP_ID
      ON NOMATCH REJECT
      ON MATCH UPDATE LAST_NAME DEPARTMENT CURR_SAL
      ON MATCH CONTINUE TO BANK_NAME
      ON NOMATCH INCLUDE
  
2.    ON MATCH/NOMATCH CRTFORM LINE 1
      "</1"
      "FUND TRANSFER INFORMATION UPDATE"
      " "
      "-----------------------------------------------"
      "BANK: <D.BN ACCT #: <T.BA"
      " "
      "BANK CODE: <T.BC <30 START DATE: <T.EDATE"
      "-----------------------------------------------"
      ON MATCH UPDATE BA BC EDATE
    DATA
    END
  1. When the MODIFY procedure is executed, the following screen is displayed:
  2. After the operator enters and transmits the data, the next CRTFORM replaces the previous one on the screen:

Generally, it is a good practice to put LINE 1 on all CRTFORMs that start a new case (see CRTFORMs and Case Logic) unless a specific screen pattern is wanted.

A combination of two or more individual CRTFORMs can occupy specific lines on one screen. To obtain a mixed screen, place the desired starting line number with the CRTFORM statement. For instance:

    MODIFY FILE EMPLOYEE 
1.  CRTFORM
      "EMPLOYEE UPDATE"
      " "
      "-----------------------------------------------"
      "EMPLOYEE ID #:    <EMP_ID LAST_NAME: <LAST_NAME"
      " "
      "DEPARTMENT:       <DEPARTMENT <30 SALARY: <CURR_SAL"
      " "
      "BANK:             <BANK_NAME"
      " "
      "FILL IN THE ABOVE FORM AND PRESS ENTER"
 
      "----------------------------------------------"
    MATCH EMP_ID
      ON NOMATCH REJECT
      ON MATCH UPDATE LAST_NAME DEPARTMENT CURR_SAL
      ON MATCH CONTINUE TO BANK_NAME
      ON NOMATCH INCLUDE 
2.    ON MATCH/NOMATCH CRTFORM LINE 12
      "</1"
      "FUND TRANSFER INFORMATION UPDATE"
      " "
      "-----------------------------------------------"
      "BANK: <D.BN  ACCT #: <T.BA"
      " "
      "BANK CODE: <T.BC <30 START DATE: <T.EDATE"
      "-----------------------------------------------"
      ON MATCH UPDATE BA BC EDATE
DATA
END

Processing occurs as follows:

  1. Like the preceding examples, this produces the first screen. Assume the operator enters and transmits the following data:
    EMPLOYEE UPDATE
    ------------------------------------------------------
    EMPLOYEE ID #:   117593129          LAST_NAME:   JONES
    DEPARTMENT:   MIS                   SALARY:   18480
    BANK:   STATE
    FILL IN THE ABOVE FORM AND PRESS ENTER
    ------------------------------------------------------
  2. The first CRTFORM remains on the screen while the next CRTFORM is displayed on line 12:
    EMPLOYEE UPDATE
    --------------------------------------------------------
    EMPLOYEE ID #:   117593129            LAST_NAME:   JONES
    DEPARTMENT:   MIS                     CURRENT SALARY:   18480
    BANK:   STATE
    FILL IN THE ABOVE FORM AND PRESS ENTER
    --------------------------------------------------------
    FUND TRANSFER INFORMATION UPDATE
    --------------------------------------------------------
    BANK: STATE                           ACCT #:40950036
    BANK CODE: 510271                     START DATE:821101
    --------------------------------------------------------

You can save certain lines from the preceding CRTFORM while you discard others. In the previous example, if you begin the second CRTFORM on line 6, the EMP_ID and the LAST_NAME remain and the next line is the beginning of the FUND TRANSFER INFORMATION AND UPDATE.

Assume the operator enters and transmits data on the first CRTFORM. Part of the first logical form disappears and the second form is displayed. Thus, a new visual form is created:

EMPLOYEE UPDATE
----------------------------------------------------
EMPLOYEE ID #:   117593129        LAST_NAME:   JONES
FUND TRANSFER INFORMATION AND UPDATE
----------------------------------------------------
BANK:  STATE                      ACCT #:   40950036
BANK CODE:  510271                START DATE:   821101
----------------------------------------------------

You can create mixed screens using the LINE option, in a variety of ways, depending on the need of the application.

CRTFORMs and Case Logic

Case Logic, described in Case Logic, enables you to perform separate complete MODIFY processes in one procedure. Each of these is a case, and the procedure contains directions about which case to execute under various circumstances.

When you use the Case Logic option of the MODIFY command, you can create a pattern of many CRTFORMs.

When there are multiple CRTFORMs in a single MODIFY request, use the LINE option to specify where each CRTFORM will be displayed. With Case Logic, generally, we recommend that you use LINE 1 to replace one screen with another.

The following example illustrates the use of Case Logic with the CRTFORM:

MODIFY FILE EMPLOYEE
COMPUTE
   PFKEY/A4= ;
CRTFORM
   "TO INPUT A NEW RECORD, PRESS PF4"
   "TO UPDATE AN EXISTING RECORD, PRESS PF5"
IF PFKEY EQ 'PF04' GOTO ADD ELSE
IF PFKEY EQ 'PF05' GOTO UPP ELSE GOTO TOP;
 
CASE ADD
CRTFORM LINE 1
   "EMPLOYEE ID #:    <EMP_ID"
   "LAST NAME:   <LAST_NAME FIRST NAME: <FIRST_NAME"
   "HIRE DATE:   <HIRE_DATE"
   "DEPARTMENT:       <DEPARTMENT"
MATCH EMP_ID
   ON MATCH REJECT
   ON NOMATCH INCLUDE
ENDCASE
 
CASE UPP
CRTFORM LINE 1
   "EMPLOYEE ID #:    <EMP_ID"
   "DEPARTMENT:       <DEPARTMENT"
   "JOB CODE:    <CURR_JOBCODE"
   "SALARY:      <CURR_SAL"
MATCH EMP_ID
   ON NOMATCH REJECT
   ON MATCH UPDATE DEPARTMENT CURR_JOBCODE CURR_SAL
ENDCASE
DATA
END

The first CRTFORM appears as:

TO INPUT A NEW RECORD, PRESS PF4
TO UPDATE AN EXISTING RECORD, PRESS PF5

If the operator presses PF4, the following is displayed:

EMPLOYEE ID #:
LAST NAME:              FIRST NAME:
HIRE DATE:
DEPARTMENT:

If the operator presses PF5, the following is displayed:

EMPLOYEE ID #:
DEPARTMENT:
JOB CODE:
SALARY:

Note: At the end of a MODIFY procedure, control defaults to the TOP Case.

Specifying Groups of Fields

In this section:

Groups of fields (that is, more than one occurrence of the same field) can be specified on the CRTFORM in two ways:

You can use Case Logic to process groups of fields.

Specifying Groups of Fields for Input

A group of fields may repeat on the form. For example:

"EMPLOYEE ID   DEPARTMENT   SALARY"
"<EMP_ID       <DPT         <CURR_SAL"

This reads the same data as the FIXFORM statement:

FIXFORM 3(EMP_ID/C9 DPT/C10 CURR_SAL/C14)

The following example shows the use of repeating groups for a single employee ID:

MODIFY FILE EMPLOYEE
CRTFORM
   "ENTER EMPLOYEE ID #: <EMP_ID"
   " "
   "ENTER PAY DATE AND GROSS PAY FOR ABOVE EMPLOYEE"
   " "
   "PAY DATE: <PAY_DATE      GROSS: <GROSS"
   "PAY DATE: <PAY_DATE      GROSS: <GROSS"
   "PAY DATE: <PAY_DATE      GROSS: <GROSS"
MATCH EMP_ID
   ON NOMATCH REJECT
   ON MATCH CONTINUE
MATCH PAY_DATE
   ON MATCH REJECT
   ON NOMATCH INCLUDE
DATA
END

Note: A group of repeated data fields cannot be specified on a MATCH or NOMATCH CRTFORM. They must be presented on a primary CRTFORM (that is, one not generated as a result of a MATCH or NOMATCH command).

This procedure processes as follows:

ENTER EMPLOYEE ID #:  818692173
 
ENTER PAY DATE AND GROSS AMOUNT FOR ABOVE EMPLOYEE
 
PAY DATE: 850405      GROSS: 3000.00
PAY DATE: 850412      GROSS: 4000.00
PAY DATE: 850418      GROSS: 2500.00

When the operator presses Enter, the transaction processes. Processing continues until a line with no data is found or all lines are completed (whichever occurs first).

Using REPEAT to Display Multiple Records

You can display multiple segment instances on the screen by directing FIDEL to read and display the contents of a HOLD buffer. You can use a subscript value to identify a particular instance in the HOLD buffer with the following syntax

 
field(n)

where:

field

Is the name of a previously held field.

(n)

Is the integer subscript that identifies the number of the instance in the HOLD buffer containing the field to be displayed. n must be in integer format or the report group will be ignored.

The variable SCREENINDEX allows you to display and modify selected groups of records from the HOLD buffer.

Consider the following example, which uses the REPEAT statement to retrieve up to a set number (in this case, six) of multiple instances, saves them in the HOLD buffer, and then displays the instances on the CRTFORM:

MODIFY FILE EMPLOYEE 
1.  CRTFORM
       "PAY HISTORY UPDATE"
       " "
       "ENTER EMPLOYEE ID#: <EMP_ID"
    MATCH EMP_ID
       ON NOMATCH REJECT
       ON MATCH GOTO COLLECT
 
    CASE COLLECT 
2.  REPEAT 6 TIMES 
2.     NEXT PAY_DATE 
2.        ON NEXT HOLD PAY_DATE GROSS 
3.        ON NONEXT GOTO DISPLAY
  
3.  ENDREPEAT
    GOTO DISPLAY
    ENDCASE
CASE DISPLAY
    IF HOLDCOUNT EQ 0 GOTO TOP; 
4.  COMPUTE
       BUFFNUMBER/I5 = HOLDCOUNT; 
5.  CRTFORM LINE 5
       "FILL IN GROSS AMOUNT FOR EACH PAY DATE"
       " "
       "PAY DATE          GROSS AMOUNT"
       "--------          ------------"
       "<D.PAY_DATE(1)    <T.GROSS(1)>"
       "<D.PAY_DATE(2)    <T.GROSS(2)>"
       "<D.PAY_DATE(3)    <T.GROSS(3)>"
       "<D.PAY_DATE(4)    <T.GROSS(4)>"
       "<D.PAY_DATE(5)    <T.GROSS(5)>"
       "<D.PAY_DATE(6)    <T.GROSS(6)>"
    GOTO UPDATE
    ENDCASE
 
    CASE UPDATE 
6.  REPEAT BUFFNUMBER
       MATCH PAY_DATE
          ON NOMATCH REJECT
          ON MATCH UPDATE GROSS
    ENDREPEAT
    GOTO COLLECT
    ENDCASE
    DATA
    END

The procedure processes as follows:

  1. When the procedure is executed, the first CRTFORM is displayed:
    PAY HISTORY UPDATE
     
    ENTER EMPLOYEE ID #:
  2. Assume the operator enters the following ID and transmits the data:
    ENTER EMPLOYEE ID #: 071382660

    If there is a match, the instruction is to REPEAT the logic six times. That is, up until six times, find a PAY_DATE and hold the PAY_DATE and the GROSS in the HOLD buffer.

  3. When there are no more PAY_DATE fields or six of them have been held, the procedure branches to CASE DISPLAY.
  4. The procedure stores the number of records that are in the HOLD buffer in the variable BUFFNUMBER.
  5. The procedure displays the following CRTFORM:
    PAY HISTORY UPDATE
    ENTER EMPLOYEE ID #: 071382660
    FILL IN GROSS AMOUNT FOR EACH PAY DATE
     
    PAY DATE           GROSS AMOUNT
    820831             916.67
    820730             916.67
    820630             916.67
    820528             916.67
    820430             916.67
    820331             916.67

    The operator makes changes to the fields in the GROSS AMOUNT column and presses Enter. All changes for all records are transmitted simultaneously as shown:

    PAY HISTORY UPDATE
    ENTER EMPLOYEE ID #: 071382660
    FILL IN GROSS AMOUNT FOR EACH PAY DATE
    PAY DATE           GROSS AMOUNT
    820831             816.67
    820730             816.67
    820630             816.67
    820528             916.67
    820430             916.67
    820331             916.67
  6. The REPEAT statement instructs FOCUS to perform the MODIFY logic on all segment instances.

Note: If a CRTFORM screen with subscripted variables is rejected with a FORMAT ERROR, you may not alter any records on the screen prior to the record rejected, as FOCUS has already held them.

Using Groups of Fields With Case Logic

When you use Case Logic to process a group of fields, some important rules apply:

  • Each time the procedure enters the case, the next group of fields is processed. FOCUS keeps track internally of which groups have been processed.
  • If the CRTFORM with the group of fields is not in the TOP case, you must create your own branching logic to process all the groups before going back to the TOP. This normally requires some kind of counting mechanism. Once the procedure goes back to the TOP case, all unprocessed data on the CRTFORM or in a lowercase is lost.

Example: Case Logic, Groups, CURSORINDEX and VALIDATE

In the following example, Case Logic is used with groups of fields. The CURSORINDEX (see Specifying Cursor Position) is used in conjunction with a VALIDATE:

MODIFY FILE EMPLOYEE 
1.  CRTFORM
       "EMPLOYEE SALARY AND DEPARTMENT UPDATE"
       " "
       "PRESS ENTER"
    GOTO COLLECT
 
    CASE COLLECT 
2.  REPEAT 6 TIMES
       NEXT EMP_ID
          ON NEXT HOLD EMP_ID CURR_SAL DEPARTMENT
          ON NONEXT GOTO DISPLAY
    ENDREPEAT
    GOTO DISPLAY
    ENDCASE
 
    CASE DISPLAY 
3.  IF HOLDCOUNT EQ O GOTO EXIT; 
4.  COMPUTE
       BUFFNUMBER/I5 = HOLDCOUNT; 
5.  CRTFORM LINE 7
       "EMPLOYEE             SALARY               DEPARTMENT"
       "--------             ------               ----------"
       "<D.EMP_ID(1)         <:AAA.T.CSAL(1)>     <:BBB.T.DPT(1)>"
       "<D.EMP_ID(2)         <:AAA.T.CSAL(2)>     <:BBB.T.DPT(2)>"
       "<D.EMP_ID(3)         <:AAA.T.CSAL(3)>     <:BBB.T.DPT(3)>"
       "<D.EMP_ID(4)         <:AAA.T.CSAL(4)>     <:BBB.T.DPT(4)>"
       "<D.EMP_ID(5)         <:AAA.T.CSAL(5)>     <:BBB.T.DPT(5)>"
       "<D.EMP_ID(6)         <:AAA.T.CSAL(6)>     <:BBB.T.DPT(6)>"
 
6.  REPEAT 6 TIMES
       COMPUTE
          CURSOR/A66 = ':AAA';
          CURSORINDEX/I5=REPEATCOUNT;
       VALIDATE
          SALTEST = IF CSAL GT 50000 THEN 0 ELSE 1;
          ON INVALID TYPE "SALARY MUST BE LESS THAN $50,000"
          ON INVALID GOTO DISPLAY
    ENDREPEAT
    GOTO UPDATE
    ENDCASE
 
    CASE UPDATE 
7.  REPEAT BUFFNUMBER
       MATCH EMP_ID
          ON NOMATCH REJECT
          ON MATCH UPDATE CURR_SAL DEPARTMENT
    ENDREPEAT
    GOTO COLLECT
    ENDCASE
    DATA
    END

The example processes as follows:

  1. The first CRTFORM requests the operator to press Enter without typing anything.
  2. The REPEAT statement retrieves six employee IDs, salaries, and department assignments and places them in a buffer.
  3. If there are no records in the buffer, the procedure terminates.
  4. The COMPUTE statement stores the number of records in the buffer in the variable BUFFNUMBER.
  5. The second CRTFORM retrieves the IDs, salaries, and department assignments from the buffer and displays them together on the screen. Note the field labels:
    • The label :AAA on the CURR_SAL (CSAL) field.
    • The label :BBB on the DEPARTMENT (DPT) field.

    Assume that the operator changes the values to the following:

    EMPLOYEE SALARY AND DEPARTMENT UPDATE
     
    PRESS ENTER
     
    EMPLOYEE             SALARY                DEPARTMENT
    --------             ------                ----------
    071382660            35000.00              PRODUCTION
    112847612            23200.00              MIS
    117593129            75480.00              MIS
    119265415            19500.00              PRODUCTION
    119329144            39700.00              PRODUCTION
    123764317            36862.00              PRODUCTION
  6. The second REPEAT statement operates on each of the six records displayed by the second CRTFORM, in order of display, performing the following tasks:
    • Sets the CURSOR variable to the label :AAA.
    • Sets the CURSORINDEX variable to the number of the record it's processing (1 through 6).
    • Validates the CURR_SAL field value. If the CURR_SAL value is $50,000 or more, the procedure branches back to the beginning of Case DISPLAY. The procedure displays the second CRTFORM again, with the CURSOR and CURSORINDEX variables positioning the cursor on the invalid salary.

    In the example, the procedure positions the cursor on the third CURR_SAL value:

    EMPLOYEE SALARY AND DEPARTMENT UPDATE
    PRESS ENTER
    EMPLOYEE           SALARY               DEPARTMENT
    --------           ------               ----------
    071382660        35000.00               PRODUCTION
    112847612        23200.00               MIS
    117593129        75480.00               MIS
    119265415        19500.00               PRODUCTION
    119329144        39700.00               PRODUCTION
    123764317        36862.00               PRODUCTION
    (FOC421)TRANS 2 REJECTED INVALID SALTEST
    SALARY MUST BE LESS THAN $50,000
  7. If all values are valid, the third REPEAT statement updates the employee's salary and department for each record in the buffer. The procedure then branches to Case COLLECT to update six more records in the data source.

Handling Errors

In this section:

It is important to know how various errors are handled by FIDEL so that proper instructions can be given to terminal operators. The following errors can cause a transaction or screen of data to be rejected:

Note: Error messages are discussed in detail in Messages: TYPE, LOG, and HELPMESSAGE.

Handling Format Errors

If the operator enters a non-numeric character into a field defined as numeric, an error message is displayed and the screen is not processed (processing stops). The error message indicates the line number and field name in error and the cursor is automatically positioned on that field. Additionally, if the operator enters a value that fails an ACCEPT test for a field an error message is displayed and the screen is not processed. Any message specified for that field with the HELPMESSAGE attribute will also be displayed.

The operator can retype the data and press the Enter key to retransmit the screen. Alternatively, the operator may press the PF2 key to cancel the transaction. The error prevents anything on the screen from being processed. When the operator corrects the error and transmits the screen, processing resumes.

There are two exceptions to this rule. When there are repeating groups, all complete transactions up to the error will be processed. Also, in REPEAT/HOLD loops, the data prior to the format error may not be altered.

VALIDATE and CRTFORM Display Logic

When the operator enters a value that is invalid, the transaction is rejected and an error message is displayed. By default, control returns to the first CRTFORM in the TOP case. However, you can use an ON INVALID GOTO statement to transfer control to any other case in the request.

If the NOCLEAR or blank option in the CRTFORM statement (see Additional Screen Control Options) is in effect, the screen will not be cleared. The operator can change the data in the offending transaction and retransmit the screen.

When you use validations, you can divide the tests into different cases and repeat a case if it fails the test. The advantage of this is that the operator can change the invalid data and retransmit the screen before other sections are processed. An ON INVALID TYPE phrase can be used to send an informative message to the operator on the screen. The following example shows the use of these options:

CASE TRY
CRTFORM
   EMPLOYEE ID #: <EMP_ID NAME: <LAST_NAME"
   "CURRENT SALARY: <CURR_SAL"
VALIDATE
   GOODSAL= CURR_SAL GT 10000 AND CURR_SAL LT 1000000;
   ON INVALID TYPE
   THE CURRENT SALARY CANNOT BE LARGER THAN 1000000 OR"
   "LESS THAN 10000"
   ON INVALID GOTO TRY
   .
   .
   .

All messages appear on the bottom four lines of the screen, unless you specify the TYPE option on the CRTFORM statement (see Additional Screen Control Options).

Handling Errors With Repeating Groups

If old style repeating groups (those without subscripts) are present and there is an error, processing continues to the next transaction on the screen. This means that if the operator changes the offending transaction and retransmits the screen, the other transactions on the screen become duplicates. It is important when using repeating groups to reject duplicates and turn the duplicate message off (LOG DUPL MSG OFF).

Alternatively, avoid using VALIDATE with repeating groups. Use COMPUTE instead and branch to a case that displays the erroneous data in a lower portion of the screen.

The following is an example of this technique. A test field is computed in Case TEST, using DECODE. This test field checks that the department value is a valid one. If the operator inputs a department value that is invalid, control branches to a case that displays the erroneous data (CASE BADDPT).

    MODIFY FILE EMPLOYEE 
1.  CRTFORM
       "FILL IN THE FOLLOWING CHART WITH THE SALARIES"
       "AND DEPARTMENT ASSIGNMENTS OF FOUR NEW EMPLOYEES"
       " "
       "           EMPLOYEE ID       DEPARTMENT       SALARY"
       "           -----------       ----------       ------"
       "PERSON 1   <EMP_ID           <DEPARTMENT      <CURR_SAL"
       "PERSON 2   <EMP_ID           <DEPARTMENT      <CURR_SAL"
       "PERSON 3   <EMP_ID           <DEPARTMENT      <CURR_SAL"
       "PERSON 4   <EMP_ID           <DEPARTMENT      <CURR_SAL"
       GOTTO TEST
  
2.  CASE TEST
    IF EMP_ID IS ' ' GOTO TOP;
    COMPUTE
       TEST/I1 = DECODE DEPARTMENT (MIS 1 PRODUCTION 1 ELSE 0);
    IF TEST IS 0 GOTO BADDEPT ELSE GOTO ADD;
    ENDCASE
  
3.  CASE ADD
    MATCH EMP_ID
       ON NOMATCH INCLUDE
       ON MATCH REJECT
    ENDCASE
  
4.  CASE BADDEPT
    COMPUTE
       XEMP/A9 = EMP_ID;
       XDEPT/A10 = DEPARTMENT;
    CRTFORM LINE 12
       "INVALID ENTRY: DEPARTMENT MUST BE MIS OR PRODUCTION"
       "CORRECT THE ENTRY BELOW"
       " "
       "EMPLOYEE ID:  <D.XEMP    DEPARTMENT:  <T.XDEPT"
    COMPUTE
       DEPARTMENT=XDEPT;
    GOTO TEST
    ENDCASE
 
    DATA
    END

The request processes as follows:

  1. This is the first and TOP case, and contains a CRTFORM that displays four instances of repeating groups. Assume the operator fills in values and transmits the screen. Control transfers to Case TEST.
  2. Case TEST contains a computed field that uses DECODE to make sure that the values that have been input for DEPARTMENT are either MIS or PRODUCTION. When a DEPARTMENT value does not match this list, TEST is returned a code of 0, in which case control transfers to Case BADDEPT.
  3. Case BADDEPT first computes two fields, XEMP and XDEPT, to have the values of EMP_ID and DEPARTMENT at the time the error occurred. Next, BADDEPT displays a CRTFORM containing a message to the operator and the two computed fields. The XDEPT field, which contains the invalid DEPARTMENT value, is a turnaround field so that the operator can see the invalid value and change it. Next, the COMPUTE is reversed and the new values are returned to their respective fields. Control transfers back to Case TEST where the DEPARTMENT values will continue to be tested until they are all valid. At that point, control transfers to Case ADD.
  4. Case ADD contains the MATCH logic necessary to include new employees into the EMPLOYEE data source. The transaction including all the repeating groups is processed at one time.

Rejecting NOMATCH or Duplicate Data

When the request directs that transactions be rejected, an error message is displayed on the screen. It is a good idea, when the major keys do not repeat, to use a split CRTFORM and give the keys in the first CRTFORM. Once the keys are accepted, the rest of the data may be entered. For example:

MODIFY FILE EMPLOYEE
CRTFORM
   "ENTER EMPLOYEE ID#:     <EMP_ID"
   "THEN PRESS ENTER"
MATCH EMP_ID
   ON NOMATCH TYPE
      "ID NOT IN DATABASE   PLEASE REENTER"
   ON NOMATCH REJECT
   ON MATCH CRTFORM LINE 4
      "LAST NAME:   <T.LAST_NAME"
      "DEPARTMENT:  <T.DEPARTMENT"
      "SALARY:      <T.CURR_SAL"
   ON MATCH UPDATE LAST_NAME DEPARTMENT CURR_SAL
DATA
END

If the EMP_ID does not match, control returns immediately to the operator with a request to correct the value. If a match does occur, the operator must then fill in the balance of the form and transmit it.

If repeating groups are present and no other cases are involved, all of the groups are processed before control returns to the screen. Thus, splitting screens in this way is particularly useful when the second CRTFORM contains repeating groups.

Logging Transactions

You can log the data entered on the screen to any log file. Only the data is logged, not the CRTFORM, so a compact log file is created. For example:

LOG TRANS ON ALLDATA

This will log transactions to a file allocated to the ddname ALLDATA.

The record length of the file must allow space for each field on each CRTFORM in the procedure, plus one character at the start of each CRTFORM. The record length should not be longer than this.

This may be an inconvenient format, since it is very long if several CRTFORMs exist. Instead you can construct a custom log file of your own design using TYPE statements. This example logs data collected from its preceding CRTFORM to a file allocated to ddname MYCRT, including a COMPUTE transaction number, TNUM:

CRTFORM
"EMPLOYEE ID #: <EMP_ID  NAME <LAST_NAME"
"HIRE DATE: <HIRE_DATE"
COMPUTE
TNUM/I4=TNUM+1;
TYPE ON MYCRT
"<TNUM><EMP_ID><LAST_NAME><HIRE_DATE"

This option is preferable to the standard LOG option whenever a procedure contains more than two CRTFORMs, or when text or computed fields must be captured on the log file.

Additional Screen Control Options

In this section:

MODIFY CRTFORMs support several additional screen control options:

Clearing the Screen: CLEAR/NOCLEAR

Data is transmitted from the CRTFORM to the data source when the operator presses the Enter key. After each successful screen is processed, the data areas are automatically cleared. You can override this default by using the NOCLEAR option. Then, after each data transmission, the screen remains unchanged.

This is a useful feature when there is a substantial amount of data that carries over from one screen to another. The syntax is

CRTFORM action

where:

action

Is one of the following:

blank is the default. Causes the screen to clear after the data is transmitted. If a transaction is invalid and an error message appears at the bottom of the screen, the screen will not be cleared.

NOCLEAR causes the data values on the screen to remain as is after data is transmitted.

CLEAR causes the data values on the screen to clear after every data transmission, even if there is an error. Thus, if CLEAR is specifically used and there is an error, data must be reentered.

Note: The options chosen may be different from one CRTFORM to the next.

Specifying Screen Size: WIDTH/HEIGHT

FIDEL assumes a default screen size of 24 lines of 80 characters each. The WIDTH/HEIGHT options allow you to use the full width and height of IBM terminals that are larger than the usual 3270 screen for the display of CRTFORMs. The following syntax allows you to override the defaults

CRTFORM [WIDTH nnn] [HEIGHT nnn]

where:

WIDTH nnn

Is the total number of characters across the face of the screen. Acceptable values for WIDTH are 80 and 132 and cannot exceed the true width of the terminal. FOCUS verifies that each line of the CRTFORM can be displayed at the current WIDTH specification. If any line of the CRTFORM exceeds it, you will receive error message FOC456, and the procedure will not run.

HEIGHT nnn

Is the total number of lines that each screen supports. It bears no relation to the number of lines in the CRTFORM. It may not exceed the true height of the terminal, but it may be less. For example, you can specify HEIGHT 20 for a Model 2 screen instead of 24 and write a CRTFORM of 32 lines. The first 16 lines appear on one screen and the next 16 on the subsequent screen. Remember that by default, four lines are reserved for TYPE messages.

The following table gives the physical screen sizes for the IBM 3270 series of terminals:

Terminal Type

Model

Width

Height

3270

1

80

24

3277, 3278, 3279, 3178

2

80

24

3278, 3279

3

80

32

3278

4

80

43

3278

5

132

27

FOCUS senses the width and height of the terminal which you are using and attempts to implement your CRTFORM WIDTH and HEIGHT specifications accordingly. Here are some rules and facts that apply:

  • If your WIDTH or HEIGHT specifications exceed the perceived characteristics of the terminal, you will receive a FOC491 error message and the procedure will not run.
  • FOCUS sees the terminal as it is defined to the operating system. For example, a Model 5 3278 may be defined to the operating system as a Model 2 terminal. That terminal will appear to FOCUS as a Model 2 (24 lines deep and 80 characters wide). A WIDTH 132 specification will produce a FOC491 error message.

Changing the Size of the Message Area: TYPE

By default, FOCUS reserves the last four lines of the terminal screen for TYPE messages and text messages specified with the HELPMESSAGE attribute (see Messages: TYPE, LOG, and HELPMESSAGE). You can override this default and determine the number of lines each CRTFORM reserves with the keyword TYPE. This feature allows you to increase the number of lines on the screen for CRTFORM display and reduce the number of lines reserved for messages at the bottom of the screen. The syntax is

CRTFORM TYPE {n|4}

where:

n

Is a number from one to four indicating the number of message lines desired. The TYPE value setting remains in effect for all subsequent CRTFORMs in the same procedure until overridden by a new value.

You can expand the actual CRTFORM screen size by specifying a number less than four. For example, a terminal with a height of 24 lines currently reserves 20 lines for the CRTFORM and four lines for the TYPE area. If you specify a TYPE area of 2, the CRTFORM area increases to 22 lines.

If one procedure varies the size of the TYPE area from a larger to a smaller number, CRTFORM will clear the necessary TYPE statements in order to generate the next screen. If multiple CRTFORMs are written to the same screen, each CRTFORM should specify the same TYPE area size. For example:

CRTFORM LINE 1 TYPE 2
:
:
CRTFORM LINE 7 TYPE 2

Messages supplied with the HELPMESSAGE attribute in the Master File for fields on the MODIFY CRTFORM, are displayed in the TYPE area.

This type of message consists of one line of text which is displayed when:

  • The value entered for a data source field is invalid according to the ACCEPT test for the field, or causes a format error.
  • The user places the cursor in the data entry area for a particular field and presses a predefined PF key. If no message has been specified for that field, the following message will be displayed:
    NO HELP AVAILABLE FOR THIS FIELD

Information Builders