The following facilities can assist you in using the MODIFY command:
All these facilities are described in the sections that follow.
If you are operating in Simultaneous Usage mode (SU), please refer to the appropriate Simultaneous Usage manual.
How to: |
Reference: |
The COMBINE command allows you to modify two or more FOCUS, relational, or Adabas data sources in the same MODIFY request. The command combines the logical structures of the FOCUS data sources into one structure while leaving the physical structures of the data sources untouched. This combined structure lasts for the duration of the FOCUS session, until you enter another COMBINE command, or it is cleared with the AS CLEAR option. Only one combined structure can exist at a time.
Note the following:
Enter the COMBINE command at the FOCUS command level (at the FOCUS prompt).
COMBINE FILES file1 [PREFIX pref1|TAG tag1] [AND] . . . filen [PREFIX prefn|TAG tagn] AS asname
where:
Are the Master File names for the data sources you want to modify. You can specify up to 63 data sources (you will be limited to fewer data sources if any of these data sources have more than one segment).
Are prefix strings for each data source; up to four characters. They provide uniqueness for field names. You cannot mix TAG and PREFIX in a COMBINE structure. See Referring to Fields in Combined Structures: The PREFIX Parameter later in this section.
Are aliases for the Master File names; up to eight characters. FOCUS uses the tag name as the qualifier for fields that refer to that data source in the combined structure. You cannot mix TAG and PREFIX in a COMBINE, and you can only use TAG if FIELDNAME is set to NEW or NOTRUNC. See Referring to Fields in Combined Structures: The TAG Parameter later in this section.
Is an optional word to enhance readability.
Is the required name of the combined structure to use in MODIFY procedures and CHECK FILE commands. For example, if you name the combined structure EDJOB, begin the request with:
MODIFY FILE EDJOB
Is the command that clears the combined structure which is currently in effect.
Note: The AS CLEAR option must be issued with no file name:
COMBINE FILE AS CLEAR
Once you enter the COMBINE command, you can modify the combined structure.
Note:
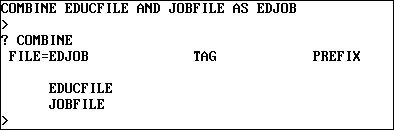
For example, to combine data sources EDUCFILE and JOBFILE, enter:
COMBINE FILES EDUCFILE AND JOBFILE AS EDJOB
After entering this command, you can run the following request. Notice that the statements pertaining to each data source are placed in different cases (Case Logic is discussed in Case Logic). This clarifies the request logic, and makes it easier to understand and clarify the request. The first case modifies the EDUCFILE data source, and the second case modifies the JOBFILE data source.
MODIFY FILE EDJOB PROMPT COURSE_CODE COURSE_NAME JOBCODE JOB_DESC GOTO EDUCFILE
CASE EDUCFILE MATCH COURSE_CODE ON MATCH REJECT ON MATCH GOTO JOBFILE ON NOMATCH INCLUDE ON NOMATCH GOTO JOBFILE ENDCASE
CASE JOBFILE MATCH JOBCODE ON MATCH REJECT ON NOMATCH INCLUDE ENDCASE DATA
If you are using tag names, you must also set the command SET FIELDNAME to NEW or NOTRUNC. The SET FIELDNAME command enables you to activate long (up to 66 characters) and qualified field names. The syntax for this SET command is
SET FIELDNAME = type
where:
Is one of the following:
OLD specifies that 66-character and qualified field names are not supported; the maximum length is 12 characters.
NEW specifies that 66-character and qualified field names are supported; the maximum length is 66 characters. NEW is the default value.
NOTRUNC prevents unique truncations of field names and supports the 66-character maximum.
When the value of FIELDNAME is changed within a FOCUS session, COMBINE commands are affected as follows:
Other changes to the FIELDNAME value do not affect COMBINE commands.
Note: For more information on the SET FIELDNAME command, refer to the Developing Applications manual.
For a MODIFY request to refer to transaction fields in a combined structure by their transaction field names, the field names must be unique; that is, the transaction field names in one data source cannot appear in other data sources. Refer to any transaction field names that are not unique by their aliases, or use the TAG parameter in the COMBINE command to assign a tag name to the data sources that share the transaction field names.
When a data source has a tag, refer to its transaction field names by affixing the tag name to the beginning of each field name.
For example, this COMBINE command combines data sources EDUCFILE and JOBFILE into the structure EDJOB, and assigns the tag AAA to all the transaction fields in the EDUCFILE data source:
COMBINE FILES EDUCFILE TAG AAA AND JOBFILE AS EDJOB
When you create a request that modifies this structure, type the EDUCFILE field names with the AAA prefix in front:
COMBINE FILES EDUCFILE TAG AAA AND JOBFILE AS EDJOB MODIFY FILE EDJOB PROMPT AAA.COURSE_CODE AAA.COURSE_NAME JOBCODE JOB_DESC GOTO EDUCFILE CASE EDUCFILE MATCH AAA.COURSE_CODE ON MATCH REJECT ON NOMATCH INCLUDE GOTO JOBFILE ENDCASE CASE JOBFILE MATCH JOBCODE ON MATCH REJECT ON NOMATCH INCLUDE ENDCASE DATA
In this request, the tag AAA has been attached to the two transaction field names in the EDUCFILE data source: COURSE_CODE and COURSE_NAME, making the new field names AAA.COURSE_CODE and AAA.COURSE_NAME. Use these tagged field names only in MODIFY requests that modify the combined structure.
For a MODIFY request to refer to fields in a combined structure by their field names, the field names must be unique so that there is no ambiguity in the request. That is, the field names in one data source cannot appear in other data sources. If there are field names that are not unique, refer to the fields by their aliases or use the PREFIX parameter in the COMBINE command to assign a prefix of up to four characters to the data sources sharing the field names.
When a data source has a prefix, refer to its field names with the prefix affixed to the beginning of each field name. The field name can be up to 66 characters in length. For example, this COMBINE command combines data sources EDUCFILE and JOBFILE into the structure EDJOB, and assigns the prefix ED to all the fields in the EDUCFILE data source:
COMBINE FILES EDUCFILE PREFIX ED JOBFILE AS EDJOB
When you enter a request modifying the structure, type the EDUCFILE field names with the ED prefix in front:
COMBINE FILES EDUCFILE PREFIX ED JOBFILE AS EDJOB MODIFY FILE EDJOB PROMPT EDCOURSE_CODE EDCOURSE_NAME JOBCODE JOB_DESC GOTO EDUCFILE
CASE EDUCFILE MATCH EDCOURSE_COD ON MATCH REJECT ON NOMATCH INCLUDE GOTO JOBFILE ENDCASE
CASE JOBFILE MATCH JOBCODE ON MATCH REJECT ON NOMATCH INCLUDE ENDCASE DATA
In this request, the prefix ED has been attached to the two field names in the EDUCFILE data source: COURSE_CODE and COURSE_NAME. The new field names are EDCOURSE_CODE and EDCOURSE_NAME.
You use these prefixed field names only in MODIFY requests modifying the combined structure. These prefixed field names are not displayed by either the ?F query or the CHECK command.
Note: A MODIFY COMBINE with prefixes cannot be loaded through the LOAD facility. However, the unloaded versions will run.
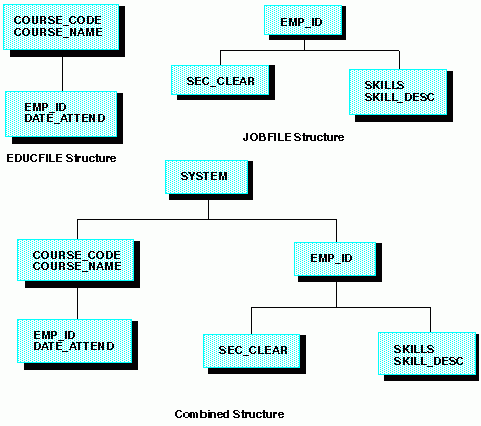
Combined structures start with a dummy root segment called SYSTEM, which becomes the parent of the root segments of the individual data sources. The SYSTEM segment contains no data. This is not an alternate view; the relationships between segments in each data source remain the same.
The following figure shows how two data sources, EDUCFILE and JOBFILE, are combined into one structure. The first two diagrams represent the EDUCFILE and JOBFILE structures; the third diagram represents the combined structure. Note that the relationship between the two segments in each data source does not change.
Field names are considered duplicates when two or more fields are referenced with the same field name or alias. Duplication can occur if a COMBINE is done without a prefix or a tag. Duplicate fields are not allowed in the same segment. The second occurrence is never accessed by FOCUS and the following warning message is generated when CHECK and CREATE FILE are issued:
(FOC1829) WARNING. FIELDNAME IS NOT UNIQUE WITHIN A SEGMENT: fieldname
How to: |
Reference: |
The COMBINE command differs from the JOIN command in the following ways:
To display information on the combined structure currently in effect, enter:
? COMBINE
FOCUS responds
FILE=name TAG PREFIX file-1 tag-1 prefix-1 file-2 tag-2 prefix-2 file-3 tag-3 prefix-3 . . . . . . file-n tag-n prefix-n
where:
Is the name of the combined structure.
Are the names of the data sources that make up the combined structure.
Are the tags attached to the field names in the data source. These tags correspond to the aliases given to the data source(s) in the combined structure.
Are the prefixes attached to the field names in the data source.
The ? COMBINE query shows up to 63 entries.
For example, when data source EDUCFILE is combined with data source JOBFILE, enter the command
? COMBINE
to display the following information:
Note: TAG and PREFIX may not be mixed in a COMBINE.
(FOC???) MAXIMUM NUMBER OF 'COMBINES' EXCEEDED. CLEAR SOME AND RE-ENTER:
The number of separate COMBINE commands exceeds the current limit of 63.
How to: |
Reference: |
This section discusses active and inactive fields. When you run a request, FOCUS keeps track of which transaction fields are active or inactive during execution:
When a MATCH statement matches on an inactive field, the request returns to the beginning (the TOP case in case requests) to avoid modifying segments for which data is not present.
If a MATCH or NEXT statement executes an INCLUDE action, all segment instances having active fields are added to the data source.
If a MATCH or NEXT statement executes an UPDATE action, only active fields update the data source. Data source fields corresponding to the inactive incoming fields remain unchanged.
This section covers the following:
A data field becomes active when:
A data field becomes inactive when:
To activate an inactive field, use the ACTIVATE statement. the ACTIVATE statement performs two tasks:
If one of these conditions is not true, the activate statement does not change the value of the field. If the field has no data, FOCUS sets the value of the field to blank if alphanumeric, zero if numeric, and the missing data symbol if the field is described by the MISSING=ON attribute in the Master File (discussed in the Describing Data manual).
The syntax of the ACTIVATE statement is
ACTIVATE [RETAIN|MOVE] [SEG.]field1 field2 ... fieldn
where:
Is an option that activates the field but leaves its value unchanged, even if the ACTIVATE statement converts the field from being inactive to active.
Is an option that activates the field and equates its value to the corresponding data source field, even if the field was already active before the ACTIVATE statement.
Are the names of the fields you want to activate. To activate all the fields in one segment, specify any segment field with the prefix SEG. affixed in front of the field name. For example:
ACTIVATE SEG.SKILLS
This sample request illustrates how ACTIVATE statements affect the fields they specify. The numbers on the margin refer to the notes below. The request is:
MODIFY FILE EMPLOYEE
1. FREEFORM EMP_ID CURR_SAL ED_HRS
2. ACTIVATE DEPARTMENT MATCH EMP_ID ON MATCH REJECT 3. ON NOMATCH INCLUDE 4. GOTO NEXT_EMP1
CASE NEXT_EMP1 5. NEXT EMP_ID ON NONEXT GOTO EXIT 6. ON NEXT ACTIVATE RETAIN CURR_SAL DEPARTMENT 7. ON NEXT UPDATE DEPARTMENT ED_HRS 8. ON NEXT GOTO NEXT_EMP2 ENDCASE
CASE NEXT_EMP2 9. NEXT EMP_ID ON NONEXT GOTO EXIT 10. ON NEXT ACTIVATE CURR_SAL DEPARTMENT ED_HRS 11. ON NEXT ACTIVATE MOVE CURR_SAL 12. ON NEXT GOTO NEXT_EMP3 ENDCASE
CASE NEXT_EMP3 13. NEXT EMP_ID ON NONEXT GOTO EXIT 14. ON NEXT UPDATE CURR_SAL DEPARTMENT ED_HRS ENDCASE
DATA EMP_ID=222333444, CURR_SAL=50000, ED_HRS=40, $ END
When you run the request, the following happens:
EMP_ID=222333444, CURR_SAL=50000, ED_HRS=40, $
ACTIVATE DEPARTMENT
activates the DEPARTMENT field. Since the request did not read any data for this field and the statement precedes the MATCH and NEXT statements, FOCUS equates the field value to blank.
The transaction record is as follows:
Transaction Record: EMP_ID: 22223333444 (active) CURR_SAL: 50000 (active) ED_HRS: 40 (active) DEPARTMENT: blank (active)
Database Segment Instance: EMP_ID: 326179357 CURR_SAL: 21780.00 ED_HRS: 75.00 DEPARTMENT: MIS
ACTIVATE RETAIN CURR_SAL DEPARTMENT
activates the CURR_SAL and DEPARTMENT fields. The RETAIN keyword prevents their values from changing. The transaction record is now:
Transaction Record: EMP_ID: 326179357 (inactive) CURR_SAL: 50000 (active) DEPARTMENT: blank (active) ED_HRS: 40 (inactive)
UPDATE DEPARTMENT ED_HRS
changes the DEPARTMENT field value in the segment instance to blank and deactivates the DEPARTMENT field on the transaction record. Since the ED_HRS transaction field is inactive, it does not change the data source ED_HRS value. The segment instance is now:
Database Segment Instance: EMP_ID: 326179357 CURR_SAL: 21780.00 DEPARTMENT: blank ED_HRS: 75.00
The request did not use the CURR_SAL transaction field to update the instance, so the CURR_SAL field remains active. The transaction record is as follows:
Transaction Record: EMP_ID: 326179357 (inactive) CURR_SAL: 50000 (active) DEPARTMENT: BLANK (inactive) ED_HRS: 40 (inactive)
Database Segment Instance: EMP_ID: 451123478 CURR_SAL: 16100.00 DEPARTMENT: PRODUCTION ED_HRS: 50.00
ACTIVATE CURR_SAL DEPARTMENT ED_HRS
declares the CURR_SAL, DEPARTMENT, and ED_HRS transaction fields to be active. Since CURR_SAL was already active, its value does not change. DEPARTMENT and ED_HRS are converted into active fields, and their values change to that of the DEPARTMENT and ED_HRS fields in the segment instance. The transaction record is now:
Transaction Record: EMP_ID: 451123478 (inactive) CURR_SAL: 50000 (active) DEPARTMENT: PRODUCTION (active) ED_HRS: 50 (active)
ACTIVATE MOVE CURR_SAL
declares the CURR_SAL transaction field to be active. The MOVE keyword changes the value of CURR_SAL to that of the CURR_SAL field in the segment instance, even though the CURR_SAL field was already active. The transaction record is now:
Transaction Record: EMP_ID: 451123478 (inactive) CURR_SAL: 16100.00 (active) DEPARTMENT: PRODUCTION (active) ED_HRS: 50 (active)
Database Segment Instance: EMP_ID: 543729165 CURR_SAL: 9000.00 DEPARTMENT: MIS ED_HRS: 25.00
Database Segment Instance: EMP_ID: 543729165 CURR_SAL: 16100.00 DEPARTMENT: PRODUCTION ED_HRS: 50.00
The transaction record is now:
Transaction Record: EMP_ID: 543729165 (inactive) CURR_SAL: 16100.00 (inactive) DEPARTMENT: PRODUCTION (inactive) ED_HRS: 50 (inactive)
To deactivate a field, use the DEACTIVATE statement. If the field is a transaction field, the DEACTIVATE statement changes its value to blank if alphanumeric, zero if numeric, or the MISSING symbol for fields described by the MISSING=ON attribute (discussed in the Describing Data manual). It also deactivates the corresponding data source field. The RETAIN option leaves the transaction value unchanged.
The syntax is
DEACTIVATE [RETAIN] [SEG.]field-1 field-2 ... field-n DEACTIVATE [RETAIN] ALL DEACTIVATE COMPUTES DEACTIVATE INVALID
where:
Is an option that deactivates data source fields but does not change the value of the corresponding transaction fields to blank or 0.
Are the fields you want to deactivate. To deactivate all the fields in one segment, specify any segment field with the prefix seg. affixed in front of the field name. For example:
DEACTIVATE SEG.SKILLS
Is an option that deactivates all fields (including temporary fields) and automatically invokes the INVALID option if the request contains CRTFORM statements (see below).
Is an option that deactivates all temporary fields.
Is an option that causes the following: if the user enters a value on a CRTFORM screen and the value fails a validation test, FIDEL does not redisplay the CRTFORM screen to reprompt the user for a valid value. Rather, it displays the next screen.
Use the INVALID option only with requests containing CRTFORM statements.
The ACTIVATE and DEACTIVATE statements can stand by themselves or they can form part of an ON MATCH, ON NOMATCH, ON NEXT, or ON NONEXT phrase in a MATCH or NEXT statement. These are some sample statements:
ACTIVATE RETAIN SKILLS
ON MATCH DEACTIVATE ALL
ON NONEXT ACTIVATE FULL_NAME SEG.SKILLS JOBS_DONE
How to: |
Reference: |
FOCUS provides three ways to protect your data if your system experiences hardware or software failure while you are executing a MODIFY request. They are:
The Checkpoint facility limits the number of transactions lost if the system fails when you are modifying a data source. You can set checkpoints for transactions that are being read from a data source, or from the terminal.
When a MODIFY request is executed, it does not write transactions to the data source immediately, instead it collects them in a buffer. When the buffer is full, FOCUS writes all transactions in the buffer to the data source at one time. This cuts down on the input/output operations that FOCUS must perform. If, however, the system crashes, the transactions collected in the buffer may be lost.
You may cause FOCUS to write more frequently to the data source by using the checkpoint facility. When you activate the Checkpoint facility, FOCUS writes to the data source whenever a specified number of transactions accumulates in the buffer. The point at which FOCUS writes the transactions is called the checkpoint.
You control the Checkpoint facility with the following MODIFY statement
CHECK {ON|OFF|n}
where:
Activates the Checkpoint facility. FOCUS writes to the data source when the buffer accumulates 100,000 transactions.
Deactivates the Checkpoint facility.
Activates the Checkpoint facility. FOCUS writes to the data source when the buffer accumulates n transactions.
Note that if you set n to a smaller number, fewer transactions are processed between checkpoints. This causes FOCUS to perform more input/output operations, thereby decreasing efficiency.
If the system does fail while you are modifying a FOCUS data source, enter the ? FILE query when the system comes back. Look at the number in the bottom row in the right-most column. This is the number of transactions written to the data source by the MODIFY request that was executing when the system came down. You can have the request start processing the transaction data source at the next transaction by using the START command, described in Reading Selected Portions of Transaction Data Sources: The START and STOP Statements.
The following MODIFY request sets the checkpoint at every tenth transaction:
MODIFY FILE EMPLOYEE CHECK 10 MATCH EMP_ID PROMPT EMP_ID CURR_SAL ON MATCH UPDATE CURR_SAL ON NOMATCH REJECT DATA
The Absolute File Integrity feature completely safeguards the integrity of a FOCUS data source that you are modifying, even if the system experiences hardware or software failure. When you are using this feature, FOCUS does not overwrite the data source on disk, instead it writes the changes to another section of the disk. If the request finishes normally, the new section of the disk becomes part of the data source. If the system fails, the original data source is preserved.
To use COMMIT and ROLLBACK you must use Absolute File Integrity (see Managing MODIFY Transactions: COMMIT and ROLLBACK). Unlike the CHECK statement, COMMIT gives you control over the content of data source changes and ROLLBACK enables you to cancel changes before they have been written to the data source. In case of system failure, COMMIT and ROLLBACK ensure that either all or no transactions are processed.
You can use either COMMIT and ROLLBACK, or the CHECK statement in your MODIFY procedures. If the MODIFY procedure uses COMMIT and ROLLBACK, CHECK processing is not used (see Managing MODIFY Transactions: COMMIT and ROLLBACK).
The ECHO facility displays the logical structure of MODIFY requests. This is a good debugging tool for analyzing a MODIFY request, especially if the logic is complex and MATCH and NEXT defaults are being used.
Each ECHO display lists:
To use the ECHO facility, first allocate the ECHO terminal output to ddname HLIPRINT. Then, begin the MODIFY command this way
MODIFY FILE file ECHO
where file is the name of the data source. When you run the request, the request does not modify the data source; rather, the ECHO facility displays the listing at the terminal.
The ECHO facility can store the listing in a file rather than display it on the screen. To do this, allocate the file to ddname HLIPRINT. A record length of 80 bytes is sufficient.
The listing has the form
MODIFY ECHO FACILITY ECHO OF PROCEDURE: focexec
----------------------------------------------------------------------- CASE casename ----------------------------------------------------------------------- statements SEGMENT: segname ON MATCH ON NOMATCH -------- ---------- match-actions nomatch-actions0 NUMBER OF DATABASE FIELDS : n TOTAL NUMBER OF FIELDS : n TOTAL SIZE OF FIELD AREAS : n
where:
Is the name of the procedure that the request is stored in. If you entered the request from a terminal, this line is omitted.
Is the name of the case, if the request uses Case Logic.
Are the MODIFY statements used. (Note: MATCH statements are shown separately.)
Is the name of the segment being modified or used to establish a current position.
Are actions taken on an ON MATCH or ON NEXT condition, including default actions.
Are actions taken on an ON NOMARCH or ON NONEXT condition, including default actions.
Is an integer.
Is the number of fields described by the Master File, including fields in cross-referenced segments.
Is the sum of the number of data source fields in the Master File and temporary fields in the MODIFY request. This includes fields automatically created by FOCUS (these fields are listed in Computing Values: The COMPUTE Statement).
Is the sum of the sizes of data source fields in the Master File and temporary fields in the MODIFY request, measured in bytes.
If you are executing a no-case procedure, the ECHO display lists the names of all segments in the data source. Those segments that you did not use in your request are listed with both MATCH and NOMATCH conditions as REJECT.
A sample request running the ECHO facility is shown below:
MODIFY FILE EMPLOYEE ECHO PROMPT EMP_ID GOTO SALENTRY CASE SALENTRY MATCH EMP_ID ON MATCH PROMPT CURR_SAL ON MATCH VALIDATE SALTEST = IF CURR_SAL GT 50000 THEN 0 ELSE 1; ON INVALID TYPE "SALARY TOO HIGH. PLEASE REENTER THE SALARY" ON INVALID GOTO SALENTRY ON MATCH UPDATE CURR_SAL ENDCASE DATA
When you run this request, the following display appears. Note that although the request did not specify an ON NOMATCH phrase in the SALENTRY case, the ECHO display lists the REJECT action under the ON NOMATCH column for the SALENTRY case, because REJECT is the default action for an ON NOMATCH condition.
EMPLOYEE FOCUS A1 ON 07/18/2003 AT 10.48.21 MODIFY ECHO FACILITY ECHO OF PROCEDURE: MOD76 ----------------------------------------- CASE TOP ----------------------------------------- PROMPT GOTO SALENTRY ----------------------------------------- CASE SALENTRY ----------------------------------------- SEGMENT: EMPINFO ------------------------ MATCH NOMATCH ----- ------- PROMPT REJECT VALIDATE INVALID TYPE INVALID GOTO SALENTRY UPDATE END OF ECHO: NUMBER OF DATABASE FIELDS : 34 TOTAL NUMBER OF FIELDS : 36 TOTAL SIZE OF FIELD AREAS : 371
After you run a FOCUS request, FOCUS automatically records statistics about the execution in specially designated Dialogue Manager variables. Since these variables do not receive values until after execution is completed, they are not useful in the requests themselves. However, you may use them in procedures after execution (that is, after the Dialogue Manager -RUN control statement).
The variables that pertain to MODIFY requests are:
&TRANS |
Number of transactions processed. |
&ACCEPTS |
Number of transactions accepted into the data source. |
&INPUT |
Number of segment instances added to the data source. |
&CHNGD |
Number of segment instances updated. |
&DELTD |
Number of segment instances deleted. |
&DUPLS |
Number of transactions rejected because of an ON MATCH REJECT condition. |
&NOMATCH |
Number of transactions rejected because of an ON NOMATCH REJECT condition. |
&INVALID |
Number of transactions rejected because transaction values failed validation tests. |
&FORMAT |
Number of transactions rejected because of format errors. |
&REJECT |
Number of transactions rejected for other reasons. |
For instructions on how to use Dialogue Manager variables to build procedures, see the Developing Applications manual.
Four query commands display information regarding the MODIFY command and the maintenance of FOCUS data sources. These are:
? COMBINE |
Displays information on combined structures (see Modifying Multiple Data Sources in One Request: The COMBINE Command). |
? FDT |
Displays information regarding the physical attributes of FOCUS data sources (see the Developing Applications manual). |
? FILE |
Displays information regarding the number of segment instances in FOCUS data sources and the dates and times the data sources were last modified (see the Developing Applications manual). |
? STAT |
Displays statistics regarding the last execution of a request (see the Developing Applications manual). |
Reference: |
COMMIT and ROLLBACK are two MODIFY subcommands. COMMIT gives you control over the content of data source changes and ROLLBACK enables you to undo changes before they become permanent.
The COMMIT subcommand safeguards transactions in case of a system failure and provides greater control (than the MODIFY Checkpoint facility) over which transactions are written to the data source.
The MODIFY CHECK statement only enables you to control the number of transactions that must occur before changes are written to the data source. When using CHECK, you cannot change the checkpoint setting once the MODIFY request begins execution. Similarly, changes cannot be canceled (see Safeguard Transactions With the Checkpoint Facility for more information on the CHECK statement).
COMMIT enables you to make changes based on the content of the transactions as well as the number. Changes you do not want to make can be canceled with ROLLBACK, unless a COMMIT has been issued for those changes. Should the system fail, either all or none of your transactions will be processed.
Absolute File Integrity is required in order to use COMMIT and ROLLBACK. Absolute File Integrity is provided by the FOCUS Shadow Writing Facility.
Note: Absolute File Integrity is not supported for XFOCUS data sources and is not required for COMMIT and ROLLBACK.
The COMMIT and ROLLBACK subcommands are automatically activated in FOCUS and cannot be deactivated. Therefore, unless you omit these subcommands from your code, COMMIT and ROLLBACK processing takes place. If you would rather use CHECK processing, make sure you do not include COMMIT and ROLLBACK subcommands, as they will take precedence over CHECK processing.
COMMIT and ROLLBACK each process a logical transaction. A logical transaction is a group of data source changes in the MODIFY environment that you want to treat as one. For example, you can handle multiple records displayed on a CRTFORM and then processed using the REPEAT command as a single transaction. A logical transaction is terminated by either COMMIT or ROLLBACK. COMMIT and ROLLBACK also can be used for single-record processing.
When COMMIT ends a logical transaction, it writes all changes to the data source. COMMIT can be coded as a global subcommand or as part of MATCH or NEXT logic. The possible MATCH and NEXT statements are:
COMMIT ON MATCH COMMIT ON NOMATCH COMMIT ON MATCH/NOMATCH COMMIT ON NEXT COMMIT ON NONEXT COMMIT
When ROLLBACK ends a logical transaction, it does not write changes to the data source. The ROLLBACK subcommand cancels changes made since the last COMMIT. ROLLBACK cannot cancel changes once a COMMIT has been issued for them.
ROLLBACK can also be coded as a global subcommand or as part of MATCH or NEXT logic. Possible MATCH and NEXT statements are:
ROLLBACK ON MATCH ROLLBACK ON NOMATCH ROLLBACK ON MATCH/NOMATCH ROLLBACK ON NEXT ROLLBACK ON NONEXT ROLLBACK
If the COMMIT fails for any reason (for example, system failure, lack of disk space), no changes are made to the data source. In this way, COMMIT is an all-or-nothing feature that ensures data source integrity.
In the following example, a user may COMMIT or ROLLBACK changes after each group of three records has been processed, or delay the COMMIT subcommand until later by selecting the option to add more records. Changes are stored permanently in the data source when the user chooses to commit the changes or when the procedure is terminated without issuing a ROLLBACK subcommand.
Note: In the following example the COMMIT and ROLLBACK subcommands are included in Case COMM and Case ROLL, respectively.
MODIFY FILE EMPLOYEE COMPUTE ANSWER/A1=; CRTFORM LINE 1 "ENTER UP TO 3 NEW EMPLOYEES" " " " EMPLOYEE ID LAST NAME FIRST NAME" "1. <EMP_ID(1) <LAST_NAME(1) <FIRST_NAME(1)" "2. <EMP_ID(2) <LAST_NAME(2) <FIRST_NAME(2)" "3. <EMP_ID(3) <LAST_NAME(3) <FIRST_NAME(3)" GOTO MATCHIT CASE MATCHIT REPEAT 3 MATCH EMP_ID ON NOMATCH INCLUDE ON MATCH REJECT ENDREPEAT GOTO DECIDE ENDCASE
CASE DECIDE CRTFORM LINE 10 "WHAT WOULD YOU LIKE TO DO NOW? <ANSWER" " C TO COMMIT CHANGES SO FAR" " R TO ROLLBACK CHANGES" " A TO ADD MORE EMPLOYEES" IF ANSWER EQ 'C' PERFORM COMM ELSE IF ANSWER EQ 'R' PERFORM ROLL ELSE IF ANSWER EQ 'A' GOTO TOP ELSE PERFORM BADCHOICE; GOTO TOP ENDCASE CASE COMM COMMIT ENDCASE CASE ROLL ROLLBACK ENDCASE CASE BADCHOICE TYPE "PLEASE ENTER C, R, OR A." GOTO DECIDE ENDCASE DATA END
|
Information Builders |