In this section: |
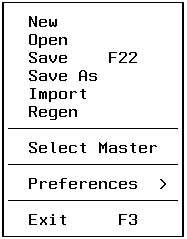
The File menu enables you to create a new Winform file or to open a different Winform file. It also enables you to perform other actions within the Winform files. Selecting the File menu yields:
The File menu offers the following options:
To close the Maintain procedure on which you are currently working, and create a new Maintain procedure, select New:
If the FOCEXEC/MAINTAIN file or WINFORMS file already exists, you have a choice of retaining it (if it's a FOCEXEC/MAINTAIN), replacing it, or canceling the operation. If you choose to retain a FOCEXEC/MAINTAIN file, skip step 3.
To close the Maintain procedure on which you are currently working, and open another one, select Open. The Painter displays the following dialog box:
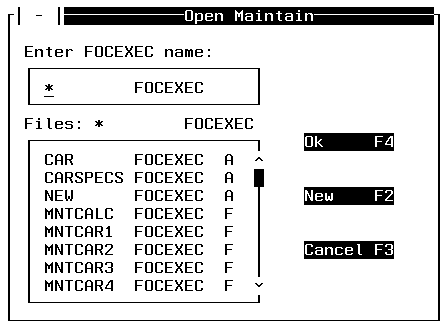
This is the same dialog box used by the Painter when you begin a session, as described in How to Access the Painter. You can do one of the following:
If you enter the name of a procedure that does not exist (that is, if the procedure's FOCEXEC/MAINTAIN file and/or WINFORMS file does not exist), the Painter creates a new procedure. If only one file of the pair does not exist, the Painter gives you the option of retaining the existing file (if it's a FOCEXEC/MAINTAIN), replacing the existing file when the Painter creates the new procedure, or canceling the operation. The Painter then displays the Select Master Files dialog box (unless you chose to retain an existing FOCEXEC/MAINTAIN file), which is described in Select Master; and the Winform Properties dialog box described in Properties.
You can also create a new procedure by clicking New. This is identical to selecting the File menu's New option.
To save the Winform file you are working with under a different name, select Save As. The Save As dialog box is displayed:
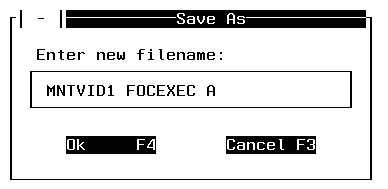
Enter the new name for the Winform file and press PF4 to save it. You may press PF3 to cancel the action.
To bring an existing Winform into your Winform file, select Import. The Import dialog box is displayed:
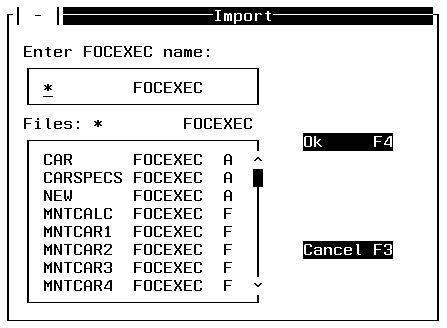
Type or specify a Maintain procedure name or move the cursor to the Maintain procedure you wish to import, then press PF4.
If the Maintain procedure name you specify has a different corresponding Master File, a dialog box similar to the following is displayed:
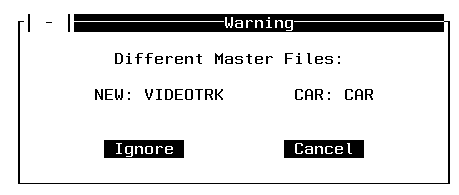
You may ignore the warning and proceed, or cancel the request.
The Painter now displays a list of the Winforms that you can import:
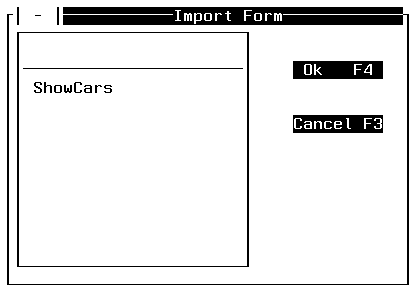
Select a Winform from the combo box and then click OK.
If the Winform you attempt to import references Maintain functions that do not currently exist in your procedure, a dialog box similar to the following is displayed. (Maintain functions—often simply called functions—are referred to in the Winform Painter as cases.)
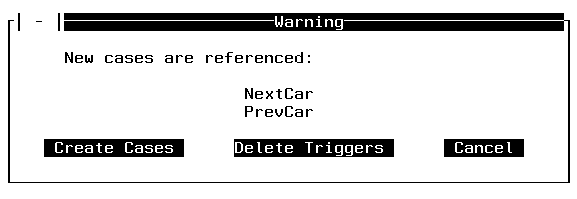
In response to the warning you may either choose:
Select Regen whenever a new error occurs after a new release of FOCUS is installed at your site. You should also select Regen whenever changes are made to your data source. The error may be occurring because of the new install of FOCUS. If the error still occurs after selecting Regen, consult your local Information Builders representative.
Selecting Select Master displays the Select Master Files dialog box, enabling you to select all of the data sources you wish to access in a Winform file. This is the same dialog box used by the Painter when you begin a session, as described in How to Access the Painter.
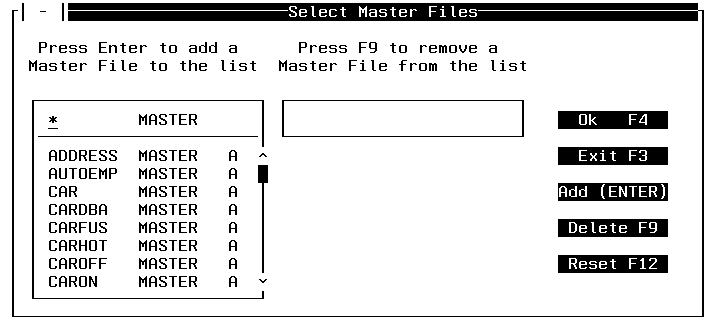
When the dialog box is first displayed, your cursor is positioned so you can type in the name of the file. You can either type in the name (and in this case the word MASTER is optional) or you can select from the list box which is just below the cursor. Once you have selected or entered a data source, you must press the Enter key to add the data source to the list. When you do this, the data source name is added to the box to the right of the list of available Master Files. You may select up to 16 data sources.
Your selections determine which fields are displayed in the Field and Grid dialog boxes.
If you accidentally add a data source you did not want to add, you can remove it from the list by moving the cursor to the data source name you want removed from the list of the selected data sources and pressing PF9. If you have made a lot of mistakes, you might want to press PF12 (or select the Reset button) which clears all changes made to the dialog box since it was displayed.
If this dialog box was displayed while beginning a Painter session for a new procedure, and the procedure will not access a data source, you do not need to select one. When this dialog box is displayed, press PF4 or the OK button.
When you have finished adding all of the data sources you want to access, click OK.
In this section: |
Selecting Preferences enables you to customize your Painter environment. For all Preference options, the options selected stay in effect from session to session until you change them.
The following menu is displayed when Preferences is chosen:
Preferences offers the following options:
If you select the Terminal option (or if you issue the EX MSETUP command at the FOCUS command prompt) the following dialog box is displayed:
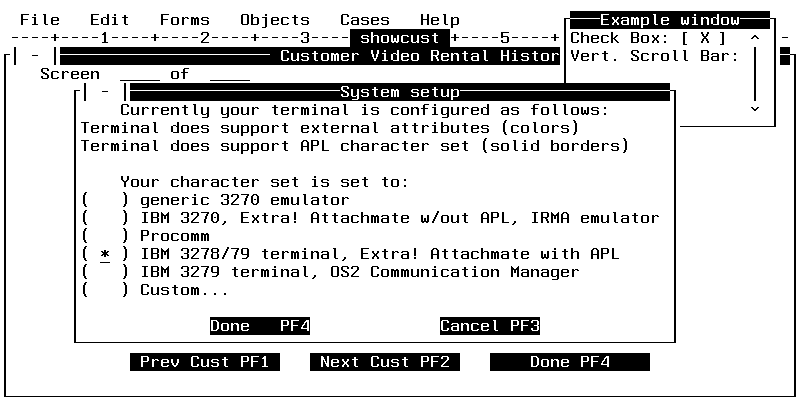
If Winform elements such as check boxes, scroll bars, borders, and colors are not displaying correctly on your terminal, you can use the System Setup dialog box to configure the Winform facility for a different terminal or terminal emulator. You can see the effect of your selection by looking at the Example Window in the upper right corner of the screen, which shows what a check box and scroll bar look like using the terminal or emulator you have selected.
To select your terminal or emulator, place a check mark in the appropriate box and press the Enter key. When you are finished press PF4. If you wish to cancel what you have entered, press PF3.
The example window in the upper-right corner of the screen shows how the Painter will display special characters.
In addition, you may choose Custom. If you choose Custom, the Custom character set dialog box is displayed:
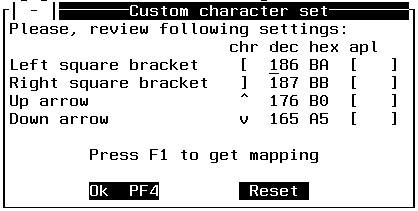
Initially your cursor is on the input area for the left square bracket. Position the cursor on the row of the character you wish to change. You can type a new value in the character column, or press PF1 to select from a list of characters. When you change a character, its decimal and hexadecimal values change automatically.
If you press PF1 the following dialog box is displayed:
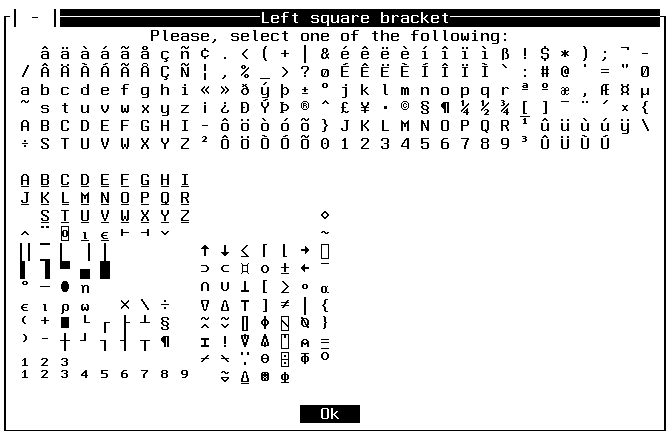
To select a value from this form, move your cursor to the appropriate character and press the Enter key.
If you wish to reset the characters to their original values, click Reset in the Custom Character Set dialog box. When you are finished customizing the characters, click OK.
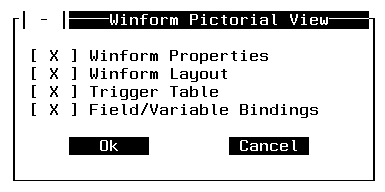
If you select the Pictorial View option the following dialog box is displayed:
By default the Painter generates four different types of comments at the end of each Maintain procedure:
|
Winform Properties |
Includes information such as Winform name, title, and position. |
|
Winform Layout |
Displays how the Winform will look when it is executed. |
|
Trigger Table |
Displays PF key settings and their actions. |
|
Field/Variable Bindings |
Displays which stacks are being used in fields and grids. |
If you do not want the Painter to generate comments, you can turn the feature off by clearing the appropriate check box.
Selecting Exit closes the Winform Painter and returns you to the FOCUS prompt. If you have made changes to the Winform file and have not saved them, you are prompted to save the changes.
| Information Builders |