In this section: |
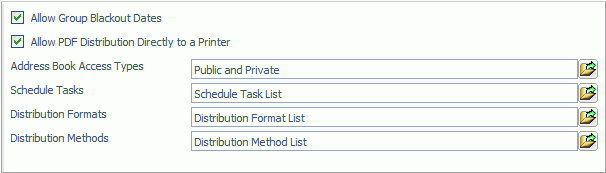
The General Preferences folder in the Configuration tab, shown in the following image, contains settings that determine which schedule tasks, distribution formats, and methods will be available to a user.
The General Preferences folder contains the following configuration settings.
|
Setting |
Optional or Required/Default Value |
Descriptions and Possible Values |
|---|---|---|
|
Allow Group Blackout Dates |
Required. By default, this option is selected. |
Designates whether or not ReportCaster administrators and Managed Reporting group administrators can schedule blackout dates for a specific group of users. If this option is not selected, then administrators and users will not be able to view existing group blackout dates. |
|
Allow PDF Distribution Directly to a Printer |
Required. By default, this option is selected. Note: By default, this option is not selected if you have installed a WebFOCUS service pack. |
When selected, then PDF is a selectable format for the Printer distribution method. This enables a PDF file to be distributed directly to a printer. The printer must have the appropriate driver to print PDF files. |
|
Address Book Access Types |
Required. Default value is Public and Private. |
Designates which types of distribution lists will be available to the user to create. If either Public or Private is selected, another option is available to designate whether or not to run existing schedules using address books with an access type that is not allowed. For details on this configuration option, see Address Book Access Types Settings. Possible values are Public, Private, or Public and Private. |
|
Schedule Tasks |
Optional. All Task Types are enabled by default. |
Enables ReportCaster administrators to specify what Task Types are available to users. For more information, see Specifying Schedule Task Settings. |
|
Distribution Formats |
Optional. All formats are enabled by default. |
Enables ReportCaster administrators to specify what report/graph formats are available to users. For more information, see Specifying Schedule Format Settings. |
|
Distribution Methods |
Optional. All distribution methods are enabled by default. |
Enables ReportCaster administrators to specify what distribution methods are available to users. For more information, see Specifying Schedule Distribution Method Settings. |
How to: |
The Address Book Access Types setting enables you control the type of access a user can select when creating a address book. For example, if you want to ensure the privacy of all ReportCaster address books in your organization and not risk the possibility of someone creating a public list, then set this option to allow private only.
In addition, if you disable either the Private or Public access option, another option is available to designate whether or not to run existing schedules that use the prohibited access type.
The ReportCaster - Address Book Access Types dialog box opens, as shown in the following image.
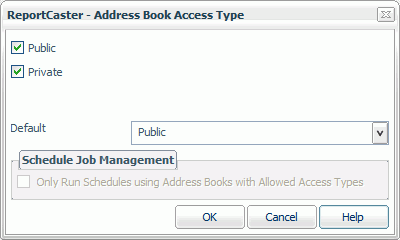
The default setting enables both Public and Private Address Books to be created by users.
Notice that when you clear either the Public or Private option, the Schedule Job Management area of the dialog box is activated, as shown in the following image.
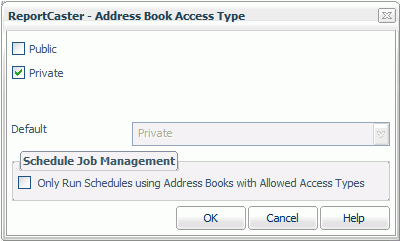
The Schedule Job Management option enables you to designate if existing schedules that use address books with access types no longer allowed will run.
A list of the address book access type that you want to prohibit appears in a pane below the General Preferences settings. The following image shows an example of an Address Book Access Type list.
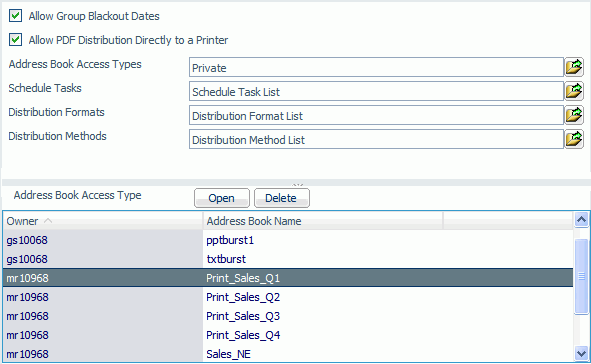
From this pane, you can select an address book and select Open to view or edit address book, or select Delete to delete it.
Clear the Only Run Schedules using Address Books with Allowed Access Types to run existing schedules using the prohibited access types.
How to: |
The Schedule Tasks setting in the General Preferences folder enables ReportCaster Administrators to specify what Task Types are available to users.
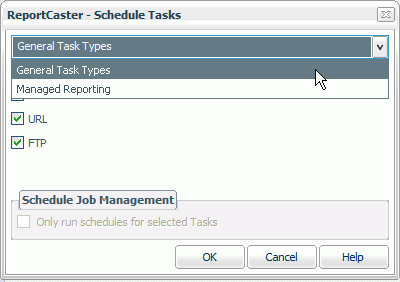
By default, all Task Types are enabled (selected). The Managed Reporting options only appear if that optional product has been installed. A minimum of one Task Type must be selected.
The ReportCaster - Schedule Tasks dialog box opens, as shown in the following image.
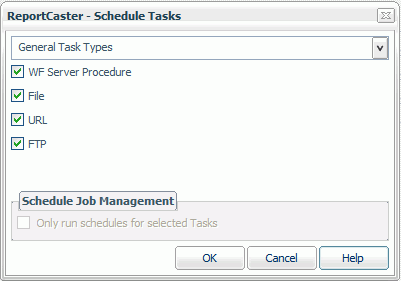
By default, all task types are selected.

To enable or disable specific Managed Reporting Task Types, select or clear the check box for the following options:
A list of schedules with tasks that you want to prohibit appears in a pane below the General Preferences settings. The following image shows an example of a Task List.
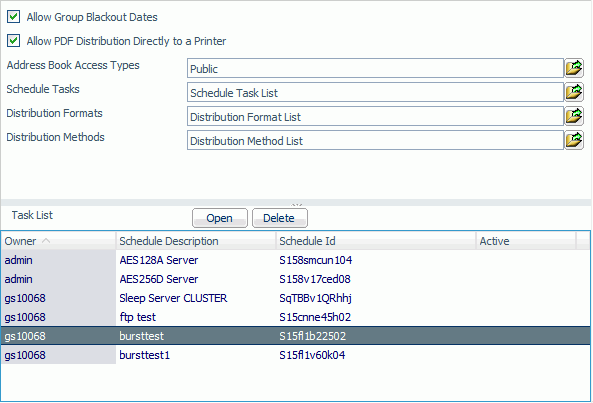
From this pane, you can select a schedule and select Open to open the selection in the Scheduling tool, or select Delete to delete it from the list.
Tip: When a user edits a schedule using an unavailable Task Type, the changes cannot be saved to the schedule until an available Task Type is selected. Information Builders recommends either changing the unavailable Task Type in the schedule or enabling the Task Type that is currently unavailable.
How to: |
The Distribution Formats setting in the General Preferences folder enables ReportCaster Administrators to specify what report and graph formats are available to users.
These settings only apply to WF Server Procedures and Managed Reporting procedures (Standard Reports and My Reports). By default, all report and graph formats are enabled (selected). A minimum of one report or graph format must be selected.
The ReportCaster - Report/Graph Formats dialog box opens, as shown in the following image.
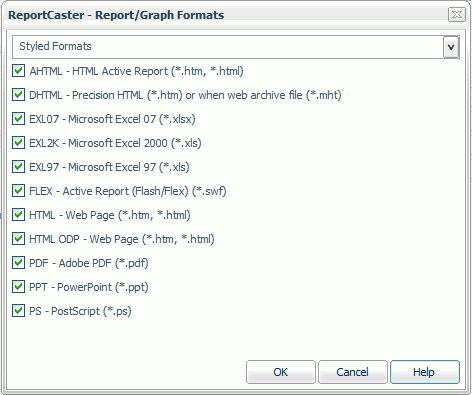

By default, the styled formats are displayed with each format type selected.
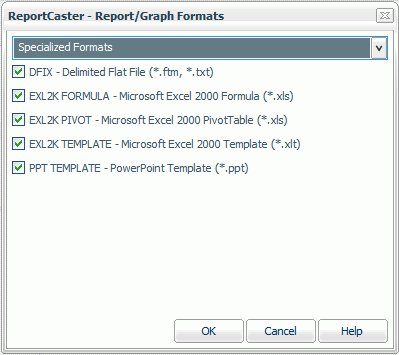
Select or clear check box for the following specialized formats.
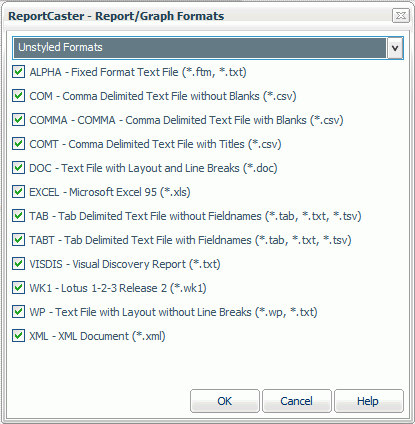
Select or clear the Allow check box for the following unstyled formats.
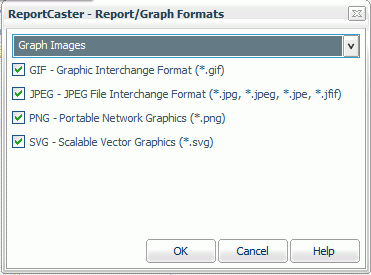
Select or clear the Allow check box for the following graph image formats.
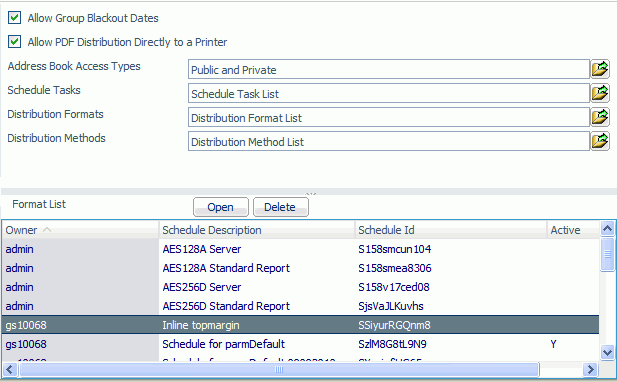
A list of unavailable format being used, along with the owner of the schedule, the description of the schedule, the name of the Task, and whether the schedule is active appears in a pane below the General Preferences settings. The following image shows an example of a Formats List.
Note:
For more information about these formats, see the ReportCaster Development and Library Content manual.
How to: |
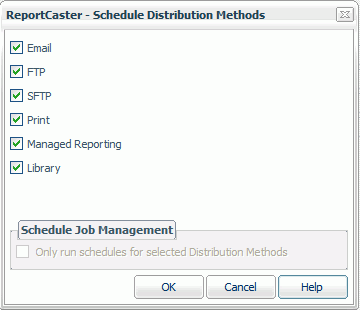
The Distribution Methods setting in the General Preferences folder enables ReportCaster Administrators to specify what distribution methods are available to users.
By default, all distribution methods are enabled (selected). The Managed Reporting and Library options only appear if these products have been installed and enabled. A minimum of one distribution method must be selected.
The ReportCaster - Schedule Distribution Methods dialog box opens, as shown in the following image.
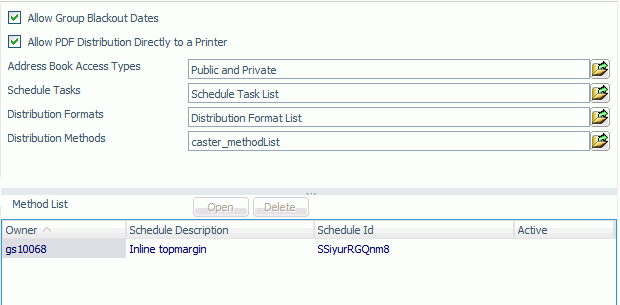
A list of unavailable format being used, along with the owner of the schedule, the description of the schedule, the schedule description and ID, and whether the schedule is active appears in a pane below the General Preferences settings. The following image shows an example of a Methods List.
Note:
| WebFOCUS |