Configuring ReportCaster With External Authentication

In this section:

In some environments, you may want to authenticate Managed Reporting/ReportCaster credentials with an external user directory. For example, user passwords may be stored in LDAP or Active Directory. In this case, you must configure ReportCaster so that it does not authenticate users against its ReportCaster Repository, because the user passwords are not stored in their ReportCaster repository. This is accomplished by configuring the ReportCaster Authentication Plug-in setting. The following two sections show how to:


Top of page

x
Configuring the Trusted MR Sign-On Setting for ReportCaster

How to:

When using a repository driver for Managed Reporting that performs external authentication, such as the Managed Reporting Realm Driver, the Authentication Plug-in setting in the Security Settings folder of the Configuration tab must be set to Trusted MR Sign-On, which is the default setting. Setting this value causes ReportCaster to make a trusted Managed Reporting sign-on on behalf of the user, instead of an explicit Managed Reporting sign-on with the user ID and password.


x
Procedure: How to Configure the Trusted MR Sign-On Setting for ReportCaster
  1. Access the ReportCaster Server Configuration tool in one of the following ways:
    • From the WebFOCUS Welcome page, under the ReportCaster section, click the ReportCaster Administration link. In the ReportCaster Administration window, select the Configuration tab.
    • You can also access ReportCaster independent of Managed Reporting by typing the following URL:
      http://hostname[:port]/rcaster/main/reportcaster.jsp

      where:

      hostname[:port]

      Is the host name and optional port number (specified only if you are not using the default port number) of the Application Server where the ReportCaster Web application is deployed.

      rcaster

      Is the site-customized context root for the ReportCaster Web application deployed on your Application Server. The default value is rcaster.

      In this case, since your user credentials have not been validated by Managed Reporting, you must type a valid ReportCaster administrator ID and password to log on to the ReportCaster Development and Administration Interface. From this interface, select the ReportCaster Server Configuration link.

    • If you are on a Windows platform and using the applet version of ReportCaster, you can access the configuration tool from the Start Programs menu by selecting Information Builders, WebFOCUS77, ReportCaster, Distribution Server, Configuration, and then clicking Edit.
    • If you want to use the applet version of ReportCaster, when logged on to Managed Reporting as an administrator, click the clock icon. The ReportCaster Development and Administration Interface opens. From this interface, select the ReportCaster Server Configuration link.

    The Configuration tab displays a list of folders in the left pane that contain the settings and options available to configure ReportCaster. Select a folder to view the settings in the right pane.

    In the applet version of ReportCaster, the ReportCaster - Server Configuration window opens displaying the General tab.

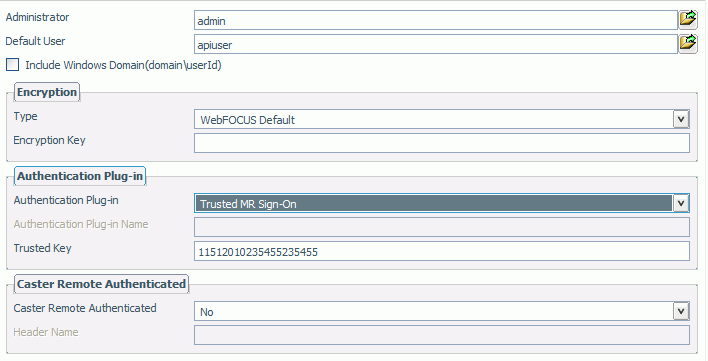
  2. Select the Security Settings folder. In the right pane, from the Authentication Plug-in drop-down list, select Trusted MR Sign-On, as shown in the following image.
    authentication plug in

    Note: If you are using the applet, from the General tab, select the Security folder and locate the Authentication Plug-in setting. From the drop-down list, select Trusted MR Sign-On.

  3. Verify that the Trusted Key value matches the IBIMR_TRUSTED_KEY setting in the webconfig.xml file located in the \ibi\WebFOCUS77\config directory.

    When you perform an InstallShield installation on Windows or UNIX, and you install Managed Reporting and ReportCaster together, the Trusted Key value is populated automatically.

    When ReportCaster and WebFOCUS are installed at different times or on different machines, you must populate the Trusted Key field in the Configuration tab, Security Settings folder with the IBIMR_TRUSTED_KEY parameter value in the webconfig.xml file. For a procedure to update the trusted key, see How to Update the Trusted MR Sign-On Key.

  4. Click the Save icon in the Configuration tab toolbar. A message appears asking for confirmation that you want to save the changes to the configuration file. Click Yes.
  5. Restart the ReportCaster Distribution Server by clicking Restart in the Configuration tab toolbar.
  6. Reload the WebFOCUS and ReportCaster Web applications.
  7. After reloading the Web application(s), all users currently logged on must restart their sessions to obtain the current configuration information. Since the user session does not have information cached pertaining to the ReportCaster configuration, you must restart the user interfaces to obtain any updated information.


x
Procedure: How to Update the Trusted MR Sign-On Key
  1. Go to the directory that contains the webconfig.xml file:

    On UNIX and z/OS, the webconfig.xml file is located in:

    cd /ibi/WebFOCUS77/config

    On Windows, the webconfig.xml file is located in:

    cd \ibi\WebFOCUS77\config
  2. Open the webconfig.xml file and copy the IBIMR_TRUSTED_KEY variable value.
  3. Open the ReportCaster Configuration tab and click the Security Settings folder.
  4. Paste the copied IBIMR_TRUSTED_KEY value into the Trusted Key field.
  5. Save the ReportCaster configuration by selecting Save from the Configuration toolbar.
  6. Restart ReportCaster by selecting Restart from the Configuration toolbar.
Top of page

x
Configuring an Authentication Plug-in for Self-Service ReportCaster Applications

How to:

When ReportCaster is not configured with Managed Reporting, you can write a customized plug-in program (in the Java language) that externally authenticates ReportCaster user credentials.


x
Procedure: How to Configure an Authentication Plug-in for Self-Service ReportCaster Applications
  1. Access the ReportCaster Server Configuration tool in one of the following ways:
    • From the WebFOCUS Welcome page, under the ReportCaster section, click the ReportCaster Administration link. In the ReportCaster Administration window, select the Configuration tab.
    • You can also access ReportCaster independent of Managed Reporting by typing the following URL:
      http://hostname[:port]/rcaster/main/reportcaster.jsp

      where:

      hostname[:port]

      Is the host name and optional port number (specified only if you are not using the default port number) of the Application Server where the ReportCaster Web application is deployed.

      rcaster

      Is the site-customized context root for the ReportCaster Web application deployed on your Application Server. rcaster is the default value.

      In this case, since your user credentials have not been validated by Managed Reporting, you must type a valid ReportCaster administrator ID and password to log on to the ReportCaster Development and Administration Interface. From this interface, select the ReportCaster Server Configuration link.

    • If you are on a Windows platform and using the applet version of ReportCaster, you can access the configuration tool from the Start Programs menu by selecting Information Builders, WebFOCUS77, ReportCaster, Distribution Server, Configuration, and then clicking Edit.
    • If you want to use the applet version of ReportCaster, when logged on to Managed Reporting as an administrator, click the clock icon. The ReportCaster Development and Administration Interface opens. From this interface, select the ReportCaster Server Configuration link.

    The Configuration tab displays a list of folders in the left pane that contain the settings and options available to configure ReportCaster. Select a folder to view the settings in the right pane.

    In the applet version of ReportCaster, the ReportCaster - Server Configuration window opens displaying the General tab.

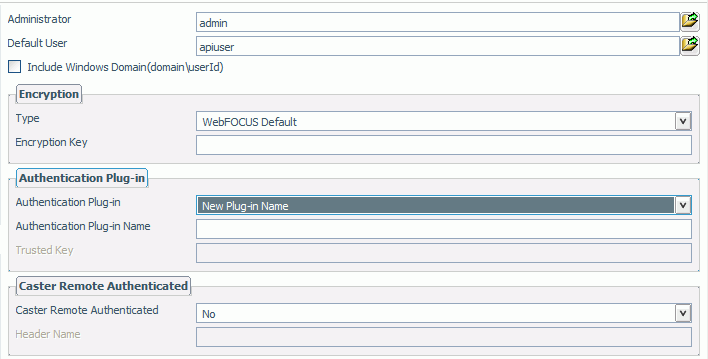
  2. In the Configuration tab, select the Security Settings folder and from the Authentication Plug-in setting, select New Plug-in Name, as shown in the following image.

    authentication plug in

  3. In the Authentication Plug-in Name field, type the fully qualified class name containing the program (for example, abcd.sample.RCSampleAuthExit) that will be performing the external authentication.

    Important:

    The \ibi\WebFOCUS77\webapps\webfocus\WEB-INF\lib\reportcaster.jar file must be added to the active classpath when you compile and run your program. The reportcaster.jar file contains the DSTCasterAuthInterface that the authentication plug-in must implement.

    The class or jar file containing the class must be added to the ReportCaster Web application. If the ReportCaster plug-in is a class, it should be placed in the \ibi\WebFOCUS77\webapps\webfocus\WEB-INF\classes subdirectory. If the ReportCaster plug-in is packaged in a .jar file, it should be placed in the \ibi\WebFOCUS77\webapps\webfocus\WEB-INF\lib subdirectory.

  4. Click the Save icon, or select Save from the Action menu. A message appears asking for confirmation that you want to save the changes to the configuration file. Click Yes.
  5. Restart the ReportCaster Distribution Server.
  6. Reload the ReportCaster Web application.
  7. After reloading the Web application, all users currently logged on must restart their sessions to obtain the current configuration information. Since a user session does not have information cached pertaining to the ReportCaster configuration, the user interfaces must be restarted to obtain any updated information.

Users will now be authenticated to ReportCaster using the logic in the external plug-in.


Example: Developing an Authentication Plug-in for Self-Service ReportCaster Applications

This sample ReportCaster Authentication Plug-in is comprised of two Java programs. The first program implements the DSTCasterAuthInterface interface. The second program enables you to override the normal authentication process of ReportCaster using this interface.

/*
** Program 1:
** DSTCasterAuthInterface.java class
**
*/
 
package ibi.broker.exit;
 
public interface DSTCasterAuthInterface {
 
    public void setUser(String userName);
    public void setPass(String password);
    public static final int INVALID_USER = -1;
    public static final int INVALID_PASS = -2;
    public static final int AUTH_FAILED  = 0;
    public static final int AUTH_SUCCESS = 1;
    public int authenticate();
}
/*
** Program 2: 
** RCSampleAuthExit.java class
*
*/
import ibi.broker.exit.*;
/**
*
* @author
* @version 7
*/
package abcd.sample;
 
public class RCSampleAuthExit implements DSTCasterAuthInterface{
 
    String user = "";
    String pass = "";
public RCSampleAuthExit() {
    }
    public void setUser(String tempUser) {
        user = tempUser;
    }
    public void setPass(String tempPass) {
        pass = tempPass;
    }
 
    public int authenticate() {
 
       if( user.equalsIgnoreCase("validuser") == true )
            return RCSampleAuthExit.AUTH_SUCCESS;
       else
            return RCSampleAuthExit.AUTH_FAILED;
    }

WebFOCUS