Creating Expressions for Temporary Fields
In this section: How to: Reference: |
When you create a temporary field for a report (with
the Define tool or the Report Options Computes tab) or in a Master
File (with the Synonym Editor), you must specify how to derive the
new field value by writing an expression.
For more information, see the Describing Data With Graphical Tools manual.
x
Procedure: How to Specify a Field in an Expression With the Define Tool
In the Define
tool window, double-click the desired field in the Fields window.
The field name is added
to the expression box.
Note: The format of the field
you specify in an expression must be consistent with the format
of the temporary field you are creating. For example, if you are
creating an alphanumeric temporary field, the fields you use in
the expression must also be alphanumeric.
x
Procedure: How to Use a Function in an Expression With the Define Tool
In the Define
tool window:
-
Click
the Functions button.
The Function Arguments dialog box opens.
-
A list
of predefined functions are grouped into categories. Select a category
from the drop-down list.
Note: A list of predefined functions are grouped
into categories that include Character, Data Source and Decoding,
Date and Time, Format Conversion, Numeric, and System. Each of the
available functions is a program that returns a value. See the Using Functions manual for complete information
on functions. There is also a list of user defined functions available.
For more information on user defined functions, see Using User Defined Functions.
-
Select
a function.
-
Enter
any other criteria for the function, such as the value, length, format,
and so on.
-
Click OK.
The function and placeholders for its arguments are added to the
expression.
-
Repeat
steps 3 through 6 for each argument.
x
Procedure: How to Specify a Field in an Expression With the Computes Tab
In the Report
Options Computes tab, click the Fields button
and double-click the desired field.
The field name is added to the expression
box.
Note: The format of the field you specify in an
expression must be consistent with the format of the temporary field
you are creating. For example, if you are creating an alphanumeric
temporary field, the fields you use in the expression must also
be alphanumeric.
x
Procedure: How to Specify Missing Value Attributes Using the Computes Tab
-
Open
the Computes tab by performing one of the following actions.
- In Report Painter,
select Computes from the Report menu.
or
- Select the Compute
icon from the Setup toolbar.
or
- Right-click
anywhere in the Fields tab of the Object Inspector and select New
Compute Virtual Field.
The Report Options
dialog box opens at the Computes tab.
-
Create
a Computes expression.
-
Click the Options button
and select the Override missing values handling check
box to specify how the missing value attributes are handled.
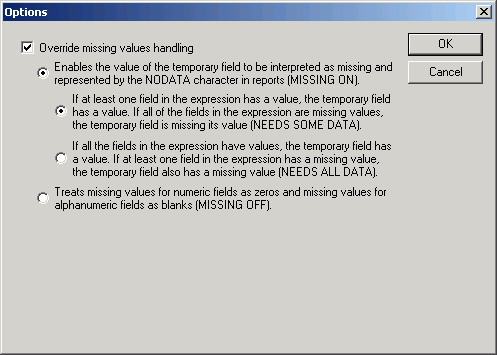
-
Click OK to
close the Options dialog box.
For more
information about Missing Field Values, see MISSING Attribute
in a DEFINE or COMPUTE Command in the Handling Records With Missing Field Values chapter
of the Creating Reports With WebFOCUS Language manual.
x
Procedure: How to Use a Function in an Expression With the Where/If or Computes Tab
-
In the
Report Options Where/If or Computes tab click the Functions button.
The Function Arguments dialog box opens. Each of the available
functions is a program that returns a value. For a list of functions,
see the Using Functions manual.
-
Select
a category from the drop-down list. Categories are: All, Character, Data
Source and Decoding, Date and Time, Format Conversion, Numeric,
and System.
-
Select
a function.
-
Enter
any other criteria for the function, such as the value, length, format,
and so on.
-
Click OK.
The function and placeholders for its arguments are added to the
expression.
-
Repeat
steps 3 through 6 for each argument.
Example: Decoding Values With a Function
The
DECODE function assigns values based on the coded value of an input
field. DECODE is useful for giving a more meaningful value to a
coded value in a field.
Note: You can use
the DECODE function by supplying values directly in the function
or by reading values from a separate file.
For example, using
information in the sample data source EMPLOYEE, use the DECODE function
to assign a department code based on the current jobcode of the
employee. Specifically, assign the department code of MANAGER to
all the managerial jobcodes. Assign the department code of ADMINISTRATIVE
to all the administrative jobcodes, and the department code of SYSTEMS
for all the programming jobcodes. DECODE expands (decodes) these
values to ensure correct interpretation on a report.
- Create the
report:
- Open the employee.mas data
source in Report Painter.
- Select LAST_NAME as
the By sort field.
- Select CURR_JOBCODE and JOB_DESC as
Detail sort fields.
- Select Computes from
the Report menu, or click the Compute icon from the Setup toolbar.
The
Report Options dialog box opens at the Computes tab.
- Type DEPT_CODE as
the Field name for the Compute.
- Type A15 as
the Format for the field.
- Click the Functions button.
The
Function Arguments dialog box opens. Each of the available functions
is a program that returns a value. For a list of functions, see
the Using Functions manual.
- Select Data
Source and Decoding from the Select a category drop-down
list.
- Select DECODE from
the Select a Function list.
The DECODE options appear. You may
supply values in the function or read values from a file.
- To supply
values in the function:
- Select Supply
Values in the Function as the DECODE option. This is
the default option.
- Select CURR_JOBCODE as
the fieldname.
- Type a list
of the actual jobcode values and the display value for the jobcode. For
example, type:
-
A07 as
the actual_value, and ADMINISTRATIVE as the
display_value.
-
A17 as
the actual_value, and MANAGER as the display_value.
-
B02 as
the actual_value, and SYSTEMS as the display_value.
-
B03 as
the actual_value, and SYSTEMS as the display_value.
-
B04 as
the actual_value, and SYSTEMS as the display_value.
-
B14 as
the actual_value, and ADMINISTRATIVE as the
display_value.
- Optionally,
enter the default value.
Note: Default is the value assigned
if the code is not found. If you omit a default value, DECODE assigns
a blank or zero to non-matching codes.
The following image
shows the Function Arguments dialog box with these options.
- Click OK to
close the Function Arguments dialog box.
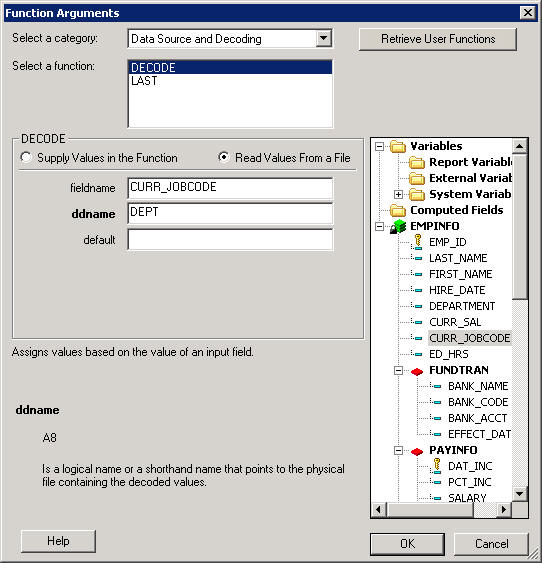
- To read values
from a file:
- Select Read
Values from a File as the DECODE option.
- Select CURR_JOBCODE as
the fieldname.
- Enter the ddname for
the file.
Note: A logical name or a shorthand name that
points to the physical file containing the decoded values is a ddname.
You may create a ddname name with the Allocation Wizard. For details,
see the Developing Reporting Applications manual.
- Optionally,
enter the default value.
Note: Default is the value assigned
if the code is not found. If you omit a default value, DECODE assigns
a blank or zero to non-matching codes.
The following image
shows the Function Arguments dialog box with these options.
- Click OK to
close the Function Arguments dialog box.
The function
and placeholders for its arguments are added to the expression in
the Computes tab.
- Click OK to
close the Report Options dialog box.
The Compute field is added
to Report Painter.
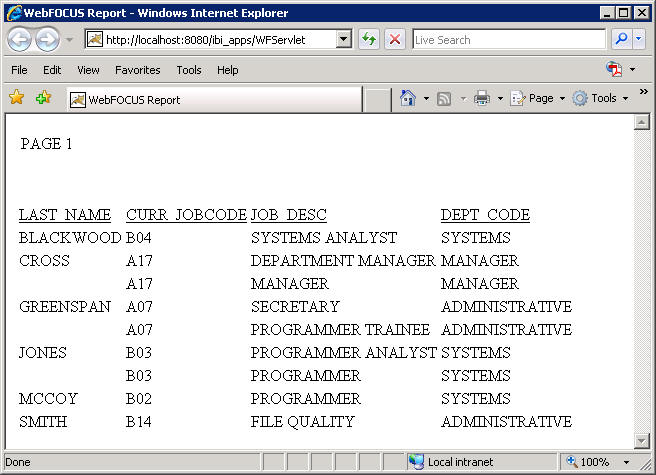
- Run the report.
The
report shows the decoded department code values assigned to the
current jobcodes in the data source.
x
Reference: Report Options Computes Tab
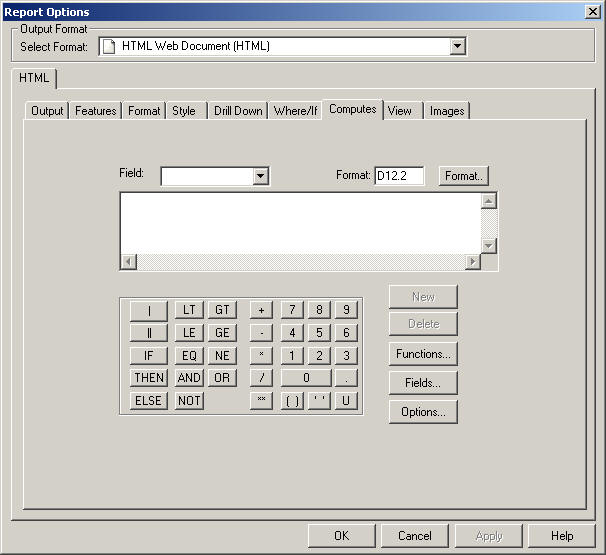
The
Computes tab includes the following fields and options for creating
expressions.
-
Field Box
-
Displays the name of the calculated value. Assign a field
name to the value you wish to calculate.
When editing a calculated
value, click the down arrow on the Field combo box, and select the
field you wish to edit. When you select a field, the corresponding
information appears in the Format box, and the expression box. You
can edit the information, eliminate the field, or run it.
-
Format Box
-
Displays the field type, field length, and display options.
The field type can be alphanumeric, numeric, or date/time.
-
Format Button
-
Opens the Format dialog box, where you can assign format
information to the calculated value.
-
Expression Box
-
Displays the expression used to evaluate the field.
Type
the expression, or use the Fields list, Calculator, and Functions
list to help you create the expression.
-
Calculator
-
Provides numbers and operators that you can use to create
numeric, alphanumeric, and conditional expressions. Click the desired
number or operator to add it to the expression box.
- To enclose a value
in parentheses, click the ( ) key in the
calculator. Parentheses affect the order in which the specified
operations are performed.
- To enclose a value
in single quotation marks, click the ' ' key
in the calculator. Use single quotation marks to enclose alphanumeric
and date literals.
- To convert entries
in the expression box to uppercase, click the U key
in the calculator. Note that field names are case-sensitive.
-
New Button
-
Clears the entry box, including the Field combo box and the
corresponding expression. It also returns the format to the default
value D12.2, and places the cursor in the Field combo box so you
can begin to create a new field. The New button becomes available
for use once a name for the expression is entered in the Field box.
Once a name is entered and you click the New button,
the previous expression is saved and can be retrieved by selecting
that expression from the Field drop-down list.
-
Delete Button
-
Deletes the current expression and clears the tab.
-
Functions Button
-
Opens the Function Arguments dialog box, which lists all
available built-in functions. A list of predefined functions are
grouped into categories that include Character, Data Source and
Decoding, Date and Time, Format Conversion, Numeric, and System.
Each of the available functions is a program that returns a value.
There is also a list of all available user defined functions. For
more information on user defined functions, see Using User Defined Functions.
Double-click the desired function
to add it to the expression box. Then, in the expression box, highlight
each argument and substitute the value or field name you wish to
use. For details, see the Using Functions manual.
-
Fields Button
-
Opens
the Insert Field window. The Field tab lists all fields in the data
source. The Column tab lists all fields being used in the report.
If there are no fields being used, the Column tab will display all
fields in the data source. Clicking Insert while a field is highlighted
will insert that field into the expression.
-
Options Button
-
Opens the Options window, which enables you to establish
how to interpret and represent missing values for the virtual field.
-
OK Button
-
Checks the syntax for your calculated value and displays
a warning message. You cannot exit until the errors are fixed. When
the syntax is correct and you click OK, the
Computes tab closes. You can continue building your report.
x
The following
image shows the Define tool.
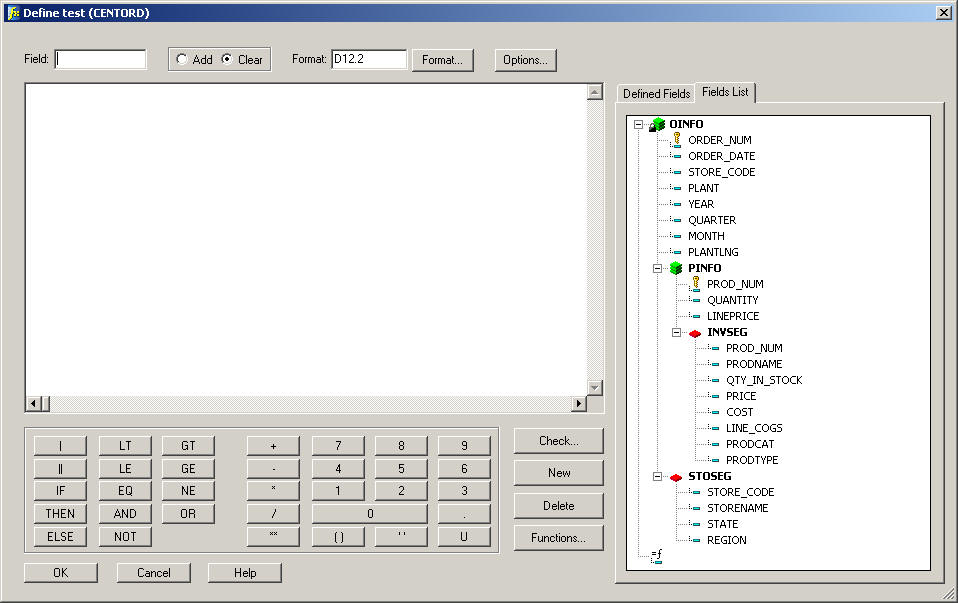
The Define
tool has the following fields/options:
-
Field
-
Displays the name of the temporary field.
When creating
a field, type the name you wish to assign.
When editing a
field, click the down arrow on the Field combo box, and select the field
you wish to edit. The drop-down list shows all virtual fields for
the current data source. When you select a field, the corresponding
information appears in the Format box, and the expression box. You
can edit the information, eliminate the field, or run it.
-
Add
-
When selected, it indicates that the current temporary field
definitions should be added to the list of temporary fields previously
defined for the same data source.
If this button is not selected,
the current set of temporary fields replaces those previously defined
for the same data source.
In Application View, this action
marks all definitions created during the current use of the Define
tool to be added to other virtual fields defined for the same data
source during earlier use of the tool.
Note: You can
define and execute several virtual fields during a single use of
the Define tool. However, unless you select Add, running the current
list will erase other virtual fields created outside of the Master
File for the same data source. Virtual fields created in the Master
File remain in effect.
-
Clear
-
When selected, it clears any current temporary field definitions
you previously added to the list of temporary fields.
-
Format button
-
Opens the Format dialog box, where you assign a format to
the temporary field.
-
Format box
-
Displays the field type, field length, and display options.
The field type can be alphanumeric, numeric, or date/time.
-
Options button
-
Opens the Options window, which enables you to establish
a segment location for a temporary field in the associated Master
File, and/or assign attributes to set how missing values in the
virtual field are handled.
-
Expressions box
-
Displays the expression used to evaluate the field.
Type
the expression or use the Fields list, calculator, and functions
list to help you create the expression.
-
Calculator buttons
-
Provide numbers and operators that you can use to create
numeric, alphanumeric, Boolean, and conditional expressions.
Click
the desired number or operator to add it to the expression box.
- To enclose a value
in parentheses, click the ( ) key in the
calculator. Parentheses affect the order in which the specified
operations are performed.
- To enclose a value
in single quotation marks, click the ' ' key
in the calculator. Use single quotation marks to enclose alphanumeric
and date literals.
- To convert entries
in the expression box to uppercase, click the U key
in the calculator. Note that field names are case-sensitive.
-
Check
-
Displays the Define phrase in code, and specifies any errors.
-
New
-
Clears the entry fields of the tools, including the Field
combo box and the corresponding expression. It also returns the
format to the default value D12.2, and places the cursor in the
Field combo box so you can begin to create a new field.
-
Delete
-
Deletes the temporary field identified in the Field box.
The field is no longer available.
-
Functions
-
Opens the Function Arguments dialog box, which lists all
available built-in functions. (A function is a program that returns
a value.)
Double-click the desired function to add it to the
expression box. Then, in the expression box, highlight each argument
and substitute the value or field name you wish to use. For details,
see the Using Functions manual.
-
Defined Fields
-
Lists the names of the temporary fields already associated
in the Master File.
-
Fields List
-
Lists the fields defined in the Master File.
Example: Creating a Virtual Field
Using
information in the sample data source EMPLOYEE, the following example
shows how to create a virtual field, INCREASE, to calculate the
annual salary increase each employee will receive. This example
assumes that you have already created a procedure with which you
want to use this virtual field.
- Open a procedure
in which you want to create a virtual field.
- Select the EMPLOYEE Master
File and click Open.
- Open the Define tool
from the component connector toolbar.
- Type INCREASE in
the Field input box.
- Click the Format button.
The
Format dialog box opens.
- Confirm that the Decimal option
button is selected under Format Types.
- Click the down arrow
in the Length input area to specify the field length 8. Leave the
number 2 in the Decimal field.
- Select the Floating
dollar--M option in the Edit Options list box.
- Click OK to
make the changes and return to the previous dialog box.
- Click the Fields
List tab, then double-click CURR_SAL.
- Enter the following
by typing or using the number/operator buttons in the Expressions
window:
* .05
The expression for
the Define field now appears as: CURR_SAL * .05.
- Click OK.
You
can then select the new field, INCREASE, in the Fields window of
the reporting tools.
xUsing the Expression Builder
The Expression Builder enables you to create expressions quickly
by selecting fields, relations, operators, and values from lists.
You can base selection criteria on a specified value, a variable
value, or a field value.
Note: You can multi-select fields and drag them from the
Fields tab to the Report Painter window. You can multi-select by
holding control and left clicking or by holding shift and left clicking,
using the up arrow, or using the down arrow. You are able to multi-select
from anywhere you are able to drag and drop a field,
You can access the Expression Builder from the Graph Assistant
Selection tab, and from the Report Painter Report Options Where/If
tab and When dialog boxes.
x
Reference: Expression Builder Dialog Box
The Expression
Builder dialog box has the following fields/options:
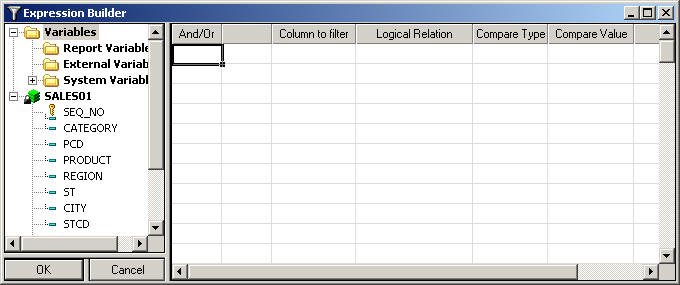
-
Field
-
Displays a list of all of the fields in the data source.
Double-click a field to add it to the Column to filter column.
-
And/Or
-
Displays the keyword used in the expression listed in the
Expression list box. You must select more than one field to activate
this option.
-
Logical Relation
-
Displays a list of possible relations between the selected
data source field and the value, parameter, or other field that
WebFOCUS will compare it to. Select a relation to activate the Compare
Type column.
-
Compare Type
-
Indicates the nature of the comparison you wish to make to
the field selected in the field section.
-
Value
-
Double-click the Compare Value column
to launch the Multiple Value Builder dialog box. Click the Select
a field ellipsis button to select a value or multiple
values to compare the selected field to a literal value.
-
Field
-
Click the down arrow in the Compare Value column to select
another field in the data source to compare it to the selected field.
-
Parameter
-
Double-click the Compare Value column
to launch the Variable Editor. The Variable Editor enables you to
create variable fields and define lists of acceptable values.
-
Function
-
Double-click the Compare Value column
to launch the Function Arguments dialog box. This tool lists functions
that you can use to calculate the value of a field in an expression
(a function is a program that returns a value). For more information,
see the Using Functions manual or click the Help button
from the Function Arguments dialog box.
-
Import Values
-
Double-click the Compare Value column
to launch the Multiple (or Single) Values dialog box. Click the
Select File ellipsis button to import values from a local external
file. The imported value(s) provide a query limit for the selected
data.
Note: The external file should be a text file
with new line delimiters.
-
Other
-
Double-click the <Please Specify> text
in the Compare Value column and overwrite it with a new expression.
-
Compare Value
-
Specifies the literal value, parameter, or other field to
which the selected field is compared.
The choices available
here are dependent on the selection you make in the Compare Type
column.
See the procedures in this topic for details.
Note: You
can add opening and closing parentheses after you select other criteria
for your expression. To add opening parentheses, click the down
arrow in the column to the right of the And/Or column. To add closing
parentheses, click the down arrow in the column to the right of
the Compare Value column.
x
Procedure: How to Display Records Based on Specified Values
In
the Expression Builder dialog box:
-
Select
a field name from the fields window.
-
Click
the down arrow in the Logical Relation list box to select a relation.
-
In the
Compare Type column, select Value.
-
Double-click
the Compare Value column. The Multiple Value
Builder dialog box opens.
-
Click
the Select a field ellipsis button and select
a value from the list.
-
Double-click
the value or click Add to add the value to
the list.
Note: Repeat this process to add other values to
the list.
-
Enter
a message that will prompt the user to select a value. This is an optional
entry.
-
Click OK.
The
values are shown in the Compare Value column.
x
Procedure: How to Display Records Based on a Variable Value
In
the Expression Builder dialog box:
-
Select
a field name from the fields window.
-
Click
the down arrow in the Logical Relation list box to select a relation.
-
In the
Compare Type column, select Parameter.
-
Double-click
the Compare Value column. The Variable Editor
opens.
-
In the
Name input box, type a name for the variable. This name will appear
as the Column title if the field is added to the report.
-
Optionally,
provide text for the message that prompts a user to supply a value
for the variable in the Prompt input box.
-
From
the Variable Type drop-down list, select Single Select or Multiselect
OR to determine whether users may select more than one value for
the variable.
-
From
the Data Content options, select Values for field.
Note: The Values for field option is only available
for Single Select and Multiselect OR variable types.
-
Click
the Select a field ellipsis button to get values
for a field. The Value Retrieval dialog box opens.
The Value Retrieval dialog box provides a list of available
fields in your data source. Double-click a field, or select a field
and click Get Data to close the Value Retrieval dialog box and return
to the Variable Editor. The available values for the field are listed.
-
Double-click
values to add them to the Accept List.
The values are shown in the Accept List.
Tip: Repeat
this process for each selection criterion you want to include in
a parameterized report created from the HTML Composer.
-
Click OK to
close the Variable Editor. The variable appears in the field list
as a Report Variable field.
x
Procedure: How to Display Records Based on Field Values
In
the Expression Builder dialog box:
-
Select
a field name from the fields window.
-
Click
the down arrow in the Logical Relation list box to select a relation.
-
In the
Compare Type column, select Field.
-
Click
the down arrow in the Compare Value column to select a field name
from the list.
-
Click OK.
x
Procedure: How to Display Records Based on Imported Values From an External File
In
the Expression Builder dialog box:
-
Select
a field name from the field list.
The field is added to the Column to filter area.
-
Click
the down arrow in the Logical Relation list box to select a relation.
-
Select Import
Values from the Compare Type list options.
-
Double-click
the Compare Value column.
The Multiple Value Builder opens.
Note: A Single or Multiple Value Builder opens,
based on your Logical Relation selection. In the Multiple Value
Builder, you may select more than one value. In the Single Value
Builder, only one value may be selected.
-
Click
the Select File ellipsis button to import values
from an external file.
-
Select
a text file from your local machine and click Open.
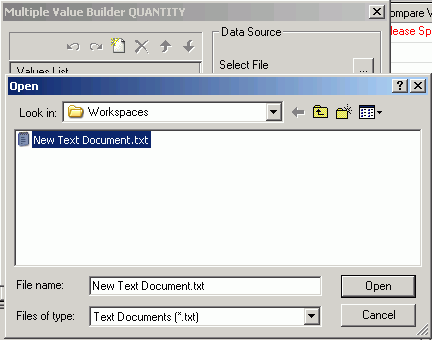
Note: The
external file should be a text file with new line delimiters.
The
imported values are loaded into the Data Source area of the Multiple
Value Builder.
-
Double-click
an imported value to add it to the Values List.
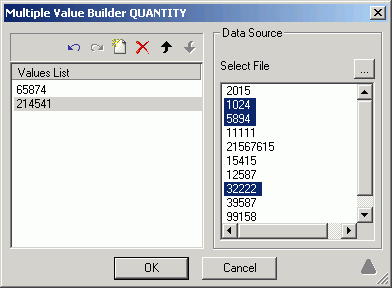
-
Click OK to
close the Multiple Value Builder dialog box and return to the Expression
Builder.
The imported values are added to the Compare Value area.
x
Procedure: How to Select Multiple Values and Fields
In
the Expression Builder dialog box, you can select multiple values
or fields to be used for record selection criteria by selecting
options in the And/Or column. The And/Or column is activated after
you have entered criteria for at least one expression.
-
Select
a field name from the fields window.
-
Click
the down arrow in the And/Or column. Select one of the following:
-
And
-
To start a new expression that will be combined with the
previous expression by the keyword AND.
-
Or
-
To start a new expression that will be combined with the
previous expression by the keyword OR.
-
Select
remaining criteria from the other columns in the Expression Builder
to complete the expression.
-
Click OK.
Note: When
the keyword And is used, WebFOCUS only selects
data that meet both conditions. When the keyword Or is
used, WebFOCUS selects data that meet either condition.