Applying Report Output Options
In this section: How to: Reference: |
The Report options tab enables you to select from a variety of
options for the output of your report.
The features of the Report options tab are shown in the following image.
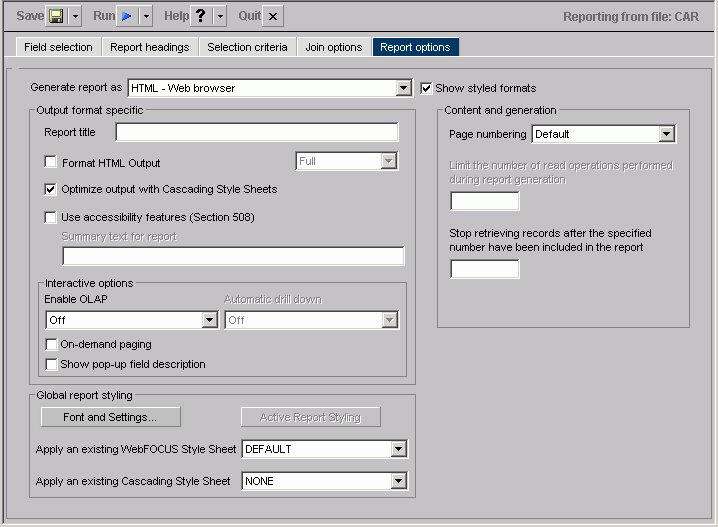
The following is a list of the Report options tab features:
- Save a report
to an output format that supports styling options.
- Save a report
to an output format that supports CSS.
- Specify the
page-numbering format.
- Set record/read
limits.
- Enter a report
title.
- Enter summary
text.
- Style the
entire report.
- Style a PDF
or PS report.
- Justify an
entire report.
- Enable On-demand
Paging and grid lines.
- Display pop-up
field descriptions for column titles.
- Optimize output
with internal Cascading Style Sheets (CSS).
- Use accessibility
features.
- Enable OLAP
features.
- Enable the
Automatic Drill Down features.
x
Procedure: How to Save a Report to an Output Format That Supports Styling Options
-
Check the Show styled formats check
box.
-
The Generate report as list box offers
a choice of file types for the report output. Select one of the
following formats from this list:
-
HTML. Creates
the report in HTML, sending the output to the Web browser, with
or without grid lines.
-
AHTML (Active Technologies Report). Creates
an HTML report that is designed for offline analysis. Users can
interact with the data, using analysis options similar to those
found in an Excel workbook, without any connection to a server.
See Creating an Active Technologies Report.
-
FLEX (Active Technologies Report for Adobe® Flash® Player). These
reports include most of the capabilities available in the HTML version
of active reports in a visually enhanced user-friendly report format.
An active report delivered as a self-contained Adobe Flash file
(an .swf file that is Adobe Flash Player compatible) allows for
faster analysis of large data sets and interaction with the active
report. Internet Explorer, Mozilla Firefox, and Opera internet browsers
recognize an active report for Adobe Flash Player as a Shockwave
Flash Object.
-
PDF. Captures
the entire report and creates a Portable Document Format (.PDF)
file, which can be opened in the Adobe Reader®.
-
EXL97. Generates
a report in Excel 97 format.
-
EXL07. Generates
a report in Excel 2007 format.
-
EXL2K. Generates
fully styled reports in the Excel 2000 HTML format. Excel 2000 provides
full support for HTML files with embedded XML.
-
EXL2KFORMULA. Excel
with Formula.
-
PS. Creates
the report as a postscript file.
x
Procedure: How to Save a Report to an Output Format That Supports CSS
-
Uncheck the Show styled formats check
box.
-
The Generate report as list box offers a choice of file types
for the report output. Select one of the following formats:
-
EXCEL. Excel
95.
-
DOC. Plain
text with page breaks.
-
WP. Plain
text without page breaks.
-
WK1. Import
to Lotus 1-2-3. See Notes on Using Lotus Format.
-
DIF. Import
to Spreadsheet.
-
LOTUS. Import
to Lotus 1-2-3. See Notes on Using Lotus Format.
-
TABT. Tab
delimited.
-
XML. eXtensible
Markup Language.
x
Procedure: How to Specify Page Numbering Format
The
Page Numbering list box offers several options for page numbering.
Select one of the following from the list box:
-
Default. Numbers
each page of the report in the format PAGE 1, PAGE 2, and so on
in the upper left-hand corner of the page.
-
On. Numbers
each page of the report in the format PAGE 1, PAGE 2, and so on
in the upper left-hand corner of the page. On is the default value.
-
Off. Suppresses
the display of page numbers.
-
NOLEAD. Suppresses
the two leading blank lines included on each page by default, causing
the report to be printed as a continuous logical page. When PAGE
is set to NOLEAD, the maximum number of lines that appear on a logical
page, from the heading at the top to the footing on the bottom is
57.
x
Procedure: How to Set a Record Limit or Read Limit
To
limit the number of records retrieved when reporting from a non-FOCUS
data source, enter a number greater than zero in the Read Limit
box. A read limit specification is ignored when reporting from a
FOCUS data source.
To limit the number of records
retrieved when reporting from a FOCUS data source, enter a number
greater than zero in the Record Limit box.
These options
are for development only.
x
Procedure: How to Include a Report Title
You
can specify a report title in the Report Title field that will appear
in the title bar of your report. This option is not available for
reports generated in PDF or PS format or for reports that utilize
on-demand paging.
x
Procedure: How to Include Summary Text for a Report
You
can specify summary text for your report in the Summary Text for
Report field. This will place a description of the output into a
SUMMARY object inside the output HTML TABLE. The length limit of
this summary is 500 characters. If you try to set the SUMMARY to
more than 500 characters, you receive the following message:
Limit on length of summary is 500 characters.
Note: You
can only specify summary text when the Use Accessibility features
(Section 508) option is checked.
x
Procedure: How to Style the Entire Report
To style
the entire report:
-
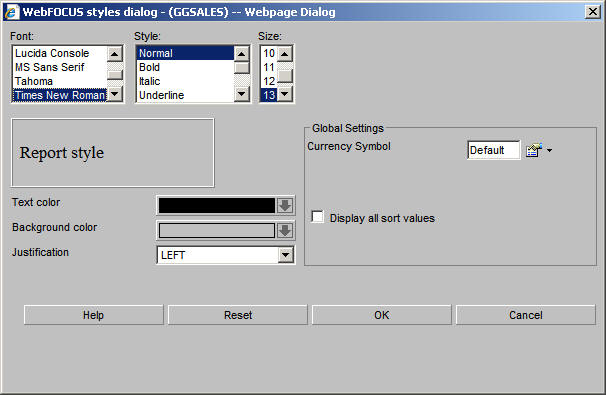
Click Font and Settings in the Global report
styling section on the Report options tab.
The Styles dialog box opens where you can select report
style options.
-
Select the font styling options from the Font, Style, and Size boxes.
-
Select a text color from the Text color list box.
-
Select a background color from the Background color list box.
-
Select a justification from the Justification list box.
-
Select a different currency symbol to override the currency
symbol set on the reporting server. Choose from Default, USD, GBP,
JPY, EUR, $, or Custom in the Currency Symbol menu. When you select
Custom, replace “Custom” with the desired one-character custom currency
symbol in the Currency Symbol field.
-
Select the Display all sort values check
box to display repeated sort values. Use this option to prevent
discontinuous data in a report and display repeated sort values.
This is recommended for use with Excel Named Ranges.
-
Click OK.
-
To specify an existing WebFOCUS Style
Sheet or Cascading Style Sheet, make your choice from the relevant
list box.
Note: Clicking
Reset returns the styling options to the following default settings:
- Font: Times
New Roman
- Style: Normal
- Size: 13
- Text Color:
Black
- Background
Color: Transparent
- Justification:
Left
x
Procedure: How to Style a PDF or PostScript Report
When
you select PDF or PostScript (PS) as the display format for a report, WebFOCUS offers several additional styling features.
-
Select PDF or PS from
the Generate report as list box.
-
Click Font and Settings. The Styles
dialog box opens.
-
Select a font.
-
Click the Page Orientation list box to select either Portrait or Landscape.
-
Click the Page size list box to select the page size for the
report.
-
Select a different currency symbol to override the currency
symbol set on the reporting server. Choose from Default, USD, GBP,
JPY, EUR, $, or Custom in the Currency Symbol menu. When you select
Custom, replace “Custom” with the desired one-character custom currency
symbol in the Currency Symbol field.
-
Click OK.
x
Procedure: How to Justify an Entire Report
The
following procedure describes how to justify an entire report. This
affects headers, footers, fields, and field headings.
-
Click Font and Settings. The Styles dialog
box opens.
-
In the Justification list box, select Left, Right,
or Center.
-
Click OK.
x
Procedure: How to Enable On-Demand Paging and Grid Lines
-
Select HTML - Web browser or HTML
- Web browser (with grid) in the Generate report as
list box.
Note: The latter option provides grid lines that
separate cells of data in your report.
You can only use On-demand
Paging for reports that use the HTML format.
-
Click the On-demand Paging check box.
-
Save and run the report.
WebFOCUS displays the first page of the report in the WebFOCUS Viewer.
x
Procedure: How to Optimize Output With Cascading Style Sheets
When
you check Optimize output with Cascading Style Sheets in the Report
options tab of Report Assistant, your report will reflect the styling
options you select, and generate Internal Cascading Style Sheet
code in the HEAD tag of HTML reports. This feature is available
only if you select HTML in the Generate report as drop-down list.
x
Reference: Setting OLAP Reporting Options
OLAP
options are available in the Interactive options section of the
Report options tab in Report Assistant. The relevant options—Enable
OLAP and Automatic Drill Down—are
located here.
Enable OLAP Options
The
Enable OLAP options in the Report Assistant control how users can
interact with an OLAP report and access OLAP tools.
For Standard Reports delivered to Managed
Reporting users, these decisions are made by Managed Reporting Developers.
However, users who
are creating their own reports can
OLAP-enable them and control the following OLAP interfaces and drill
down options.
-
OFF. OLAP
is off when off is selected, OLAP options are not available for
the report.
-
Columns only. Turns
off the OLAP Control Panel and the OLAP Selections pane, but enables
OLAP functionality from the report itself. You can access options
on right-click menus, drag and drop columns within the report, and
use up and down arrows to sort columns from high to low or low to
high. This is the default.
-
Columns with panel. Provides
access to the OLAP Selections pane from a square button to the left
of the column titles.
-
Show filters on top. Opens
the OLAP Selections pane above the report. The Measures, Graph,
and Dimension controls, as well as the band containing the OLAP,
Run, and Reset buttons appear above the report output. You can open
the Control Panel by clicking the OLAP button on the Selection pane.
-
Show filters on bottom. Opens
the OLAP Selections pane below the report. The Measures, Graph,
and Dimension controls, as well as the band containing the OLAP,
Run, and Reset buttons appear below the report output. You can open
the Control Panel by clicking the OLAP button on the Selection pane.
-
Show Panel in Report. Opens
the OLAP report with the OLAP Selections pane hidden. You can perform
a variety of analytic tasks from the report itself. Selection Criteria
is shown next to the OLAP button.
-
Show Tabbed. For
OLAP reports that have multiple dimensions, this option groups the
dimension elements under a tab labeled with the dimension name.
Automatic Drill Down Options
These
options enable you to sort instantly from high to low or low to
high for selected report columns:
-
Off. Disables
automatic drill downs.
-
Dimensions only. Enables
automatic drill downs on dimensions in reports and graphs.
-
Measures and Dimensions. Enables
automatic drill downs on dimensions in both reports and graphs and
on measures in reports.
xDisplaying Pop-up Field Descriptions for Column Titles
You can have pop-up field descriptions display in an
HTML report when the mouse pointer is positioned over column titles.
Field description text displays in a pop-up box near the column
title using the default font for the report. Pop-up text appears
for report column titles including titles created with ACROSS phrases
and stacked column titles created with OVER phrases.
The description attribute in the master file for the corresponding
field defines the pop-up text displayed for a column. If a column
title has no Description entry in the Master File, then no pop-up
box is generated when your mouse is positioned over the title.
This feature is not supported in the Graph Assistant.
x
Procedure: How to Display Pop-up Field Descriptions in an HTML Report
-
Open the Report Assistant.
-
In the Report Assistant window, select the Report options tab.
-
In the Interactive Options area, select the Show
pop-up field description check box.
-
Click Save to save this option in your report.
x
Reference: JavaScript Requirements for Pop-up Field Descriptions
Distributing
an HTML report containing pop-up field descriptions with ReportCaster
requires the use of JavaScript components located on the WebFOCUS Client.
To access these components in a report distributed by ReportCaster,
the scheduled procedure must contain the SET FOCHTMLURL command,
which must be set to an absolute URL instead of the default value.
For example,
SET FOCHTMLURL = http://hostname[:port]/ibi_html
where:
- hostname[:port]
Is the host name and optional port number (specified only
if you are not using the default port number) where the WebFOCUS
Web application is deployed.
- ibi_html
Is the site-customized Web server alias pointing to the WebFOCUS77/ibi_html
directory (where ibi_html is the default value).