How to:
Reference: |
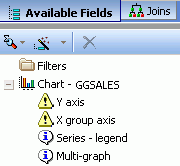
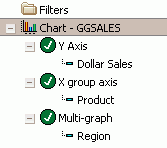
Advanced Merge functionality is enabled by default in Advanced Graph Assistant and enables you to build complex graph requests with multiple sort fields. Graphs are merged according to the dimensions specified by adding sort fields to the X group axis, Series-legend, and Multi-graph sort containers ("buckets"), located below the Chart icon in the query pane. These buckets determine how and where multiple sort fields are plotted, and are represented by the X group axis, Series-legend, and Multi-graph icons, as shown in the following image.
You can add sort fields to these buckets to create multiple graphs, nested X-axis graphs, merged graphs, and any combination of these graph types.
Each sort field bucket has characteristics and limitations, as described in the following:
Creates a nested X-axis if more than one sort field is added to this X group axis dimension. The sort field or fields added to the X group axis bucket determine how the X-axis labels appear.
The number of X group axis sort fields must be 1, 2, or 3, and can never be 0.
Creates secondary X-axis fields and merges the values into one graph. The sort field added to this Series-legend bucket determines how the legend data labels appear.
The number of Series-legend sort fields must be 0 or 1.
Creates outermost sort fields and serves as a page break for bursting into multiple graphs. The sort field added to this Multi-graph bucket is not plotted on the graph, but each unique sort field value is displayed for every bursted graph. The number of graphs created depends on the number of values for the sort field you select. For example, if you select a sort field with two values, two graphs are generated, and if you select a sort field with ten values, ten graphs are generated.
The number of Multi-graph sort fields must be 0 or 1.
Note: Advanced Merge also enables you to create Coordinated Reports in Power Painter where multiple TABLE and GRAPH requests are tied together by common sort field values. For more information about Power Painter, see the Creating Compound Reports With Power Painter manual.
Click a field in the Available Fields pane, drag in into the Graph Preview area, and drop in on the Y axis icon.
or
Click a field in the Available Fields pane, drag it into the query pane below the Chart icon, and drop it on the Y axis icon.
Click a field in the Available Fields pane, drag it into the Graph Preview area, and drop it on the X group axis icon.
or
Click a field in the Available Fields pane, drag it into the query pane below the Chart icon, and drop it on the X group axis icon.
Click a field in the Available Fields pane, drag it into the Graph Preview area, and drop it on the Series-legend icon.
or
Click a field in the Available Fields pane, drag it into the query pane below the Chart icon, and drop it on the Series-legend icon.
Note: To display the Series-legend icon, the Crosstab Mode Chart property must be set to Yes. For details, see How to Enable Series-legend (Crosstab Mode) Functionality.
Click a field in the Available Fields pane, drag it into the Graph Preview area, and drop it on the Multi-graph icon.
or
Click a field in the Available Fields pane, drag it into the query pane below the Chart icon, and drop it on the Multi-graph icon.
Note: As you add fields and perform any customizations to your graph, the graph preview area immediately displays the changes. An exception is when you add a field to the Multi-graph icon to create multiple graphs, which cannot be displayed in one location (such as the graph preview area) at the same time.
Select the GGSALES data source when opening Advanced Graph Assistant.
The Chart area should contain all of the fields added in the previous steps and appear, as shown in the following image.
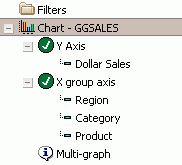
WHERE GGSALES.SALES01.REGION EQUAL to Midwest
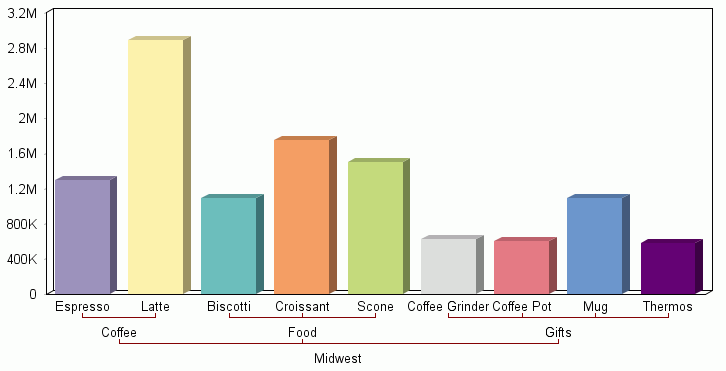
The nested X-axis graph output appears, as shown in the following image.
Select the GGSALES data source when opening Advanced Graph Assistant.
The Chart area should contain all of the fields added in the previous steps and appear, as shown in the following image.
WHERE GGSALES.SALES01.CATEGORY NOT EQUAL to Gifts
The merged graph output appears, as shown in the following image.
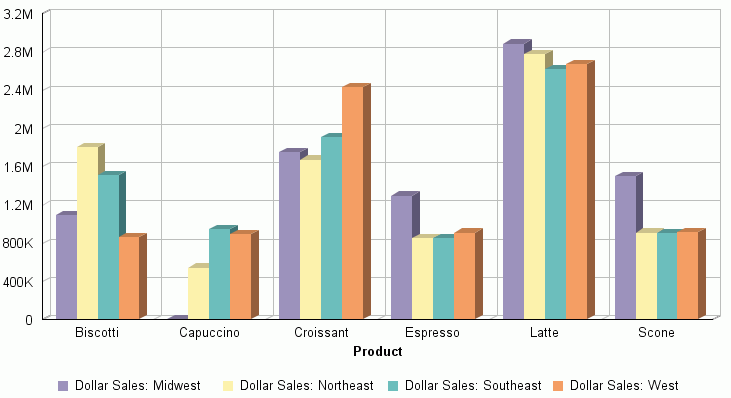
Four graphs, one for each region, are merged into one in the graph output. The legend area at the bottom of the graph shows the four region values associated with the product. These values are 'Dollar Sales: Midwest', 'Dollar Sales: Northeast', 'Dollar Sales: Southeast', and 'Dollar Sales: West'.
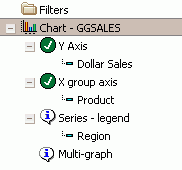
Select the GGSALES data source when opening Advanced Graph Assistant.
The Chart area should contain all of the fields added in the previous steps and appear, as shown in the following image.
WHERE GGSALES.SALES01.CATEGORY NOT EQUAL to Gifts
The following image shows the first of four graphs created in the multi-graph output.
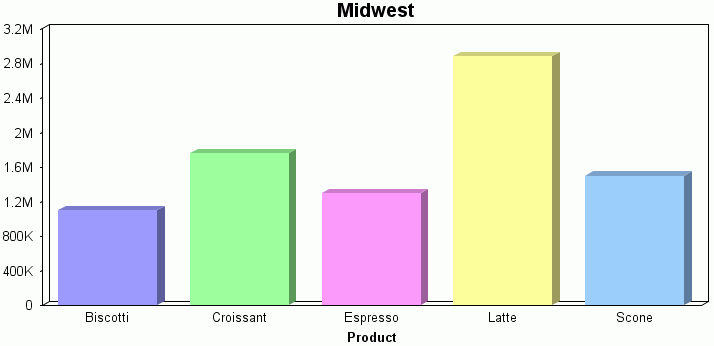
One graph is displayed in the output for each of the four regions (Midwest, Northeast, Southeast, West).
The Advanced Merge feature is enabled by default in Advanced Graph Assistant with the following code:
ON GRAPH SET GRMERGE ADVANCED
The three dimensions used in Advanced Merge determine how and where multiple sort fields are plotted. These dimensions are represented by the following SET commands, which are always generated in a graph request:
ON GRAPH SET GRMULTIGRAPH [0|1]
ON GRAPH SET GRLEGEND [0|1]
ON GRAPH SET GRXAXIS [1|2|3]
The following is a description of each new SET command:
Creates the outermost sort fields and serves as a page break for bursting into multiple graphs. Sort fields added to this Multi-graph dimension are not plotted on the graphs, but each unique sort field value is displayed for every bursted graph.
Number of sort fields for GRMULTIGRAPH must be 0 or 1.
Creates secondary X-axis fields and merges the values into one graph. The sort field used for this Series-legend dimension determines the data labels for the legend.
Number of sort fields for GRLEGEND must be 0 or 1.
Creates a nested X-axis if more than one sort field is added to this X group axis dimension.
Number of sort fields for GRXAXIS must be 1, 2, or 3, and can never be 0.
Note: In the syntax of a graph request, the order of the BY sort fields is important. The BY fields are allocated in the order they appear in the code to the GRMULTIGRAPH, GRLEGEND, and GRXAXIS commands depending on the number of dimensions specified for each. The sum of all BY sort fields specified in a graph request must be equal to the sum of all dimensions.
To display the Series-legend icon and enable secondary X-axis functionality:
or
Click the Chart icon  in the
query pane below the Available Fields tab.
in the
query pane below the Available Fields tab.
The Chart Properties form is displayed below the graph preview area.
A drop-down arrow appears at the far right edge of the row in the Value column.
| WebFOCUS |