Advanced Graph Assistant provides options for how your
data is displayed in your graph. You can display detailed or summed
data for the X-axis, display numeric summary type values for Y-axis
fields, hide the display of data, modify the display of X-axis and
Y-axis data labels.
xHiding the Display of Y-axis, X-axis, or Multi-graph Data
When you create a graph that has two or more Y-axis,
X-axis, and multi-graph data fields, you may want to hide one of
these fields when running the graph. In terms of traditional graph
syntax, this is the equivalent of adding the NOPRINT command to
a field. You can hide the display of a field by using the Field
properties form, which is displayed below the graph preview area
when you select a field in the query pane. For detailed information,
see How to Hide the Display of Y-axis, X-Axis, or Multi-graph Data.
Note: You cannot hide the display of all fields in a graph.
If you do, an error occurs when you run the graph indicating that
no data values were generated for the request.
x
Procedure: How to Hide the Display of Y-axis, X-Axis, or Multi-graph Data
-
Click
the Data selection tab.
-
Click
the desired Y-axis, X-axis, or multi-graph field in the query pane below
the Available Fields tab.
The Field properties form for the selected field appears
below the graph preview area.
-
Click
the Value column area to the right of Visible in the Property column.
A drop-down arrow appears at the far right edge of the
row in the Value column.
-
Click
the down-arrow to open the drop-down list.
-
Select No.
The field no longer appears in the graph preview area.
xModifying the Display of Data Labels
The data labels that appear on the graph are the same
names listed for the data fields added to the query pane, which
originate in the Master File for the selected data source. You can
modify the default data label values by using the Chart Editor or
the Field properties form. In terms of traditional graph syntax,
this is the equivalent of using an AS phrase with a field. For detailed
information, see Editing Vertical (Y-axis) and Horizontal (X-axis) Data Labels.
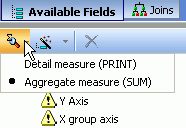
xDisplaying X-axis Data as Detail or Aggregate Measures
You have the option of displaying data values for the
X-axis as detail or aggregate measures. The detail measure option
is also referred to as the PRINT option because every instance of
each unique value for the selected data field is printed on the
X-axis. The aggregate measure option is also referred to as the
SUM option because only the aggregated total of each unique value
for the selected data field is summed on the X-axis in your graph.
You can toggle between the Detail measure (PRINT) and Aggregate
measure (SUM) options using the Sum/Print button, located to the
far left immediately below the Available Fields tab, as shown in
the following image.
xAssigning a Numeric Summary Type Value to Y-axis Data
For most graphs, only numeric
data is displayed on the Y-axis. If you add non-numeric data fields
to the Y-axis, a summary type value is assigned to it automatically. The
default summary type assigned is Count, which adds the CNT. prefix
to the non-numeric field added to the Y-axis.
You have the option of assigning a specific
numeric summary type value to both numeric and non-numeric fields
that you add to the Y-axis. Assigning a numeric summary type value
enables you to display Y-axis data as a numeric value in a variety
of different ways. You can assign any of the following numeric summary
types to the Y-axis data fields in your graph.
|
Available Summary Types
|
|---|
|
Average Square
|
Average
|
|
Count
|
Count Distinct
|
|
Distinct
|
Show first in group
|
|
Show last in group
|
Maximum
|
|
Minimum
|
Percentage
|
|
Count Percentage
|
Row Percentage
|
|
Sum
|
Total
|
x
Procedure: How to Assign a Numeric Summary Type Value to Y-axis Data
-
Select
a Y-axis field in the query pane below the Available Fields tab.
The Field Properties pane appears below the graph preview area.
-
Click
the Value column to the right of where Summary Type is listed in the
Property column of the Field Properties pane.
A drop-down arrow appears at the far right edge of the
row in the Value column.
-
Click
the down arrow to open the drop-down list.
-
Select
one of the available summary types from the list.