Applying Conditional Styling to a Graph
You can add further value to your graph by using conditional
styling to highlight certain defined data with specific styles and
colors. Conditional styling, also referred to as stoplighting, enables
you to define conditions that determine when to apply particular
fonts, point size, text style, foreground and background color,
and drill-down procedures to the data in your report, when the report
is run.
For example, you can apply the color red to all departments that
did not reach their sales quotas and apply the color black to all
departments that did reach their sales quotas. In this example,
the user can view quickly which departments did or did not reach
their quotas. To examine how the results of one department may impact
the results of a second department, you may want to provide a drill
down to a report that examines this possibility.
You can apply color to the following
graph types:
- Bar graphs.
- Three-dimensional graphs with noncontinuous
plot points.
- Pie graphs.
- Stack charts.
Conditional styling is only supported for Y-axis values.
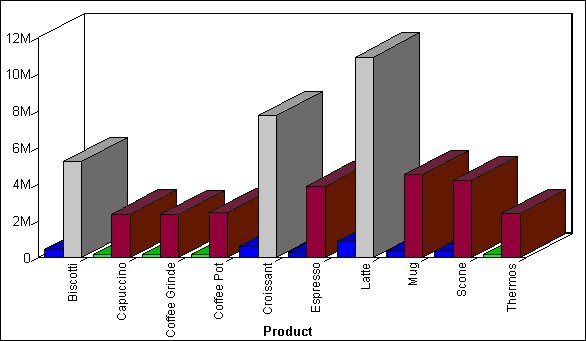
Example: Applying Conditional Styling to a Graph
The
following illustrates how you can apply conditional styling to a
graph. In this example:
- Blue is specified
as the default color for all data in the graph.
- Firebrick is
specified as the color for data in the DOLLARS column.
- Silver is specified
as the color for data in the DOLLARS column when the value is greater
than five million.
- Lime is specified
as the color for data in the UNITS column when the value is less than
two hundred thousand.
The output is shown in the following
image.
x
Procedure: How to Apply Conditional Styling to a Graph in the Developer Studio Environment
This
procedure is applicable to the Graph Assistant in the Developer
Studio environment.
-
From
the Field selection tab of the Graph Assistant, highlight the field
(from the Y-axis Fields box) where you wish to apply conditional
styling and click Conditional styling from
the Display subtab.
-
From
the Conditional Styling dialog box, click Add.
-
From
the Condition List dialog box, click New.
The Edit Condition dialog box opens.
-
Type
a name for the condition or accept the default.
-
From
the Field window, select the field for which you want to define
a condition.
-
Select
a relation from the Relations List.
-
Specify
a value by doing one of the following:
- Type a literal
value in the Value box.
or
- Click the Values button
to display existing data source values and select a value.
-
Click OK.
The condition is now added to the Condition List in the
Condition List dialog box.
Tip: To create another
condition, repeat steps 3 to 8.
-
After
creating all of your conditions, click OK from
the Condition List dialog box.
-
To attach
a style to the condition, highlight the condition in the Condition
List and click the Color drop-down list.
-
Select
a color from the drop-down list and click OK.
-
After
applying styles to all the desired conditions, click OK to
return to the Graph Assistant.