Getting Started With the Document Composer

How to:

Reference:

You can create compound reports and coordinated compound reports in one integrated process with the Document Composer.


Top of page

x
Procedure: How to Access the Document Composer From the Procedures Folder
  1. With the Procedures folder highlighted, select New from the File menu, then select Procedure.

    The Add Procedure dialog box opens.

  2. Enter a name for the new procedure in the File name field.
  3. Select Composer from the Create with drop-down list.
  4. Click Open.

    The Document Composer opens.


Top of page

x
Procedure: How to Access the Document Composer From QuickLinks
  1. Select QuickLinks from the View menu in the Developer Studio Explorer.

    Note: QuickLinks is turned off by default.

  2. From the QuickLinks dialog box, click Coordinate reports and graphs.

    The New Procedure File dialog box opens.

  3. Enter a name for the new procedure in the File name field and click Create.

    The Document Composer opens.

    Note: The Document Composer is the default for the Coordinate reports and graphs QuickLink.


Top of page

x
Reference: Document Composer Windows and Toolbars

When you open the Document Composer, it appears similar to the following image.

The main elements of the Document Composer are:

Menu Bar

Displays pull-down menus for the Document Composer.

Developer Studio Toolbar

Displays tool buttons, such as Open and Run.

Standard Toolbar

Displays buttons, such as Copy and Paste, that enable you to edit the layout.

Components Toolbar

Displays buttons that insert objects, such as Reports and Graphs, into the layout.

Positioning Toolbar

Displays buttons that align objects and control the appearance of the layout.

Formatting Toolbar

Displays buttons that format and align text when using a text element in the layout.

Properties Tab (Properties Window)

Displays the properties of objects in the layout.

Thumbnails Tab (Properties Window)

Enables you to view thumbnails of each page in the layout. Thumbnails work similar to thumbnails in AdobeĀ® PDF, and enable you to scroll to different pages. Select an image from the Thumbnails tab to jump to the selected object in the layout. You may also refresh the Thumbnails tab, enlarge or reduce the thumbnails, and select pages to be reordered directly from the Thumbnails tab. For more information, see Moving Pages With the Thumbnails Tab.


Top of page

x
Reference: Standard Toolbar

The Standard toolbar contains the following buttons:

Button

Description

Saves the existing procedure (.fex) and output files to the current project. This button is unavailable once the layout is saved and no new changes have been made. When a change has been made to the layout, the Save button is active until the report is saved again.

Note: The Save icon drop-down list offers options to Save Document As and Save Current Document As. For details, see How to Save a Page Master in the Document Composer and How to Save an Individual Page Layout in the Document Composer.

Save Document As and Save Current Page As will be grayed out and unavailable when the Document Composer is accessed through the HTML Composer.

Removes the highlighted object(s) and saves it to the clipboard.

Copies the highlighted object(s) to the clipboard.

Pastes the object(s) to the specified location.

Deletes the highlighted object(s).

Resets the layout by reversing the last action performed.

Repeats the last action performed.

The Refresh All option enables you to view any edits or changes that you made to your document. Refresh All reloads all pages and reruns the reports and graphs in Design View.

Note: Refresh also shows changes made to reports and graphs that are referenced in your document.


x
Reference: Components Toolbar

The Components toolbar contains the following buttons:

Button

Description

Inserts a report object to the layout.

Inserts a graph object to the layout.

Tip: You may right-click on a graph object to open the Advanced Graph Assistant.

Inserts a placeholder for an image. You can multiselect image files from the Get source files dialog box. The files will be cascaded on the canvas and can then be moved as required.

Inserts text.

Inserts a line.


x
Reference: Positioning Toolbar

The Positioning toolbar contains the following buttons.

For more information about positioning objects, see Controlling the Overflow and Relative Positioning of Objects.

Button

Description

Toggles between displaying and hiding the grid.

Aligns objects to the left.

Aligns objects to the right.

Aligns objects by the top of the highest selected object.

Aligns objects by the bottom of the lowest selected object.

Aligns objects at the horizontal center point of the canvas in Design View.

Aligns objects at their vertical center (or middle) point of the canvas in Design View.

Makes two or more objects the same width.

Makes two or more objects the same height.

Makes two or more objects the same size.

Aligns objects to the center of the canvas in Design View.

Note: You can also select any of the align options from the drop-down list.

Sets the relationship between selected objects.

Breaks the relationship between objects.

Shows or hides the arrow indicating relationships between objects.

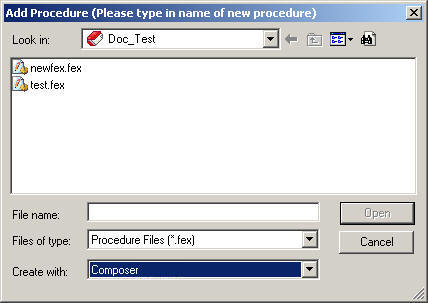
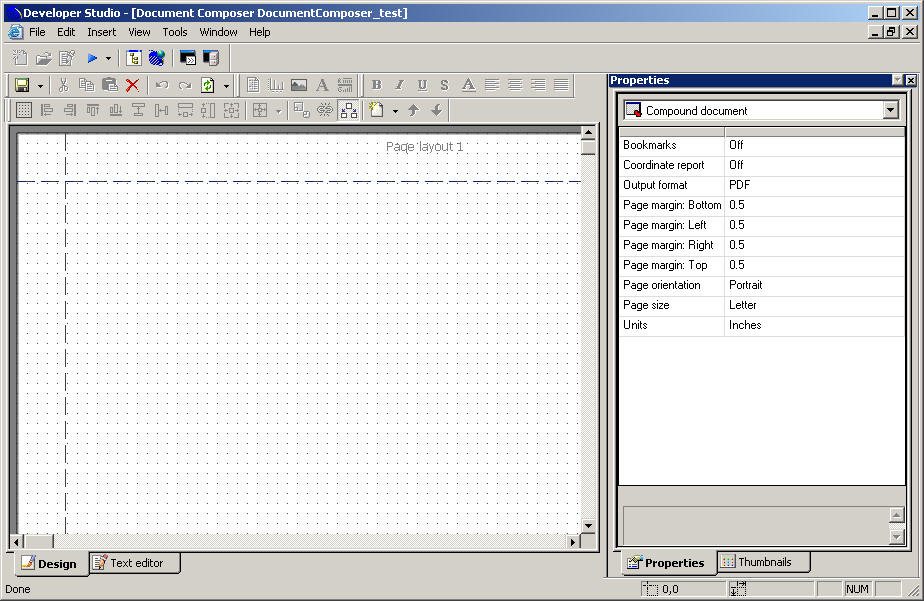
Creates a new page layout.

Moves up one level to the next page (for multiple page layouts).

Moves down one level to the next page (for multiple page layouts).

Adds a control to a chain. Each time a selection is made, all chained controls will be dynamically updated.

Note: The Add to current chain button is available when controls are multi-selected on the canvas. This button is disabled if you multi-select controls that are already in a chain.

Removes a control from a chain.

Note: The Remove from current chain button is available when controls are multi-selected on the canvas. This button is disabled for the first control in a chain but enabled for all others.

Shows the chaining order of all controls that are currently part of a chain.


x
Reference: Formatting Toolbar

The Formatting toolbar contains options that can be applied to individual strings of text, as well as to the entire text element, with the exception of the alignment options. The alignment options can only be applied to the text element.

For more information about using text elements, see Formatting Text in the Document Composer.

Button

Description

Applies bold formatting to the text.

Applies italic formatting to the text.

Applies underline formatting to the text

Applies superscript typography to the text.

Font style opens the Font dialog box where you can set the Font, Font Style, Size, Color, and Effect of the text.

Aligns the text element to the left.

Aligns the text element to the center.

Aligns the text element to the right.

Aligns the text to fill the width of the text element.


x
Reference: Compound Document Properties Window

The following image is the Properties window for Compound documents.

The Compound Document Properties window contains options that control the properties of your report and reporting objects. These properties adhere to the Microsoft standards. For more information on Microsoft object properties, see your Microsoft documentation.


WebFOCUS