Positioning Headings, Footings, or Items Within Them
For a PDF, PS, or HTML report, you can use the POSITION
attribute in a StyleSheet to specify a starting position for a heading
or footing, expressed as a unit measurement. For HTML, this capability
requires an internal Cascading Style Sheet. For details on selecting
an alignment method, see Choosing an Alignment Method for Heading and Footing Elements.
In addition, for a PDF or PS report, you can use the POSITION
attribute to specify an absolute or relative starting position for
an element within a heading or footing or to align an item in a
heading or footing with a report column. An absolute starting position
is the distance from the left margin of the report. A relative starting
position is the distance from the preceding object. For the first
item on a heading line this is the left margin of the report.
In an HTML report, you can use related syntax and an internal
Cascading Style Sheet to position an image in a heading or footing.
For details on images, see Laying Out the Report Page.
x
Syntax: How to Set a Starting Position for a Heading or Footing
Use the following syntax to specify
a starting position for an entire heading or footing in relation
to the left margin of a report.
TYPE = headfoot, POSITION = position, $
where:
- headfoot
- Is the type of heading or footing. Valid values are TABHEADING,
TABFOOTING, HEADING, FOOTING, SUBHEAD, and SUBFOOT.
- position
- Is the desired distance from the left, expressed by the UNITS
attribute (the default is INCHES).
Note: In
an HTML report, this syntax must be used in conjunction with an
internal Cascading Style Sheet. For an illustration, see Setting a Starting Position for a Report Heading in HTML.
Example: Setting a Starting Position for a Report Heading in PDF
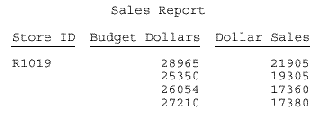
This request positions the report heading
1.25 inches from the left margin.
SET ONLINE-FMT=PDF
TABLE FILE GGSALES
PRINT BUDDOLLARS DOLLARS
BY STCD
WHERE BUDDOLLARS GE 25000
WHERE STCD EQ 'R1019'
ON TABLE SUBHEAD
"Sales Report"
" "
ON TABLE SET PAGE-NUM OFF
ON TABLE SET SQUEEZE ON
ON TABLE SET STYLESHEET *
TYPE = TABHEADING, POSITION = 1.25, $
ENDSTYLE
END
The output is:
Example: Setting a Starting Position for a Report Heading in HTML
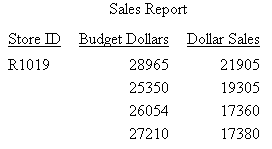
The request generates an internal Cascading
Style Sheet as part of its HTML code, enabling the use of the POSITION
attribute to specify a starting position for the heading, Sales
Report, 1.5 inches from the left margin.
SET ONLINE-FMT = HTML
TABLE FILE GGSALES
PRINT BUDDOLLARS DOLLARS
BY STCD
WHERE BUDDOLLARS GE 25000
WHERE STCD EQ 'R1019'
ON TABLE SUBHEAD
"Sales Report"
" "
ON TABLE SET PAGE-NUM OFF
ON TABLE SET HTMLCSS ON
ON TABLE SET STYLESHEET *
TYPE=REPORT, GRID=OFF, $
TYPE = TABHEADING, POSITION = 1.5, $
ENDSTYLE
END
The output is:
x
Syntax: How to Set a Starting Position for a Heading or Footing Element
For a PDF or PS report, use the following
syntax to specify a starting position for a heading or footing element
in relation to the preceding item
TYPE = headfoot, [subtype,] POSITION = {+|-}option, $where:
- headfoot
- Is the type of heading or footing. Valid values are TABHEADING,
TABFOOTING, HEADING, FOOTING, SUBHEAD, and SUBFOOT.
- subtype
- Are additional attributes that identify the report component.
These options can be used separately or in combination, depending
upon the degree of specificity you need to fully identify an element.
Valid values are:
LINE which
identifies a line by its position in a heading or footing. Identifying
individual lines enables you to format each line differently.
If
a heading or footing has multiple lines and you apply a StyleSheet
declaration that does not specify LINE, the declaration is applied
to all lines. Blank lines are counted when interpreting the
value of LINE.
ITEM which identifies an item
by its position in a line. To divide a heading or footing line into
items, you can use the <+0> spot marker. See Identifying a Report Component in a WebFOCUS StyleSheet.
To determine an ITEM number for an OBJECT,
follow these guidelines:
- When used with
OBJECT=TEXT, count only the text strings from left to right.
- When used with OBJECT=FIELD, count only
values from left to right.
- When used without
OBJECT, count text strings and field values from left to right.
If
you apply a StyleSheet declaration that specifies ITEM, the number
is counted from the beginning of each line in the heading or footing,
not just from the beginning of the first line.
OBJECT which identifies
an element in a heading or footing as a text string or field value.
Valid values are TEXT or FIELD. TEXT may represent free text or
a Dialogue Manager amper (&) variable.
It is not necessary
to specify OBJECT=TEXT unless you are styling both text strings and
embedded fields in the same heading or footing.
- option
- Is the alignment method. Valid values are:
position which
is the desired distance, expressed by the UNITS attribute (the default
is inches) for absolute positioning.
+ starts
the heading or footing element at the specified distance to the right of
the preceding item. For the first item in a heading or footing,
the preceding item is the left margin of the report.
- starts
the heading or footing element at the specified distance to the left of
the preceding item. This is useful if you want to overlap images
in a heading.
column_title aligns
the heading or footing element with the first character of the designated
column.
Example: Setting an Absolute Starting Position for a Heading Item
This request uses the spot marker <+0>
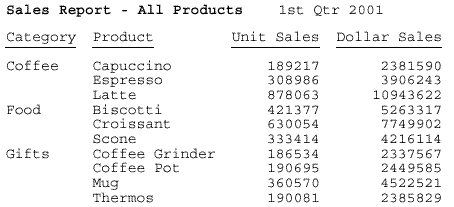
to divide the report heading into three text strings. It starts
the third text string, 1st Qtr 2001, 3 inches from the left report
margin. This technique can be used in PDF as well as PS reports.
SET ONLINE-FMT = PDF
TABLE FILE GGSALES
SUM UNITS DOLLARS BY CATEGORY BY PRODUCT
ON TABLE SUBHEAD
"Sales Report - <+0>All Products<+0> 1st Qtr 2001"
" "
ON TABLE SET PAGE-NUM OFF
ON TABLE SET SQUEEZE ON
ON TABLE SET STYLESHEET *
TYPE = TABHEADING, OBJECT = TEXT, ITEM=1, SIZE = 12, STYLE = BOLD, $
TYPE = TABHEADING, OBJECT = TEXT, ITEM=2, STYLE = BOLD, $
TYPE = TABHEADING, OBJECT = TEXT, ITEM=3, POSITION = 3, $
ENDSTYLE
END
The output is:
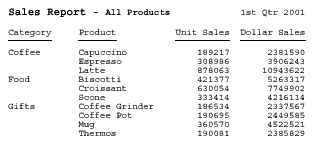
Example: Setting a Relative Starting Position for a Heading Item
This request uses the spot marker <+0>
to divide the report heading into three text strings. It starts
the third text string, 1st Qtr 2001, one inch to the right of the
previous item on the heading line. Inches is the default unit of
measure. This technique can be used in PDF as well as PS reports.
SET ONLINE-FMT = PDF
TABLE FILE GGSALES
SUM UNITS DOLLARS BY CATEGORY BY PRODUCT
ON TABLE SUBHEAD
"Sales Report - <+0>All Products<+0> 1st Qtr 2001"
" "
ON TABLE SET PAGE-NUM OFF
ON TABLE SET SQUEEZE ON
ON TABLE SET STYLESHEET *
TYPE = TABHEADING, OBJECT = TEXT, ITEM=1, SIZE = 12, STYLE = BOLD, $
TYPE = TABHEADING, OBJECT = TEXT, ITEM=2, STYLE = BOLD, $
TYPE = TABHEADING, OBJECT = TEXT, ITEM=3, POSITION = +1, $
ENDSTYLE
END
The output is:
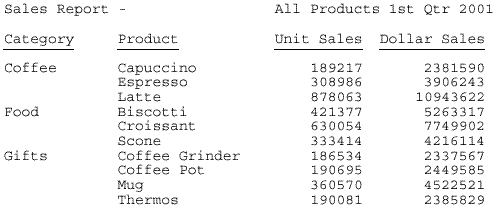
Example: Aligning a Heading Item With a Column
This request uses the spot marker <+0>
to divide the report heading into three text strings. It starts
the second text string at the horizontal position where the column
UNITS (Unit Sales) is. This technique can be used in PDF as well
as PS reports.
SET ONLINE-FMT = PDF
TABLE FILE GGSALES
SUM UNITS DOLLARS BY CATEGORY BY PRODUCT
ON TABLE SUBHEAD
"Sales Report - <+0>All Products<+0> 1st Qtr 2001"
" "
ON TABLE SET PAGE-NUM OFF
ON TABLE SET SQUEEZE ON
ON TABLE SET STYLESHEET *
TYPE = TABHEADING, LINE=1, ITEM=2, POSITION=UNITS, $
ENDSTYLE
END
The output is:
Tip: In
this request the column (UNITS) is identified by name. However,
there are other ways to identify a column that you wish to format.
See Identifying a Report Component in a WebFOCUS StyleSheet.
x
PRINTPLUS includes enhancements to display alternatives
offered by WebFOCUS. For example, you can place a FOOTING after
a SUBFOOT in your report. PRINTPLUS provides the flexibility to
produce the exact report you desire.
The PRINTPLUS parameter must be set to
ON to use the following TABLE capabilities:
- PAGE-BREAK
is handled internally to provide the correct spacing of pages. For example,
if a new report page is started and an instruction to skip a line
at the top of the new page is encountered, WebFOCUS knows to suppress
the blank line and start at the top of the page.
- NOSPLIT is
handled internally. (Use NOSPLIT to force a break at a specific spot.)
- You can perform
RECAPs in cases where pre-specified conditions are met.
- A Report SUBFOOT
now prints above the footing instead of below it.
- Data displays
correctly in subfoots when IF/WHERE TOTAL or BY HIGHEST is used.
- BY field actions
are linked with BY field options so they appear on the same page. The
footing no longer splits on two pages.
- Footings and
Subfoots always appear on a page with at least one data item, and will
never split between two pages.
- Printing beyond
the length of the page no longer occurs.
- Splitting of
fields linked by OVER onto separate pages no longer occurs.
- There is no
reserved space for conditional output. The output page is fully used.
- The order of
sort fields is no longer relevant.
Note: PRINTPLUS is not supported for StyleSheets. A warning
message is generated in this case.
x
Syntax: How to Use PRINTPLUS
Issue the command
SET PRINTPLUS = {ON|OFF}
Example: Using PRINTPLUS With SUBFOOT and FOOTING
With PRINTPLUS on, the SUBFOOT prints
first, followed by the FOOTING.
SET PRINTPLUS = ON
 TABLE FILE CAR
  PRINT CAR MODEL
  BY SEATS BY COUNTRY
  IF COUNTRY EQ ENGLAND OR FRANCE OR ITALY
  ON TABLE SUBFOOT
  " "
  " SUMMARY OF CARS IN COUNTRY BY SEATING CAPACITY"
  FOOTING
  " RELPMEK CAR SURVEY "
ON TABLE SET STYLE *
TYPE=REPORT,GRID=OFF,$
 END
The output is:
SEATS | COUNTRY | CAR | MODEL |
----- | ------- | — | ----- |
2 | ENGLAND | TRIUMPH | TR7 |
| ITALY | ALFA ROMEO | 2000 GT VELOCE |
| | ALFA ROMEO | 2000 SPIDER VELOCE |
| | MASERATI | DORA 2 DOOR |
4 | ENGLAND | JAGUAR | V12XKE AUTO |
| | JENSEN | INTERCEPTOR III |
| ITALY | ALFA ROMEO | 2000 4 DOOR BERLINA |
5 | ENGLAND | JAGUAR | XJ12L AUTO |
| FRANCE | PEUGEOT | 504 4 DOOR |
| | | |
SUMMARY OF CARS IN COUNTRY BY SEATING CAPACITY |
RELPMEK CAR SURVEY |
xUsing Spot Markers to Refine Positioning
You can employ several types of spot markers to refine
the positioning of headings and footings, and elements within them,
in HTML and PDF reports that use proportional fonts. For maximum
control, you can combine spot markers with other alignment techniques.
See Choosing an Alignment Method for Heading and Footing Elements.
The following spot markers enable you
to position items and to identify items to be formatted:
Note: When a closing spot marker is immediately followed
by an opening spot marker (><), a single space text item will
be placed between the two spot markers (> <). This must be
considered when applying formatting.
You can also use spot markers to position heading and footing
elements at fixed and relative column locations. Several spot markers
control positioning based on the pre-defined width of a character
in a monospace font. This is a legacy formatting technique that
is not supported for proportional fonts.
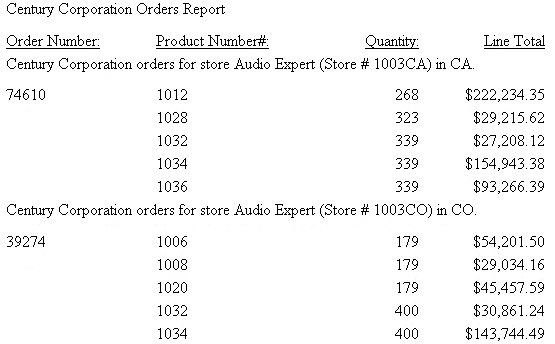
Example: Positioning a Character Immediately After a Field in an HTML Report
This request generates an HTML report
in which the closing parenthesis and the period in the sort heading
follow immediately after the STORE_CODE and STATE fields, respectively.
This behavior is controlled by the <-1 spot markers, which indicate
a relative starting position from the preceding object. Without
these spot markers to indicate that the punctuation characters should
follow the preceding objects, an extra space would appear in each
of these positions in the display.
SET ONLINE-FMT = HTML
SET PAGE-NUM = OFF
JOIN STORE_CODE IN CENTCOMP TO STORE_CODE IN CENTORD
TABLE FILE CENTCOMP
HEADING
"Century Corporation Orders Report </1"
PRINT PROD_NUM QUANTITY LINEPRICE
BY STORE_CODE NOPRINT
BY ORDER_NUM
ON STORE_CODE SUBHEAD
"Century Corporation orders for store <STORENAME <0X
(store # <STORE_CODE<-1 ) in <STATE|.</1"
ON TABLE SET STYLE *
TYPE=REPORT, GRID=OFF, $
ENDSTYLE
END
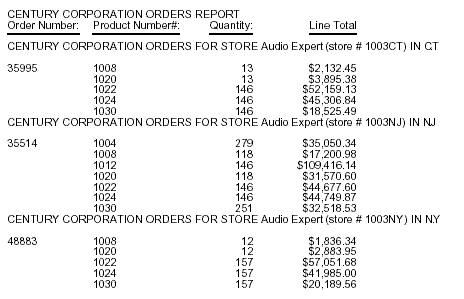
The partial output is:
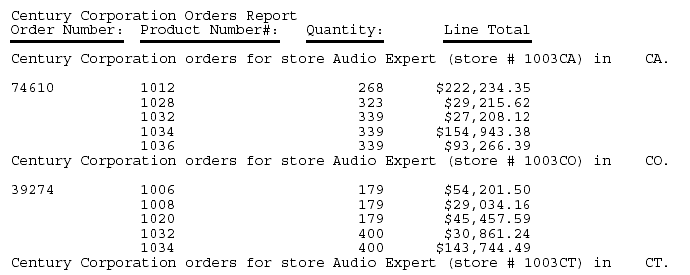
Example: Positioning a Character Immediately After a Field in a PDF or PS Report
In
a PDF report, an embedded field in a heading or footing must be
followed by a space in the request to be recognized for processing.
However, in the output the space may not be desirable. This example
demonstrates two techniques for positioning punctuation characters
immediately after a field in a PDF report.
The
first technique uses the POSITION attribute in a StyleSheet to position
the closing parenthesis immediately after the STORE_CODE value.
The second technique uses the <-1 spot marker to position the
period immediately after the STATE value. The POSITION measurement
is based on the UNITS designation POINTS. Experimentation demonstrated that
-7 points moves the closing parenthesis to the proper location after
the field, using the default proportional font and size.
SET ONLINE-FMT = PDF
SET PAGE-NUM = OFF
JOIN STORE_CODE IN CENTCOMP TO STORE_CODE IN CENTORD

TABLE FILE CENTCOMP
HEADING
"Century Corporation Orders Report"
PRINT PROD_NUM QUANTITY LINEPRICE
BY STORE_CODE NOPRINT
BY ORDER_NUM
ON STORE_CODE SUBHEAD
"Century Corporation orders for store <STORENAME (store # <STORE_CODE )
in <0X <STATE <-1 . </1"
ON TABLE SET STYLE *
TYPE=REPORT, GRID=OFF, UNITS=POINTS, $
TYPE=SUBHEAD, OBJECT=TEXT, ITEM=3, POSITION= -7, $
ENDSTYLE
END
The output is:
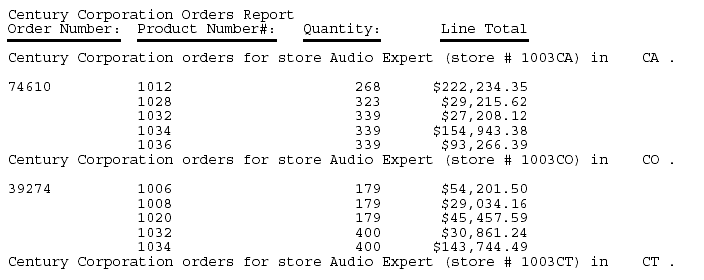
Without the spot marker and position
measurement, the output would have looked like this:
Example: Customizing Position Measurements for Font Attributes
This request uses a 12-point Helvetica
font. Experimentation demonstrated that the POSITION value of -2
moves the text in this font and size to the required position.
SET ONLINE-FMT = PDF
SET PAGE-NUM = OFF
JOIN STORE_CODE IN CENTCOMP TO STORE_CODE IN CENTORD

TABLE FILE CENTCOMP
HEADING
"CENTURY CORPORATION ORDERS REPORT"
PRINT PROD_NUM QUANTITY LINEPRICE
BY STORE_CODE NOPRINT WHERE STORE_CODE EQ '1003NY' OR '1003CT' OR
    '1003NJ'
BY ORDER_NUM
ON STORE_CODE SUBHEAD
"CENTURY CORPORATION ORDERS FOR STORE <STORENAME (store # <STORE_CODE)<0X
 IN <STATE <-1 . </1"
ON TABLE SET STYLE *
TYPE=REPORT, GRID=OFF, UNITS=POINTS, FONT='Helvetica', SIZE=12, $
TYPE=SUBHEAD, OBJECT=TEXT, ITEM=3, POSITION= -2, $
ENDSTYLE
END
Tip: You cannot use the POSITION attribute
to position a heading element in an in HTML report. However, you
can achieve the same result by placing the horizontal spot markers <-1
immediately after the fields STORE_CODE and STATE. Do not add a
space between the field and the character that will follow it.
The output is:
