Priority, Notification, and Zip File Options

How to:

Reference:

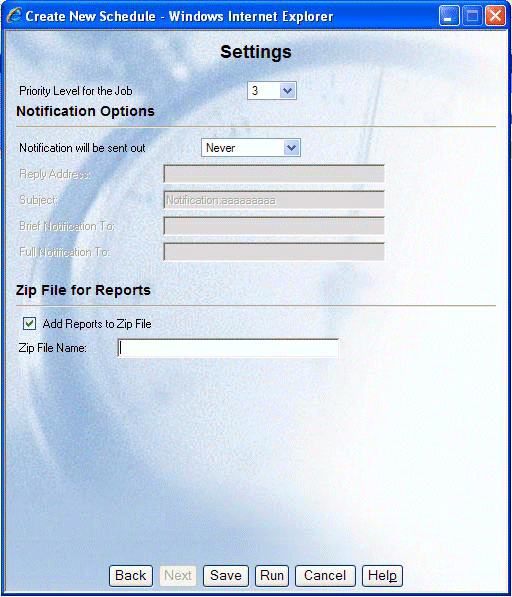
After you have specified the distribution options and click Next, the Settings window opens. This window provides options to specify the priority level of the schedule, select notification options, and when the distribution is set to e-mail, determine if the report will be contained in a Zip file. The following image shows the priority level drop-down list and the notification options (the mail information fields related to notification), the Zip file option, and the action buttons that you can click to complete the schedule.

Settings window


Top of page

x
Procedure: How to Specify Priority and Notification Options

Specify the following information in the Settings window:

  1. From the Priority Level for the Job drop-down list, select the priority for running the job. The highest priority is 1 and the lowest is 5. The default priority is 3. The ReportCaster Distribution Server queue sorts scheduled jobs by priority and then by the time the schedule is set to run. If multiple jobs share the same priority and time, ReportCaster arbitrarily schedules the jobs.
  2. From the Notification will be sent out drop-down list, you can send notification of the schedule status to a specified e-mail address by selecting one of the following options:
    • Never. ReportCaster does not send notification of the schedule status under any circumstances. If you select Never, you can proceed to Step 7.

      The default value is Never. Contact your ReportCaster administrator If you want the Scheduling Wizard to display a different default value.

    • On Error. The specified users are notified when errors are encountered while running the schedule. Information Builders recommends using the On Error notification option.
    • Always. The specified user is always notified when the schedule runs.
  3. In the Reply Address field, type the e-mail address of the sender. If report recipients reply to the report sender, their messages are sent to this address. If your e‑mail system is unable to deliver a report, the undeliverable report message is also returned to this address.

    Note: If the Email Delivery, Restrict Email Domains option is set to yes in the ReportCaster Server Configuration tool, then only those e-mail domains (the portion of the e-mail address following the at (@) sign) listed in Allowed Email Domains (also in the Server Configuration tool) are valid e-mail recipients.

    Tip: You can retrieve e-mail addresses defined in an LDAP data source. For more details, see How to Retrieve E-mail Addresses for a Schedule Using Address Search.

  4. In the Subject field, type the text you want to display in the e‑mail subject line. There is a limit of 255 alphanumeric characters.
  5. In the Brief Notification To field, type the e-mail address to which you want a brief notification sent. A brief notification sends the ID and job description of a schedule, as well as messages about the schedule (such as Completed Successfully). Note that there is no syntax error checking for this field.

    Note: If the Email Delivery, Restrict Email Domains option is set to yes in the ReportCaster Server Configuration tool, then only those e-mail domains (the portion of the e-mail address following the at (@) sign) listed in Allowed Email Domains (also in the Server Configuration tool) are valid e-mail recipients.

    Tip:

    • We recommend using the Brief Notification option when you are sending notification to devices that have limited memory, such as pagers and cell phones. If you want to notify multiple recipients, you can use group mail lists defined on your mail server provided that you append an at (@) sign followed by a valid domain.
    • You can retrieve e-mail addresses defined in an LDAP data source. For more information, see How to Retrieve E-mail Addresses for a Schedule Using Address Search.
  6. In the Full Notification To field, type the e-mail address to which you want a full notification sent. A full notification sends a complete log report as an e-mail attachment. Note that there is no syntax error checking for this field.

    Note: If the Email Delivery, Restrict Email Domains option is set to yes in the ReportCaster Server Configuration tool, then only those e-mail domains (the portion of the e-mail address following the at (@) sign) listed in Allowed Email Domains (also in the Server Configuration tool) are valid e-mail recipients.

    Tip:

  7. If the distribution method is by e-mail, then you have the option to Zip the report output. To do this, select Add Reports to Zip File, then type a name for the file in the Zip File Name field.
  8. Click Save. The Created New Schedule Successfully message appears.
  9. Click Close to complete the schedule and exit the Scheduling Wizard.

Top of page

x
Reference: Notification and Log Information for Unavailable Options

When schedules with unavailable Task Types or distribution methods are not permitted to run, error notification is triggered and information is included in full and brief notifications and in the log report that your ReportCaster administrator or the owner of the schedule must change the unavailable Task Types or distribution methods in the schedule.

When schedules with unavailable Task Types or distribution methods are permitted to run, normal job execution occurs and a message appears in the log report indicating that your ReportCaster administrator is allowing existing schedules using the unavailable Task Types or distribution methods to run.


WebFOCUS