-
In the Schedules
tab, select the schedule or schedules for which you want to view
a log report.
Note: To select multiple schedules, use the Shift key and Control (Ctrl) key as in a standard Windows interface.
The following image shows the East Coast Sales and Sales Summary schedules selected in the Schedules tab.

-
Click Log.
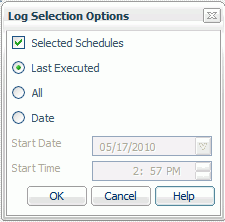
The Log Selection Options window opens, as shown in the following image.

To switch from the schedule you selected to viewing information about all of your schedules, deselect Selected Schedules option. If you want to change your selection criteria, click Cancel and select another schedule from the list.
-
Select one of the following options:
- Last Executed. Produces a log report containing the most currently run process for the selected schedule(s) or for all schedules (if you did not select a schedule). This is the default option.
- All. Produces a log report containing all run processes for the selected schedule(s) or for all schedules (if you did not select a schedule).
- Date Executed. Activates the Start Date and Start Time fields.
If you have selected the Date option, proceed to the following step. Otherwise, go to Step 6.
- Start Date. Specify the date on which you want the log report to begin. The report displays all processes for the selected schedule (or schedules) that were run on or after the specified Start Date. You can select a Start Date from the pop-up calendar, or you can accept the default Start Date, which is the current date.
- Start Time. Specify a start time for the Start Date by typing in the time or using the scroll arrows.
- Click OK to view the log report.
The Job Process Log Report opens. The following image is an example of a Log Report.

For more details on Log Reports, see Using Schedule Logs.