When you access the ReportCaster Development
and Administration Interface, click the Create a New
Schedule link to access the New Schedule - ReportCaster
window. The Schedule tab is the first to display, as shown in the
following image.
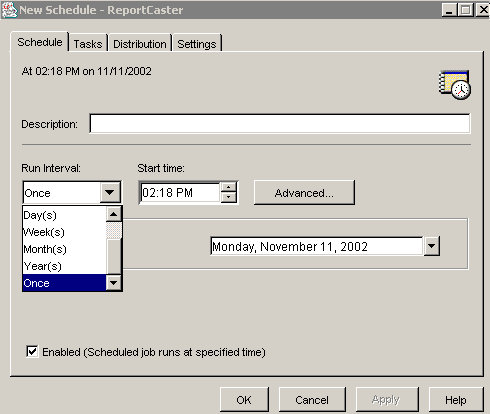
In the Schedule tab, specify the job description, the run interval,
and the date and time you want the schedule to run. You can select
to have the schedule run once or repeatedly on any day at any time.
Uncheck the Enabled check box if you want the
schedule to be inactive.
Tip: As a ReportCaster administrator, you can define dates
on which schedules cannot run or be set to run. For more information
about defining blackout dates for your ReportCaster site, see Schedule Blackout Dates.
Enter the following information to create
a new schedule or modify an existing schedule.
- In the Description
field, type a descriptive name for the schedule. This description
is used throughout ReportCaster to identify the schedule. After
the schedule runs, the description appears in your list of schedules.
- From the Run Interval drop-down list,
select how frequently to run the schedule. Possible values are:
-
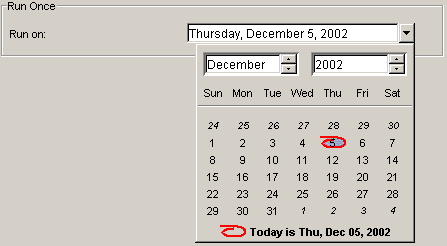
Once. Select
this option to run the schedule only once. By default, the job will
execute immediately. If you do not want the schedule to run immediately,
then modify the date or time. You can specify the date on which
you want the schedule to run by either typing the date directly
in the Run on field or by selecting a date from the drop-down calendar.
-
Minute(s). Select
this option to run the schedule every n minutes. Select a
range between 1 and 59 minutes, and check the days of the week on
which you want to run the schedule. For example, the following schedule
will run every 30 minutes beginning at 1:20 PM on Mondays and Fridays.
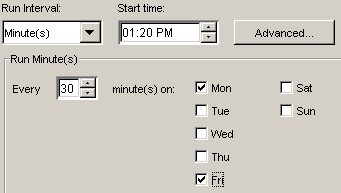
Note: Selecting
the minute interval may affect system performance if you choose
to run the schedule every 5 minutes or less. We recommend specifying
a minimum of 30 minutes. The minute interval option is primarily
useful for alert schedules.
-
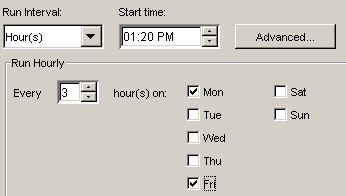
Hour(s). Select
this option to run the schedule every n hours. Select a range
between 1 and 24 hours, and check the days of the week on which
you want to run the schedule. For example, the following schedule
will run every 3 hours beginning at 1:20 PM on Mondays and Fridays.
-
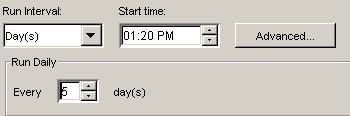
Day(s). Select
this option to run the schedule every n days. The following
schedule will run every 5 days.
-
Week(s). Select
this option to run the schedule every n weeks. Select how
often you want to run the schedule (for example, every 2 weeks), and
check the days of the week on which you want to run the schedule.
The following schedule will run every two weeks on Mondays and Fridays
beginning at 1:20 PM.

Note: When
selecting the Week(s) interval, set the Start Date (located in the
Advanced tab) to the date of the first day (current or future) of
the week you want the schedule to run. If you select the current
date, then you must make sure that the schedule Start time is later
than the time at which you save the schedule. If the schedule Start
time is less than or equal to the schedule save time, the calculation
for the next run time results in the schedule not running on the
current date.
-
Month(s). Select
this option to run the schedule every n months. You can select
to schedule a job every nth day of the week every n months
(for example, the first Monday every 2 months), or on specific days
every n months.
The following image shows a schedule that
will run on the first Monday of every month. Although the current
dated appears highlighted in the Day(s) calendar it is inactive
since the Every n Day(s) and The nth day of the month(s) options
are mutually exclusive.

The
following image shows a schedule that will run on the 2nd, 9th,
16th, 23rd, and 30th of every month regardless of which day of the
week they fall on.
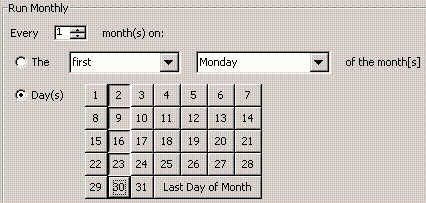
You
can also click the Last Day of the Month option
at the end of the calendar to run the schedule on the last day of
the month.
Note: When selecting the Month(s) interval,
set the Start Date (located in the Advanced tab) to the date of
the first day (current or future) of the month you want the schedule
to run. If you select the current date, then you must make sure
that the schedule Start time is later than the time at which you
save the schedule. If the schedule Start time is less than or equal
to the schedule save time, the calculation for the next run time
results in the schedule not running on the current date.
-
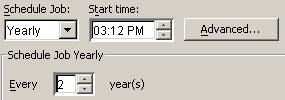
Year(s). Select
this option to run the schedule every n years. The following
schedule will run every 2 years.
Click Advanced if
you want to specify a start date other than the current date.
- In the Start
Time field, set the time you want the schedule to begin
using the up or down arrow to the right of the field. (You can also
place the cursor at the beginning of any time component and then
type the new value over the old value.) The current time is the
default start time. It applies only to the start date and does not
apply to any date thereafter. If you select a time that is after
the current time, the scheduled job will not run until the next
instance of the start time that fits within the specifications of
the schedule.
xSpecifying Advanced Options for a Schedule
The
Advanced window within the Schedule tab is where you can change
all default values for a schedule, and create a secondary run interval
within the day the schedule runs.
Click Advanced within
the Schedule tab to change the default values for the following
options:
-
Start Date. Specify
the date on which you want the schedule to begin using the drop-down
calendar. The current date is the default Start Date.
-
End Date. Specify
the date on which you want the schedule to end using the drop-down
calendar. December 31, 2099 is the default End Date. An administrator can
change the default End Date using the Default End Date/Time setting
located on the General tab of the ReportCaster Server Configuration
tool. For more information about accessing and using the configuration
tool, see Configuring ReportCaster Using the Applet Tool.
-
End Time. Specify
the time you want the schedule to end. Select any time component
(hour or minute or AM/PM) and click the up or down arrow to the
right of the field. You can also place the cursor at the beginning
of any time component and then type the new value over the old value.
11:59 PM is the default End Time. You can change the default End
Time using the Default End Date/Time setting located on the General
tab of the ReportCaster Server Configuration tool. For more information
about accessing and using the configuration tool, see Configuring ReportCaster Using the Applet Tool.
-
Delete the job if it is not scheduled to run again. Check
this option if you want the schedule to run once and not be stored
in the ReportCaster Repository.
x
Reference: Creating a Secondary Run Interval
In
the Advanced window within the Schedule tab, you have the option
to create a secondary run interval within the day the schedule runs.
You can apply the secondary run interval every n minutes
or hours for a specified number of hours/minutes or until a specified
time. This option is available for schedules that run every day(s),
week(s), month(s), or year(s). The following image shows the Secondary
run interval options.
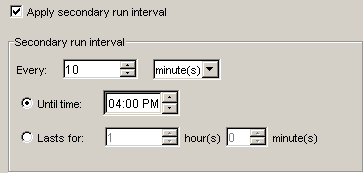
Clicking the Apply secondary
run interval check box activates the following options:
-
Every n [minutes|hours]. Applies
the secondary run interval every n minutes or hours (in this
example every 10 minutes) within the day the schedule runs.
-
Until time. The
time up until which the secondary run interval will be applied.
In this example, the schedule will be rerun every 10 minutes until
4:00 P.M.
-
Lasts for n hour(s) n minute(s). The
duration, specified in hours/minutes, during which the secondary
run interval will be applied. This option and the Until time option
are mutually exclusive, so this option is inactive in this example.
Note:
- The secondary run
interval is not validated when the schedule is created. Instead,
validation is performed every time the schedule's NEXTRUNTIME is
calculated when running within the secondary run interval. The secondary
run interval cannot exceed the NEXTRUNTIME for the primary run interval.
For example, a daily schedule cannot have a secondary run interval
greater than Every 1 day(s). If a secondary run interval is scheduled
to run after the schedule's next primary run interval, the secondary run
interval is stopped and an error message is displayed to the user
and written to the log file.
Click the Tasks tab
to continue creating the schedule. For more information, see Creating a Task.
- When a schedule is
updated, the next run time is recalculated based only on the primary
run interval. This means that if a schedule that includes a secondary
run interval is updated before the secondary schedule is able to
run, then the secondary run interval is ignored and the NEXTRUNTIME
is calculated based on the primary interval.
For example, a schedule
exists that is set to run daily at 2:00 PM with a secondary run
interval of every 10 minutes from 2:00 PM to 3:00 PM. When the schedule
runs at 2:00 PM, the NEXTRUNTIME is reset to run at 2:10, which
honors the secondary run interval. If this schedule is updated at
2:03 PM, the NEXTRUNTIME is recalculated to be 2:00 PM the next
day, rather than 2:10 PM on the current day.