How to: |
You can access the Library Access List interface from the ReportCaster Development and Administration Interface by selecting the Library Access List link. You can also select the Library Access List icon or select Library Access List from the Tools menu.
- If you are an administrator, the Library Access Management window opens displaying all users who own a Library Access List.
- If you are not an administrator, the Library Access Management window opens displaying all Library Access Lists that you own.
From the Library Access Management interface, you can:
- Create a new Library Access List. For more information, see How to Create a New Library Access List.
- Edit the properties of a Library Access List. For more information, see How to Edit the Properties of a Library Access List.
- Delete a Library Access List. For more information, see How to Delete a Library Access List.
- Refresh the Report Library so that it contains the latest Library Access List information. To refresh the list, click the Refresh icon, select Refresh from the Action menu, or right-click a user and then select Refresh from the drop-down menu.
- Exit the Library Access List interface by selecting Exit from the Action menu.
- Access the online Help by clicking the Help icon or selecting a topic from the Help menu.
-
Select
the Create a New Access List icon or select New
Access from the Action menu. The Create New Access List
window opens, as shown in the following image.
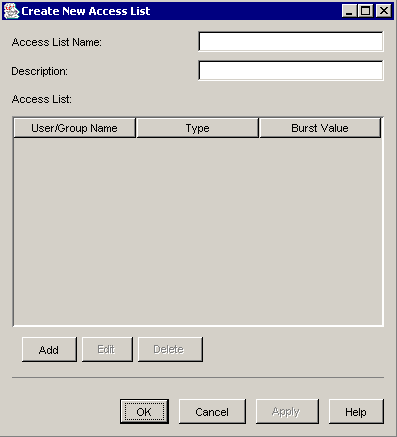
- In the Access List Name field, type the name of the Library Access List.
- In the Description field, type a description that will identify the list.
-
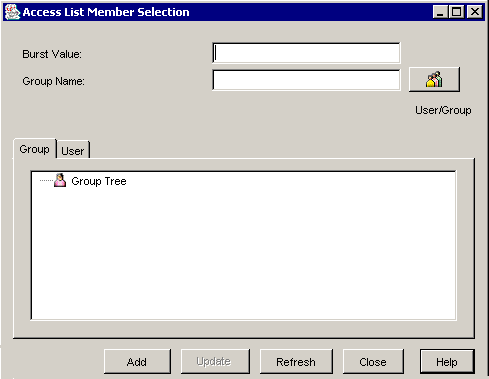
Click Add to
retrieve a list of users and groups you can add to the list. The
Access List Member Selection window opens with the Group tab displayed,
as shown in the following image.
Note: The Create New Access List window remains open as you work in the Member Selection window.
- Optionally, type a burst value. This value is case-sensitive.
-
To add
a group or user to the Library Access List, perform one of the following
steps:
To add an entire group to the Library Access List:
- Type the group
name in the Group Name field. (The User/Group button
enables you to toggle between the group and user selections. If
this field reads User Name, click User/Group to
access the Group Name field.)
Note: Entering the group name in this manner enables you to add groups that do not currently exist in the ReportCaster Repository to the Library Access List. Although no validation is performed when adding groups in this manner, only valid users who have been granted proper access can view the content in the Report Library. Therefore, these groups must be added to the ReportCaster Repository at a later date, either individually or using a batch program.
or
- Click the Group Tree in the Group tab pane to view a list of groups available to add to the Library Access List. Select the group you want to add. This populates the Group Name field with the group name you selected.
Click Add to add the group to the Library Access List. The Create New Access List window displays the group just added. Repeat these steps for each additional group you want to add to the Library Access List.
To add a user to the Library Access List:
- Double-click
a group and then select a user from within the group. This populates
the User Name field with the user you select.
or
- Click the User tab
and then select a user from the list. This populates the User Name
field with the user you select.
or
- Click User/Group to
access the User Name field and type the user name.
Note:
- Entering the user name in this manner enables you to add users that do not currently exist in the ReportCaster Repository to the Library Access List. Although no validation is performed when adding users in this manner, only valid users who have been granted proper access can view the content in the Report Library. Therefore, these users must be added to the ReportCaster Repository at a later date, either individually or using a batch program.
- User names in an Access List are not case sensitive. Even though a user name can appear in the list with capital letters, ReportCaster actually stores all user names in lowercase.
Click Add to add the user to the Library Access List. The Create New Access List window displays the user just added. Repeat these steps for each additional user you want to add to the Library Access List.
- Type the group
name in the Group Name field. (The User/Group button
enables you to toggle between the group and user selections. If
this field reads User Name, click User/Group to
access the Group Name field.)
-
Click Close.
The Create New Access List window is populated with the users and
groups you added to the list, as shown in the following image.
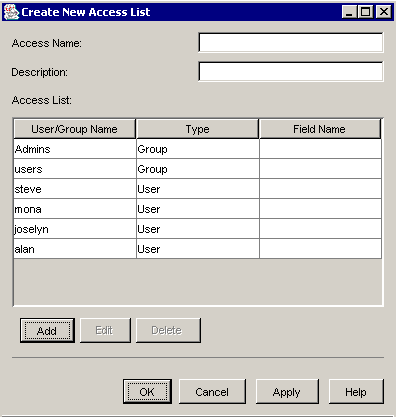
- Click Apply to save the Library Access List and remain in the Create New Access List window, where you can continue to add additional users and/or groups.
- Click OK to save the Library Access List and return to the Library Access Management window.
-
Select
a user from the User List (for example, mona). The right pane displays
all Library Access Lists that the user owns, along with the description
for each list, as shown in the following image.

- Select the Library Access List whose properties you want to edit (for example, eastcoast).
-
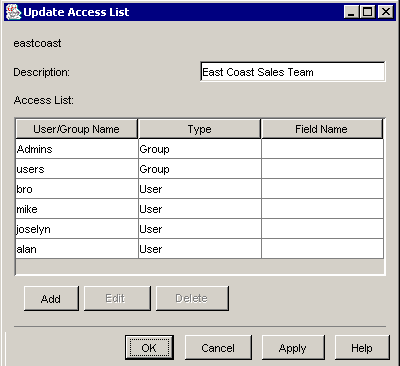
Click
the Open icon, select Open from
the Edit menu, or right-click and select Open from
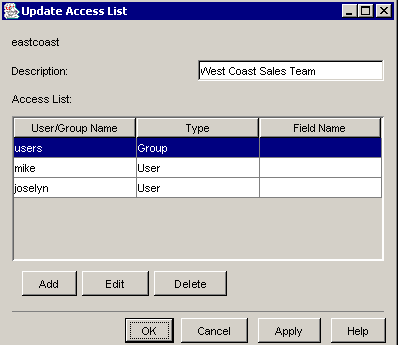
the drop-down menu. The Update Access List window opens, as shown
in the following image.
-
You
can edit the properties of the Library Access List by:
- Typing a different description (for example, West Coast Sales Team).
- Clicking Add to change or add a Burst Value, and add users and groups to the list.
- Selecting a user or group and then clicking Edit to change or add a Burst Value, and add users and groups to the list.
- Selecting a user or group and then clicking Delete to delete the user or group from the list. The following images show modifications made to the Access List shown in Step 3.
- Click Apply to save your changes to the Library Access List and remain in the Update Access List window, where you can continue to make changes.
- Click OK to save the updated Library Access List and return to the Library Access Management window.
- Select a user from the User List. The right pane displays all Library Access Lists that the user owns, along with a description of each list.
- Select the Library Access List you want to delete.
- Click the Delete icon, select Delete from the Edit menu, or right-click and select Delete from the drop-down menu. A message appears asking for confirmation to delete the selected list.
- Click OK to delete the list, or click No to cancel the request.