Web Console

In this section:

This section describes new Web Console features.


Top of page

x
Custom Monitor Pages

How to:

Custom Monitor Pages let you create pages that monitor the various services available on the Configuration/Monitor page. These pages are represented by icons on the navigation pane of the Applications page.

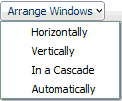
Custom Monitor Pages allow you to include multiple monitoring pages on a single page, creating a combination of Data Agents, Java Services, Listener and Special Services, Cluster Manager, and Resource Management pages. These pages can be arranged horizontally, vertically, or in a cascade. Refresh and autorefresh will update all sections of a Custom Monitor Page. Custom Monitor Pages can be saved in a server application for future use.


x
Procedure: How to Create Custom Monitor Pages

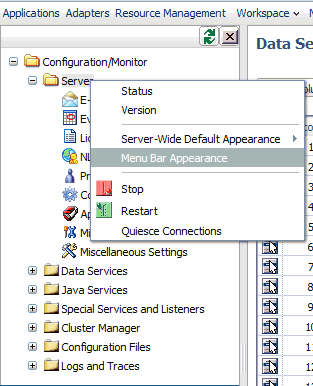
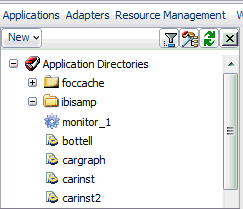
Custom Monitor Pages are created from Application directory folders.

  1. Right-click an Application directory folder and select Custom Monitor Page.

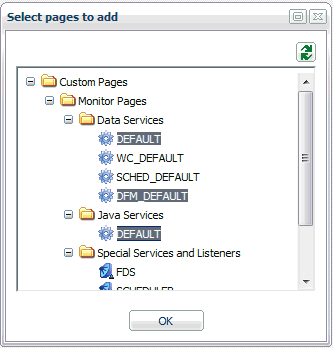
    The Select pages to add dialog box opens.

  2. Open the Monitor Pages folders and select the pages to add. Press Ctrl while selecting for multiple pages.

  3. Click OK.

    The Custom Monitor Page opens.

  4. Click the Save this page into a file button.

    The Save Custom Page opens.

  5. Enter a name in the Name field and click Save.

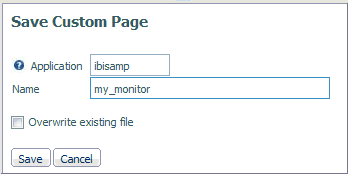
    Optionally, you can specify a different Application folder in the Application field. The default value is the folder that was right-clicked. You can also replace an existing page by selecting the Overwrite existing file check box.

You can arrange the pages using the Arrange WIndows drop-down menu.


Top of page

x
Limiting Sample Data Output Using Web Console Preferences

How to:

You can limit the number of columns and rows used for Sample Data output using the Web Console Preferences page.


x
Procedure: How to Limit Sample Data Output
  1. From the My Console menu, select Preferences.

    The Preferences page opens.

  2. Enter a value in the Maximum number or rows for test reports and/or Maximum number or columns for test reports fields. The default values are 50 (rows) and 999999 (columns).
  3. Click Update.

Top of page

x
Refreshed Pages Retain Custom Sort and Column Positions

Web Console pages that display tables of agents, procedures, or scheduled agents retain their column and row selections, column sort orders, and column positions when the pages are refreshed. These include the Data Services Agents, Scheduler Agents, and Web Sessions pages.

Users can:

These customizations will be maintained after the page is refreshed manually or through an auto-refresh.

Users can also see the customized report view of any report after the page is refreshed manually or through an auto-refresh.


Top of page

x
Savediag Option Added to Help Menu

How to:

A Savediag option has been added to the Help menu. This option produces diagnostic information used to troubleshoot server problems and provides the option of sending the information to Customer Support Services.


x
Procedure: How to Create a SAVEDIAG From the Help Menu

The Savediag option is available from the Help menu.

  1. Click the Help menu and select Savediag - Report a Bug from the drop-down menu, as shown in the following image.

    The Savediag page opens.

    Note: To run a Savediag, you must be a Server Administrator or have administrator privileges.

For more information on creating a Savediag, see the Server Administration for UNIX, Windows, OpenVMS, IBM i, and z/OS manual.


Top of page

x
Displaying a Custom Link and Banner in the Web Console

How to:

You can customize the look of the Web Console by adding a custom link to the menu bar and displaying a banner image.


x
Procedure: How to Display a Custom Link and Banner
  1. From the Workspace menu, select Configuration/Monitor.
  2. Right-click the Server folder and select Menu Bar Appearance.

    The Menu Bar Appearance page opens.

  3. Enter a title for the custom link in the Caption Of The Custom Link field.
  4. Enter a URL in the URL Of The Custom Link field.
  5. Enter an image file name in the Banner field.

    Note: The image file must be in the EDAHOME\etc\wc folder.

    Sample settings are shown in the following image.

  6. Click Save.

The resulting Web Console is shown in the following image.

Note: You can suppress the banner by using a setting in the My Console, Preferences page.

  1. From the My Console menu, select Preferences.

    The Preferences page opens.

  2. Select No from the Show Banner drop-down menu.

  3. Clck Update.

The banner no longer displays.


WebFOCUS