This section provides detailed descriptions of new security features.
xPrivilege Setting to Restrict the Execution of System Commands
A privilege setting has been added to restrict certain
users from executing system commands from procedures. The setting
is available from the General Privilege tab of the Access Control
Properties page. The privilege can be set on the Role, Group, or
User level.
x
Procedure: How to Restrict a User From Executing System Commands
-
Access the
Web Console with a server administrator user ID.
-
From the Workspace menu,
select Access Control.
The Access Control page opens.
-
From the Roles folder,
open the user group.
-
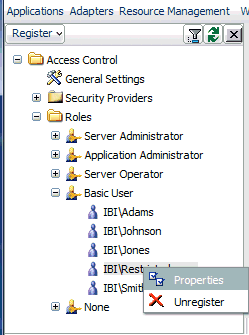
Right-click
the user and select Properties, as shown
in the following image.
The Access Control Properties page
opens.
-
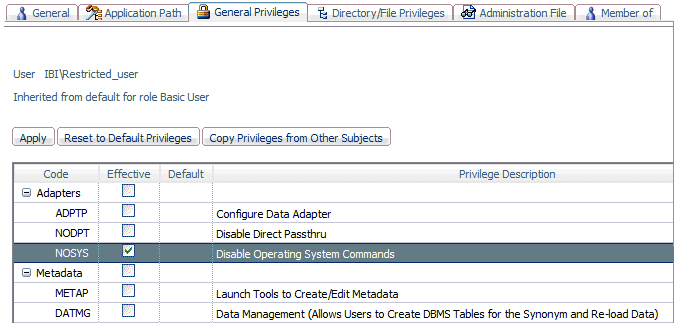
Select the General
Privileges tab.
-
Select the NOSYS check
box under the Adapters section, as shown
in the following image.
-
Click Apply.
xPreventing Unsecured Server Starts After Upgrades
If
the explicit environment variable EDAEXTSEC is set to OPSYS (or
ON), and the server cannot impersonate users because it lacks platform-specific authorization
steps performed during installation and described in the installation
guide, the server start aborts and error messages are written to
the edaprint log file.
This feature prevents an unsecured
server start after a software upgrade if any of the required post-upgrade,
reauthorization steps are missed on a UNIX, IBM i, or z/OS HFS
deployment. This is not applicable to other platforms. The setting
may be placed in any normal server start-up shell or profile that
a site is using or in the server edaenv.cfg configuration file.
The messages vary slightly by platform.
The edaprint messages
are:
Configured security is 'ON' as set by EDAEXTSEC variable.
Server
has no root privilege. (UNIX)
Server is not
APF-authorized. (z/OS HFS)
TSCOM300.PGM has
no QSECOFR authority. (IBM i)
Workspace initialization aborted.
(EDA13171) UNABLE TO START SERVER
xUser-Defined Password Encryption and Decryption
An encryption option has been added to the Reporting
Server to configure user-defined password encryption and decryption
programs.
A Password Settings option has been added
to the Web Console Access Control navigation tree. This option
opens the Access Control - Password Settings page which contains
the cfgfile_cipher parameter. This parameter
enables you to specify your password encryption and decryption programs
in the cfgfile_cipher_encrypt and cfgfile_cipher_decrypt parameters.
Note: If you choose to use password encryption
outside the server, only the path to the decryption program needs
to be specified.
In cases where a password is encrypted outside of the server,
the encrypted password string (or label) must be used, instead of
the password in server and adapter configurations. When user-defined
program is chosen, all passwords for registered user in the admin.cfg file,
all adapter connections in the edasprof.prf file (or user, group
and role profiles), passphrases in the odin.cfg file, and pooled
user passwords need to be encrypted using the same encryption program.
They will be decrypted using the same decryption program. Remote
Server connections in the odin.cfg file don't support the user-defined
encryption option. If user-defined encryption is chosen, the Cluster
Manager Feature should not be enabled.
x
Procedure: How to Set Up User-Defined Password Encryption and Decryption
-
From the Workspace menu,
select Access Control.
-
From the Access Control navigation tree, right-click Password
Settings and select Configure,
or double-click Password Settings.
The Access Control - Password Settings page opens.
-
Select user defined program from
the cfgfile_cipher drop-down menu, as shown
in the following image.
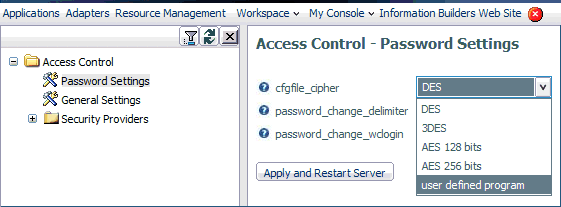
Two additional parameters
are displayed.
-
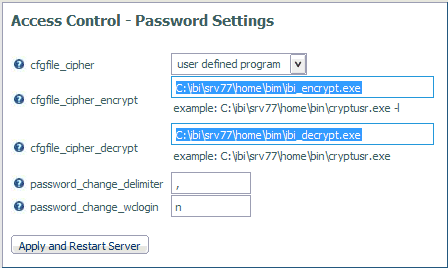
Enter the full paths to the encryption and decryption
programs in the cfgfile_cipher_encrypt and cfgfile_cipher_decrypt fields
respectively, as shown in the following image.
-
Click Apply and Restart Server.