Installing and Registering the
WebFOCUS Portlets
To use WebFOCUS Portlets with your CleverPath Portal
Server, you must perform the following steps:
- Access the
CleverPath Portal.
- Create a WebFOCUS
folder in the library.
- Add portlets
to the WebFOCUS folder.
- Create WebFOCUS
channels.
- Add content
to the WebFOCUS channel.
- Create a WebFOCUS
workplace.
- Configure the
WebFOCUS workplace.
Each WebFOCUS Portlet must be configured and made available
to the user by modifying the content URL for each portlet. For
more information see How to Add the Portlets to the WebFOCUS Folder.
x
Procedure: How to Access the CleverPath
Portal
-
Open
your Web browser.
-
Type
the URL of the Portal Server in the Address field and press
Enter.
For example, the URL might resemble the following
http://servername:port/servlet/portal
where:
- servername
-
Is the server name (or IP address) of the Portal
Server.
- port
-
Is the port that the Portal Server monitors.
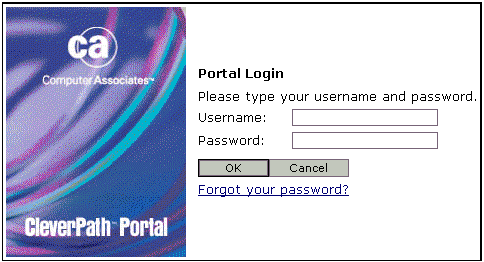
The Portal Login
page opens.
-
Type
a user ID and password in the appropriate fields and click
OK.
x
Procedure: How to Create a WebFOCUS Folder in the
Library
You
must create a folder in the CleverPath Portal Library that will
contain all the WebFOCUS Portlets.
-
Click
Knowledge from the main Portal
menu bar.
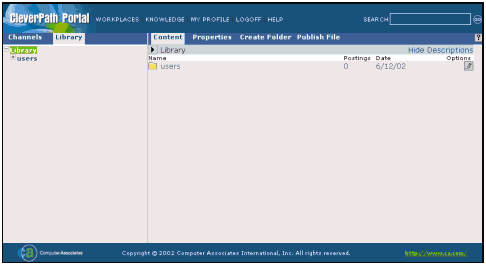
The Knowledge page opens. The left pane displays
a menu bar and the Library/Channels tree, which represents the
Library or Channels structure on the CleverPath Portal. The right
pane displays a menu bar and lists content and folders associated
with the currently active Library or Channel.
-
From
the left pane Knowledge bar, click Library.
The Library tree appears in the left pane.
-
From
the Library tree, select the folder within which you want
to create a new subfolder. If no folders are currently defined,
click Library.
The right pane now lists the subfolders currently
defined for the folder selected in the left pane. The right
pane Knowledge bar also changes.
-
From
the right pane Knowledge bar, click Create
Folder. The Create Folder form appears in the right
pane.
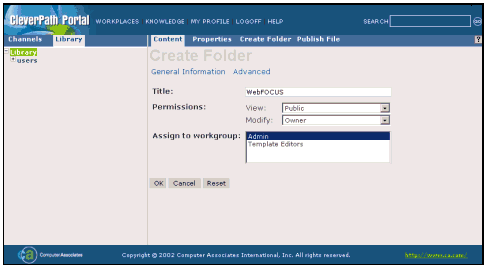
Note: The Create Folder feature
is only available if you have modify access to the selected
folder.
-
Complete
the fields on the Create Folder form accordingly. If necessary,
click Advanced to set advanced folder
properties.
-
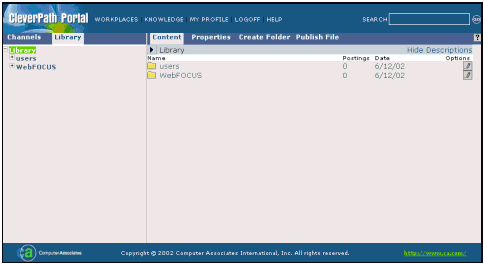
Click
OK. The Create Folder form closes and
the folder list in the Channels/Library palette updates to include
the newly defined subfolder.
x
Procedure: How to Add the Portlets to the WebFOCUS Folder
Once
the WebFOCUS folder is created, you must add the portlets that
you want to make available in the workplace.
-
Click
Knowledge from the main Portal
menu bar. The knowledge page opens.
-
From
the left pane Knowledge bar, click Library.
The Library tree appears.
-
In the
Library tree, browse to the WebFOCUS folder and select it.
-
From
the right pane Knowledge bar, click Publish
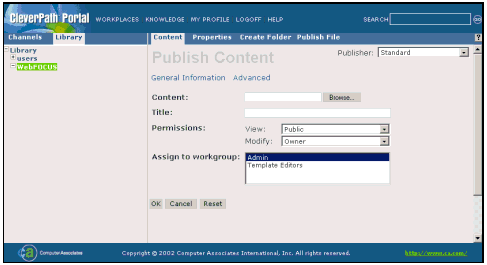
File. The Publish Content form opens.
-
Type
the content URL for the WebFOCUS Portlet you are adding in
the Content field and the title in the Title field.
Click Advanced to go
to the advanced properties page and type the following into
the Content (mime) Type field:
portal/variable-url
Note: You can have multiple instances
of the WebFOCUS Report Portlet. To create multiple instances,
add the following syntax to the end of the content URL in the
Advanced Settings window for each WebFOCUS Report Portlet
http://hostname/ibi_apps/components/woas/governor/
WOAS_view.jsp?SID=$USER.username$&view=report&gn=number
where:
- hostname
-
Is the machine where the WebFOCUS client is installed.
- number
-
Is a unique numerical value representing the
portlet report number.
-
Click
OK.
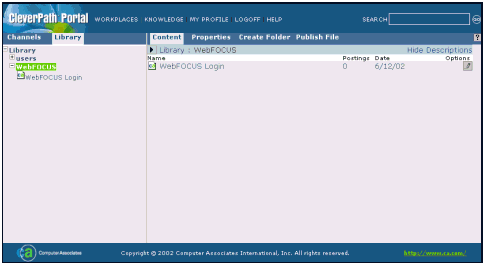
The Publish Content form closes and the folder
list in the Channels/Library palette updates to show the title
and icon for the newly added WebFOCUS Portlet.
-
To verify
the content URL you entered, select the WebFOCUS Portlet in
the Library palette, click Properties in
the right pane Knowledge bar, and click Advanced in
the Content Properties form.
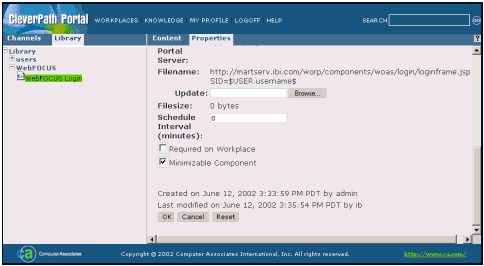
The Filename field displays the entire
content URL for the WebFOCUS Portlet. To change the content URL
immediately, type the new address in the Update field and click
OK.
x
Procedure: How to Create WebFOCUS Channels
Channels
are logical groups of information that contain links to content
objects in the Library. If necessary, create a single channel
that contains some WebFOCUS Portlets for a specific purpose
(for example, testing). In another scenario, you can create multiple
channels for specific departments in an organization (for example,
human resources or accounting). The following steps describe
how to create a channel for the WebFOCUS Portlets.
-
Click
Knowledge from the main Portal
menu bar. The Knowledge page opens.
-
From
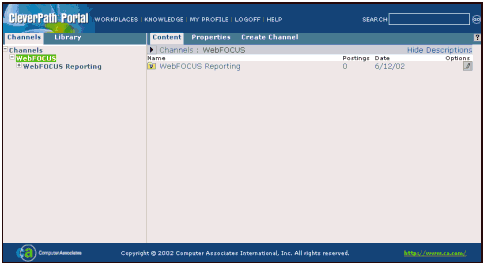
the left pane Knowledge bar, click Channels.
The Channels tree appears in the left pane. The Channels tree
represents the Channel structure on the CleverPath Portal
Server.
-
In the
Channels tree, select where to create the new channel. Create channels
directly in the top level of the hierarchy, or as sub-channels
of an existing channel.
When you select a channel in the left pane,
the right pane lists that content channel, including sub-channels
(if any). The right pane Knowledge bar also changes.
-
From
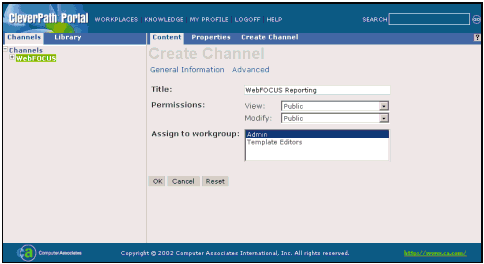
the right pane Knowledge bar, click Create
Channel. The Create Channel form appears in the
right pane.
-
Complete
the fields on the Create Channel form as appropriate. If necessary,
click Advanced to set advanced
properties.
-
Click
OK. The Create Channel form
closes and the Channels/Library palette updates to include the newly
defined Channel.
x
Procedure: How to Add WebFOCUS Portlets to a
Channel
Once
a channel is created, you will be able to add the portlets to
that channel.
-
Click
Knowledge from the main Portal
menu bar. The knowledge page opens.
-
Click
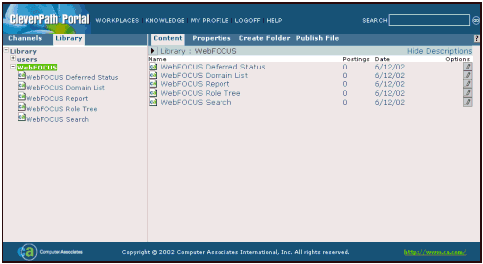
Library from the left pane of
the Knowledge bar. The Library tree appears.
-
In the
Library tree, select the WebFOCUS folder.
-
In the
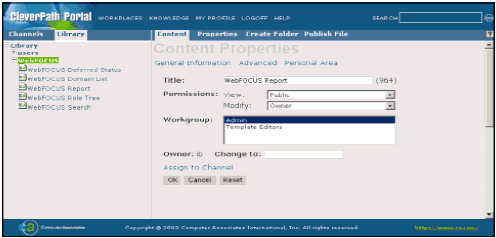
right pane of the Knowledge page, click the properties
 icon for the portlet you want to assign to a channel.
The Content Properties form opens.
-
In the
Properties form, click Assign to Channel.
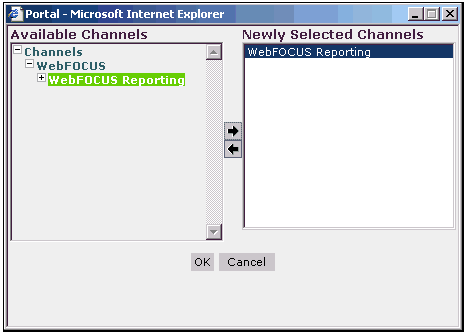
The Assign to Channel dialog box opens.
-
In the
Available Channels pane of the Assign to Channel dialog, click to
select the WebFOCUS Channel to which to assign the item, then
click the right arrow
 icon
to add the channel to the Newly Selected Channels pane.
-
Repeat
Step 6 for each channel to which you want to assign the item.
Note: To remove a channel from
the Newly Selected Channels pane, click to select it and click the
left arrow  icon.
icon.
-
Click
OK to assign the item to the
selected channel. The Assign to Channel dialog box closes.
-
In the
Properties form, click OK. The
item is assigned to the selected channel.
x
Procedure: How to Create a WebFOCUS
Workplace
A
workplace is where a user accesses the WebFOCUS Portlets. You
can customize the look and feel of a workplace and define multiple
workplaces if required. The following steps describe how to
create a WebFOCUS Workplace on the CleverPath Portal.
-
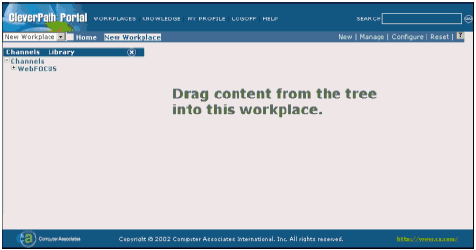
Click
New from the Workplace bar. A
new workplace opens.
-
Add
portlets to the new workplace by dragging them from the Library/Channels
palette. For more information see How to Configure the WebFOCUS
Workplace.
-
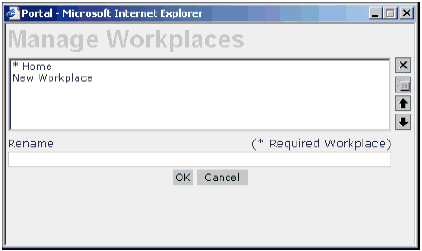
Click
Manage from the Workplace bar.
The Manage Workplaces dialog box opens.
-
Select
the New Workplace and rename it
to WebFOCUS, using the Rename
field.
-
Click
OK to save the changes.
Note: Use the Manage Workplaces
dialog box also to change the order in which the workplaces are
listed on the Workplace bar, to create new workplaces or to
delete existing ones.
x
Procedure: How to Configure the WebFOCUS
Workplace
Once
you have created the WebFOCUS Workplace, you will be able to
populate it with the WebFOCUS Portlets.
-
Click
Workplaces from the main Portal
menu bar. The current Workplace page opens.
-
Select
the WebFOCUS Workplace from the drop-down
list or from the Workplaces bar. The WebFOCUS Workplace opens, displaying
the Library/Channels palette.
Note: If the Library/Channels
palette does not appear on the left side of the Workplace page,
click Configure from the Workplace bar
to open it.
-
In the
Library/Channels palette, click Channels to
add a channel to the workplace or click Library to
add an object from the Library to the workplace.
-
In the
Library or Channels tree, click the item you want to drag
to the workplace and drag from the palette to the workplace.
When you release the mouse button, the portlet
appears as a small window inside the workplace. To resize the
portlet, click and drag the bottom and right edges.
-
Repeat
Steps 3 through 4 for each Library object or Channel you want to
add to the workplace.
-
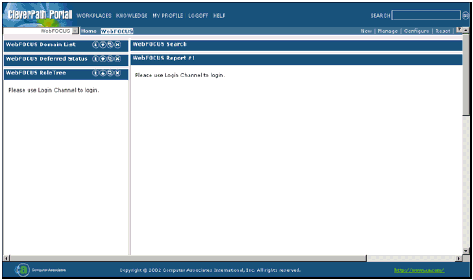
When
you finish adding content to the workplace, click the close button
in the upper-right corner of the Library/Channels palette
to close the palette. A recommended layout for the WebFOCUS
workplace is shown below:
Note: To return the workplace
to its state before you began making changes, click Reset from
the Workplace bar. If you navigate away from the workplace,
the CleverPath Portal automatically saves any changes you made.


 icon for the portlet you want to assign to a channel.


 icon
to add the channel to the Newly Selected Channels pane.
 icon.
icon. 

