To publish WebFOCUS Web Parts for Microsoft SharePoint
Portal Server 2010, you must perform the following steps:
xInstalling the WOAS_Cab.CAB File
The following section describes how to install the WOAS_Cab.CAB
file on the SharePoint Portal Server 2010.
Note: The WOAS_Cab.CAB file is not packaged with the WebFOCUS installation
and is provided separately.
x
Procedure: How to Install the WOAS_Cab.CAB File
Perform
the following steps to install the WOAS_Cab.CAB file.
-
Copy the WOAS_Cab.CAB file
to a directory on the SharePoint Portal Server. For example, drive:\webparts.
-
Copy the stsadm.exe file from
the following directory
drive:\Program Files\Common Files\Microsoft Shared\web server
extensions\14\BIN
to the directory you created in
the previous step (for example, drive:\webparts)
where:
- drive
Is the location where SharePoint Portal Server is installed.
-
Enter the following from the MS-DOS command prompt
stsadm -o addwppack -filename drive:\webparts\WOAS_Cab.CAB -force
-globalinstall
where:
- drive
Is the location where SharePoint Portal Server is installed.
This
Web Part is now installed in a global access cache on the SharePoint
Portal Server. The following message appears.
Operation completed successfully
Note: To
delete a Web Part installation from the configuration, enter the following
from the MS-DOS command prompt:
stsadm -o deletewppack -name WOAS_Cab.CAB
-
Log on to the Microsoft SharePoint Portal Server 2010.
xConfiguring the WebFOCUS Web Part .DWP Files
The following section describes how to configure the
WebFOCUS Web Part .dwp files.
Note: You must perform this configuration for each WebFOCUS
Web Part file before you add it to the SharePoint Portal Server.
x
Procedure: How to Configure the WebFOCUS Web Part .DWP Files
Perform
the following steps to configure each Web Part .dwp file.
-
Open each .dwp file with a text editor and change localhost to
the name of the machine where WebFOCUS is installed. For example:
xmlns="WOAS_ContentViewer">http://localhost/ibi_apps/components/woas/g
overnor/WOAS_view.jsp?SID=_LogonUser_&view=search</Link>
to
xmlns="WOAS_ContentViewer">http://dshbdqa/ibi_apps/components/woas/gov
ernor/WOAS_view.jsp?SID=_LogonUser_&view=search</Link>
-
Repeat this procedure for each WebFOCUS Web Part .dwp file.
xAdding the WebFOCUS Web Parts
This section describes how to add the WebFOCUS Web Part
to the Microsoft SharePoint Portal Server.
x
Procedure: How to Create a New Site
To
create a new site for Microsoft SharePoint Portal Server 2010:
-
Log on to the Microsoft SharePoint Portal Server 2010.
-
Click Site Actions, and then click New
Site, as shown in the following image.
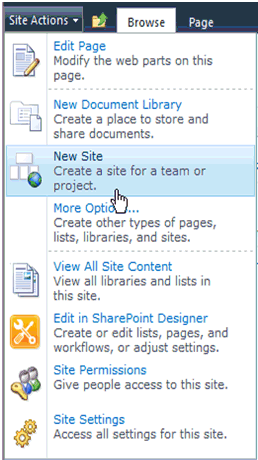
The New Site page
opens.
-
Click Team Site.
-
Specify a name for the site and a URL in the corresponding fields.
-
Click Create.
x
Procedure: How to Create a New Page for the Site
To
create a new page for the site that was recently created:
-
Log on to the Microsoft SharePoint Portal Server 2010.
-
Click Site Actions, and then click New
Page.
-
Specify a name for the new page in the corresponding field.
-
Click Create.
-
Click Save & Close from the Ribbon.
x
Procedure: How to Add a Page to the Site Navigation Top Link Bar
To
add a page to the site navigation top link bar:
-
Log on to the Microsoft SharePoint Portal Server 2010.
-
Click Site Actions, and then click Site
Settings.
-
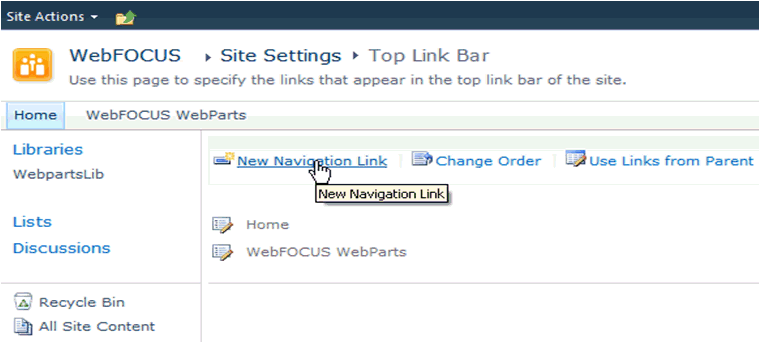
From the Look and Feel links, click Top Link Bar.
The Top Link Bar settings page opens, as shown in the following image.
-
Click New Navigation Link.
The Navigation Link settings page opens.
-
Specify the page URL and description in the corresponding fields.
-
Click OK.
x
Procedure: How to Add WebFOCUS Web Parts to a Group in the Web Part Gallery
You
can add a WebFOCUS Web Part to a page without uploading it to the
Web Part gallery. Using the Ribbon allows you to add a new WebFOCUS Web
Part to a page. When the Web Part gallery is displayed in the interface,
click Upload a Web Part under the Categories
list. The uploaded WebFOCUS Web Part is added to the Imported Web
Parts category and can then be added to a page.
Note: This
method of uploading WebFOCUS Web Parts is only temporarily available
in the Web Part gallery to the user who is editing the specific
page and is not available once you exit the Edit mode. Adding WebFOCUS
Web Parts to a Group in the Web Part gallery keeps the WebFOCUS
Web Parts organized and always available from the Categories list
under the specified Group name.
To add WebFOCUS Web Parts
to a Group in the Web Part gallery:
-
Log on to the Microsoft SharePoint Portal Server 2010.
-
Click Site Actions, and then click Site
Settings.
-
From the Galleries Group, click Web Parts.
-
From Library Tools, click Documents.
-
From the Ribbon, click Upload Document.
-
Click Browse and navigate to the
location on your file system where WebFOCUS is installed.
For example:
\ibi\WebFOCUS77\worp\components\webparts2
Note: You
can edit the Web Part files (.dwp) in this directory and specify the
WebFOCUS client host name, port number, and context path before
they are uploaded to Microsoft SharePoint Portal Server.
-
Select one of the following WebFOCUS Web Parts:
- Domains
- Report
- Favorites
- Deferred Status
- QuickLinks
-
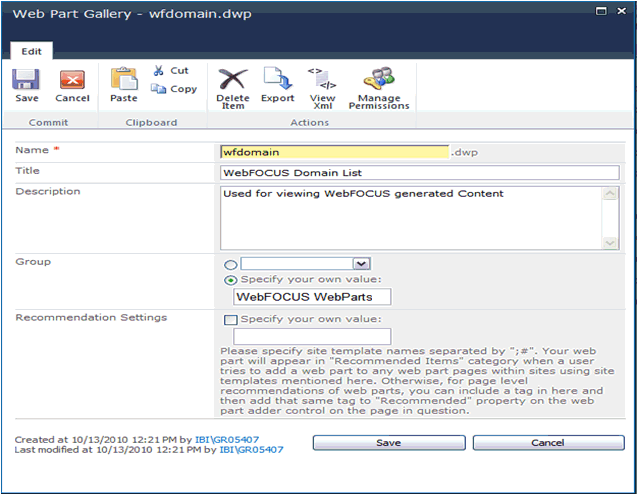
Select the Specify your own value option
in the Group area, as shown in the following image.
-
Enter the name of an available Group where the WebFOCUS
Web Part will be added.
Note: If you are uploading multiple WebFOCUS Web
Parts, Microsoft SharePoint Portal Server requires you to edit each
Web Part individually and change the Group after the Web Part is
uploaded.
-
Click Save.
x
Procedure: How to Add WebFOCUS Web Parts to a Page
To
add WebFOCUS Web Parts to a page:
-
Log on to the Microsoft SharePoint Portal Server 2010.
-
Navigate to the page where you want to add WebFOCUS Web Parts.
-
Click Site Actions, and then click Edit
Page.

-
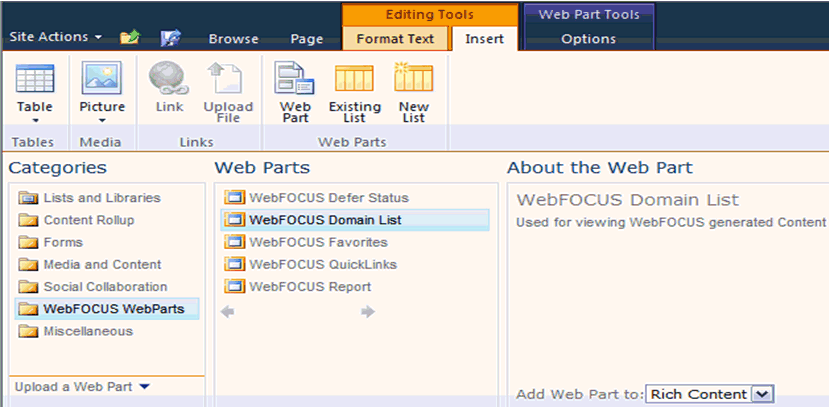
From the Editing Tools menu, click Insert.
-
Click Web Part in the menu bar.
-
From the Categories list in the left pane, click the WebFOCUS
WebParts category.
-
From the Web Parts list, select the specific WebFOCUS
Web Part and click Add.
-
To display the Web Part properties, move your cursor
over the right corner of the Web Part to display a drop down menu.
-
Click Edit Web Part.
-
Expand the Content category.
-
Edit the Source URL by changing the machine name, port
number, and context path that points to the WebFOCUS client if the
WebFOCUS Web Part .dwp files were not edited prior to being uploaded
to Microsoft SharePoint Portal Server.
-
Click Apply and then OK.
Repeat steps 8 through 12 for each WebFOCUS Web Part that
you added to a page.
x
Reference: Sample WebFOCUS Web Part .DWP File
The
following syntax shows how a WebFOCUS Web Part .dwp file is structured.
In this case, the WebFOCUS Domain Web Part is used as an example.
<?xml version="1.0" encoding="utf-8"?>
<WebPart xmlns:xsd="http://www.w3.org/2001/XMLSchema"
xmlns:xsi="http://www.w3.org/2001/XMLSchema-instance"
xmlns="http://schemas.microsoft.com/WebPart/v2">
  <Title>WebFOCUS Domain List</Title>
  <FrameType>Default</FrameType>
  <Description>Used for viewing WebFOCUS generated Content</Description>
  <IsIncluded>true</IsIncluded>
  <ZoneID>TopZone</ZoneID>
  <PartOrder>1</PartOrder>
  <FrameState>Normal</FrameState>
  <Height />
  <Width />
  <AllowRemove>true</AllowRemove>
  <AllowZoneChange>true</AllowZoneChange>
  <AllowMinimize>true</AllowMinimize>
  <IsVisible>true</IsVisible>
  <DetailLink />
  <HelpLink />
  <Dir>Default</Dir>
  <PartImageSmall />
  <MissingAssembly />
  <PartImageLarge />
  <IsIncludedFilter />
  <Assembly>WOAS_ContentViewer, Version=1.0.0.0, Culture=neutral,
  PublicKeyToken=1d47861a7788f05b</Assembly>
  <TypeName>WOAS_ContentViewer.ContentViewer</TypeName>
  <Link
xmlns="WOAS_ContentViewer">http://localhost/ibi_apps/components/woas/gove
rnor/WOAS_view.jsp?SID=_LogonUser_&view=domain</Link>
</WebPart>


